| Share points that are configured to automatically mount on your clients at startup are called network mounts. (In previous versions of Mac OS X Server, they were sometimes called automounts.) It's important to understand that network mounts are always available to any user on the client computer, whereas a share point located in the user's Login Items is available only to that user and is mounted only when the user logs in. Essentially, network mounts are instructions stored in a directory database that tell client computers to mount certain share points at startup. Thus, the Workgroup Manager tool can configure network mounts only for servers that are part of a directory service system. In addition, your client computers must be configured as clients of the directory service system. (For more information about Directory Services and Open Directory, see Chapter 3.) Network mounts are an important option because there are certain share points that client computers must have access to at all times. To create a home directory network mount 1. | Launch the Workgroup Manager tool located in /Applications/Server, authenticate as the administrator if necessary, and click the Sharing icon.
| 2. | Click the Share Points tab above the sharing browser and select the Users folder (Figure 5.52):
The Users and/or Groups folders are common network mounts.
Figure 5.52. Select your share point from the list in Workgroup Manager. 
| | | 3. | Click the Network Mount tab and click the Lock icon next to the directory that will be hosting the mount to view the authentication dialog (usually LDAPv3/127.0.0.1) (Figure 5.53).
Figure 5.53. Select the Network mount tab after clicking the share point. 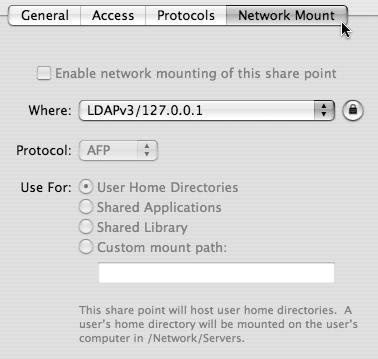
| 4. | Authenticate as an administrator of the selected directory server (Figure 5.54).
Figure 5.54. You must authenticate to the selected directory to add the mount point. 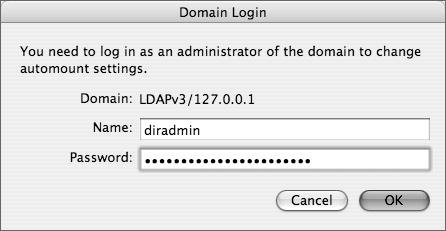
Authenticating as an administrator makes the "Enable network mounting of this share point" option available.
| 5. | Click the "Enable network mounting of this share point" check box (Figure 5.55).
Figure 5.55. Select the "Enable network mounting of this share point" to add the mount point. 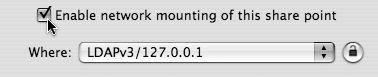
| | | 6. | From the Protocol pop-up menu, select either AFP or NFS as the share point's protocol (Figure 5.56).
Figure 5.56. Choose AFP as your protocol of choice. 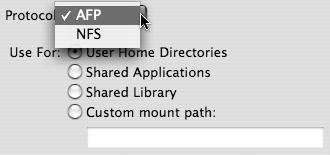
AFP is the generally suggested way of handling network mounts.
| 7. | Select the User Home Directories radio button and click Save.
See the following section for an explanation of the other options.
| 8. | Restart the Mac OS X computers and verify the network mount.
Home directory network mounts are found on the local clients at /Network/Servers/<servername>/<sharename>.
|
 Tip Tip
Creating additional network mounts You may find it useful to add other types of share points as network mounts. Examples include the Groups folder, a shared Applications folder, a shared Library folder, or any other share point you want to automatically mount to a specific point on the local client. You can create additional network mounts by repeating the previous task and selecting another share point. To change the mount point on the client, choose from the following network mount options (Figure 5.57). Figure 5.57. The various options when creating a network mount point. 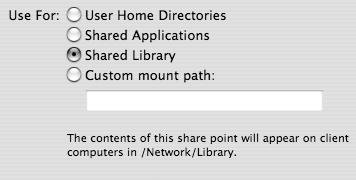
- Shared Applications will automatically mount to the /Network/Applications directory. The client system will search this folder for available applications.
- Shared Library will automatically mount to the /Network/Library directory. The client system will search this folder for available resources, including fonts, frameworks, preference panes, or any other application or system support files.
- Custom mount path will automatically mount to the path specified in the field below.
You can view the network mount details using the Workgroup Manager Inspector (Figure 5.58). Figure 5.58. Viewing the mount point attributes using the All records tab within Workgroup Manager. 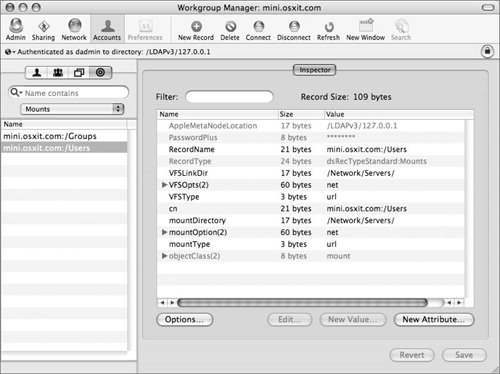
Locally Configured Network Mounts Instructions for automatic network mounts can be stored in any directory database, including the client's local NetInfo database. From the client in NetInfo Manager, you can add new mount directory entries. You need to add only a few properties and values for each mount entry: A typical network mount entry has the following properties (Figure 5.59): Figure 5.59. Add the mount information in NetInfo Manager. 
|
|