| Every file and folder on your Mac OS X Server is protected by Unix-style permissions, and/or access controls, sometimes called privileges. An entire book could be dedicated to the technology behind file and folder permissions, but they basically boil down to a few simple concepts: - All items are associated with one owner and one group.
- Only the owner of the folder or file, or an administrative user, can change the permissions.
- All items have permissions defined at three POSIX levels: owner, group, and everybody else (commonly referred to as User, Group, and Other) and access controls, which allow for a much more granular set of permission options (discussed later in this chapter).
- At each POSIX level, you can have one of four basic access settings: none, read only, read and write, or (in the case of folders) write only.
- The permissions most specific to the user attempting to access the file are enforced.
- Permissions define access to an item's contents, not to the item itself.
If you're still confounded by the prospect of Unix-style permissions, you're not alone. Many experienced administrators learned permissions through trial and error. Experimenting with various permissions settings is often the best way to learn, and right now is a good time to start. Command-Line POSIX Permissions You can also configure POSIX and ACL file and folder permissions from the command line using the following utilities: ls -l lists the contents and permissions of a folder, disk, or volume. chown changes an item's user and group ownership. chgrp changes an item's group. chmod changes an item's access rights. chmod -a changes an item's access rights using ACLs.
Please consult the UNIX man page for chmod to see all the POSIX and ACL options, because they are too expansive to list here. |
Access Control Lists (ACLs) add to the complexity of permission permutations by allowing a larger set of options. They are mainly defined by "allow only" or "deny only." For most purposes, you should not use "deny only," because it will ignore any other permissions under that share point. Instead, simply don't give a user or group access to a share point. Additionally, ACLs will override POSIX controls. ACL permissions are as follows: Read Read/Write Write Full Control Custom
There are two ACL permission levels (Full Control and Custom) that do not exist with standard POSIX level permissions: Full Control of a share point permits the selected user to handle every aspect of read/write management. The Custom setting allows a very granular set of permissions, which will be discussed later in this chapter.
When enabling ACLs, planning plays the most critical role in the process. Since Mac OS X Server allows for nested groups, creating smaller groups and then nesting those groups to create levels of control allows for the easiest management of what can be very complex permissions sets. You can apply ACLs to K12 institutions, where each grade is a group, schools can be groups, and all students are in one group. Therefore, you have 12 basic groups within three nested groups within one larger group (Figure 5.5). Teachers, other staff, and IT staff can be separated in a similar fashion. This allows for some groups to have read-only access, others to have read/write, and still others to have full control. Figure 5.5. Setting up nested groups for logical permissions structure. 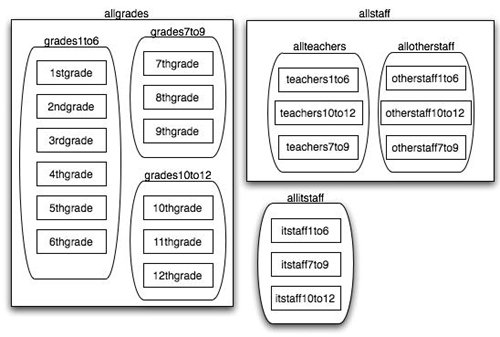
To Share or Not to Share You do not have to share a folder to change ownership or permissions on that folder. Often folders on volumes have their owner-ship and permissions changed even though the folders are not being shared. |
To change POSIX permissions 1. | Launch the Workgroup Manager tool located in /Applications/Server and authenticate as the administrator if necessary, and then click the Sharing icon and do one of the following:
- Click the Share Points tab to configure a share point or its contents.
- Click the All tab to configure any item on a local server volume.
| 2. | From the sharing browser, select the item you wish to edit and click the Access tab.
| 3. | Click the Users & Groups button.
An account list drawer appears to one side of the main Workgroup Manager window (Figure 5.6).
Figure 5.6. The Users and Groups drawer opens in Workgroup Manager. 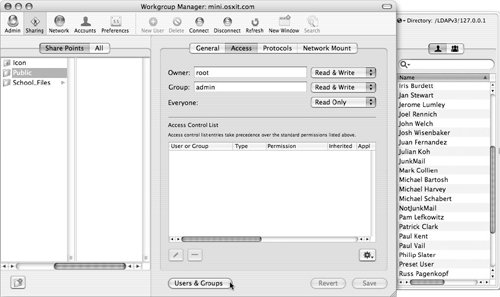
| 4. | Click the directory authentication icon in the account list drawer and select the appropriate directory database from the pop-up menu (Figure 5.7):
- If you're working on the local directory, choose Local.
- If you're working on an Open Directory master, choose /LDAPv3/127.0.0.1.
- If you're connected to another database, select your database from there.
Figure 5.7. Selecting the LDAP domain from the Users and Groups domain list. 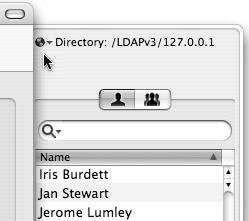
| 5. | To define a new owner, click the Users tab and click-and-drag an account from the user list to the Owner field, or type in the short name of the user (Figure 5.8).
Figure 5.8. Dragging a user into the POSIX ownership field for a share point. 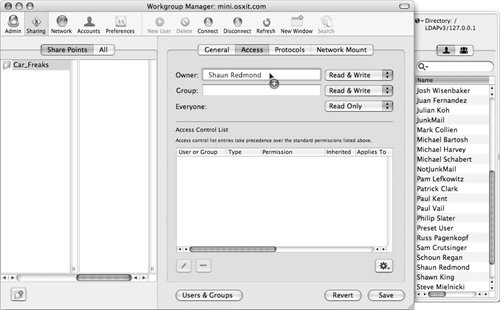
| | | 6. | To define a new group, click the Groups tab at the top of the Users and Groups drawer, and click-and-drag an account from the group list to the Group field, or type in the name of the group (Figure 5.9).
Figure 5.9. Dragging a group into the POSIX group field for a share point. 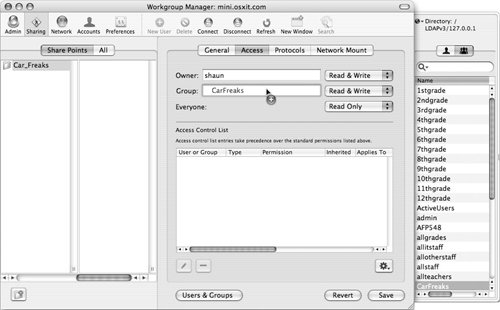
| 7. | You can use the pop-up menus to the right of the Owner, Group, and Everyone fields to define access rights for any of the three fields (Figure 5.10).
Figure 5.10. The POSIX permission options can be chosen from the pop-up menu. 
| 8. | When you've finished making changes, click Save.
|
 Tips Tips
Although it's not recommended, you can also change file and folder permissions by choosing Finder > Get Info. This approach may yield unexpected results, such as not retaining the permissions or ownership you set, so it's always best to change file and folder permissions on Mac OS X Server using Workgroup Manager. You do not need to have a shared (LDAP) domain to set up share points or change ownership and permissions of any share points. Always test access to your item(s) before allowing clients access to them.
Working with ACLs ACLs further define access to devices or folders by adding fine grain control over the way users and/or groups handle these share points. There is of course the standard read and write, but now additional options are available (Figure 5.11). To set these permissions, use the Custom option when selecting a user or group. Figure 5.11. The potential options when entering into the Access Control Lists for share points. 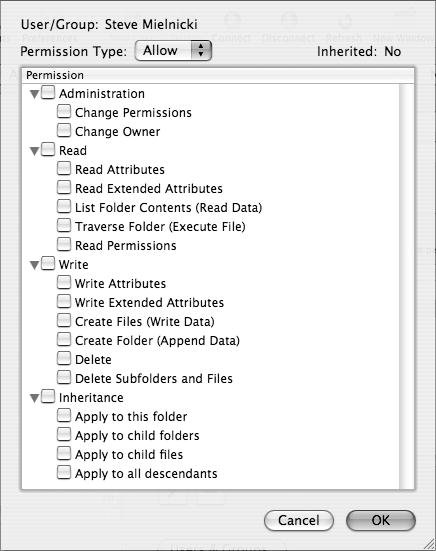
To add users and groups to ACLs 1. | Follow steps 1-4 in the previous task.
| 2. | Click the Users folder at the top of the Users and Groups drawer and click-and-drag an account (or accounts) from the account list drawer to the Access Control List field (Figure 5.12).
Figure 5.12. Drag a user into the Access Control List field. 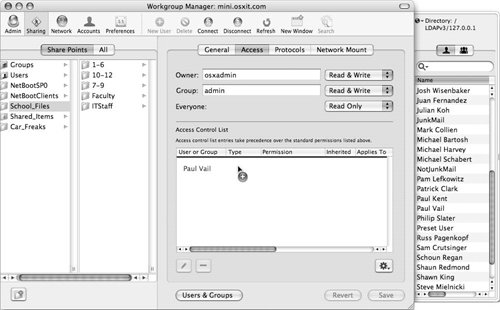
| 3. | Click the Groups tab at the top of the Users and Groups drawer and click-and-drag a group (or groups) from the group list to the Access Control List field (Figure 5.13).
Figure 5.13. Dragging groups into the Access Control List field. 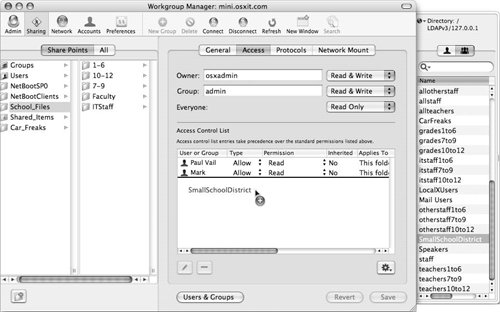
The use of nested groups immediately becomes useful here.
| 4. | When you've finished making changes, click Save and keep Workgroup Manager open to this window.
|
Tip
To set share point ACL parameters 1. | Using Workgroup Manager, select the share point on which you wish to set ACLs.
| 2. | In the Access Control List field, select the user or group whose access you want to edit (Figure 5.14).
Figure 5.14. Selecting a user from the Access Control List field. 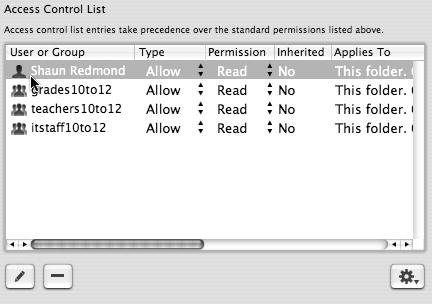
| 3. | Click the Type tab to select a permission setting from the pull-down menu (Figure 5.15).
Figure 5.15. Choosing the type of access control for a user, allow or deny. 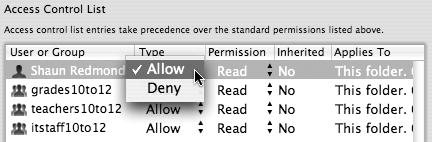
The default setting is Allow, and unless you have a very specific reason, you should not choose Deny.
| | | 4. | Click the Permission tab to select Full Control from the pull-down menu, since this user will be managing the share point (Figure 5.16).
Figure 5.16. Choosing the level of permissions for access control from the list. 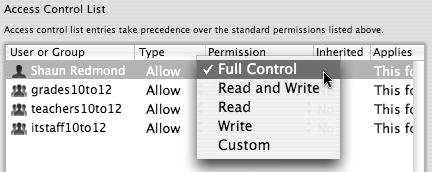
Full Control allows the user or group total access to do anything to this share point.
or
If the user or group needs specific permissions to the share point, select Custom (Figure 5.17).
Figure 5.17. Selecting the Custom option from the list... 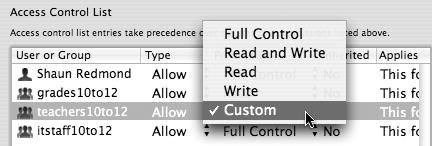
A dialog opens, showing the four main types of access control (Figure 5.18).
Figure 5.18. ...brings up the Access Control List dialog showing all available options. 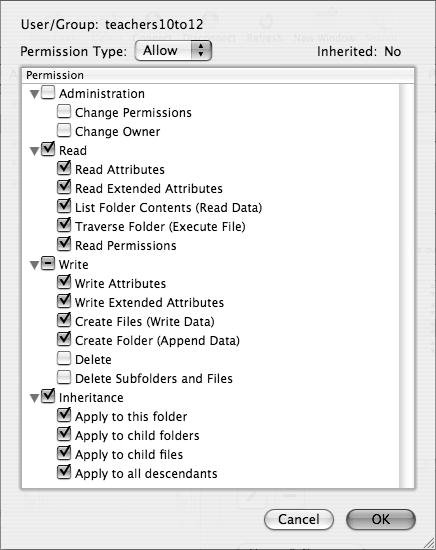
| 5. | Select the appropriate check boxes that correspond to the permissions you want the user or group to have and click OK.
| | | 6. | If the POSIX or access control settings need to be propagated down all folder levels, click the gear button and select Propagate permissions from the pull-down menu (Figure 5.19).
Figure 5.19. Choosing to propagate permissions from the gear menu in Workgroup Manager... 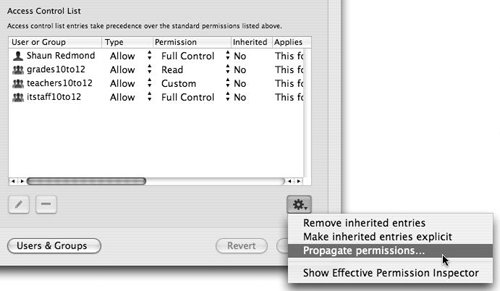
A dialog opens, allowing you to set the propagation with either POSIX or ACLs (Figure 5.20).
Figure 5.20. ...brings up the dialog allowing both permission types for propagation. 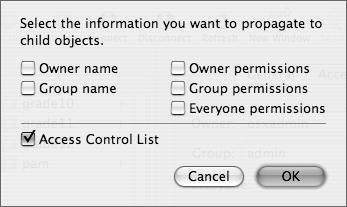
| 7. | Click the permissions you want to set and when you've finished making changes, click Save.
| 8. | Thoroughly test the permissions to avoid any conflict due to the fact a user may be in multiple groups.
Now that you have configured owner-ship and permissions on your share point(s), you'll need to go over what protocols they are sharing and how to set up those protocols.
|
The Effective Permissions Inspector The Effective Permissions Inspector is perhaps the best tool when learning about ACLs. When you have a share point selected within Workgroup Manager, click the gear button and choose Show Effective Permissions Inspector from the pull-down menu (see Figure 5.19). When the Inspector opens, simply drag a username into the Inspector to see the permissions on that given share point (Figure 5.21). It's a good idea to view a user's permissions on several share points throughout a folder structure to make sure each user has the proper access. Figure 5.21. The Effective Permissions Inspector is used to review user access control permissions. 
|
|