| Mac OS X Server includes the open-source software Samba to provide Windows services. This means your Mac OS X Server can provide a variety of services to Windows clients, including the following: File sharing via the Server Message Block (SMB) protocol Print sharing, also via the SMB protocol Local network browsing via the Network Basic Input/Output System (NetBIOS) protocol Network browsing and name/address resolution via the Windows Internet Naming Service (WINS) protocol Network authentication and security services by acting as a Primary Domain Controller (PDC)
Initially, when you enable the Windows service, your Mac OS X Server acts as a stand-alone file server on the network. Windows and Mac OS X client computers can discover your server on the local network via the NetBIOS protocol, and connectivity is handled via the SMB protocol. The following task steps you through the process of enabling this basic configuration. For more advanced Windows network configurations, see the remaining tasks in this section. For more information about Windows print sharing, refer to Chapter 7, "Printing Services."  Tip Tip
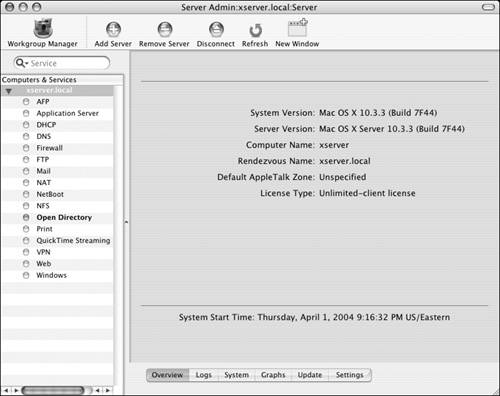
To set SMB access options: 1. | Launch the Server Admin tool located in /Applications/Server, and authenticate as the administrator (Figure 5.42).
| 2. | Select the Windows service for your server in the Computers & Services list (Figure 5.43).

| 3. | Click the Settings button and then the Access tab (Figure 5.44).
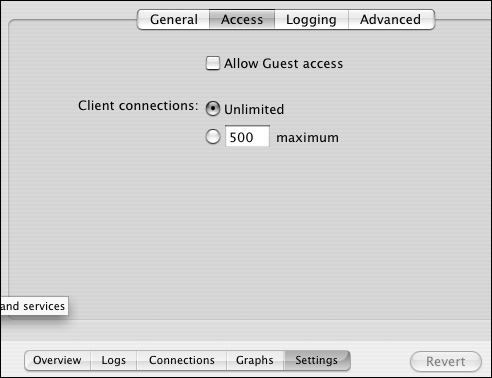
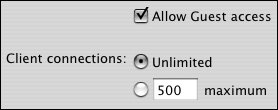
| 4. | Select the "Allow Guest access" check box to enable Windows guest connections (Figure 5.45).
You can also select the total number of simultaneous Windows connections. Mac OS X Server doesn't have any licensing restrictions on the number of simultaneous Windows connections.
| 5. | When you've finished making changes, click the Save button  . .
| 6. | Click the Overview button  . .
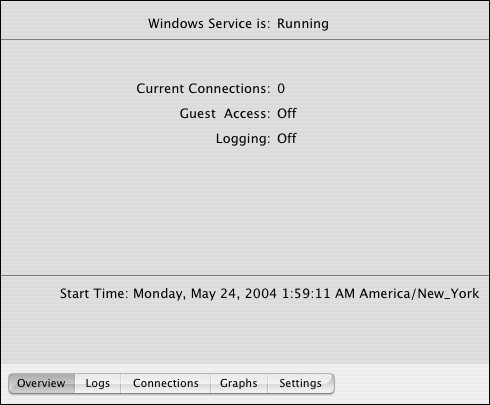
Verify that the Windows service is running (Figure 5.46). If it isn't, click the Start Service button  to activate the Windows server. to activate the Windows server.
|
Tips A small green dot  to the left of the Windows service in the Computers & Services list indicates that the Samba service is running. to the left of the Windows service in the Computers & Services list indicates that the Samba service is running. In order to allow guest access, you must also enable guest access for each share point. See the "To configure Windows share-point settings" task for more information about enabling guest access for individual share points. In Mac OS X Server 10.3, you don't have to configure any other settings for basic Windows authentication and sharing.
| Connecting to an SMB server from a Mac OS X client involves a few simple steps: 1. | In the Finder, click the Network icon  to browse for your server. Mac OS X client can browse for SMB servers via the NetBIOS protocol. to browse for your server. Mac OS X client can browse for SMB servers via the NetBIOS protocol.
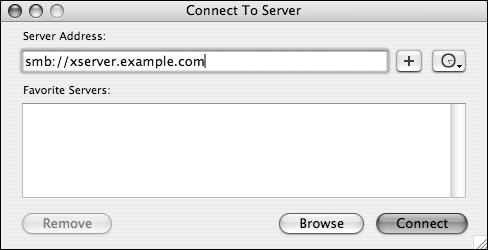
You can connect directly in the Finder by selecting Go > Connect to Server from the menu bar and entering an SMB address or by pressing Command-K from the keyboard (Figure 5.47).
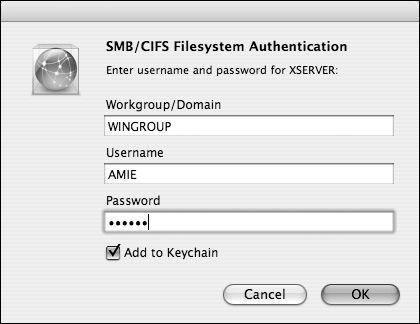
| 2. | The SMB share point pop-up menu defaults to guest connection options at first (Figure 5.48). Select a share from the menu, and click OK  ; or, click the Authenticate button ; or, click the Authenticate button  to gain availability to more share points. Either button will bring you to the SMB authentication dialog (Figure 5.49). to gain availability to more share points. Either button will bring you to the SMB authentication dialog (Figure 5.49).
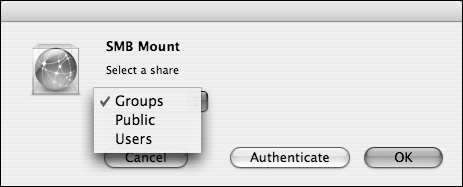
Default settings dictate that the share point's icon will mount on the Finder's desktop  . .
|
|
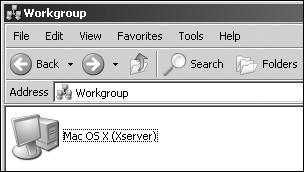
| Connecting to a Mac OS X SMB server from a Windows client involves the following steps (all the screenshots are from Windows XP): 1. | In Windows Explorer, browse to your server as if it were another Windows computer (Figure 5.50).
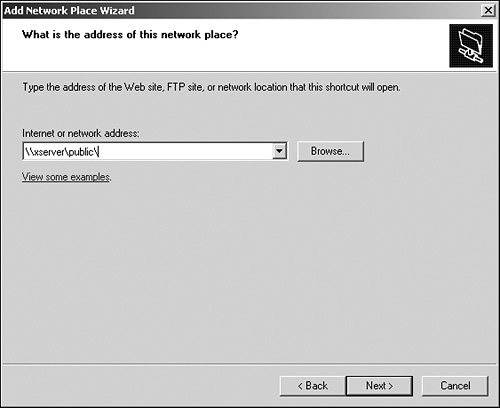
You can also manually add your server using the Add Network Place Wizard (Figure 5.51).
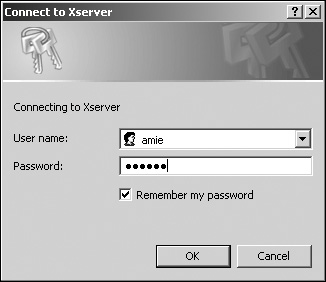
| 2. | The authentication dialog is similar to that for any other Windows network connection (Figure 5.52).
|
Once you've authenticated, all the share points appear in the Windows Browser (Figure 5.53). 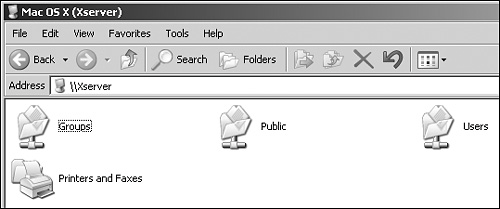
|
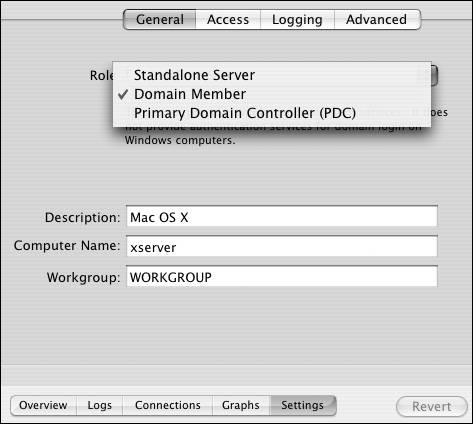
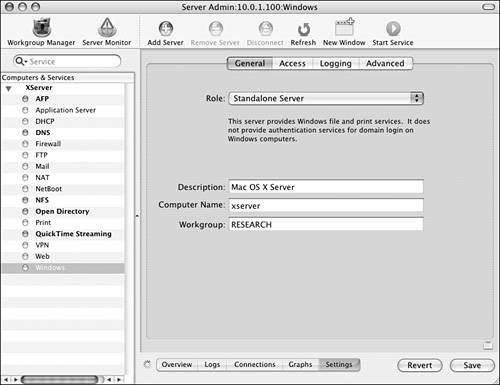
Advanced SMB roles Large SMB networks use an organizational unit known as a domain to segregate computers and services. You can restrict access to items inside each domain by enabling domain authentication. Mac OS X Server can join a domain or even host a domain by becoming a Primary Domain Controller (PDC). When you configure your server as a PDC, Windows clients can authenticate against your server for access to items inside the domain. Enabling your Mac OS X Server as a PDC also enables your Windows clients to change their passwords from their computers. Because authentication is involved with hosting a PDC, your server must also be hosting an Open Directory (OD) database. Windows clients will use the same user accounts hosted in your OD database to log in to your domain. For more information about directory services and Open Directory, see Chapter 3, "Open Directory." By default, your server will act as a Standalone Server (Figure 5.54). This means your server will create the workgroup you specify using the NetBIOS protocol. If this is all you need, enter server Description, Computer Name, and Workgroup values. When you've finished, click the Save button . 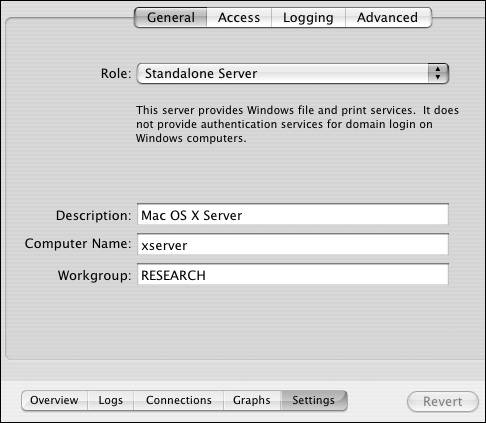
To enable Mac OS X Server as a domain member: 1. | In Server Admin, navigate to your server's Windows service settings (Figure 5.55).
Instructions for this step are detailed in steps 13 of the task "To set SMB access options."
| 2. | Click the General settings tab.
| 3. | Select Domain Member from the Role pop-up menu (Figure 5.56).
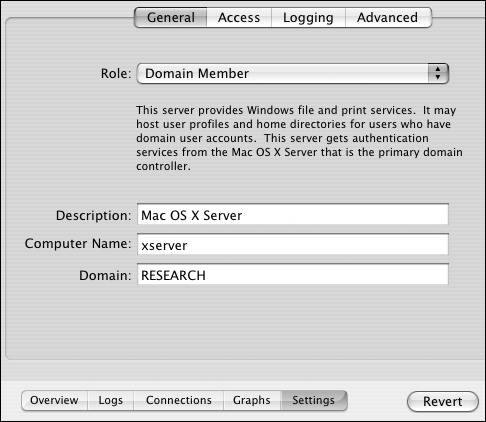
| 4. | Enter the following values:
Description Computer Name Domain
| 5. | Click the Save button .
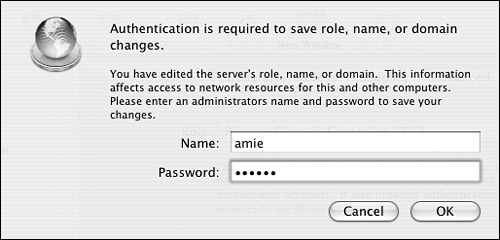
| 6. | When you change SMB server roles, you must authenticate as an LDAP domain administrator for the PDC server (Figure 5.57).
|
To enable Mac OS X Server as a Primary Domain Controller: 1. | Be sure you're an Open Directory master before proceeding.
For more information about directory services and Open Directory, see Chapter 3, "Open Directory."
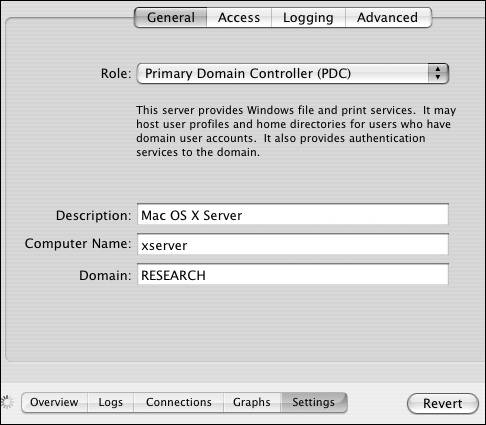
| 2. | In Server Admin, navigate to your server's Windows service settings, and click the General settings tab (Figure 5.58).
| 3. | Select Primary Domain Controller from the Role pop-up menu (Figure 5.59).
If your server isn't configured as an Open Directory master, then you'll receive an error dialog and you won't be able to continue.
| 4. | Enter the following values:
Description Computer Name Domain
| 5. | Click the Save button .
| 6. | When you change SMB server roles, you must authenticate as an LDAP domain administrator for the PDC server (Figure 5.60).

|
Tips It's best if your server's computer name is the unqualified DNS host name (xserver, instead of xserver.example.com). Windows workgroup and domain names are typically capitalized and can't exceed 15 characters. On a Mac OS X Client, you can configure SMB network settings in the Directory Access application. This includes the ability to configure a specific workgroup or domain for the client. Always verify client connectivity after you make SMB server role changesespecially from Windows clients, because domain authentication is vital to proper network functionality. See the sidebar "Connecting Windows Clients via SMB," earlier in this chapter.
Advanced SMB features Mac OS X Server provides a variety of advanced SMB features that your Windows users may need. These features include support for alternate languages, improved network browsing, and hosting Windows home folders. You can also participate in the election of workgroup master and domain master browsers and enable Windows Internet Naming Service (WINS). WINS allows Windows browsing across subnets and facilitates more efficient browsing. The other option is to enable virtual share points, which provides easier configuration for Windows home directories. If your server is a PDC, a user's home folder automatically mounts when they log in to your domain from a Windows computer. In addition, users have the same home folder for both Windows and Mac OS X. To enable advanced SMB features: 1. | In Server Admin, navigate to your server's Windows service settings and click the Advanced tab (Figure 5.61).
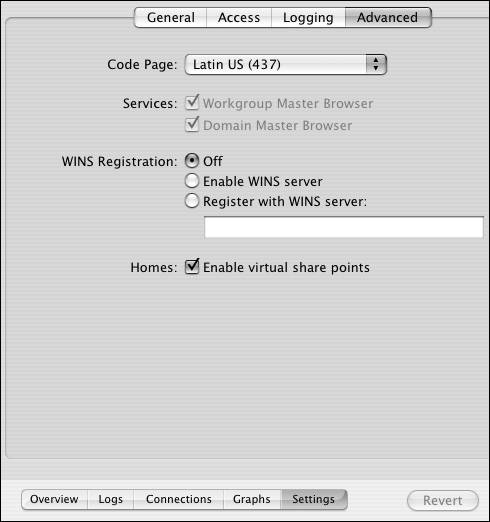
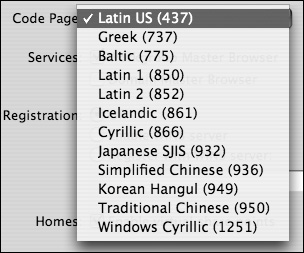
| 2. | The Code Page setting determines which language is used for Windows services. To change the Code Page, select the pop-up menu and choose from the list (Figure 5.62).
| 3. | Select one or both of the Workgroup Master Browser and Domain Master Browser check boxes to have your server take part in the master browser elections (Figure 5.63).

| 4. | Choose one of the following modes for WINS registration (Figure 5.64):
Off Your server has nothing to do with WINS registration.
"Enable WINS server" Your server is the WINS server that other machines register with.
"Register with WINS server" Your server informs other WINS servers that you're providing Windows services. You must enter the IP address(es) of your WINS server(s). You can enter more than one server by separating the addresses with a comma and a single space.

| 5. | Choose whether to enable virtual share points (Figure 5.65).

| 6. | When you've finished making changes, click the Save button .
|
| Master browsers are used to facilitate more efficient network browsing when using the NetBIOS protocol. This is the way Windows computers collect and display information when services are shared from Windows computers to Windows computers on a local subnet (local network). A domain master browser is elected by choosing one of the master browsers on each local network. It collects and offers the list of services offered by Windows computers that resided on all the master browsers. Selecting the Workgroup Master Browser and Domain Master Browser options doesn't guarantee that your server will become the master browser and/or the domain master browser if other computers are involved in the election. |
Tips If your server is acting as a PDC, the Workgroup Master Browser and Domain Master Browser options aren't available. This is because a PDC must be the domain master browser for that particular domain. On a Mac OS X Client, you can configure SMB network settings in the Directory Access application. This includes the ability for a client to register with WINS servers. You should test these settings thoroughly from both Windows and Mac OS X client computers.
Windows share-point settings When you create a share point on Mac OS X Server, it's automatically shared via SMB (as well as AFP and FTP), assuming the Windows service is running. Share points are also automatically configured for both registered user and guest access via SMB. You can configure such settings individually for each share point using the Workgroup Manager tool. To configure Windows share-point settings: 1. | Launch the Workgroup Manager tool located in /Applications/Server, and authenticate as the administrator (Figure 5.66).
| 2. | Click the Sharing icon  in the Toolbar (Figure 5.67). in the Toolbar (Figure 5.67).
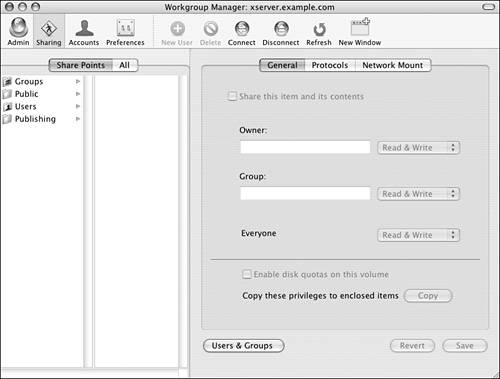
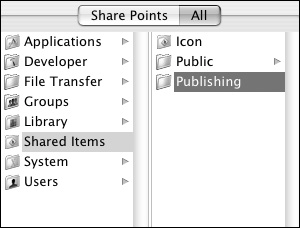
| 3. | Configure an existing share point by clicking the Share Points tab  and then selecting the share point you wish to edit from the sharing browser (Figure 5.68). and then selecting the share point you wish to edit from the sharing browser (Figure 5.68).
| 4. | Click the Protocols tab  to the right of the sharing browser. to the right of the sharing browser.
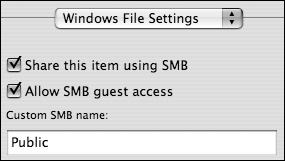
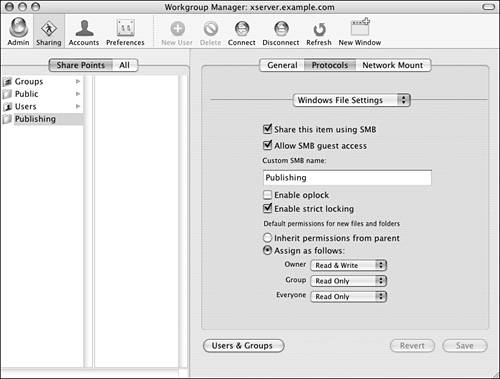
| 5. | Directly below the Protocols tab is the Protocols pop-up menu. From this menu, select Windows File Settings (Figure 5.69).
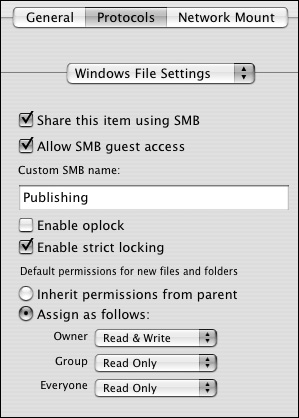
| 6. | In this frame, you can configure SMB sharing and guest access for this particular share point.
You can also configure a custom SMB share point name that differs from the original folder's name (Figure 5.70).
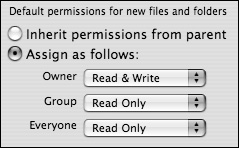
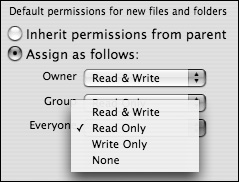
| 7. | Choose one of the following options based on your permissions requirements (Figure 5.71):
"Inherit permissions from parent" New items created within this share point will have the same permissions as the share point itself. See "Configuring File and Folder Permissions," earlier in this chapter.
"Assign as follows" This is the default behavior. It's similar to inherited permissions in that the owner and group assigned to each item are the same as those of the parent share point. The difference here is that you can configure specific access for the user, group, or everyone from the pop-up menus (Figure 5.72).
| 8. | When you've finished making changes, click the Save button .
|
Tips Changing the name of a share point can help disguise a disk as a folder name but can also backfire if the user is looking for the folder's original share name. Sharing the same folder over several different protocols and using different share point names can be difficult to manage. In order for guests to access a share point, its permissions must be set to allow read access for everyone. Keep in mind that the general Windows service settings may affect the settings you configure here. For instance, disabling guest access to the Windows service in Server Admin disables Windows guest access for every share point regardless of individual share settings. Remember to verify proper Windows service configuration in both Workgroup Manager and Server Admin.
File locking The Windows file service offers a few unique features for managing files that reside on the server but are open on client computers. These file-locking options improve the performance and consistency of open files. You can configure these options individually for each share point. Once configured, file locks are transparent to the users connected to the server. In addition, file-locking options don't conflict with any Windows service configuration in Server Admin. To enable file locking: 1. | In Workgroup Manager, navigate to a specific share point's Windows service settings.
Instructions for this step are detailed in the first five steps of the task "To configure Windows share-point settings" (Figure 5.73).
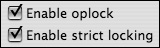
| 2. | Choose one of the following Windows filelocking options (Figure 5.74):
"Enable oplock" Opportunistic locking is disabled by default. Enabling this feature lets client computers cache changes to open files locally for improved performance.
"Enable strict locking" Enabled by default. Strict locking allows only one user at a time to open a particular file. This prevents the file corruption that occurs when applications attempt to edit files that are currently being edited by other users.
| 3. | When you've finished making changes, click the Save button .
|
|