| Workgroup Manager is another too you'll use frequently when you're managing Mac OS X Server (Figure 2.59). The main job of Workgroup Manager is to manage users and groups; add share points such as folders and volumes; and edit preferences for users, groups, and computer accounts. You can access Workgroup Manager directly via Server Admin and vice versa, using the top-left icon in the Toolbar. Figure 2.59. Workgroup Manager is another frequently used tool. 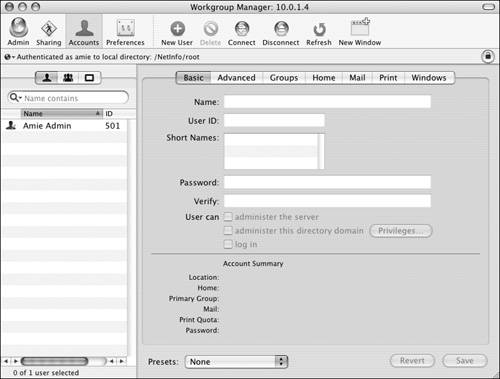
Like other tools in the Server folder, Workgroup Manager can be run locally and remotely; the authentication process is identical to that of Server Admin. The first time you launch Workgroup Manager, you'll need to connect to your server. A dialog will drop down from the Workgroup Manager window. Depending on where you're physically located, you have three options: A direct connection to the server. If you're doing this on the server, the Address field contains the rendezvous name of the server and the logged-in administrator's name. A connection from another Mac OS X Server or Mac OS X client running the Workgroup Manager tool on your local network/subnet. You can click the Browse button  in the Workgroup Manager Connect dialog and search for your server on your local network. in the Workgroup Manager Connect dialog and search for your server on your local network. A remote connection from anywhere around the globe, provided your server has a public IP address. You'll need to have the IP address handy for entry into the Address field.
Enter your administrator name password, choose whether you wish to add the password to your keychain so you don't have to type it in later, and click the Connect button  (Figure 2.60). (Figure 2.60). Figure 2.60. In the Workgroup Manager Connect dialog, enter your administrator name password, choose whether you wish to add the password to your keychain, and click Connect. 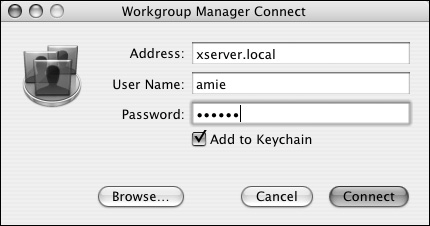
 Tip Tip
The Workgroup Manager Toolbar gives you access to the following buttons (from left to right) (Figure 2.61): Admin, which launches the Server Admin tool Buttons that narrow the focus of Workgroup Manager to three specific areas: Sharing settings Accounts management, which lets you manage users, groups, and computers Preferences settings for user, groups, and/or computers
New User and Delete for account management Connect, Disconnect, and Refresh New Window, which creates a new Workgroup Manager window for the server You might use this option to view users in one window and groups in another.
Figure 2.61. The Workgroup Manager Toolbar gives you access to a variety of useful buttons. 
Managing Workgroup Manager Workgroup Manager is used to enter or import user and group information. You can also use it to view and edit accounts not located on a Mac OS X Server. Although this topic is more advanced than this chapter can explore, it's useful to understand how important Workgroup Manager is in your daily dealings with Mac OS X Server. |
In the drop-down menu directly beneath the Toolbar on the left, you can select various directories you're authenticated to see (directories are discussed in the next chapter) (Figure 2.62). Clicking on the globe or triangle allows you to see those directories. Figure 2.62. The Workgroup Manager Directory drop-down menu lets you select directories you're authenticated to see. 
Account Types To switch between user, group, and computer lists, click the Accounts button in the Toolbar and then select the icon  that corresponds to the account type. that corresponds to the account type. When you choose each account type, you'll notice the settings (tabs) for those account types change (in the settings frame to the right in Workgroup Manager) based on the account type: User account settings tabs (Figure 2.63) Figure 2.63. User account settings tabs. 
Group account settings tabs (Figure 2.64) Figure 2.64. Group account settings tabs. 
Computer account settings tabs (Figure 2.65) Figure 2.65. Computer account settings tabs. 
|
Altering Workgroup Manager preferences Workgroup Manager has preferences that affect how you'll use this tool, regardless of the server(s) you connect to. To see Workgroup Manager's preferences, choose Preferences from the Workgroup Manager menu. Some of the important options available to you are as follows (Figure 2.66): Resolve DNS names when possible. This option is used when servers have properly configured DNS (discussed in later chapters). Figure 2.66. Choose Preferences from the Workgroup Manager menu to open the Workgroup Manager Preferences dialog. 
Use secure transactions (SSL) for Sharing (secure connections are discussed in Chapter 10). Show system users and groups, including root and those used by various services. These are hidden by default; you shouldn't change any parameters to the system users and groups unless you're absolutely sure of the result. Show "All Records" tab and inspector. You can show the Inspector tab (to be discussed in Chapter 4, "User and Group Management"), which lets you see and edit attributes for user, group, or computer accounts on both the local and LDAP databases. This tab becomes incredibly useful when you're doing such advanced editing as adding attributes to users (attributes are discussed in the next chapter). Limit search results to requested records and List a maximum of () records. These options become important in large organizations where you have thousands of records. You may wish to show only 500 and do searches for the rest. Chapter 4 covers searching for account records. Auto-refresh Sharing. You can auto-refresh this portion of Workgroup Manager more or less frequently. Tip
To add the All Records tab and Inspector to your view: 1. | Launch the Workgroup Manager tool located in /Applications/Server (Figure 2.67).
Figure 2.67. The Workgroup Manager tool's location on the disk. 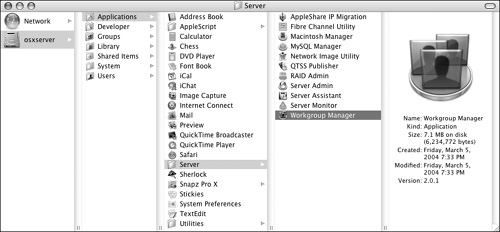
You don't need to authenticate, although you can.
| 2. | Choose Preferences from the Workgroup Manager menu.
The Workgroup Manager Preferences window opens (Figure 2.68).
Figure 2.68. The Workgroup Manager Preferences dialog. 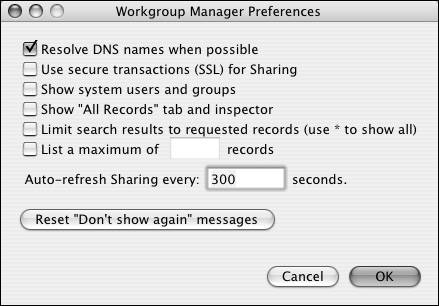
| 3. | Select the "Show 'All Records' tab and inspector" check box (Figure 2.69).
Figure 2.69. The Inspector tab check box in Workgroup Manager. 
| 4. | Click OK to close the Preferences window.
| 5. | A warning dialog tells you that you can possibly lose data or make your system inoperable by editing raw attributes.
Click OK to dismiss the dialog (Figure 2.70).
Figure 2.70. A warning dialog tells you that you can lose data or make your system inoperable by editing raw attributes. 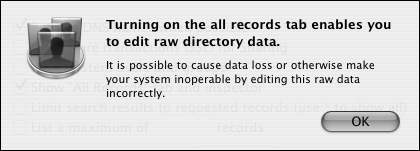
If you click the Accounts icon  , regardless of account type (user, group, computer), you'll see an additional tab at the end of the account types , regardless of account type (user, group, computer), you'll see an additional tab at the end of the account types  and an additional tab at the end of the account configuration frame and an additional tab at the end of the account configuration frame  . This tab will be discussed in more detail in Chapter 4. . This tab will be discussed in more detail in Chapter 4.
|
Tips The more you learn about your server and user attributes, the more you'll appreciate the Inspector tab. It's a good idea to leave it up so you can refer to it. Add your server to the Favorites menu in Workgroup Manager by launching Workgroup Manager, entering your server information, authenticating, and choosing your server from the Add to Favorites selection from the Favorites menu.
Increasing the Workgroup Manager refresh rate When you're setting up and managing shared folders or volumes, you may wish to get a faster response from Workgroup Manager when it updates the information in the window. To increase the refresh rate: 1. | Launch the Workgroup Manager tool located in /Applications/Server, and authenticate as the administrator.
| 2. | Choose Preferences from the Workgroup Manager menu.
The Preferences window opens (Figure 2.71).
Figure 2.71. The Workgroup Manager Preferences dialog. 
| 3. | Change the auto-refresh rate from the default 300 seconds to something shorter, such as 60 seconds (Figure 2.72).
Figure 2.72. Change the Workgroup Manager auto-refresh option to 60 seconds. 
| 4. | Click OK to close the Preferences window.
When you work with share points, you'll now see a faster response when the Workgroup Manager window refreshes.
|
Tip
Adding users to your Mac OS X Server Mac OS X Server can have more than one directory database (discussed in the next chapter). However, you can quickly add users to Mac OS X Server using Workgroup Manager. You'll add users to the local database at this point, but the process of adding them to another directory database is the same (Figure 2.73). Figure 2.73. You can quickly add users to Mac OS X Server on the Workgroup Manager Basic tab. 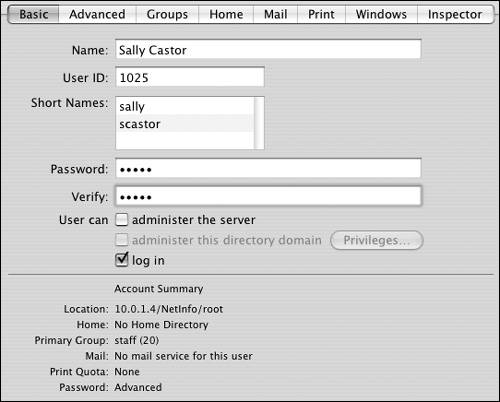
To add user accounts to Mac OS X Server: 1. | Launch the Workgroup Manager tool located in /Applications/Server, and authenticate as the administrator.
| 2. | Select the Accounts icon in the Toolbar and the User icon in the Account Types tab.
| 3. | In the user settings frame on the right, select the Basic tab  . .
Click the New User icon  in the Toolbar. in the Toolbar.
| 4. | Enter the following information in the appropriate fields:
Name The full name of the user, such as Sally Castor.
User ID Already entered for you in this case. A unique ID that Mac OS X Server (and Client) uses to enforce folder and file permissions.
Short Names The user's short name(s). For compatibility with older operating systems, this name should only use letters (usually lowercase) and numbers and be eight characters or less, such as sally or scastor. Additional short names can be longer if you wish.
Password and Verify Passwords should include a variety of characters and both uppercase and lowercase letters. Passwords can be well over 64 characters long; however, this is impractical, and not all computer software that requires authentication can accept such a long character string.
| 5. | Click the Save button  in the Workgroup Manager window. in the Workgroup Manager window.
There are many other options when adding users, as you'll see in Chapter 4.
|
Tip
Additional Administration Tools In addition to the tools discussed here, you may wish to add the following items to the Dock on your server (some items, such as the Terminal, are already on the Dock): Activity Monitor Monitors processes Console Lets you view local log files easily Directory Access Allows the server to authenticate and connect to other directory types Disk Utility Lets you carry out permissions repair on your server NetInfo Manager Lets you edit data on local accounts Network Utility Checks the network status and connections Printer Setup Utility Lets you create printers on your server |
|