Understanding lookupd
| An additional process called lookupd interacts with DirectoryService and provides some similar services for system-level requests. The lookupd process uses agents that are extensions to the lookupd code to retrieve information about users, groups, and domain name system (DNS) configuration. Each agent is designed to locate a particular type of information. Command-line utilities such as ls and any network applications requiring DNS resolution use lookupd to retrieve DNS information. The following agents retrieve information for directory services:
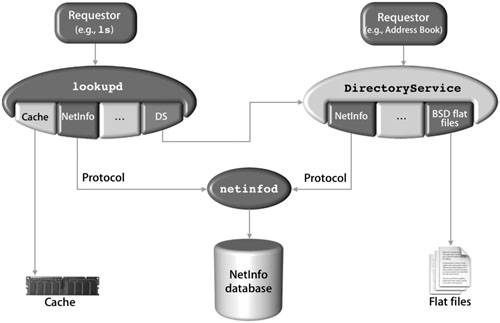
You can configure which agents are used and the order in which they are searched, although the cache agent is typically searched first. Also, you can use lookupd to check what information is being retrieved from the DirectoryService process. These are both good troubleshooting steps when attempting to locate a problem with directory services not looking in the proper place. Another point to consider is that the lookupd process can be configured to work with DirectoryService using DSAgent. Any process that uses lookupd would also search the DSAgent and, therefore, DirectoryService. Because lookupd has a DNS agent, it is the DNS resolver for Mac OS X. It is, therefore, an acceptable tool for performing DNS lookups. Comparing DirectoryService and lookupdDirectoryService and lookupd are similar in that both have an architecture that allows for flexible configuration of various data stores. There are, however, significant differences between the two:
These differences are summarized in the following table:
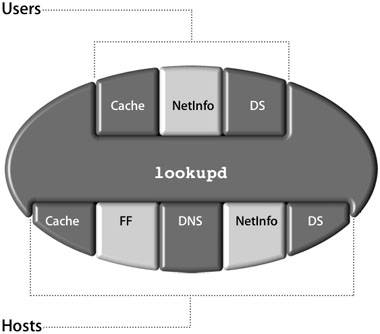
Identifying lookupd AgentsBecause different types of information might be stored in different places, you can configure a separate set of agents and a separate lookup order for each category of agents. When lookupd searches for user information, it looks in the cache first (using the CacheAgent), then the NetInfo database (using the NIAgent), and then DirectoryService (using the DSAgent). When lookupd searches for host information, it looks in the cache first, then the /etc/hosts file (using the FFAgent), then the DNS server (using the DNSAgent), then the NetInfo database, and, finally, the DirectoryService process. The lookupd process has a predefined default configuration. No configuration files are necessary. There are two methods for changing the configuration of lookupd:
While global settings affect the process as a whole, you can add further configuration information for each agent or category of agents. For example, the global timeout value for lookupd might be set to 30 seconds, but you could set the timeout value for the DNSAgent to be 15 seconds. The more specific settings will override the global values. To determine the configuration of lookupd, type lookupd configuration at the command line. To change the values in the NetInfo database for lookupd and its agents, you can use Workgroup Manager (running locally) or through manual configuration files. Refer to the man page for lookupd for more information.
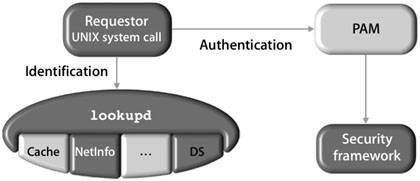
Working With lookupd and PAMAlthough lookupd is able to do the work of identification, it cannot actually authenticate the user account. To solve this, Mac OS X provides a pluggable authentication module (PAM) that accesses the security framework. PAM is a set of libraries that handle authentication tasks for applicationsin this case, BDS utilities and UNIX system calls. The primary purpose of PAM is to provide a layer of abstraction between the open-source system calls and the security framework that works directly with DirectoryService. The configuration for PAM-enabled services are stored in /etc/pam.d. The following figure illustrates how Mac OS X leverages a PAM to act on behalf of the requestor when talking to the security framework. Examples of an ssh LoginThere are two basic ways to do ssh login, depending on whether the user is in the NetInfo database or in BDS flat files. Both of these examples illustrate how the lookup process handles queries to the user data, depending on where that data is stored. ssh Login of a User in the NetInfo DatabaseThe lookupd process is used when a user logs in via the command line, referencing getpwent, getpwnam, and other various system calls, depending on the specific command, which can be ftp, ssh, su, or sudo. The login process may or may not use DirectoryService, depending on where the user record is stored and in what order the agents are used. In this first example, the user record is located in the local NetInfo database. From a remote computer, the user (Warren) uses ssh to access a Mac OS X computer, which then uses lookupd to retrieve the user record. To perform the search, lookupd agents query data stores. First the cache is checked. If the user record is not found in the cache, the NetInfo agent queries the local NetInfo database. The record is found and returned to ssh, and the user is authenticated using PAM. DirectoryService is not used for this request. 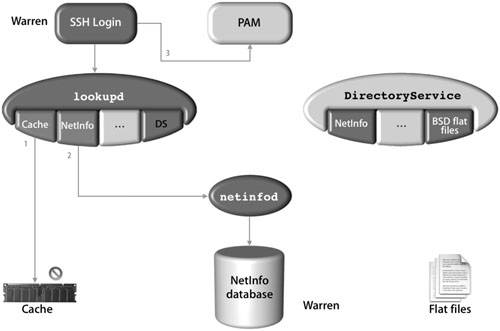 ssh Login of a User in BSD Flat FilesFrom a remote computer, the user (Tina) uses ssh to access a Mac OS X computer, which then uses lookupd to retrieve the user record. To perform the search, lookupd agents query data stores. First the cache is checked. If the user record is not found in the cache, the NetInfo agent queries the local NetInfo database. When the record is not found in the local NetInfo database, the DSAgent queries the DirectoryService process. Provided DirectoryService is configured to search the BDS flat files (along with the preceding default search in the NetInfo database) for authentication, the record is found and returned to ssh, and the account is authenticated with PAM. 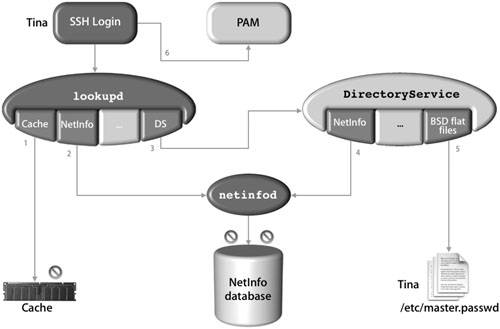 An alternative to this somewhat lengthy process would be to reconfigure lookupd to search the flat files using the FFAgent. This would require you to create a lookup order for lookupd in either a configuration file or in the NetInfo database. Viewing the Current Configuration of lookupdWhen you use the lookupd command to retrieve directory-service information, it is helpful to understand how lookupd is configured so that you know where the information is coming from.
Running an Interactive Session With lookupdBy using the -d option with the lookupd command, you can begin an interactive session of lookupd. Using this option creates a second lookupd process on the machine, separate from the one that is normally running. This enables you to test lookupd settings interactively, without affecting the entire machine.
|
EAN: 2147483647
Pages: 258