Understanding VPN
| You have seen SSH in action, providing a secure, encrypted connection over an insecure, visible network. You can also take the next step and ensure that the entire network connection is secure and encrypted, thus allowing any type of access to be safe, even insecure protocols such as Telnet and standard FTP. This process is known as creating a virtual private network (VPN). A VPN can consist of a single host connecting to a private network, or an entire remote site connecting into a private network, in both cases using VPN security protocols over an insecure network (such as the Internet). The following figure shows a VPN connection from a client computer to an internal corporate network using NAT for IP addressing (shown at the bottom). The client machine has both a public IP address 17.187.175.4 (provided by an ISP, either at home, or at a hotel, or at a remote site) and a private VPN address 10.1.1.100 on the internal network (provided by the VPN server after authentication). Note that transactions to the internal network go through the VPN pipe, but non-VPN connections get blocked at the VPN/firewall server and are not allowed internal access. 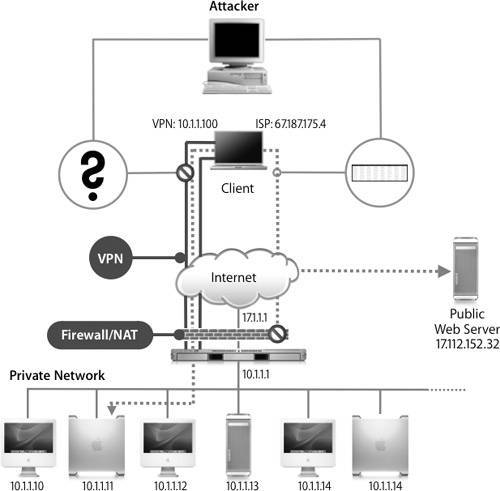 An attacker can snoop the non-VPN network transactions but will see only encrypted gibberish while observing the VPN connection. You will see later that when you create a VPN connection, you have full control over which packets get sent over the VPN and which get sent over the public network. VPN comes in a variety of flavors and textures, featuring various authentication schemes and transport protocols. VPN Transport ProtocolsMac OS X and Mac OS X Server support two transport protocols:
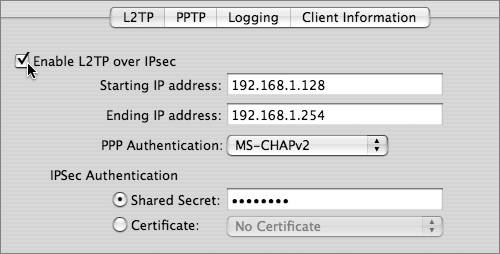
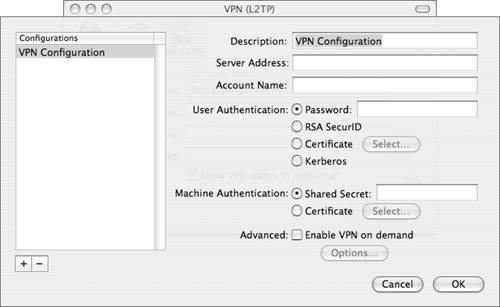
A Mac OS X system may have multiple connection profiles to different VPN servers (which may or not be using Mac OS X Server), each using either one or the other of these transport protocol for connectivity. Mac OS X Server can provide VPN services using one or both of these protocols. Before you learn how to implement VPN connectivity in Mac OS X and Mac OS X Server, let's take a look at each transport protocol in detail. L2TPL2TP is the more secure of the two protocols. The default configuration is L2TP/IPSec, which supports a shared secret mechanism. You can also use certificates instead of shared secrets, which you will find out how to do later in this lesson. PPTPPPTP, which was developed by Microsoft, provides more compatibility with older Windows clients. It supports both 40-bit and 128-bit encryption, but unless you need to support older Windows clients, it is best to stick with 128-bit, because 40-bit is very susceptible to security breaches. Note Regardless of the protocol used to connect to the VPN server, you should enable all traffic to go over the VPN. In the Internet Connect application, choose Connect > Options and select the "Send all traffic over the VPN connection" checkbox. Authentication MethodsBecause different organizations require different levels of authentication security, VPN supports several authentication schemes. On Mac OS X Server, the default authentication protocol is MS-CHAPv2. MS-CHAPv2MS-CHAPv2 is a fairly simple user name/password authentication model using a password hash. KerberosBeginning with Mac OS X 10.4, Kerberos VPN authentication is supported with L2TP. Two-FactorA two-factor authentication protocol utilizes a user name, but instead of a fixed password, a token (which can change) is combined with a password. The most common example is the RSA SecurID system, where the user carries a device that generates tokens dynamically. This SecurID device is either a keychain, or credit-card sized device (for easy placement in a wallet or planner). Each SecurID device is usually specifically coordinated to a userin other words, one SecurID device cannot be used by another person, even if he or she is in the same system. Providing VPN Service With Mac OS X ServerMac OS X Server provides a graphical interface for VPN configuration using the Server Admin program. Most popular VPN configuration options are easily configured through the GUI, but other configuration options are configurable only via the command line. Mac OS X Server can provide both L2TP and PPTP VPN service concurrently, or you can enable just one of the types. VPN configuration information for OS X Server is stored in /Library/Preferences/SystemConfiguration/com.apple.RemoteAccessServers.plist. L2TP ConfigurationAfter enabling L2TP, which you will do in the next exercise, you must first select a block of IP addresses that the VPN system will vend to clients as they attach, similar to what a DHCP server does. Speaking of DHCP servers, it is very important that the IP address range you select is not already assigned statically or allocated to a DHCP server. Next, you must select PPP authentication type. Mac OS X Server defaults to MS-CHAPv2 authentication, but you can also choose to use Kerberos authentication instead (from the pop-up menu, new to Mac OS X Server v10.4). To enable two-factor protocols such as RSA SecurID, a trip to the command line is necessary. Also new to the Mac OS X Server v10.4 Server Admin GUI is the ability to use a certificate instead of a shared secret for client-server host authentication. You must already have generated a certificate. You could do this from the command line in previous versions of Mac OS X Server, but it is now a welcome addition to the GUI. Here, you will configure L2TP over IPSec to use MS-CHAPv2 PPP authentication and use a client/server host shared secret:
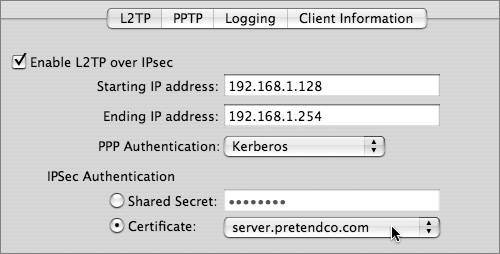
You are not done setting up VPN yet, but if this is the only configuration you want, skip ahead to the exercise on setting up client information. In this exercise, you will configure L2TP over IPSec to instead use Kerberos for PPP authentication and use a certificate for IPSec authentication:
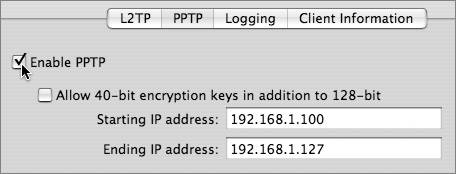
PPTP ConfigurationPPTP configuration is straightforward in Mac OS X Server, because Server Admin offers only a few simple configuration options. As with L2TP, you must first select a block of IP addresses that the VPN system will vend to clients as they attach, similar to what a DHCP server does. Again, it is very important that the IP address range you select is not already assigned statically or allocated to a DHCP, VPN, or other type of server elsewhere.
Configuration for Two-Factor AuthenticationAs mentioned earlier, you can configure VPN on OS X Server to support two-factor authentication. In this exercise, you will add support for SecurID:
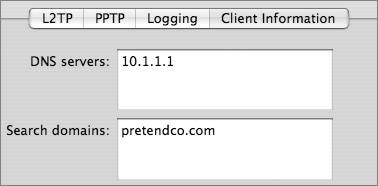
Client Information: "DHCP"-likeWith Server Admin, you can configure your clients to receive not only an IP address, but also default DNS server and search domain info. If this sounds like the type of information a DHCP server would provide for non-VPN clients, you are correct. To configure VPN to provide a default DNS server of 10.1.1.1 and a default search domain of pretendco.com, perform these steps:
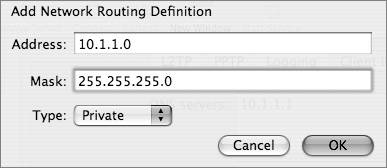
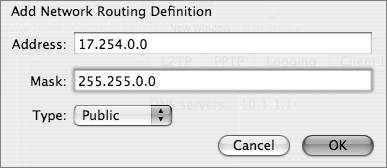
Client Information: Public/Private Network RoutingWith Server Admin, you can also configure public and private routing for VPN users. This ensures that public IP address routing, which does not require a VPN tunnel, does not waste VPN resources, and also that private network traffic is required to be on the private VPN network. When packets are sent through a VPN tunnel, this results in a load on the VPN server for encrypting/decrypting packets. For connection to internal hosts, as shown in the connection from the client machine to the internal host 10.1.1.11, this is the exact behavior you want. However, if the client machine wants to contact a public Web server at 17.112.152.32, is it necessary to burden the VPN server with this request? If you don't think so you may configure public and private network routing within your VPN client information to control this behavior. In this exercise, you will configure the network so that packets destined for 10.1.1/24 go through the VPN server, and packets destined for 17/8 do not:
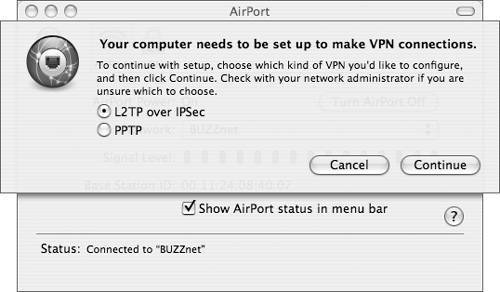
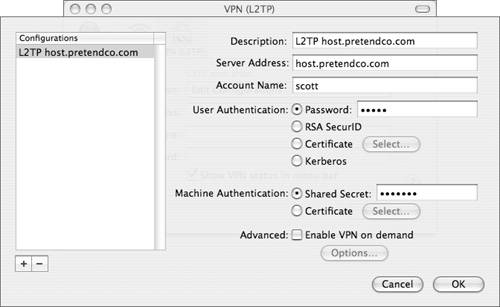
Connecting to VPN ServiceMac OS X and Mac OS X Server users connect to VPN servers using the Internet Connect program located in /Applications. In this exercise, you will connect to a VPN server:
|
EAN: 2147483647
Pages: 258