Snort
Although PortSentry can provide a good tip-off that something "inappropriate" is about to happen to your computer, it cannot detect targeted attacks to services that are actually open and running on your system, nor can it identify attempted attacks that aren't preceded by a portscan. For simple setups that just want to keep tabs on who might be tweaking the system, PortSentry is a useful tool. Administrators who are responsible for the health of an entire network, however, should consider installing Snort.
Snort is a modular IDS that takes detection far beyond portscan detection and provides attack recognition by analyzing incoming packet payloads in real time. Most attacks are based on automated scripts that repeatedly issue the same exploit commands, or have very obvious "signatures" that can be used for detection. An attempted Nimda attack on a Windows IIS system (http://www.cert.org/advisories/CA-2001-26.html), for example, will show up in your Apache log files as follows :
65.24.217.121 - - [17/Nov/2001:15:07:02 -0500] "GET /scripts/root.exe?/c+dir HTTP/1.0" 404 274 65.24.217.121 - - [17/Nov/2001:15:07:03 -0500] "GET /MSADC/root.exe?/c+dir HTTP/1.0" 404 272 65.24.217.121 - - [17/Nov/2001:15:07:03 -0500] "GET /c/winnt/system32/cmd.exe?/c+dir HTTP/1.0" 404 282 65.24.217.121 - - [17/Nov/2001:15:07:03 -0500] "GET /d/winnt/system32/cmd.exe?/c+dir HTTP/1.0" 404 282 65.24.217.121 - - [17/Nov/2001:15:07:03 -0500] "GET /scripts/..%255c../winnt/system32/cmd.exe?/c+dir HTTP/1.0" 404 296 65.24.217.121 - - [17/Nov/2001:15:07:03 -0500] "GET /_vti_bin/..%255c../..%255c../..%255c../winnt/system32/ cmd.exe?/c+dir HTTP/1.0" 404 313 65.24.217.121 - - [17/Nov/2001:15:07:04 -0500] "GET /_mem_bin/..%255c../..%255c../..%255c../winnt/system32/ cmd.exe?/c+dir HTTP/1.0" 404 313 ...
Each attack is identical, and, given access to the actual contents of network traffic, it is easily recognizable. Snort makes it possible to recognize such exploits by writing rules that compare incoming packets to known attacks, and, if a match is detected , react appropriately. To sweeten the deal, Snort comes with rules for matching hundreds of known attacks out of the box.
SNORT USAGE AND DEPLOYMENTAt this point, you might be wondering, what does Nimda have to do with my Mac OS X system? Nothing: It won't harm your Apache installation other than force it to process unnecessary requests . Snort, however, is often deployed in conjunction with a firewall system to protect all computers on a network, not just a single platform. Someone needs to protect Windows users from themselves , don't they? When Snort is used in the capacity of "network protector," it is usually placed either topologically in the same "space" as a firewall or on a firewall box itself. Today's computer networks, by and large, are switched networks. Rather than broadcasting traffic to all nodes on a network, a switch maintains an internal per-port ARP cache, and can match individual packets to the correct destination ports. The result is that each switch port "sees" only traffic that is destined for the devices connected to it. To be effective, the Snort monitor must be placed at the level of the network feed ”before the first switch ”where it can monitor all traffic to and from the network. From this vantage point, Snort can detect attacks destined for any machine on the local network, and respond by remotely triggering firewall blocks with SSH (Chapter 14, "Remote Access: Secure Shell, VNC, Timbuktu, Apple Remote Desktop"), or alerting the network administrator. The easiest way to modify an existing network to include a Snort monitor is to take the incoming feed (usually from a router) to a hub. (Hubs, unlike switches, replicate network packets on each port.) One port on the hub can then, in turn , be used to feed the switch arrays for the rest of the network, while another port can be used with the Snort monitor, as shown in Figure 18.1. Figure 18.1. A network IDS should be placed so that it can monitor all network traffic. The "best possible" scenario places a second IDS inside the firewall so that a comparison can be made between the "inside" and "outside" alerts to verify that the firewall is operating correctly. |
Installing Snort
To compile and install Snort on Mac OS X, download the latest source (1.9.0 at the time of this writing) from http://www.snort.org/, unarchive , and enter the distribution directory.
% curl -O http://www.snort.org/dl/snort-1.9.0.tar.gz % tar zxf snort-1.9.0.tar.gz % cd snort-1.9.0
Next , use configure to prepare the source for compilation. Be sure to set the --mandir flag to store the Snort man pages in the standard Mac OS X location. This example also includes MySQL support with the --with-mysql flag. This will enable Snort to log alerts to a MySQL database, which can be used for reporting and traffic analysis. If you do not have MySQL on your system, you can download a precompiled version from http://www.aaronfaby.com/mysql.php or compile the source code from http://www.mysql.com/. Snort is fully functional without MySQL support, but a number of reporting packages require its presence.
% ./configure --mandir=/usr/share/man --with-mysql creating cache ./config.cache checking for a BSD compatible install... /usr/bin/install -c checking whether build environment is sane... yes checking whether make sets ${MAKE}... yes checking for working aclocal... found checking for working autoconf... found checking for working automake... found ... creating templates/Makefile creating src/win32/Makefile creating config.h After configure has completed, compile the source with make :
% make make all-recursive Making all in src Making all in win32 make[3]: Nothing to be done for 'all'. Making all in output-plugins gcc -DHAVE_CONFIG_H -I. -I. -I../.. -I../.. -I../../src -I/sw/include -I../../src/output-plugins -I../../src/detection-plugins -I../../src/preprocessors -I/usr/local/include/mysql -DENABLE_MYSQL -g -O2 -Wall -c spo_SnmpTrap.c Finally, install the software with make install (as root, or using make install prefixed with sudo ):
# make install /bin/sh ./mkinstalldirs /usr/share/man/man8 /usr/bin/install -c -m 644 ./snort.8 /usr/share/man/man8/snort.8 ... You need to complete two more steps by hand before Snort can be used: copying the rule files to a common location and creating a directory for logging. From within the Snort distribution, issue the following commands (remember, root access is assumed):
# mkdir -p /usr/local/etc/snort/rules # cp rules/* /usr/local/etc/snort/rules # cp etc/* /usr/local/etc/snort # chmod -R 600 /usr/local/etc/snort # mkdir /var/log/snort
Before starting Snort for the first time, open /usr/local/etc/snort/snort.conf . You need to change the RULE_PATH to reflect the location of the rule files in relation to the snort.conf file. Search for the following line:
var RULE_PATH ../rules
Change it to
var RULE_PATH rules
Running Snort
After getting the basic configuration in place, you can start Snort for the first time. You'll need to make tweaks later for your IDS to be truly effective, but for now you can test to verify that the installation is correct, and even detect an attack or two.
Start Snort by typing /usr/local/bin/snort -c /usr/local/etc/snort/snort.conf . If everything has gone according to plan, you should see something like this:
# /usr/local/bin/snort -c/usr/local/etc/snort/snort.conf Initializing Output Plugins! Log directory = /var/log/snort Initializing Network Interface en1 --== Initializing Snort ==-- Decoding Ethernet on interface en1 Initializing Preprocessors! Initializing Plug-ins! Parsing Rules file /etc/snort/snort.conf +++++++++++++++++++++++++++++++++++++++++++++++++++ Initializing rule chains... No arguments to frag2 directive, setting defaults to: Fragment timeout: 60 seconds Fragment memory cap: 4194304 bytes Fragment min_ttl: 0 Fragment ttl_limit: 5 Fragment Problems: 0 Stream4 config: Stateful inspection: ACTIVE Session statistics: INACTIVE Session timeout: 30 seconds Session memory cap: 8388608 bytes State alerts: INACTIVE Evasion alerts: INACTIVE Scan alerts: ACTIVE Log Flushed Streams: INACTIVE MinTTL: 1 TTL Limit: 5 Async Link: 0 No arguments to stream4_reassemble, setting defaults: Reassemble client: ACTIVE Reassemble server: INACTIVE Reassemble ports: 21 23 25 53 80 143 110 111 513 Reassembly alerts: ACTIVE Reassembly method: FAVOR_OLD http_decode arguments: Unicode decoding IIS alternate Unicode decoding IIS double encoding vuln Flip backslash to slash Include additional whitespace separators Ports to decode http on: 80 rpc_decode arguments: Ports to decode RPC on: 111 32771 telnet_decode arguments: Ports to decode telnet on: 21 23 25 119 Conversation Config: KeepStats: 0 Conv Count: 32000 Timeout : 60 Alert Odd?: 0 Allowed IP Protocols: All Portscan2 config: log: /var/log/snort/scan.log scanners_max: 3200 targets_max: 5000 target_limit: 5 port_limit: 20 timeout: 60 1273 Snort rules read... 1273 Option Chains linked into 133 Chain Headers 0 Dynamic rules +++++++++++++++++++++++++++++++++++++++++++++++++++ Rule application order: ->activation->dynamic->alert->pass->log --== Initialization Complete ==-- -*> Snort! <*- Version 1.9.0 (Build 209) By Martin Roesch (roesch@sourcefire.com, www.snort.org) Checking Snort Logs
To verify that Snort is truly functioning, try running a portscan or other "attack" from another machine. For example, try an nmap stealth scan against Snort: nmap -sS <your Snort machine> .
After nmap completes its run, you can check the Snort logs to see exactly what has been detected. By default, Snort stores its log files in /var/log/snort . Here you'll find several log files:
-
alert . Security alerts generated by Snort. All logged intrusion attempts are stored here along with the information detailing the issue. For example, an nmap stealth scan is detected and logged as follows:
[**] [1:469:1] ICMP PING NMAP [**] [Classification: Attempted Information Leak] [Priority: 2] 11/16-00:38:32.765794 10.0.1.1 -> 10.0.1.101 ICMP TTL:58 TOS:0x0 ID:41250 IpLen:20 DgmLen:28 Type:8 Code:0 ID:11693 Seq:0 ECHO [Xref => arachnids 162] [**] [117:1:1] (spp_portscan2) Portscan detected from 10.0.1.1: 1 targets 21 ports in 1 seconds [**] 11/16-00:38:33.515666 10.0.1.1:61880 -> 10.0.1.101:1112 TCP TTL:59 TOS:0x0 ID:3927 IpLen:20 DgmLen:40 ******S* Seq: 0x374170C6 Ack: 0x0 Win: 0x1000 TcpLen: 20
-
scan.log . A detailed log of portscans, including the source and destination ports.
11/16-00:38:33.515666 TCP src: 10.0.1.1 dst: 10.0.1.101 sport: 61880 dport: 111 tgts: 1 ports: 21 flags: ******S* event_id: 0 11/16-00:38:33.525192 TCP src: 10.0.1.1 dst: 10.0.1.101 sport: 61880 dport: 933 tgts: 1 ports: 22 flags: ******S* event_id: 4 11/16-00:38:33.557660 TCP src: 10.0.1.1 dst: 10.0.1.101 sport: 61880 dport: 700 tgts: 1 ports: 23 flags: ******S* event_id: 4 11/16-00:38:33.567283 TCP src: 10.0.1.1 dst: 10.0.1.101 sport: 61880 dport: 679 tgts: 1 ports: 24 flags: ******S* event_id: 4 11/16-00:38:33.599891 TCP src: 10.0.1.1 dst: 10.0.1.101 sport: 61880 dport: 580 tgts: 1 ports: 25 flags: ******S* event_id: 4
-
<trigger ip> . Directories are created for machines triggering attacks. For each triggered alert a separate log file is generated in the directory containing the attack details.
Snort generates two types of information: alerts and logs. An alert is a notification of a triggering event, whereas a log is the capture of the data that generated the alert.
Interpreting Snort alerts/logs does not require an in-depth knowledge of the TCP/IP suite, but can be overwhelming to the first-time user . Information includes the alert type, how it has been classified (severity) by the rule's authors, and a description of the packet that matched the rule. In many cases, a cross-reference is given to an online resource to look up further information about the attack type. In the portscan example shown previously, the cross-reference is to archNIDS 162 . Table 18.1 contains the online references that you'll see in the output.
Table 18.1. Online Alert References
| Reference System | URL |
|---|---|
| Bugtraq | ">http://www.securityfocus.com/bid/<reference> |
| CVE | ">http://cve.mitre.org/cgi-bin/cvename.cgi? name =<reference> |
| arachNIDS | ">http://www.whitehats.com/ info /IDS<reference> |
| McAfee | ">http://vil.nai.com/vil/dispVirus.asp?virus_k=<reference> |
| <url> | ">http://<url> |
For example, to look up the referenced arachNIDS 162 alert, one would use http://www.whitehats.com/info/IDS162, which tells us:
This event indicates that a ping request was sent to your network. This is usually used as a test to check whether a host is responsive . However, it can be misused to map your network. Nmap 2.36BETA (or earlier) versions probably generated this particular ping.
To better understand the additional information provided in the alerts, read the Snort rule design guide (http://www.snort.org/docs/writing_rules/chap2.html#tth_sEc2.3). It describes the packet header fields (TTL, TOS, and so on) that can be used for comparison against network traffic ”the same fields you'll see logged with the alerts.
A number of other logging options are available ”such as logging to syslog or MySQL, or disabling logging altogether ”we'll get to those shortly.
Snort Startup Options
The Snort CLI syntax is simply snort <options> <BPF Filter> (See tcpdump in Chapter 7, "Eavesdropping and Snooping for Information: Sniffers and Scanners ," for more information on BPF filters). When Snort is started without any command-line switches (such as -c/usr/local/etc/snort/snort.conf ), it attempts to read its configuration from the file ~/.snortrc from your home directory. For our purposes, using -c to choose a systemwide config file works best. In addition to this switch, a number of additional startup options can, in some cases, alter Snort's fundamental operation. Table 18.2 shows many of the common Snort startup flags and their purpose.
Table 18.2. Snort Startup Options
| Command-Line Switch | Purpose |
|---|---|
| -c <Snort config> | Set the configuration file Snort will use. |
-v | Run as a network packet sniffer, outputting packet headers to STDOUT. |
-d | Output application data (packet contents). |
-e | Output data link headers. |
-w | Output management and control frames . |
| -u <user> | Set the user ID under which Snort runs. |
| -g < group > | Set the group ID under which Snort will run. |
-s | Log alerts to the syslog daemon ( /var/log/system.log on your Mac OS X machine). This is overridden by the settings in the config file. |
-v | Verbose output. |
-d | Run as a background daemon. This is the mode you'll be using if you want to use Snort as an IDS for your network. |
-b | Log packets in tcpdump mode. See Chapter 7 for more information on tcpdump . |
| -hn <network/mask> | Identify your local network to Snort. |
| -A [fastfullconsolenone] | Set the alert logging mode. The fast mode logs a single line to the alert file for each alert, whereas full (the default) logs the full packet headers, console outputs the alerts to /dev/console , and none logs nothing. |
| -i <interface> | Listen on the named network interface. |
For the example IDS, all that's needed to start Snort is /usr/local/bin/snort -D -c /usr/local/etc/snort/snort.conf . In some cases, running in fast log mode ( -A fast ) may be necessary if Snort can't keep up your network traffic. Unfortunately, some Snort reporting software may require the full format to operate correctly.
To start Snort at boot-time, create a new folder named Snort in /Library/StartupItems . Into this folder, add two files, StartupParameters. plist and Snort , with the following contents:
StartupParameters.plist: { Description = "Snort IDS"; Provides = ("IDS"); Requires = ("Resolver"); OrderPreference = "None"; Messages = { start = "Starting Snort IDS"; }; } and Snort:
#!/bin/sh ## # Start Snort IDS ## . /etc/rc.common if [ "${SNORT:=-NO-}" = "-YES-" ]; then ConsoleMessage "Starting Snort IDS" cd /usr/local/bin ./snort -D -c /usr/local/etc/snort/snort.conf fi Finally, add the line SNORT=-YES- to /etc/hostconfig to turn the automatic startup on.
Snort Configuration Files
Although it's easy to set up and start using, Snort's true effectiveness comes with time and patience. In it's default setup, Snort detects everything that seems even the slightest bit "shady" on your network. Although it's interesting to watch for a short while, you'll quickly reach the (correct) conclusion that Snort is giving you information overload, and that you're being alerted to thousands of false positives. The reason for this is twofold. First, some perfectly legitimate traffic matches attack signatures. For example, Snort will happily detect and report on attempts to alter files through FrontPage serve extensions, even if the access is legitimate . Secondly, many Snort rules provide informational alerts and are not meant to signal the start of a network attack. There are rules included to alert you to network traffic containing pornography and other "inappropriate" material. These can help you enforce network policies (see Chapter 2, "Thinking Secure: Security Philosophy and Physical Concerns," for details), but in most cases simply get in the way of monitoring for the "real" attackers .
GIMME GUIIf you want to avoid the do-it-yourself approach to Snort, you can download a packaged and GUI-fied version called HenWen from http://home.attbi.com/~dreamless/henwen.html. HenWen provides a precompiled Snort distribution and a point-and-click interface for configuration. HenWen lacks many of the fine-tuning features of running Snort from the command line, but provides value-added features, such as displaying pop-up messages as alerts occur. |
snort.conf
The main Snort config file ( /usr/local/etc/snort/snort.conf ) controls the what/where/how of alerts. It is the most complicated of the Snort configuration files, so we'll walk through it step by step. You should use only the options that are appropriate for your network ”don't start enabling options just because they're available. Unnecessary comments are removed for brevity.
First, configure the internal variable HOME_NET for your local network. This can be used in rules to ignore packets from trusted local computers, decreasing your chances of false positives. Variables are set in the Snort file using the syntax var <variable name> <value> . HOME_NET can be set to a network and mask ( var HOME_NET <network>/<mask> , any address var HOME_NET any , or automatically to the network local to the interface on which Snort is running on ” var HOME_NET $eth0 ADDRESS . In this example, it has been set to 10.0.1.0/24 , my internal network.
################################################### # Step #1: Set the network variables: # # You must change the following variables to reflect # your local network. The variable is currently # set up for an RFC 1918 address space. # var HOME_NET 10.0.1.0/24 Like the internal network, you can also set up the addresses that constitute the "outside" world with the EXTERNAL_NET variable. In general, you can leave this as any , or, to exclude your local network machines, use the ! character to negate the given address. For example, !10.0.1.0/24 matches anything except the addresses on the 10.0.1.0/24 subnet.
# Set up the external network addresses as well. # A good start may be "any" var EXTERNAL_NET any Use the DNS_SERVERS , SMTP_SERVERS , SQL_SERVERS , TELNET_SERVERS , and AIM_SERVERS variables to differentiate between the different types of servers running on your network. By default, these variables are set to the same value as HOME_NET , meaning that all IPs in your local network are covered. To set them for specific machines, list the machines' IP addresses surrounded by brackets and separated by commas ”such as in [10.0.1.5,10.0.1.100] ”without any spaces.
# Configure your server lists. This allows snort to only look for attacks # to systems that have a service up. Why look for HTTP attacks if you are # not running a web server? This allows quick filtering based on IP addresses # These configurations MUST follow the same configuration scheme as defined # above for $HOME_NET. # List of DNS servers on your network var DNS_SERVERS $HOME_NET # List of SMTP servers on your network var SMTP_SERVERS $HOME_NET # List of web servers on your network var HTTP_SERVERS $HOME_NET # List of sql servers on your network var SQL_SERVERS $HOME_NET # List of telnet servers on your network var TELNET_SERVERS $HOME_NET # AIM servers. AOL has a habit of adding new AIM servers, so instead of # modifying the signatures when they do, we add them to this list of # servers. var AIM_SERVERS [64.12.24.0/24,64.12.25.0/24,64.12.26.14/24,64.12.28.0/24,64.12. 29.0/24,64.12.161.0/24,64.12.163.0/24,205.188.5.0/24,205.188.9.0/24]
Set the ports that Snort will monitor for attacks by using the variables HTTP_PORTS , SHELLCODE_PORTS , ORACLE_PORTS , and AIM_SERVERS . Ports can be specified as either a single number or a port range if the upper and lower limits of the range are separated by a : . Individual port lists are not allowed, although the ! as a negation operator can be used to choose any port but a named value.
# Configure your service ports. This allows snort to look for attacks # destined to a specific application only on the ports that application # runs on. For example, if you run a web server on port 8081, set your # HTTP_PORTS variable like this: # # var HTTP_PORTS 8081 # # Port lists must either be continuous [eg 80:8080], or a single port [eg 80]. # We will adding support for a real list of ports in the future. # Ports you run web servers on var HTTP_PORTS 80 # Ports you want to look for SHELLCODE on var SHELLCODE_PORTS !80 # Ports you do oracle attacks on var ORACLE_PORTS 1521
WAIT ”WHAT ABOUT SSH PORTS, MY MYSQL SERVERS, AND SO ON?There are many ( many ) other port list values and server lists that you might feel apply to your network. Unfortunately, these values are just variables; they do not have any effect internally on Snort. It is up to the Snort rules (we're getting there!) to use the variables appropriately when sensing attacks. You can add additional variables ”such as MYSQL_SERVERS ”but you need to create your own rule files to use them. These examples apply to only the included rule files, not every possibility that could exist. |
Set the RULE_PATH variable to the path of the rules directory. For the example installation, rules is a directory at the same level as the snort.conf file, so you can use a simple relative path ( rules ) as the setting.
# Path to your rules files (this can be a relative path) var RULE_PATH rules Although Snort's primary value comes from its expandable rule base, a number of preprocessor modules and detection plug-ins make up the program and work at a lower level to detect packet modifications, such as IP fragmentation attacks and portscans, and to normalize packet contents for detection by the Snort ruleset. You should not need to change the default values for these settings. The preprocessor documentation is provided in Table 18.3 for your reference. Please refer to snort.conf for additional information on their use and logged values.
| Some of the preprocessor modules are commented out because they are either experimental or perform the same functions as other modules. You do not, for example, want to enable both the portscan and portscan2 modules. |
################################################### # Step #2: Configure preprocessors # # General configuration for preprocessors is of # the form # preprocessor <name_of_processor>: <configuration_options>
Table 18.3. Snort Modules
| Preprocessor | Enabled? | Description |
|---|---|---|
| frag2 | yes | This preprocessor performs IP defragmentation. This plug-in also detects people launching fragmentation attacks (usually DoS) against hosts . No arguments loads the default configuration of the preprocessor, which is a 60-second timeout and a 4MB fragment buffer. |
| stream4 | yes | Use in concert with the -z [allest] command-line switch to defeat Stick/Snot attacks against TCP rules. Also performs full TCP stream reassembly, stateful inspection of TCP streams, and so on. Can statefully detect various portscan types, fingerprinting, ECN, and so on. |
| http_decode | yes | http_decode normalizes HTTP requests from remote machines by converting any %XX character substitutions to their ASCII equivalents. This is very useful for doing things such as defeating hostile attackers trying to stealth themselves from IDSs by mixing these substitutions in with the request. Specify the port numbers you want it to analyze as arguments. |
| rpc_decode | yes | RPC may be sent in alternate encodings in addition to the usual 4-byte encoding that is used by default. This preprocessor normalizes RPC traffic in much the same way as the http_decode preprocessor. This plug-in takes the ports numbers on which RPC services are running as arguments. |
bo | yes | Detects Back Orifice traffic on the network. This preprocessor uses the Back Orifice "encryption" algorithm to search for traffic conforming to the Back Orifice protocol (not BO2K). This preprocessor can take two arguments. The first is -nobrute , which turns off the plug-in's brute forcing routine (brute forces the key space of the protocol to find BO traffic). The second argument that can be passed to the routine is a number to use as the default key to decrypt the traffic. The default value is 31337 (just like BO). Be aware that turning on the brute forcing option runs the risk of impacting the overall performance of Snort, so you've been warned |
| telnet_decode | yes | This preprocessor "normalizes" Telnet negotiation strings from Telnet and FTP traffic. It works in much the same way as the http_decode preprocessor, searching for traffic that breaks up the normal data stream of a protocol and replacing it with a normalized representation of that traffic so that the "content" pattern-matching keyword can work without requiring modifications. This preprocessor requires no arguments. |
| portscan | no | portscan preprocessor by Patrick Mullen <p_mullen@linuxrc.net> . This preprocessor detects UDP packets or TCP SYN packets going to four different ports in less than three seconds. "Stealth" TCP packets are always detected, regardless of these settings. |
| portscan-ignorehosts | no | Use portscan-ignorehosts to ignore TCP, SYN, and UDP " scans " from specific networks or hosts to reduce false alerts. It is typical to see many false alerts from DNS servers, so you may want to add your DNS servers here. You can add multiple hosts/networks in a whitespace-delimited list. |
| arpspoof | no | Experimental ARP detection code from Jeff Nathan, detects ARP attacks, unicast ARP requests, and specific ARP mapping monitoring. To make use of this preprocessor you must specify the IP and hardware address of hosts on the same layer 2 segment as you. Specify one host IP MAC combo per line. Also takes a -unicast option to turn on unicast ARP request detection. |
| asn1_decode | yes | This is an experimental preprocessor. This preprocessor detects abuses of the ASN.1 protocol on which higher-level protocols (such as SSL, SNMP, x.509, and so on) rely. |
| fnord | no | This is an experimental preprocessor. This preprocessor watches traffic for polymorphic NOP-type sleds to defeat tools such as ADMutate. |
| conversation | yes | This preprocessor tracks conversations for TCP, UDP, and ICMP traffic. It is a prerequisite for running portscan2. |
| portscan2 | yes | Detect portscans in a new and exciting way. |
| perfmonitor | no | Provides performance stats for Snort. |
Next, you can choose how Snort logs alerts. By default, it uses the /var/log/snort directory that you've already seen. However, there are a few other options that you might want to use instead.
The first option is to output to a syslog daemon. Syslog handles almost all the critical logging for your computer. (See Chapter 19 for more information on configuring syslog ). Use the output alert_syslog <syslog facilities> to enable syslog logging:
#################################################################### # Step #3: Configure output plugins # # Uncomment and configure the output plugins you decide to use. # General configuration for output plugins is of the form: # # output <name_of_plugin>: <configuration_options> # # alert_syslog: log alerts to syslog # ---------------------------------- # Use one or more syslog facilities as arguments # # output alert_syslog: LOG_AUTH LOG_ALERT
Another option is to dump logged packets in tcpdump 's binary format by using the directive output log_tcpdump: <log file name> . For more information on tcpdump , see Chapter 7.
# log_tcpdump: log packets in binary tcpdump format # ------------------------------------------------- # The only argument is the output file name. # # output log_tcpdump: tcpdump.log
One of the more interesting and useful log methods is logging to a database server, such as MySQL. To use a database output option, you must have built support into Snort when it was being compiled. (The sample compilation of Snort provided in this chapter included MySQL support.) Information can be output to the database by the Snort alert or log facilities. As mentioned earlier, an alert is the notification of a Snort event, whereas a log is a logging of the packet that generated the event. This is a particularly annoying and confusing area of Snort configuration because what one would expect isn't necessarily reality. The most important thing to remember is that not all alerts are subsequently logged. To capture all data, use the alert facility with MySQL. Using log will work, but does not capture events such as portscans, which do not use the Snort log facility.
Before you can use Snort with MySQL, you must first configure a MySQL database to hold the information. Assuming you have a MySQL installation, create a new empty database (such as snortdb ) and a username and password that can access that database.
Next, load the database schema contained in the contrib /create_mysql file in the Snort source distribution with the syntax: mysql -u <username> -p <password> -h <host with MySQL database server> <snort database name> < <path to create_mysql> . You do not need to include the -h <host..> switch unless your MySQL server is on another machine:
$ mysql -ujray -pnopasshere snortdb < /Users/jray/snort/contrib/create_mysql Finally, use output database: alert, mysql, user= <mysql username> password= <mysql password> dbname=< snort database> host =<mysql hostname> to turn on logging in Snort:
# database: log to a variety of databases # --------------------------------------- # See the README.database file for more information about configuring # and using this plugin. # output database: alert, mysql, user=jray password=nopasshere dbname=snortdb host=localhost The full documentation on the Snort database scheme can be found at http://www.andrew.cmu.edu/~rdanyliw/snort/snortdb/snortdb.html.
Next, the snort.conf file includes two additional configuration files that define how attacks are classified and how references are provided to the different attack types. The contents of these files, which we'll see shortly, ( /usr/local/etc/snort/classification.config and /usr/local/etc/snort/reference.config ) could be included in the main configuration file, but are left separate for ease of management.
# # Include classification & priority settings # include classification.config # # Include reference systems # include reference.config
Finally, Snort includes the rule files necessary to fingerprint the hundreds of possible attacks against your system. Each rule file is included from /etc/snort/rules and provides protection against specific types of attacks (for example, ftp.rules protects against FTP attacks, and so on). A number of rule files are commented out, such as policy.rules and virus.rules , that will need to be updated for your particular network setting; otherwise you may end up logging information that is of no value to your particular situation. We'll take a look at the anatomy of a rule file directly.
#################################################################### # Step #4: Customize your rule set # # Up to date snort rules are available at http://www.snort.org # # The snort web site has documentation about how to write your own # custom snort rules. # # The rules included with this distribution generate alerts based on # on suspicious activity. Depending on your network environment, your # security policies, and what you consider to be suspicious, some of # these rules may either generate false positives or may be detecting # activity you consider to be acceptable; therefore, you are # encouraged to comment out rules that are not applicable in your # environment. # # Note that using all of the rules at the same time may lead to # serious packet loss on slower machines. YMMV, use with caution, # standard disclaimers apply. :) # # The following individuals contributed many of rules in this # distribution. # # Credits: # Ron Gula <rgula@securitywizards.com> of Network Security Wizards # Max Vision <vision@whitehats.com> # Martin Markgraf <martin@mail.du.gtn.com> # Fyodor Yarochkin <fygrave@tigerteam.net> # Nick Rogness <nick@rapidnet.com> # Jim Forster <jforster@rapidnet.com> # Scott McIntyre <scott@whoi.edu> # Tom Vandepoel <Tom.Vandepoel@ubizen.com> # Brian Caswell <bmc@snort.org> # Zeno <admin@cgisecurity.com> # Ryan Russell <ryan@securityfocus.com> # #========================================= # Include all relevant rulesets here # # shellcode, policy, info, backdoor, and virus rulesets are # disabled by default. These require tuning and maintance. # Please read the included specific file for more information. #========================================= include $RULE_PATH/bad-traffic.rules include $RULE_PATH/exploit.rules include $RULE_PATH/scan.rules include $RULE_PATH/finger.rules include $RULE_PATH/ftp.rules include $RULE_PATH/telnet.rules include $RULE_PATH/rpc.rules include $RULE_PATH/rservices.rules include $RULE_PATH/dos.rules include $RULE_PATH/ddos.rules include $RULE_PATH/dns.rules include $RULE_PATH/tftp.rules include $RULE_PATH/web-cgi.rules include $RULE_PATH/web-coldfusion.rules include $RULE_PATH/web-iis.rules include $RULE_PATH/web-frontpage.rules include $RULE_PATH/web-misc.rules include $RULE_PATH/web-client.rules include $RULE_PATH/web-php.rules include $RULE_PATH/sql.rules include $RULE_PATH/x11.rules include $RULE_PATH/icmp.rules include $RULE_PATH/netbios.rules include $RULE_PATH/misc.rules include $RULE_PATH/attack-responses.rules include $RULE_PATH/oracle.rules include $RULE_PATH/mysql.rules include $RULE_PATH/snmp.rules include $RULE_PATH/smtp.rules include $RULE_PATH/imap.rules include $RULE_PATH/pop3.rules include $RULE_PATH/nntp.rules include $RULE_PATH/other-ids.rules # include $RULE_PATH/web-attacks.rules # include $RULE_PATH/backdoor.rules # include $RULE_PATH/shellcode.rules # include $RULE_PATH/policy.rules # include $RULE_PATH/porn.rules # include $RULE_PATH/info.rules # include $RULE_PATH/icmp-info.rules # include $RULE_PATH/virus.rules # include $RULE_PATH/chat.rules # include $RULE_PATH/multimedia.rules # include $RULE_PATH/p2p.rules include $RULE_PATH/experimental.rules include $RULE_PATH/local.rules
Alert Classification and Priority
Each alert that is generated is given a classification and priority based on information in the rule that triggered the alert. For example, the stealth portscan triggered the following alert:
[**] [1:469:1] ICMP PING NMAP [**] [Classification: Attempted Information Leak] [Priority: 2]
Here the classification is "Attempted Information Leak" with a priority of 2. Classifications and priorities are generated so that administrators and reporting software can better react to a given event; Snort does not handle them internally.
The classifications/priorities for the Snort rules included in the source distribution you've installed are stored in the file /usr/local/etc/snort/classification.config . Each line of the file consists of a shortname (single word) for the classification, a description, and a priority.
For example, the "Attempted Information Leak" alert was classified and prioritized by the following line:
config classification: attempted-recon,Attempted Information Leak,2
The rule that triggered the event classified it as attempted-recon . This was subsequently expanded to Attempted Information Leak and prioritized to level 2 by the classification.config line. In some cases, you may see alerts that have a priority level that does not match the assigned value in the classifications file. Priorities can be overridden by any rule if the rule explicitly states a priority level for the attack. Again, these are relatively arbitrary values and are provided for your benefit, not to change Snort's functionality.
You can create your own classifications and priority levels by simply adding config classification lines to any of the Snort configuration files (although classification.config makes the most sense). Existing rules can be modified to use the new classifications (via the classification's shortname) or new rules can be created for your own specific class of attack signatures.
Alert References
In addition to containing a classification shortname (which subsequently maps to a classification description and priority), rules can also contain a reference field, which, in turn, maps to an online reference for a given exploit. Earlier in the chapter you saw the included mappings in Table 18.1. The file /usr/local/etc/snort/reference.config contains lines of the format config reference <reference system> <reference URL> . For example, the arachNIDS online reference is denoted as
config reference: arachNIDS http://www.whitehats.com/info/IDS
If you are generating an extensive network policy of do's and don'ts, you may want to write your own ruleset and online database of policies. Your rules could subsequently map to an online reference of the policy that was broken.
As with the classifications, this is a mechanism that is provided for the benefit of the administrator. References are not included with all rules, and, given the coverage of the included references, it is unlikely that you'll ever need to add any of your own. If you happen to write a new rule that matches a known attack, you can simply use the existing reference mappings, such as CVE, which we've attempted to use for exploit references throughout the book.
Snort rules
The Snort rule files contain the "guts" of what makes Snort, Snort. Each rule defines a pattern against which incoming network traffic is compared, and if a match is found, an alert is generated. Rules follow the basic structure:
<alert log> <protocol> <source address/network> <source port> <direction> <destination address/network> <destination port> ( <pattern> <output options> <classification options> )
Although most of these values are self-explanatory (and those that aren't will be examined shortly), the direction operator can be a bit confusing. It can be either -> , indicating that the source is sending data to the destination, or <> , in which case the rule will match traffic for the listed networks/ports heading either to or from the source or destination.
For example, the Papa Worm detection signature (found in rules/virus.rules ) looks like this (with line numbers added):
1: alert tcp any 110 -> any any ( 2: msg:"Virus - Possible Papa Worm"; 3: content: "filename=\"XPASS.XLS\""; 4: nocase; 5: reference:MCAFEE,10145; 6: sid:745; 7: classtype:misc-activity; 8: rev:3; 9: )
NOTEIn most cases, rules are written on a single line. Here, the Papa Worm rule has been broken into multiple lines for clarity. Either format works fine in Snort. |
Line 1 indicates that an alert will be generated if the rule matches. (Alternatively, log could be used to send the event information directly to the log facility.) The network traffic that is examined is TCP-based traffic from port 110 (POP3) on any server to any other machine on any network (that is, any POP3 client retrieving mail from a local or remote network). The variables, such as HOME_NET , EXTERNAL_NET , and so on, may be used directly in the rule definitions to eliminate the hardcoding of addresses if specific network information is to be used. Variables must be prefixed by $ (for example, $HOME_NET ) when used in a rule.
On line 2, the msg keyword provides the alert message that will be generated if there is a match ”in this case Virus - Possible Papa Worm .
Line 3 defines what the rule is looking for. In this case, it's examining the content of the packet for filename=XPASS.XLS , a string that is common to all Papa Worm attacks.
Line 4 tells Snort that the preceding content match should not be casesensitive.
Line 5 consists of a reference followed by the reference name and ID and is used to include online attack reference information in the logs. For example, here the reference is MCAFEE,10145 which, using the file reference.config , can be mapped to the online URL: http://vil.nai.com/vil/content/v_10145 ”an online description of the Papa Worm virus.
Line 6 defines a unique signature ID for the rule.
Line 7 classifies the rule as the shortname misc-activity . This is later expanded through the mappings in classification.config to the classification Misc Activity with a priority of 3 .
Line 8 denotes that this is the third revision of the rule.
Snort rules can be as complex or as simple as you want. Those experienced with the TCP/IP can match against packet headers, RPC traffic, and so on. A full guide to creating Snort rules is available at http://www.snort.org/docs/writing_rules/chap2.html#tth_chAp2. Documentation of existing rules can be found at http://www.snort.org/snort-db/.
CAUTIONSnort rules are not infallible. In fact, the Papa Worm definition given here does not monitor mail traffic over port 143 ”IMAP. Alerts are generated only if the content match is made over a POP3 connection. To match IMAP content, a second rule could be added that monitors port 143 traffic. Unfortunately, both rules would fail if the traffic is encrypted. |
As a Snort user, your first priority should be finding the rules that apply to your network and disabling the rest. There are a number of misc-activity rules, such as the icmp.rules , that will invariably trigger alerts on an active (and healthy ) network. Run Snort on your network for a day or two, making note of the alerts that have accumulated and which warrant attention. Remove the rules that aren't being used, or are generating false positives. Alternatively, alter the source and destination parameters of the rules so that they are not generated by your own network traffic. I, for example, have replaced the source address (hardcoded to any in most rules) to $EXTERNAL_NET to help cut down on false positives.
TIPSnort rules are not static; they are updated on a continuing basis to reflect the latest network vulnerabilities. Keep your rules up to date by downloading the latest versions from http://www.snort.org/dl/rules/. |
Blocking Attacks with Guardian
Out of the box, Snort is capable of watching your network and reporting on what it sees. It does not, however (without an experimental plug-in), do anything about potential alerts. If you'd like to block hosts that have generated alerts, you can use the Guardian software, included in the Snort distribution. Written in Perl for Linux, Guardian watches the Snort /var/log/snort/alerts file and blocks hosts that have generated alerts. To use the software, you need to have Snort running in a stable and predictable manner, and you'll also have to make a few changes to the Guardian script.
Go to the contrib directory of your Snort distribution, look for the file Guardian.tar.gz , unarchive, and enter its directory:
# tar zxf Guardian.tar.gz # cd Guardian
Next, edit the Guardian.pl file and search for the line that reads
system ("/sbin/ipchains -A input -s $source -i $interface -j DENY"); Change it to
system ("/sbin/ipfw add 1 deny all from $source/32 to any"); Next, search for
if (/inet addr:(\d+\.\d+\.\d+\.\d+)/) { and modify it to read
if (/inet (\d+\.\d+\.\d+\.\d+)/) { Save your changes, then open the guardian.conf file and set the variables so that they match your system configuration. In this example file, I'm using en0 as my network interface and a HostGatewayByte of 1 (meaning that my gateway address is the same as my IP address, except the last octet is ".1"). Enter the remainder of the values exactly as shown. You'll see some references to ipchains ”the Linux firewall software. Don't pay any attention to it.
# The machine's IP address that is visable to the internet # If this is left undefined, then guardian will attempt to get the information # from ifconfig, as long as it has an interface to use. This would be usefull # for people on ppp links, or dhcp machines, or if you are lazy :) # HostIpAddr # Here we define the interface which we will use to guess the IP address, and # block incoming offending packets. This is the only option that is required # for guardian to run. If the rest are undefined, guardian will use the default. Interface en0 # The last octet of the ip address, which gives us the gateway address. HostGatewayByte 1 # Guardian's log file LogFile /var/log/guardian.log # Snort's alert file AlertFile /var/log/snort/alert # The list of ip addresses to ignore IgnoreFile /usr/local/etc/guardian.ignore # The path to ipchains ipchainsPath /sbin/ipfw
Next, create the Guardian logfile with touch /var/log/guardian.log . You can also create a list of hosts that will never be blocked (one IP address per line) in the file /usr/local/etc/guardian.ignore . It's a good idea to place your servers/DNS/gateways/etc in this list so they aren't inadvertently blocked by a false positive reading.
Finally, copy Guardian.pl and guardian.conf to logical locations on your drive, such as /usr/local/bin and /usr/local/etc , respectively:
# cp Guardian.pl /usr/local/bin # cp guardian.conf /usr/local/etc
You can now start Guardian from the command line with /usr/local/bin/Guardian.pl -c /usr/local/etc/guardian.conf :
# /usr/local/bin/Guardian.pl -c /usr/local/etc/guardian.conf Warning! HostIpAddr is undefined! Attempting to guess.. Got it.. your HostIpAddr is 10.0.1.101 My ip address and interface are: 10.0.1.101 en1 Loaded 0 addresses from /usr/local/etc/guardian.ignore Becoming a daemon.. As attacks occur, they are logged to /var/log/guardian.log and automatically blocked by your Mac OS X firewall.
TIPIf you want to be alerted "visually" to an attack, you can modify Guardian.pl to include something along the lines of ` osascript -e 'display dialog "Blocking $source"'`; directly after the system line you edited in the Guardian.pl file. This will cause an Applescript dialog to be displayed with the IP address of the host being blocked. |
Snort Reporting
A number of Snort reporting tools are available for download and use on your system. These products use the Snort log files and Snort MySQL logs to generate reports on the attack signatures that are being matched, where they're coming from, and even to provide tools for tracking them. Because Snort has a number of output options, you must make sure that the reporting tool you're attempting to use supports the log style you've decided on.
One of the easiest report tools to use is Snort Report, a PHP Web-based tool that relies on the MySQL logging that was set up earlier. You can download Snort Report from http://www.circuitsmaximus.com/download.html. After downloading, unarchive and move the Snort Report directory to a Web-accessible directory on your PHP-enabled server, then enter the Snort Report distribution directory:
% curl -O http://www.circuitsmaximus.com/snortreport/snortreport-1.11.tar.gz % tar zxf snortreport-1.11.tar.gz % cd snortreport-1.11
Edit the file srconf.php . This contains the information necessary for Snort Report to find your MySQL database. Look for the lines that are similar to this:
// Put your Snort database login credentials in this section. $server = "localhost"; $user = "jray"; $pass = "nopasshere"; $dbname = "snortdb";
and change them to match the hostname, username, password, and database that you used when configuring Snort itself.
Finally, assuming you don't have GD support compiled into PHP (the Mac OS X default), skip down a few lines and change
$haveGD = TRUE;
to
$haveGD = FALSE;
NOTEIf you have GD support, you can leave this line as-is to enable a few graphs of the traffic distribution on your system. These graphs are not important to the operation of Snort Report and add little additional value beyond a "gee-whiz" factor. If you want GD support and don't have it, download a GD-enabled PHP from http://www.entrophy.ch. |
Snort Report should now be configured for use through your browser. Open Mozilla or Internet Explorer and open the URL to the alerts.php file inside the Snort Report directory. If everything has gone according to plan (and Snort has logged an alert or two), you should see something similar to that of Figure 18.2.
Figure 18.2. Snort Report provides easy-to-read access to your IDS logs.
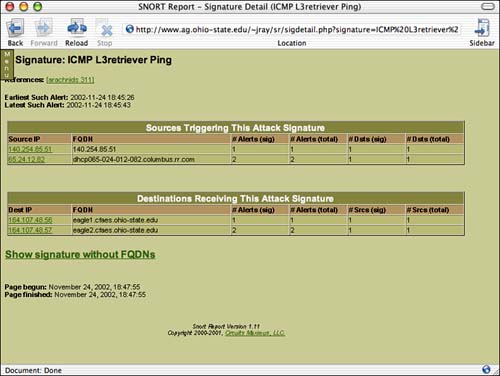
As mentioned earlier, there are a number of Snort reporting packages ”all sorts of shapes , sizes, and colors. If you find that Snort Report isn't performing as you had hoped, you may want to look into one of these other systems:
-
SnortSnarf . http://www.silicondefense.com/software/snortsnarf/index.htm
-
ACID . http://www.cert.org/kb/acid/
-
snort-rep . http://people.ee.ethz.ch/~dws/software/snort-rep/
| |
| |
| Top |
EAN: 2147483647
Pages: 158