Built-In GUI Mac OS X Firewall Tools
Starting in 10.2, Apple has provided the means necessary to configure the BSD firewall built into Mac OS X as well as deliver NAT services to an entire network, effectively creating a networkwide firewall. These tools, developed with the lowest common denominator in mind, are easy to use, but lack many of the features afforded their command-line equivalents. After seeing what's possible through the GUI, we'll take a closer look at what can be done at a command prompt.
Apple's Firewall Tool
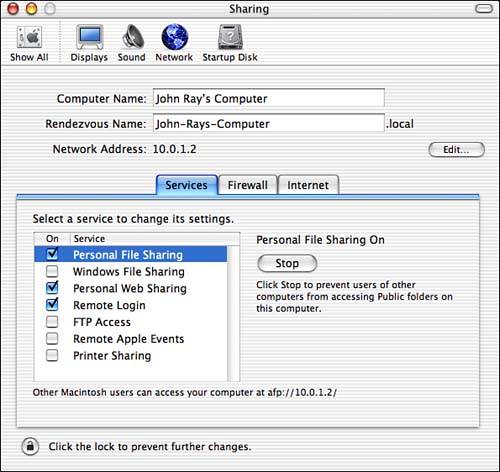
Apple has done a nice job of making a basic Mac OS X firewall simple for even the most novice users to configure. Using the Services tab of the Sharing panel in System Preferences, shown in Figure 17.1, users turn on and off network services on their computer such as file sharing, Web sharing, and so on.
Figure 17.1. The Sharing pane provides control over active network services.
In doing this, one is also setting up a simple firewall configuration that, when active, will protect everything except the active network services. For example, in Figure 17.1, three services are active. To firewall anything else that might be running on the machine, just click the Firewall tab, shown in Figure 17.2.
Figure 17.2. The firewall picks up settings from the Sharing pane.
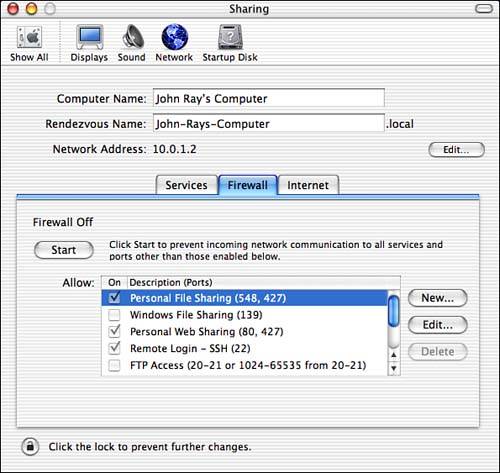
The default firewall settings are picked up from the active services. Clicking the Start button blocks all traffic to the ports that aren't listed. You cannot "uncheck" an active network service; you must first disable it at the Services tab.
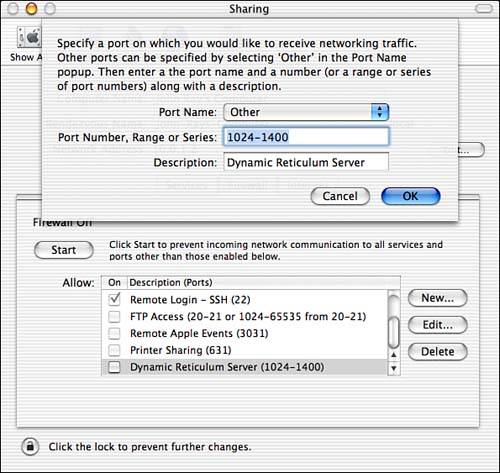
By default, there are seven services' ports that you can choose to leave open when the firewall is started (file sharing, FTP, printer sharing, and so on). You can add to these by clicking the New button to the right of the list. Choose a port name (several popular services are included by default, such as Retrospect, ICQ, and so on). Choosing Other will let you type your own service description, as shown in Figure 17.3. The description is arbitrary and used only to help you identify the settings.
Figure 17.3. Add your own open service ports.
TIPIf you have a trusted user base and specialized network services, you might want to generate a customized firewall configuration file that includes more than base Apple services. Do this by editing the XML file /Library/Preferences/com.apple.sharing.firewall. plist . The format (XML obviously) is simple to understand: Each service is defined along with the ports that it uses. Changes in this file are reflected in Apple's firewall GUI. |
After entering a description, provide a port number (for example, 1024), a range of ports (for example, 1024 “1400), or a list of port numbers (for example, 1024, 1025, 1026).
NOTENotice that the Apple firewall does not provide protocol-specific settings such as TCP/UDP ports. Only TCP ports will be blocked if you use the Apple GUI. You'll need the command line to provide additional control. |
Click OK to save the settings. You need to stop and start the firewall to enable your changes.
Network Address Translation
NAT on a Mac OS X machine can serve as a network firewall for an entire LAN of any sort of client computers (Mac, Windows, Linux, and so forth). The computer serving as the gateway will provide outgoing Internet access to the LAN side, whereas incoming connections will be rejected.
WHAT IS NAT?NAT, or Network Address Translation, provides network access to multiple machines on a private subnet through a single public network address ”this is frequently referred to as "IP Masquerading." NAT enables networks to increase in size without using valuable (and sometimes costly) public IP addresses. For more information on this technology, read RFC 1631: http://www.cis.ohio-state.edu/cgi-bin/rfc/rfc1631.html. |
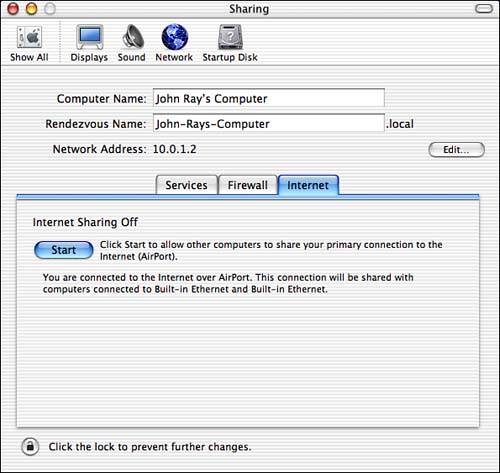
To use this feature, you need multiple network interfaces in your computer ”usually two ethernet adapters or an ethernet adapter and an AirPort card. Your Internet source should be connected and active. Open the Sharing panel in System Preferences, then click the Internet tab and then the Start button to begin sharing the connection, as shown in Figure 17.4.
Figure 17.4. Click Start to activate NAT service.
LAN-side computers should be connected to the network interface indicated in the Sharing panel. If, for example, you are sharing through an ethernet card, you need to connect a switch or hub to the ethernet port on your computer, then connect the additional client machines to the switch.
NOTEA quick refresher: Be sure to wire from your computer to a normal switch/hub port, not an uplink port. You'd be amazed how often this mistake is made when wiring computers to switches. |
Mac OS X provides DHCP service to the LAN, eliminating the need for manual configuration of the client computers. At the time of this writing, Internet Sharing could not be automatically enabled at startup. To do this, you need to script it manually.
CAUTIONThe Internet Sharing feature in the shipping version of 10.2 suffers from a somewhat serious issue: DHCP is served on both Internet and LAN interfaces, which could easily conflict with other DHCP servers on a network. This feature has been strictly forbidden on some networks. See http://www.net.princeton.edu/mac/internet-sharing-x/ for a warning published by Princeton University. |
| |
| Top |
EAN: 2147483647
Pages: 158
- Linking the IT Balanced Scorecard to the Business Objectives at a Major Canadian Financial Group
- A View on Knowledge Management: Utilizing a Balanced Scorecard Methodology for Analyzing Knowledge Metrics
- Measuring ROI in E-Commerce Applications: Analysis to Action
- Governing Information Technology Through COBIT
- Governance in IT Outsourcing Partnerships