Applying Account Security: Security
| < Day Day Up > |
Creating Multiple User Accounts: AccountsIn this section, we touch on some of the basics involved in user account creation. First we will take a look at the multi-user system nature of Mac OS X, and then we will look at adding a user, setting user limitations, enabling fast user switching, understanding administrative user capabilities, and removing users. Introduction to Multiuser SystemsMac OS X is a Unix-based operating system. As such, it's a multiuser operating system; that is, everyone who uses the machine may do so by having an account on the machine. A user can use his account on the machine either at the console or via a network connection if you choose to enable remote login from the sharing pane of System Preferences, which we discuss in further detail in Chapter 21, "Accessing and Controlling Tiger Remotely." A particularly nice feature of a multiuser system is that multiple users can use the machine at the same time. While each user is using the system, it seems to each user as if he's the only user on the system. Each user has a home directory where he stores his files. In Mac OS X, the users' home directories are located in the /Users directory. Figure 8.1 shows the /Users directory on a sample Mac OS X client. Figure 8.1. You can get to the /Users directory by clicking on your OS X drive in your finder view and opening the Users folder.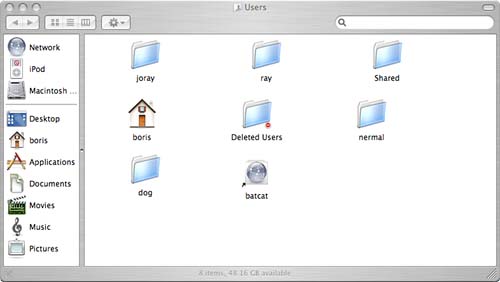
When a user logs in to the system, the default area where he is logged in is his home directory; hence, the use of the house as an icon in the Finder window. Additionally, you see the same icon in Figure 8.1 among the user directories. Users can still see most areas on the machine, although they might not necessarily be able to see all of another user's files. In a multiuser system, users can set permissions on their files to allow different types of access. Even if other users can see your files, they can't modify them unless you've set permissions to allow them to do so. For example, Figure 8.2 shows how the home directory for user nermal looks to another user. A number of folders have a white minus in a red circle on them. Directories so marked aren't viewable by this user. The other files and directories, however, can be viewed by this user. Figure 8.2. Depending on how the owner grants permissions on his files and directories, other users might not be able to view them.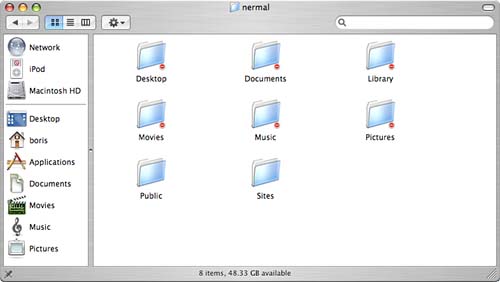 Adding a New UserWhen you install Mac OS X, you're asked to provide your name and a short name that can be used as your login name. During the installation process, you create an account. Specifically, you create an administrator account. Adding another user account is much like creating the original administrator account that you create at installation time. Because it can be used to modify the machine settings or install software, the administrator account is a rather powerful account. When you add a new user, you have the choice of adding a regular user or adding one with administrator capabilities. Although it's helpful to have more than one user with administrator capabilities, don't give administrator access to every user account that you create. Otherwise, every user on the machine can modify your system. You create a new user account using the Accounts pane in the System section of System Preferences as follows:
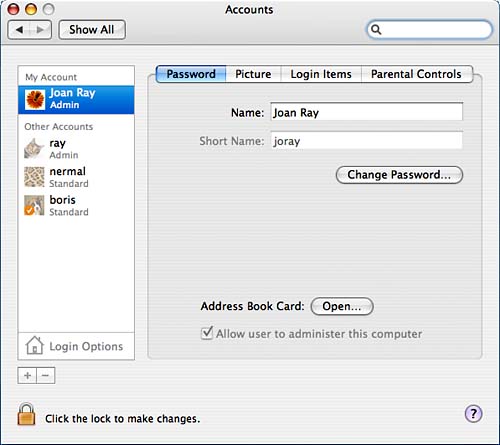
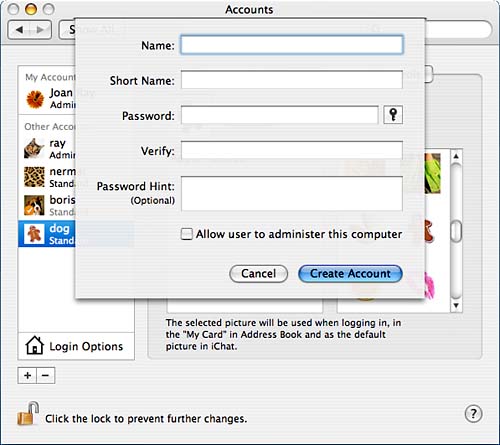
The first section for adding a new user, the Password section, shown in Figure 8.4, has the following fields:
Figure 8.4. Complete the fields in this sheet to start to create a new user.
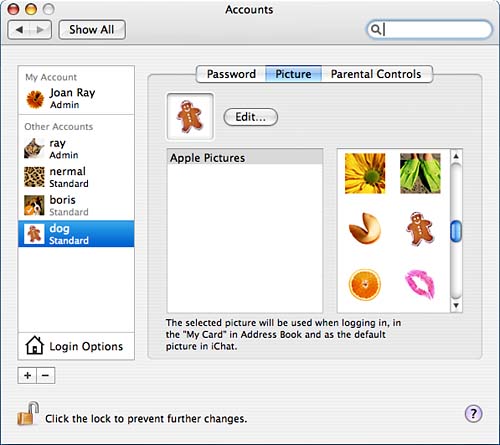
When you have entered the information for the new user, the pane returns to the Password section, where you can now see the name and short name of your new user. Here you can also reset the password and choose to allow this user to administer the computer. Continue to the next section, Picture. When you complete the Password section and continue to another section, your new user's identification as shown in the left column is updated to include the user's name. In Chapter 20, "Configuring Advanced Multiuser/Multisystem Cooperation Features," you learn how to create a specific user called software with a specific user ID and group ID. The Picture section, shown in Figure 8.5, is where you select a picture for the new user. This picture is used in the login window, in the My Card in the Address Book, and as the default iChat picture. Either select one of the default images, choose a custom picture elsewhere on your machine, or choose to take a video snapshot by selecting Edit. Figure 8.5. Select a picture for the new user in the Picture section.
Setting User LimitationsFor standard users, there is quite an extensive set of user limitations that you can apply. They are available under the Parental Controls section of the Accounts pane, shown in Figure 8.6. The categories to which you can apply user limitations are Mail, Finder & System, iChat, Safari, and Dictionary. After you've applied some limitations, the description for the user in the left side changes from Standard to Managed. Figure 8.6. Set user limitations in the Parental Controls section.
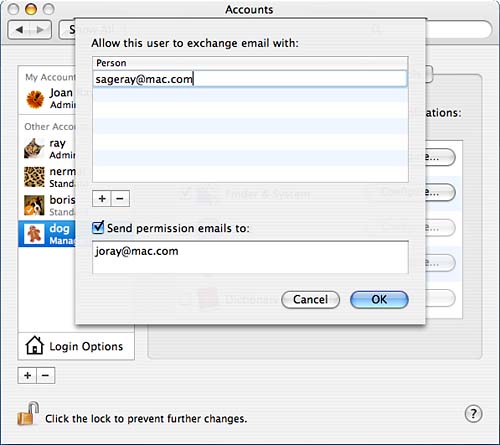
Under the Mail category, shown in Figure 8.7, you list which email addresses are acceptable for this user to communicate with, and you have the option of having permission emails emailed to a specified address. Figure 8.7. List acceptable email addresses to which the user can communicate.
The Finder & System category, shown in Figure 8.8, is similar to the Limitations section of Mac OS X 10.3. In this section you set the user to Some Limits or Simple Finder. Some Limits, shown in Figure 8.8, enables you to specify whether the user can open all of System Preferences, modify the Dock, change his password (this becomes available if you choose to allow the user to open all system preferences), burn CDs and DVDs, administer printers, or allow supporting programs. Additionally, the user can be restricted to use only certain applications. The Simple Finder option restricts the user to a simplified dock and allows him to use only those applications showing in the My Applications folder in the Dock. Figure 8.9 shows a sample desktop for a user who has been restricted to the Simple Finder. Figure 8.8. The Finder & System category of limitations.
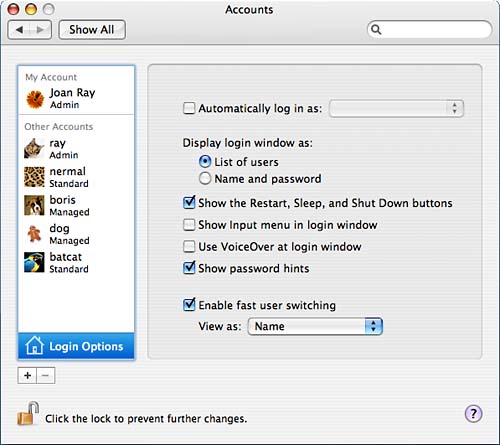
Figure 8.9. Desktop of a user restricted to the Simple Finder.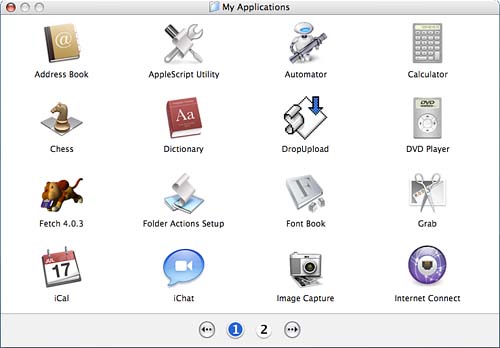 Under the iChat category, you list acceptable names and AIM addresses that the user may communicate with. The interface for this category looks much like that for the Mail category. If you turn on the Safari limitation, the pane tells you to log in as the user to add acceptable Safari sites that the user may visit. Log in as that user and browse the acceptable sites. Safari will ask for your administrator username and password when you visit the sites. By default, though, some sites, such as Apple's, CNN's, and eBay's are considered acceptable. If you select the Dictionary category, the Configure changes to Info, which tells you that the user is prevented from viewing certain words, such as profanity. Enabling Fast User Switching and Other Login OptionsUnder the Login Options section of the Accounts pane, shown in Figure 8.10, you can choose to enable fast user switching. Fast user switching allows multiple users to be logged in to the console at the same time. This can be particularly useful in a family environment because it allows everyone to be able to use the computer at the console, even if someone is logged in but not there. When you enable fast user switching, you can choose to have the users for the machine displayed by name, short name, or icon. When fast user switching is enabled, the menu bar includes, in whatever way you specified, a login window menu item. Both in the pull-down menu and the login window of the machine, users who are logged in are shown with a checkmark. Users who are logged in are also shown with a checkmark in the Accounts pane. You cannot make changes for users who are currently logged in at the console. Figure 8.10. Fast user switching can be enabled under the Login Options section as well as the behavior of the login window.
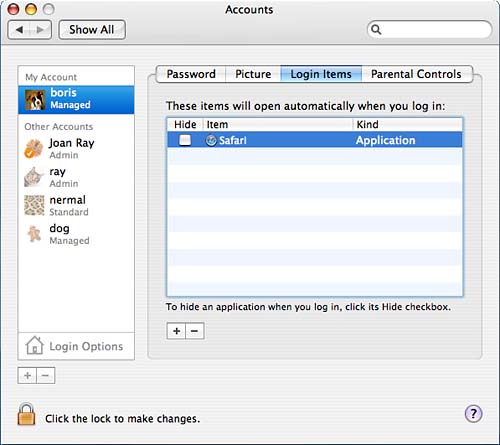
There are some drawbacks to fast user switching. You might experience some resource conflicts. For example, one user could be using the digital camera, so the other users will not be able to access the digital camera during that time. Additionally, some applications might not let multiple users at the console use them. In addition to enabling fast user switching, you can specify who to automatically log in as, or you can disable automatic login. This option is not recommended if your machine is truly serving as a multiuser machine because anyone can easily modify the automatically logged-in account without having to know anything about the username or password for the account. You can also select whether the login window displays a list of users or displays just the name and password fields to be filled in by the user when she logs in. In this section, you can choose to hide the Sleep, Restart, and Shut Down buttons. If your machine is serving as a multiuser machine, especially in a public location, this option is recommended. This provides you a little more control over the machine's uptime, but does not prevent anyone from turning the machine off at the power button. Additionally, you can specify whether to use the Input menu at login, use VoiceOver at login, or to show password hints. The Show Input Menu at Login option shows the keyboard section of the Input menu. The Input menu was covered in Chapter 6, "Printer, Fax, and Font Management." We will cover VoiceOver later in this chapter. If you choose to show password hints, a user who has a password hint will be shown his password hint after three unsuccessful login attempts. Note that the login window also displays the hostname. You can click on this and rotate though a series of information about the machine that includes hostname, operating system version, operating system build, serial number, and date. Login ItemsUnless a user has been denied access to the Accounts pane in one way or another, that user can access the Password and Login Items sections. When you are creating accounts, there is not a Login Items section for the different users. Each individual user has access to his own Login Items section when he is logged in. For example, the administrator has a Login Items for himself, but he cannot make those adjustments for the user whose account he is creating. Figure 8.11. Under the Login Items section, list any applications that you would like to automatically start when you log in.
Understanding Administrative User CapabilitiesThe first account that is created on your machine is an administrative account. In the Accounts pane, under the Password section, you can turn any existing user into an administrative user by checking the box to allow the user to administer the computer. It is often useful to have at least one administrative user in addition to the first administrative user, but you do not want to give administrator capabilities to all of your users. Why is this? An administrative user can do anything on your machine. Only an administrative user can adjust system settings in Security, Energy Saver, Printer & Fax, Network, Sharing, Accounts, Date & Time, Software Update, and Startup Disk. These are just some of the places where an administrator has the authority to make changes. Administrators also belong to the group called admin. Users in this group are also allowed to execute the sudo command, which allows them to run commands as root, the most powerful user on the system. More information on sudo and root is included in Chapter 20. You must trust any user to whom you give administrator access. An administrator can not only adjust your system settings and fix a broken system an administrator can also accidentally wipe out your system. Removing User AccountsTo remove a user account, open the Accounts preferences pane, unlock it, select the user whose account should be removed, and click the minus sign that appears beneath the list of users. A dialog then appears, asking how you want to handle deleting the account. You can choose to delete the account immediately, archive the account and delete it, or cancel the action. Click Delete Immediately to delete the account without saving its contents. Click OK to archive the contents of the account before deleting it. When you choose the option to archive the contents of the account, user information for the account is removed from the system, but the actual contents of the account are saved as a disk image in the /Users/Deleted Users directory. If you need to access the files that were in the account, go to that directory and mount the user's disk image. Only administrators have access to the Deleted Users folder. |


| < Day Day Up > |
EAN: 2147483647
Pages: 251