Using Tiger with MS Exchange
| < Day Day Up > |
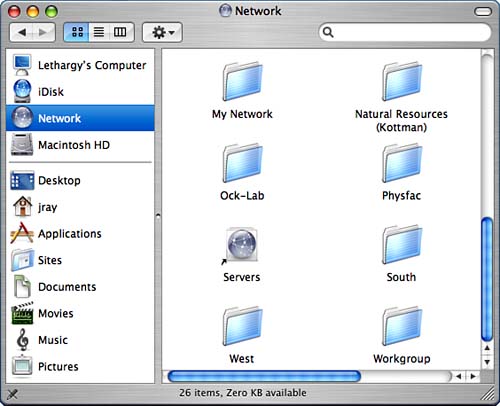
Accessing and Sharing Windows ResourcesTiger provides integrated browsing of Windows shares directly in the Finder just like any other network volume. In addition, the system enables you to serve your files and printers to Windows clients all within the Tiger GUI. These features are provided by the underlying Samba software suite, which we'll look at later in the chapter. Browsing and Mounting Windows SharesTo browse available Windows shares, open the Network level in the Finder (Go, Network, or Shift-Command-K), as shown in Figure 27.1. Windows workgroups, domains, and computers will be mixed in with Appletalk Zones, and so on. Figure 27.1 shows a number of workgroups, including Workgroup, West, and South. Figure 27.1. The Finder can browse Windows workgroups on your local network.
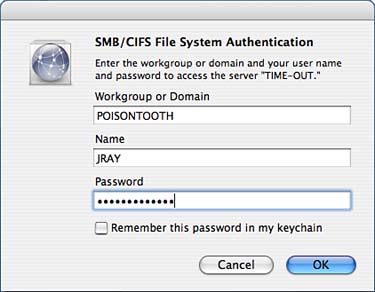
To connect to a server, double-click it within the Finder. You are prompted for login information, just like an Apple shared volume, as demonstrated in Figure 27.2. If you plan to connect to the volume in the future, you can choose to store the login information in your keychain. Mounted volumes behave just like any other network share. Figure 27.2. Log on to the Windows share.
Mounting by Name and IPIt is often easier to mount a share by its IP address or hostname than by browsing especially if the server is located on another subnet. Tiger supports connecting to Windows shares using the following naming conventions: smb://<server name or ip>/[<volume>] cifs://<server name or ip>/[<volume>] To mount a volume by name, choose Go, Connect to Server (Command-K). Enter the connection string within the Server Address field and then click Connect. If a volume name is not supplied, you are presented with a list of available shares to choose from. The connection proceeds exactly as it would if you had browsed to the server directly. Using smbtreeTo browse the Windows network from the command line, use the smbtree command, which prints a hierarchical view of the available network resources. For example, to browse the publicly visible volumes on your network, use smbtree -N: $ smbtree -N WORKGROUP \\CLIENT19 Samba 2.2.3a (build 26) \\CLIENT19\ADMIN$ IPC Service (Samba 2.2.3a (build 26)) \\CLIENT19\IPC$ IPC Service (Samba 2.2.3a (build 26)) \\CLIENT18 Mac OS X \\CLIENT18\Test_on_10.0. PT Laser \\CLIENT18\Darkness@clie Darkness \\CLIENT18\ADMIN$ IPC Service (Mac OS X) \\CLIENT18\IPC$ IPC Service (Mac OS X) POISONTOOTH \\PAINFUL Painful \\PAINFUL\C$ Default share \\PAINFUL\ADMIN$ Remote Admin \\PAINFUL\SharedDocs \\PAINFUL\IPC$ Remote IPC \\PAINFUL\Secret Stuff \\CARROT3 Mac OS X Server \\CARROT3\ADMIN$ IPC Service (Mac OS X Server) \\CARROT3\IPC$ IPC Service (Mac OS X Server) \\CARROT3\Groups macosx \\CARROT3\www.cutelittl macosx \\CARROT3\Websites macosx \\CARROT3\Users macosx \\CARROT3\Public macosx Here, the two workgroups, WORKGROUP and POISONTOOTH, are shown with two clients in each. Many of the shares shown here are default administrative shares that are normally invisible in Windows (those that end in $), so the list isn't exactly what you would see within the Mac browser. You can modify the operation of smbtree to query using a username/password, or only display machines visible by responding to broadcast requests. Table 27.1 contains the most useful of the smbtree options.
Mounting with mount_smbfsTo mount a network volume from the command line, use mount_smbfs. In its simplest form, the mount_smbfs syntax is mount_smbfs "//<server name>/<share>" <mount point>. Note that the slashes have changed direction from the output of smbtree and the direction typically used in Windows. For example, to mount the volume \\PAINFUL\Secret Stuff in the directory /tmp/ mysmbmount, use brezup:jray jray $ mount_smbfs "//PAINFUL/Secret Stuff" /tmp/mysmbmount Password: ******* A quick look at the output of the mount command displays that the mount succeeded (of course, looking in the /tmp/mysmbmount directory would do the same). brezup:jray jray $ mount /dev/disk0s11 on / (local, journaled) devfs on /dev (local) fdesc on /dev (union) <volfs> on /.vol /dev/disk0s9 on /Volumes/Laptop X2 (local, journaled) automount -nsl [315] on /Network (automounted) automount -fstab [320] on /automount/Servers (automounted) automount -static [320] on /automount/static (automounted) //JRAY@PAINFUL/SECRET STUFF on /tmp/thing (nodev, nosuid, by jray)
A common problem with using mount_smbfs in this fashion is the failure of server name resolution. If you experience any trouble finding the server, try specifying the fully qualified domain name or IP address in the connection string. Alternatively, you can provide a connection hostname using the -I command-line switch such as -I carrot3.poisontooth.com. Table 27.2 contains a list of useful switches.
Interactive File Transfers with smbclientIf you prefer to interact with your SMB servers much as you would an FTP server, the smbclient utility (part of Samba), provides an interactive client that can query and transfer files to and from a server. Unlike mount_smbfs, smbclient doesn't mount the filesystem and can be run by any user. To connect, use the syntax smbclient -U <username> "//<servername>/<share name>" <password>. For example, to connect to my local share \\carrot3\Websites with the username admin and password mypass, I'd use brezup:jray jray $ smbclient -U admin "//carrot3/Websites" mypass Domain=[POISONTOOTH] OS=[Unix] Server=[Samba 2.2.3a (build 26)] smb: \> When connected, smbclient presents the smb: \> prompt, indicating that you are located at the root level of the server (\) and it is ready to receive commands. If you've ever used command-line FTP, you'll feel at home here. For example, to list files, use ls: smb: \> ls . D 0 Sat Jul 26 03:00:29 2003 . D 0 Tue Jul 1 23:09:45 2003 .DS_Store AH 15364 Sat Jul 26 03:00:29 2003 .VolumeIcon.icns H 46531 Sat Nov 10 00:46:21 2001 calendar.poisontooth.com D 0 Mon Feb 14 00:23:14 2005 coco.shadesofinsanity.com D 0 Mon Feb 14 22:38:52 2005 html D 0 Wed Nov 7 21:39:54 2001 icbins.poisontooth.com D 0 Sun Nov 18 01:39:09 2001 julie.vujevich.com D 0 Mon Feb 14 14:37:48 2005 Network Trash Folder D 0 Mon Aug 26 14:23:01 2002 ... To enter a directory, use cd: smb: \> cd www.macosxunleashed.com smb: \www.macosxunleashed.com\> To get/put files, use (surprise) get and put: smb: \www.macosxunleashed.com\> put INSTALL.TXT putting file INSTALL.TXT as \www.macosxunleashed.com\INSTALL.TXT (4.1 kb/s) (average 4.1 kb/s) The easiest way to learn the complete smbclient syntax is to use the help function to get a list of available interactive commands and then help <command> to get detailed help for a specific command. Table 27.3 contains the most important functions you'll need to manage your files.
Using smbutil to Retrieve Server InformationAnother command-line utility that you might want to keep your eye on is smbutil. Provided by Apple, this utility promises to provide several functions, such as login, logout, and printing on SMB servers. Unfortunately, at the time of this writing, smbutil doesn't actually seem to work as described by the Apple documentation. Three functions that are working, however, are view, lookup, and status. The first lists resources shared from a named host, the second translates NetBIOS names to IP addresses, and the third translates IPs to names. The basic syntax of smbutil is smbutil <function> <name or ip>. For example, to display the shared resources on painful, use brezup:jray jray $ smbutil view //painful Password: ****** Share Type Comment ------------------------------- Secret Stuff disk IPC$ pipe Remote IPC SharedDocs disk ADMIN$ disk Remote Admin C$ disk Default share 5 shares listed from 5 available
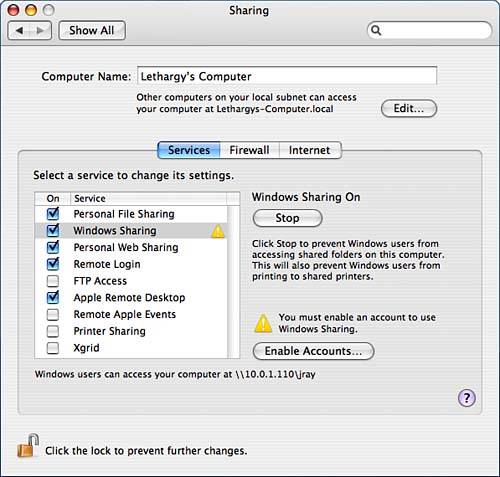
To look up the IP address associated with painful, use the lookup function: brezup:jray jray $ smbutil lookup painful Got response from 10.0.1.107 IP address of painful: 10.0.1.107 Finally, to reverse the lookup, use the view function to find a NetBIOS name given the IP address: brezup:jray jray $ smbutil status 10.0.1.107 Workgroup: POISONTOOTH Server: PAINFUL Presumably, the rest of smbutil will work as described in the man page at some point, but for now the command is only partially functional. Sharing Files and Printers to Windows SystemsTo share files and printers with a Windows system, open the Tiger preferences and click the Sharing pane. A single option Windows Sharing activates printer and folder sharing, as shown in Figure 27.3. Figure 27.3. Activate file and printer sharing then choose the accounts you want to enable.
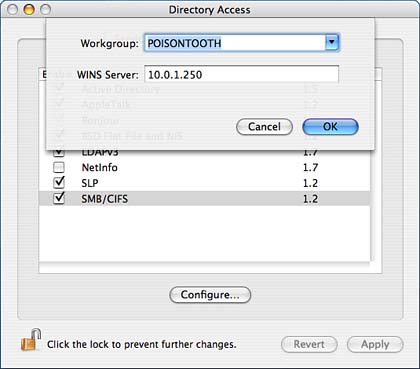
Before anyone can connect, however, you must enable the local accounts that will be given access to your system. Click the Enable Accounts button, and then click the On check box in front of each name that should be allowed to log in to Samba through SMB you will be prompted for that user's password. To work correctly with Windows clients, Tiger must store the password in a different (and less secure) manner than the default. You can disable sharing for an account at any time by reversing these steps. Click Done when you have finished configuring the accounts. When Windows Sharing is active, a message appears at the bottom of the window with the connection string that Windows users can use to access your computer. For example, in Figure 27.3, the connection string is \\client18.poisontooth.com\jray. Windows machines should also be able to browse to your computer and connect to shares and printers. You can verify that the shares are active using the smbutil command discussed previously: brezup:jray jray $ smbutil view //client18.poisontooth.com Password: ***** Share Type Comment ------------------------------- IPC$ pipe IPC Service (Mac OS X) ADMIN$ pipe IPC Service (Mac OS X) Darkness@clie printer Darkness Test_on_10.0. printer PT Laser jray disk User Home Directories 5 shares listed from 5 available In this example, the default IPC$ and ADMIN$ shares are visible, along with two printers and my home directory jray. Setting Your Workgroup and WINS ServerBy default, Tiger registers your computer in the workgroup WORKGROUP. Although this might be amusing for you, it can be annoying for Windows users who expect to find a little order on their network. To fix the problem, you can use SWAT to edit the Samba configuration (which we'll see shortly), or use the Directory Access utility (/Applications/Utilities/Directory Access) to edit it through a GUI. To change your workgroup, start the utility and authenticate, if necessary, by clicking the lock button. Next, highlight the SMB/CIFS line and click the Configure button. A dialog appears, as shown in Figure 27.4. Figure 27.4. Set your workgroup and WINS server.
Enter the name of the workgroup that you want to join and specify a WINS server that Samba should register with, if desired. Click OK to save your changes.
|
| < Day Day Up > |
EAN: 2147483647
Pages: 251