Summary
| < Day Day Up > |
Accessing Database Information Using ODBCWhile Perl's DBI/DBD data abstraction can be used in many cross-platform database scripting solutions, it isn't available outside of Perl. A more universal approach to database abstraction is ODBC (Open Database Connectivity). Starting in Mac OS X 10.2, our favorite platform once again has ODBC support built into the operating system by way of the open source iODBC (Independent Open Database Connectivity) software. Before you get excited (or start scratching your head wondering what this is), let's answer a few of the obvious questions. First, what is ODBC? ODBC is a programming API that allows developers to interact with many different types of databases without having to create custom code for each system. Each database is made accessible by downloading and installing a driver, which plugs into an ODBC manager and hides the details of the server from the programmer and user. There are numerous alternatives to ODBC such as JDBC (Java), Apple's own Enterprise Objects Framework, and Perl's DBI module, which you just read about. So, with all these different APIs, each doing something similar, why do we need ODBC? ODBC is (one of) Microsoft's standards for database connectivity. It is widely used on the Windows platform and is an accepted developer standard. Is it better than the other options? Nope but that hasn't stopped other software supported by a monopolistic company from becoming the standard. The Tiger-included iODBC software is a free implementation of the ODBC standard (http://www.iodbc.org). What can we do with Tiger's ODBC support? To be honest, at the time of this writing, the answer is "not much" unless you're a programmer. Keep in mind that ODBC is a developer standard for interacting with databases. If developers haven't created applications that use ODBC, users can't do very much with it. ODBC is typically used by software on the Windows platform to allow users to insert live database data into documents. Unfortunately, the support isn't even remotely as pervasive in Tiger. Although this is slowly improving in end-user applications such as FileMaker and Microsoft Office, it isn't nearly as widespread as we might like. To start using the ODBC productively, you must first install a driver for the database server you want to access. This driver will handle the protocols necessary to talk to the database and subsequently allow iODBC and applications that use it to interact with the server. You'll usually install a driver in one of two ways: either using a point-and-click installer or by compiling your own. Installing a Prepackaged Driver: MyODBCIf you're lucky, the ODBC driver you need to use will have a GUI installer and a user-friendly configuration tool. Thankfully, this is the case with MyODBC, the official ODBC driver for the MySQL database. To download MyODBC, visit http://dev.mysql.com/downloads/connector/odbc/. To install a packaged driver, double-click the installation package. You will be led through the install process just as with any other Mac application, as demonstrated in Figure 19.5. When the installation finishes, the installed driver might present a GUI for configuring an initial connection to a particular database. If you aren't ready to set the connection up yet, quit out of the setup. We'll look more at this step in later in the "Defining a Data Source Name" section later in this chapter. Figure 19.5. Some drivers come in prepackaged installers.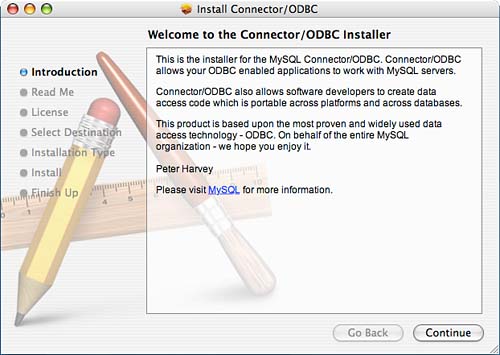
To verify that the driver has installed correctly, open the ODBC Administrator utility and click to the Drivers button. Your display should resemble Figure 19.6. We will discuss more about the operation of ODBC Administrator later in this chapter. Figure 19.6. Use the Drivers pane within the ODBC Administrator to verify that the driver installed correctly. Not all driver packages will install the same way, but the end result should be the same: a new driver entry in ODBC Administrator. If you don't see this entry, consult the driver documentation.
Building iODBC Drivers from ScratchVery few packaged drivers are available for Tiger, and many that are available cost money. For those who have to squeeze every penny out of their IT budgets, there are free solutions that can be built without spending a dime. Most drivers require you to manually compile them, and, before you can do that, you'll need to fix your iODBC installation. Apple, although including iODBC in the system, neglected to include the header files required to compile iODBC-compatible drivers. So, our first step is to retrieve and install the iODBC header files. The good news is that you'll have to do this only once. First, download the iODBC Manager source code from http://www.iodbc.org and unarchive it. Next, cd into the source distribution and run ./configure to set up the software. We're not going to compile it, but running configure is necessary to create one of the header files: brezup:jray libiodbc-3.52.1 $ ./configure checking for a BSD-compatible install.. /usr/bin/install -c checking whether build environment is sane.. yes checking for gawk.. no checking for mawk.. no checking for nawk.. no checking for awk.. awk ... Finally, we need to create a directory for the header files (/usr/local/include/iodbc) and copy the contents of the source distribution's include folder to that location. To do this, issue these commands from inside the iODBC source distribution directory: brezup:jray libiodbc-3.52.1 $ sudo mkdir /usr/local/include/iodbc brezup:jray libiodbc-3.52.1 $ cd include brezup:jray include $ sudo cp *.h /usr/local/include/iodbc Now you're ready to compile iODBC drivers. Just make sure that the iODBC headers are in the include path during compilation. Compiling an iODBC Driver for Microsoft SQL ServerA MySQL driver is great for connecting to MySQL, but much of the corporate world relies on Microsoft SQL Server as the database server of choice. As you might guess, there is no Microsoft-supplied ODBC driver for connecting to its products. Thankfully, an open source project named FreeTDS (Tabular Data Stream) provides this functionality remarkably easily on Tiger. To build a Microsoft SQL Server compatible driver, you must first download the latest release from http://www.freetds.org/, which offers both nightly snapshots and stable builds. Currently, only the 0.64 nightly snapshots will build cleanly, so download the nightly snapshot. After unarchiving the source distribution, cd into the directory and use /configure to prepare the software for compilation: brezup:jray freetds-current $ ./configure ./configure checking for a BSD-compatible install... /usr/bin/install -c checking whether build environment is sane... yes checking for gawk... no checking for mawk... no checking for nawk... no checking for awk... awk ... Next, compile using make, and then install with sudo make install: brezup:jray freetds-current $ make Making all in include make all-am echo '#define FREETDS_SYSCONFDIR "/usr/local/etc"' >freetds_sysconfdir.h Making all in src Making all in replacements if /bin/sh ../../libtool --mode=compile gcc -DHAVE_CONFIG_H -I. -I. -I../../include -I../../include -D_FREETDS_LIBRARY_SOURCE -DIODBC -D_REENTRANT Once finished, your FreeTDS ODBC driver is located at /usr/local/lib/libtdsodbc.so. This new driver must be configured in ODBC Administrator before it can be used. Let's find out how that happens now. Managing Drivers and Data Sources: ODBC AdministratorThe command-line interface to iODBC is not user friendly. With the benefits of ODBC support coming to GUI applications, it's unreasonable to think that end users will be opening a command prompt to install and manage database connections. Apple has provided a simple GUI ODBC manager (path: /Applications/Utilities/ODBC Administrator) that enables mere mortals to create and edit connections. ODBC Administrator works (and looks) like Microsoft's ODBC Data Sources control panel, so if you've used ODBC on Windows, you might experience deja vu. If not, a few terms will be helpful to understand going forward:
Manually Adding a Driver to ODBC AdministratorThere are two ways to add drivers to the ODBC Administrator: either through the GUI, or by editing the appropriate configuration file. Because both methods are simple, let's quickly review each. The iODBC configuration files consist of /Library/ODBC/odbcinst.ini, which contains the installed system drivers, and /Library/ODBC/odbc.ini, containing the installed system data source names. The user-level versions of these files are stored in ~/Library/ODBC/odbcinst.ini and ~/Library/ODBC/odbc.ini, respectively. Keep in mind the using the system-level /Library/ODBC files results in a systemwide configuration whereas the user level files are accessible to your account only.
To add an ODBC driver to the system, edit the file /Library/ODBC/odbcinst.ini and add the lines that follow this pattern: [ODBC Drivers] <Driver Name> = Installed [<Driver Name>] Driver = <path to driver file> The first section [ODBC Drivers] is simply a list of each driver installed on the system. The driver name is arbitrary but should describe what is installed. For each driver listed under [ODBC Drivers], there should be a corresponding section named identically to the driver name, that contains a Driver = line set to the location of the installed driver file. There could be additional options that can be set here (see the individual driver instructions for details), but for most cases, this is sufficient. For example, to add the FreeTDS driver, use: [ODBC Drivers] FreeTDS = Installed [FreeTDS] Driver = /usr/local/lib/libtdsodbc.so An odbcinst.ini file that includes both the FreeTDS driver and the MyODBC driver would look like this: [ODBC Drivers] MySQL ODBC 3.51 Driver = Installed FreeTDS = Installed [MySQL ODBC 3.51 Driver] Driver = /usr/lib/libmyodbc3.bundle Setup = /usr/lib/libmyodbc3S.bundle [FreeTDS] Driver = /usr/local/lib/libtdsodbc.so After editing the file, start ODBC Administrator and click the Drivers button. You should see the drivers listed, as shown in Figure 19.7. Figure 19.7. The Drivers button lists the installed drivers.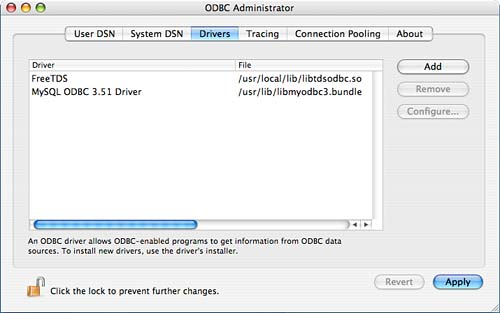 If you prefer a more graphical approach to adding the driver, you can avoid editing files altogether by using the Drivers button and the Add button to configure a driver within the Administrator. First, click Add to display a dialog box where you can specify a description of the driver, the location of the ODBC driver file, and a setup file if one is provided with the driver such as with MyODBC. The setup file is a GUI wizard that is run to help set up connections to specific databases. Next, choose whether it will be available as a User or System driver. Finally, use the Add and Remove buttons within the sheet enable driver-specific variables to be set. Figure 19.8 shows a properly filled-out Add window for adding the FreeTDS driver to ODBC Administrator. Figure 19.8. Use the Add button to add driver files within the ODBC Administrator GUI.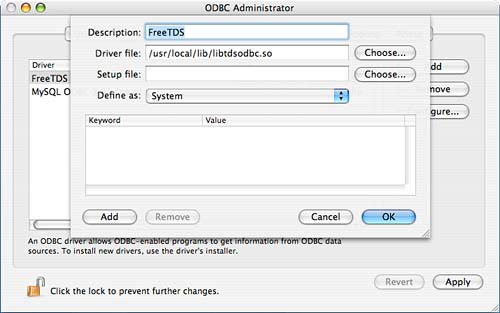
After a driver has been added, you can change its configuration at any time by highlighting the name in the list and clicking the Configure button. Drivers can be removed altogether by clicking Remove. Defining a Data Source NameRegardless of whether you're using an ODBC driver that installed itself via a GUI interface or a driver that you've added manually to an odbcinst.ini file, there's still one more step before you can actively use the driver defining a data source name. User data source names and system data source names function identically it's just a matter of what users have access to them. System DSNs can be accessed by anyone on the machine, whereas user DSNs are limited to the account that installed them. To define a DSN, click the appropriate DSN button at the top of the ODBC Administrator window. For test purposes, use the User DSN button. Next, click the Add button. You will be presented with a list of the drivers available on your system, as demonstrated in Figure 19.9. Figure 19.9. Choose the ODBC driver you want to use to make a connection.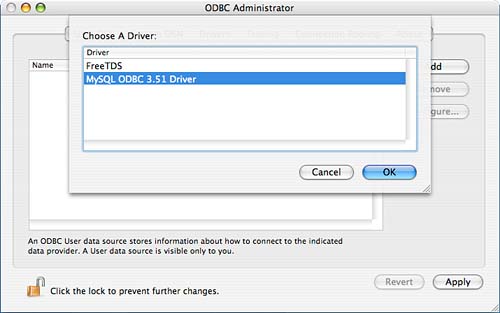
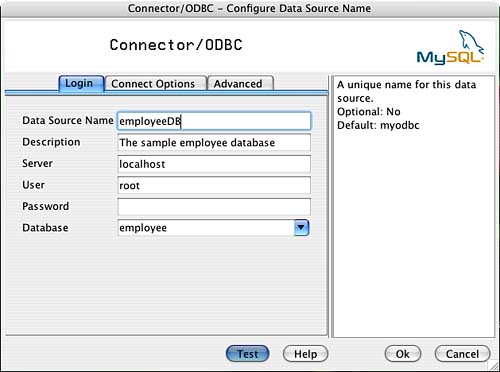
After you've chosen the driver, one of two things happens. If your driver includes an automated setup tool, such as the MyODBC drivers, you are taken to a GUI setup wizard; otherwise, you are presented with a generic setup screen. Check with your driver installation instructions to properly complete the setup. In the case of the MyODBC drivers, use the Login tab to configure your connection, as shown in Figure 19.10. Figure 19.10. The MyODBC data source setup is handled through a GUI.
Choose a DSN, such as employeeDB for the database we created in this chapter. The hostname should be set to the computer running the database server or localhost if it is on the same computer as the ODBC driver. Provide a username and password by which to connect to the database server, and choose the database (such as employee) itself. This is all highly dependent on who packaged the driver, so what works with one ODBC driver might not work with another. Unlike MyODBC, the FreeTDS drivers do not include a setup utility, so they must be configured manually. Drivers such as this show a generic setup screen, similar to that in Figure 19.11. Figure 19.11. Drivers without GUI setup wizards must be configured by hand.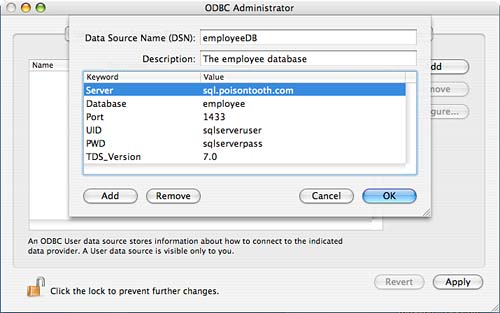 Use the DSN field to provide a DSN employeeDB, for our example database. In the Description field, provide a brief description of what the DSN will do. Next, use the Add and Remove buttons to add and remove keywords and values that will be used to define the connection (we'll review these next). Click OK to save the DSN definition. After a DSN has been added (regardless of the means), it can be reconfigured by clicking the Configure button, or removed entirely by clicking the Remove button. MyODBC DSN ConfigurationEach ODBC driver can (and does) implement different keywords for configuration. You should always check the driver documentation for the settings it supports. Even though MyODBC has a convenient setup utility, it also is easy to configure manually using these keywords:
FreeTDS DSN ConfigurationThe settings for FreeTDS are similar, but not identical to MyODBC. Use the following keywords and the appropriate values to define a Microsoft SQL Server connection:
Testing and Querying the DSNTo test and query a configured DSN, you can either use an ODBC-enabled application or the command-line iodbctest utility. To use iodbctest to connect to a user DSN, simply invoke it at a command prompt: brezup:jray jray $ iodbctest iODBC Demonstration program This program shows an interactive SQL processor Driver Manager: 03.51.0001.0908 Enter ODBC connect string (? shows list): Press ? to display a list of the defined DSNs: Enter ODBC connect string (? shows list): ? DSN | Description --------------------------------------------------------------- employeeDB | MyODBC Enter ODBC connect string (? shows list): Finally, type DSN=<DSN> to connect to a listed DSN: Enter ODBC connect string (? shows list): DSN=employeeDB Driver: 03.51.0001.0908 SQL>
If the driver has been configured successfully, you'll arrive at an SQL> prompt where you can issue SQL commands to the database server. This works just like the mysql client application we used earlier: SQL> select * from tblemployee; employeeID|firstname|lastname|titleID|salary ----------+---------+--------+-------+--------- 1 |John |Ray |1 |25300.7 2 |Will |Ray |1 |32100.2 3 |Joan |Ray |1 |55300.8 4 |Robyn |Ness |2 |35000.2 5 |Anne |Groves |2 |35000.6 6 |Julie |Vujevich |2 |30300 7 |Jack |Derifaj |1 |12000 8 |Russ |Schelby |1 |24372.1 9 |Bill |Gates |3 |50000 10 |Steve |Jobs |3 |3.8e+08 result set 1 returned 10 rows. After verifying that the connection works and value results are returned, exit odbctest by typing exit: SQL> exit Have a nice day. You now have a completely functional ODBC driver and DSN defined. Any software compatible with iODBC should recognize and work with the DSN.
Advanced ODBC Administrator SettingsTwo additional buttons in ODBC Administrator can be used to debug or fine-tune your database connections. The first button, Tracing, is shown in Figure 19.12. Figure 19.12. Enable tracing to debug connection problems.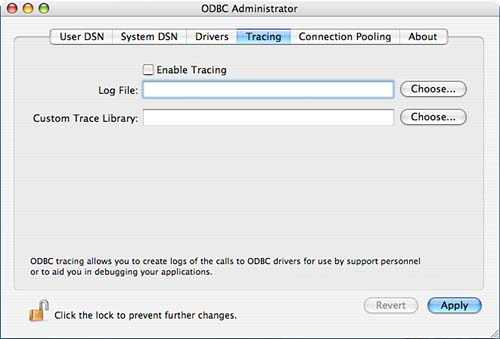 If you are having problems connecting to your database server, you can enable tracing and choose a log file to hold the trace information. The trace file contains all information sent between the driver and the database server, enabling you to pinpoint where the failure is occurring.
The second button, Connection Pooling, makes it possible for you to enable pooling for individual drivers. If a driver is pooled, it attempts to reuse open connections instead of relocating connection resources each time they are requested. To enable pooling, authenticate with ODBC Administrator and then enter a timeout value in the Pool Timeout field. This is the length of time that a pooled connection exists before it is released. |
| < Day Day Up > |
EAN: 2147483647
Pages: 251