Accessing Database Information Using Perl
| < Day Day Up > |
Creating and Working with a MySQL DatabaseThe key to using MySQL is an understanding of the SQL syntax itself. If you've used Oracle or another SQL-based system, you'll be right at home interacting with MySQL. For beginners, this introduction should be enough to get started, but we recommend a more complete text such as MySQL, 2nd Edition (ISBN: 0-7357-1212-3). To start MySQL, invoke the client (mysql) using mysql -u<username> -p<password>. To start, only the root account is available. If you didn't set the password for root, no password is required.
Creating and Deleting DatabasesThe first step when working with MySQL is to create the database itself. If you've worked with FileMaker Pro or AppleWorks, this is a very different concept. In MySQL, a database is a container that holds a collection of tables. These tables, in turn, hold actual information. The FileMaker database model has a single table in a single database. To create relationships between different collections of data requires multiple databases. In MySQL, a single database can contain multiple tables each with unique data. To create a database, make sure that you've started MySQL and are at a command prompt: brezup:jray jray $ /usr/local/mysql/bin/mysql -uroot -pjohn Welcome to the MySQL monitor. Commands end with ; or \g. Your MySQL connection id is 1 to server version: 4.1.7-standard Type 'help;' or '\h' for help. Type '\c' to clear the buffer. mysql> Next, use create database <database name> to set up an empty database. Finally, type use <database name> to start working with the new database.
For example, let's start with an employee database: mysql> create database employee; Query OK, 1 row affected (0.07 sec) mysql> use employee; Database changed mysql> If you want to delete the database that you've defined, you can use the drop command, which works just like the create command: drop database <database name>
Creating TablesAfter a database has been created, you need to set up the internal tables that actually hold the data you want to store. When making a table, use another create command to tell the system what type of data you want to store. create table <tablename> (<columns...>) For example, let's create some tables for our employee database: create table tblemployee ( employeeID int not null, firstname varchar(50), lastname varchar(50), titleID int, salary float, primary key (employeeID) ); create table tbljobclassification ( titleID int not null, title text, minsalary float, maxsalary float, primary key (titleID) ); The first table, tblemployee, holds information about each person in the database, such as his name and salary. The second table, tbljobclassification, contains job classification data a general position description, and the minimum and maximum salary ranges for that position.
Fields are defined within a table creation statement by using the syntax <fieldname> <datatype> <options>. Two common options are employed to force certain conditions on a table field:
The final line of a table creation command should define a primary key (or keys) for the table: primary key (<fieldname 1,fieldname 2,...>). Defining keys is a necessary part of creating a normalized database structure. For more information on normalization, see http://www.devshed.com/c/a/MySQL/An-Introduction-to-Database-Normalization. We highly recommend reading through this tutorial, at the very least, before designing large-scale database models. To remove a table that has been defined, type drop table <table name>. MySQL Data TypesWhen defining a database table, numerous data types are used to build the collection of information that can be stored. Table 19.1 contains a description of the common available data types. This is a summarized version of the documentation supplied at http://dev.mysql.com/.
Inserting Records into a TableThere are two ways to insert data into a table; both use the insert command with this structure: insert into <table name> [(<field1,field2,...>)] values (<'value1','value2',...>) The difference between the methods comes from the optional field listing. If you want to insert into only a few fields of a table, and want to manually specify the order, you would include the field names, as in this example using the tblemployee table created earlier: insert into tblemployee (lastname,firstname,employeeID) values ('Ray','John','1'); In this example, only the lastname, firstname, and employeeID fields are given in the record, and they don't occur in the same order in which they were defined in the original table. The second way you can use insert is to provide all the field values at once, in the table definition order. This method doesn't require the field names to be listed: insert into tblemployee values ('1','John','Ray','1','35000.00'); It is important to note that you must obey the not null clause for a table definition at all times. In these examples, we had to include a value for the employeeID field; otherwise, the insert would have caused an error message to be generated. To demonstrate the rest of the MySQL syntax, you'll need some data to work with. Go ahead and insert some information into the tables: insert into tbljobclassification values ('1','Programmer/Analyst','20000','80000'); insert into tbljobclassification values ('2','Web Developer','20000','50000'); insert into tbljobclassification values ('3','CEO/President','40000','5000000000'); insert into tblemployee values ('1','John','Ray','1','25300.65'); insert into tblemployee values ('2','Will','Ray','1','32100.25'); insert into tblemployee values ('3','Joan','Ray','1','55300.75'); insert into tblemployee values ('4','Robyn','Ness','2','35000.20'); insert into tblemployee values ('5','Anne','Groves','2','35000.65'); insert into tblemployee values ('6','Julie','Vujevich','2','30300.01'); insert into tblemployee values ('7','Jack','Derifaj','1','12000.00'); insert into tblemployee values ('8','Russ','Schelby','1','24372.12'); insert into tblemployee values ('9','Bill','Gates','3','50000.01'); insert into tblemployee values ('10','Steve','Jobs','3','380000000.00'); These statements add three different job classifications (Programmer/Analyst, Web Developer, and CEO/President) to the system, as well as 10 employees who fall under these classifications. After your database has been populated, you can update or delete individual records using the commands update, delete, and replace into.
Modifying Records in a TableObviously, data in a database must be able to change; otherwise, it would be useful for only a short period of time or for limited applications. There are three types of modification that can be made: updating data already in a table, deleting a record outright, or completely replacing a record with new data. Updating Existing RecordsTo change existing data, use the update command: update <table name> SET <field name 1>=<expression 1>, <field name 2>=<expression 2>,<field name n>=<expression n> [WHERE <search expression>] To use update, you must supply a table name as well as the names of the fields that need to be updated and the new values that they should take on. This leaves one important part of the equation missing: the search expression. If you don't tell update which fields to modify, it modifies all the tables. For example, issuing the command update tblemployee set salary='3000'; modifies every listed employee so that the salary field contains '3000'. If this is the desired action, great! If not, you're likely to be smacking your forehead when you discover what you've done. To be a bit more selective about the update, you must define the WHERE search expression. This selects only the records that you want to update. For example, assume that we want to set the salary for employeeID 1 to equal 30000.99. The update statement would look like this: update tblemployee set salary='30000.99' where employeeID='1'; This update statement searches the table for a field where employeeID is equal to 1 and then updates the value in that record's salary field. In addition to =, there are a number of common ways to select a record based on comparing a field to a value; that is, you can select records by creating an expression that evaluates to true or false. Table 19.2 shows some of the most common expression operators and syntax.
These basic expressions can be combined to form more complex searches:
Check the MySQL documentation for further information on available mathematical expressions, string comparisons, and other operators that can be used in expression syntax. Deleting Records from a TableTo delete data from a MySQL system, you use a command similar to update but without supplying new field values: delete from <table name> [WHERE <search expression>] As with the update command, you can leave out the WHERE portion of the statement entirely. Unfortunately, the result would be the elimination of all data from the named table. Again, if this is your intention, by all means use it! For example, to delete employees who make more than $50,000 from the database, you would enter delete from tblemployee where salary>'50000'; Replacing Existing RecordsThere is one final way to conveniently replace existing records with new data. Using the INSERT command to try to save a record more than once when one already exists will result in an error. This happens because only one record with a given primary key can exist at a time. For example, assuming that we've filled the database with the following employee record: insert into tblemployee values ('1','John','Ray','1','25300.65'); attempting to insert another record using the same employee ID (1) causes an error: mysql> insert into tblemployee values ('1','Maddy','Green','1','41000.00'); ERROR 1062: Duplicate entry '1' for key 1 To circumvent this, you could update the existing record; or delete the record and then rerun the insert; or use the replace into command. replace replaces an existing record with new data or, if no record exists, simply inserts a record. Think of replace as a more powerful version of the basic insert command. It can be used to add new records to a table or replace existing records with new data. The syntax is identical to insert. For example, let's retry the insert into the tblemployee table this time using replace: mysql> replace into tblemployee values ('1','Maddy','Green','1','41000.00'); Query OK, 2 rows affected (0.00 sec) Success!
Querying a DatabaseAfter you've added data to the tables in a database, you would obviously want to display it. Querying a MySQL database is performed with the select statement. The power of relational databases comes from the capability to relate data in one table to that of another, and select can do just that: select <field name1>,<field name2>,.. from <table name 1>,<table name 2>,.. [where <search expression>] [ORDER BY <expression> ASC|DESC] If this isn't confusing for you, fantastic. If you're like the rest of us, however, some explanation is necessary. The simplest query that select can perform is to pull all the data out of a single table (select * from <table name>). For example: mysql> select * from tbljobclassification; +---------+--------------------+-----------+-----------+ | titleID | title | minsalary | maxsalary | +---------+--------------------+-----------+-----------+ | 1 | Programmer/Analyst | 20000 | 80000 | | 2 | Web Developer | 20000 | 50000 | | 3 | CEO/President | 40000 | 5e+09 | +---------+--------------------+-----------+-----------+ 3 rows in set (0.00 sec) Changing Result OrderTo sort the information based on one of the fields, use order by with an expression (often one or more comma-separated field names), and asc for ascending order or desc for descending order: mysql> select * from tbljobclassification order by maxsalary desc; +---------+--------------------+-----------+-----------+ | titleID | title | minsalary | maxsalary | +---------+--------------------+-----------+-----------+ | 3 | CEO/President | 40000 | 5e+09 | | 1 | Programmer/Analyst | 20000 | 80000 | | 2 | Web Developer | 20000 | 50000 | +---------+--------------------+-----------+-----------+ In this example, the tbljobclassification table is displayed, and the records are sorted by the maximum salary in descending order (most to least). Obviously, this is great for getting data out of a single table and manipulating its order, but it still doesn't draw on the relational power of MySQL. Joining Multiple TablesTo fully exploit MySQL's capabilities, relationships must be created and used. A relationship links two or more tables based on a common attribute. For example, the tblemployee and tbljobclassification tables share a titleID field. Each employee record has a titleID field that can be used to relate to the tbljobclassification table. The process of relating tables together is called a join. To see a join in action, let's take a look at how you would display a list of each employee's name, along with his or her job title. The select statement looks like this: select firstname,lastname,title from tblemployee,tbljobclassification WHERE tblemployee.titleID=tbljobclassification.titleID; Translating this query into English is simple: Select the firstname, lastname, and title fields (select firstname,lastname,title) from the tblemployee and tblj obclassification database tables (from tblemployee,tbljobclassification). Relate the two tables by matching the titleID field in tblemployee to the titleID field in tbljobclassification (WHERE tblemployee.titleID=tbljobclassification.titleID). The result is a neat display of the employees and their corresponding job titles: mysql> select firstname,lastname,title from tblemployee,tbljobclassification WHERE tblemployee.titleID=tbljobclassification.titleID; +-----------+----------+------------------- + | firstname | lastname | title | +-----------+----------+------------------- + | Maddy | Green | Programmer/Analyst | | Will | Ray | Programmer/Analyst | | Joan | Ray | Programmer/Analyst | | Jack | Derifaj | Programmer/Analyst | | Russ | Schelby | Programmer/Analyst | | Robyn | Ness | Web Developer | | Anne | Groves | Web Developer | | Julie | Vujevich | Web Developer | | Bill | Gates | CEO/President | | Steve | Jobs | CEO/President | +-----------+----------+--------------------+ 10 rows in set (0.03 sec)
A select statement can be combined with the WHERE search expressions that you've already seen in this chapter. For example, the last query can be modified to show only the employees who earn more than $50,000: select firstname,lastname,title,salary from tblemployee,tbljobclassification WHERE tblemployee.titleID=tbljobclassification.titleID AND tblemployee.salary>'50000'; For example: mysql> select firstname,lastname,title,salary from tblemployee,tbljobclassification WHERE tblemployee.titleID=tbljobclassification.titleID AND tblemployee.salary>'50000'; +-----------+----------+--------------------+---------+ | firstname | lastname | title | salary | +-----------+----------+--------------------+---------+ | Joan | Ray | Programmer/Analyst | 55300.8 | | Bill | Gates | CEO/President | 50000 | | Steve | Jobs | CEO/President | 3.8e+08 | +-----------+----------+--------------------+--------- + 3 rows in set (0.00 sec) Of course, expressions can be combined with other expressions to create truly complex queries. Performing Calculations Within ResultsUsing built-in MySQL functions, you can create virtual fields that contain data calculated as the query is performed. The syntax for an inline calculation is <expression> as '<variable name>' For example, the expression required to calculate the percentage of the maximum salary that each person makes could be represented by tblemployee.salary/tbljobclassification.maxsalary*100 as 'percent' Adding this code into a query of all the employee names and salaries results in mysql> select firstname,lastname,salary,tblemployee. salary/tbljobclassification.maxsalary*100 as 'percent' from tblemployee,tbljobclassification where tblemployee.titleID=tbljobclassification.titleID; +-----------+----------+---------+-------------------+ | firstname | lastname | salary | percent | +-----------+----------+---------+-------------------+ | Maddy | Green | 41000 | 51.25 | | Will | Ray | 32100.2 | 40.1253125 | | Joan | Ray | 55300.8 | 69.1259375 | | Jack | Derifaj | 12000 | 15 | | Russ | Schelby | 24372.1 | 30.465148925781 | | Robyn | Ness | 35000.2 | 70.0003984375 | | Anne | Groves | 35000.6 | 70.001296875 | | Julie | Vujevich | 30300 | 60.60001953125 | | Bill | Gates | 50000 | 0.001000000234375 | | Steve | Jobs | 3.8e+08 | 7.6 | +-----------+----------+---------+-------------------+ 10 rows in set (0.01 sec) Suddenly, the database has provided information that didn't even exist previously! Using these methods, you can use the MySQL database engine to perform much of the mathematical work of database applications, leaving the logic to other programming languages.
Using Summarization and Grouping FeaturesSummarizing data is another useful part of any query. Using the summarization functions, you can easily find totals for numeric columns, or count the number of records of a particular type. Here are a few summarization functions that can be used in a query:
For example, you could find the minimum salary of all the employees by typing mysql> select min(salary) from tblemployee; +-------------+ | min(salary) | +-------------+ | 12000 | +-------------+ 1 row in set (0.01 sec) Or a count of the occurrences of the titleID field: mysql> select count(titleID) from tblemployee; +----------------+ | count(titleID) | +----------------+ | 10 | +----------------+ 1 row in set (0.00 sec) This second example obviously isn't very useful all it did was return the number of times the titleID field was used that is, 10 times, once in each record. Displaying the count of each of the types of titleIDs would make more sense. This can be accomplished with one last construct the group by clause. group by organizes the data based on a field name and then makes it available to the summarization function. For example, the previous query could be modified like this: select titleID,count(titleID) from tblemployee group by (titleID); Instead of simply counting the field occurrences and reporting a result, the query groups the records by the titleID field and then counts the occurrences within each group. The output looks like this: mysql> select titleID,count(titleID) from tblemployee group by (titleID); +---------+----------------+ | titleID | count(titleID) | +---------+----------------+ | 1 | 5 | | 2 | 3 | | 3 | 2 | +---------+----------------+ 3 rows in set (0.00 sec) As with all queries, this could be turned into a join to provide information from more than one table. To show the actual job titles rather than just ID numbers, you could modify the query like this: mysql> select title,count(tblemployee.titleID) from tblemployee,tbljobclassification where tblemployee.titleID=tbljobclassification.titleID group by (tblemployee.titleID); +--------------------+----------------------------+ | title | count(tblemployee.titleID) | +--------------------+----------------------------+ | Programmer/Analyst | 5 | | Web Developer | 3 | | CEO/President | 2 | +--------------------+----------------------------+ This output should be a bit more presentable. Note that in the modified query, the extended name (table name and field name) was used to refer to the titleID field. Failure to do this would result in an ambiguity error.
Alternative Database ServersBesides MySQL, Tiger boasts several industrial-strength commercial SQL database solutions. If you're interested in pointing and clicking, take a look at these products:
Accessing MySQL Through a GUIIf you find yourself managing MySQL databases frequently, you might find that the command-line client is a less-than-appealing solution for controlling your database server. GUI clients can provide simpler access to the data and easy editing of MySQL user permissions and database schema. Two of the best clients for working with MySQL are the native Cocoa application CocoaMySQL and the PHP-based phpMyAdmin. We will take a short look at how you can install and configure these applications to start working with your MySQL server immediately. CocoaMySQLCocoaMySQL is a fast and easy way to work with databases directly from a native Tiger GUI. You can download the application for free from http://cocoamysql.sourceforge.net. When starting CocoaMySQL, it will prompt you for connection information for your database server, as seen in Figure 19.1. Enter the hostname (or localhost/127.0.0.1 for the local machine) and the username and password you created when installing the MySQL Server. If you didn't change anything, the default username is root with no password. Figure 19.1. Enter the information needed to connect to your MySQL server.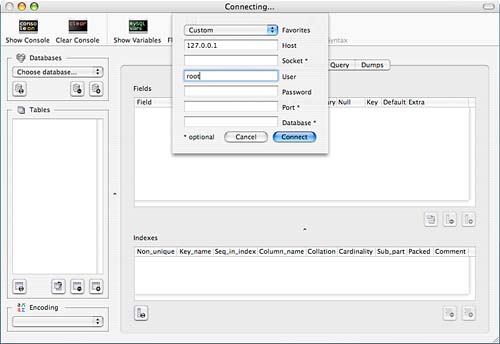 You can save the information you've entered by choosing Save To Favorites from the Favorites pop-up menu. Click Connect to connect to the MySQL Server. The CocoaMySQL interface is divided into three primary components: databases, tables, and information, as shown in Figure 19.2. Figure 19.2. The CocoaMySQL Windows provides quick access to all the data stored in MySQL.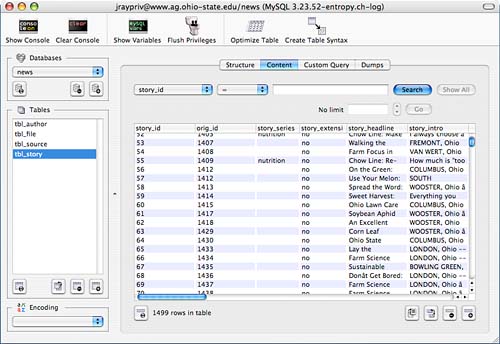 Use the pop-up menu in the Databases area to select a database to work with. The Tables list will refresh to display all the tables in the chosen database. Selecting a table will display information about the choice in the main viewing area to the right. The Structure, Content, and Custom Query buttons can be used to edit and display the field definitions for the table, the data stored in the table, and create custom SQL queries, respectively. The buttons below each of the areas can be used to refresh the display, duplicate the selected resources, and delete (drop) or add a new database, table, or record. Most anything you would commonly need to do from the MySQL command line can be managed within CocoaMySQL. If you find that you would like additional control, however, (such as editing user accounts), a better solution might be phpMyAdmin. phpMyAdminThe phpMyAdmin application works through your web browser to provide access to just about every feature MySQL has to offer. To use phpMyAdmin, you must have access to a PHP server or have enabled PHP on your Tiger computer. The instructions to do this are located in Chapter 23, "Creating a Web Server." Start by downloading the latest phpMyAdmin distribution from http://www.phpmyadmin.net/home_page/. Unarchive the distribution in your PHP-enabled server, or the ~/Sites folder if you've enabled PHP on your desktop. To keep things simple, you may want to rename the distribution folder or create an Apache alias to the distribution folder; the default installation folder includes a version number and patch-level string. [www:~/public_html] jray% mv phpMyAdmin-2.6.0-pl3 phpMyAdmin Next, you'll need to set up a user account in MySQL that can read the MySQL user table this will enable phpMyAdmin's ability to authenticate users against known MySQL users. To do this, invoke the mysql client with the username and password you used to set it up, and then enter the following command. You should replace <a new password> with a password of your choice. GRANT USAGE ON mysql.* TO 'pma'@'localhost' IDENTIFIED BY '<a new password>'; GRANT SELECT ( Host, User, Select_priv, Insert_priv, Update_priv, Delete_priv, Create_priv, Drop_priv, Reload_priv, Shutdown_priv, Process_priv, File_priv, Grant_priv, References_priv, Index_priv, Alter_priv, Show_db_priv, Super_priv, Create_tmp_table_priv, Lock_tables_priv, Execute_priv, Repl_slave_priv, Repl_client_priv ) ON mysql.user TO 'pma'@'localhost'; GRANT SELECT ON mysql.db TO 'pma'@'localhost'; GRANT SELECT ON mysql.host TO 'pma'@'localhost'; GRANT SELECT (Host, Db, User, Table_name, Table_priv, Column_priv) ON mysql.tables_priv TO 'pma'@'localhost'; This creates a new MySQL user, pma, with the password you've chosen. Finally, you'll need to edit the phpMyAdmin file config.inc.php to make a few configuration changes. Search for the following lines: $cfg['Servers'][$i]['host'] = 'localhost'; // MySQL hostname or IP address $cfg['Servers'][$i]['port'] = ''; // MySQL port - leave blank for default port $cfg['Servers'][$i]['socket'] = ''; // Path to the socket - leave blank for default socket $cfg['Servers'][$i]['connect_type'] = 'tcp'; // How to connect to MySQL server ('tcp' or 'socket') $cfg['Servers'][$i]['extension'] = 'mysql'; // The php MySQL extension to use ('mysql' or 'mysqli') $cfg['Servers'][$i]['compress'] = FALSE; // Use compressed protocol for the MySQL connection // (requires PHP >= 4.3.0) $cfg['Servers'][$i]['controluser'] = 'pma'; // MySQL control user settings // (this user must have read-only $cfg['Servers'][$i]['controlpass'] = '<pma password>'; // access to the "mysql/user" // and "mysql/db" tables). // The controluser is also // used for all relational // features (pmadb) $cfg['Servers'][$i]['auth_type'] = 'http'; // Authentication method (config, http or cookie based)? Edit the lines to reflect the host you are connecting to, the username and password you just set up in MySQL (pma and whatever you chose), and finally, set $cfg['Servers'][$i]['auth_type'] to http. Your phpMyAdmin installation should now be ready to go. Point your web browser at the phpMyAdmin directory on your web server, such as http://127.0.0.1/~jray/phpMyAdmin/ for the installation in my local Sites directory. You will be prompted for a username and password supply the account and password you used when you set up MySQL. If you didn't configure a username and password, the default is root with an empty password. The default phpMyAdmin page, shown in Figure 19.3, provides access to serverwide configuration, including a privileges section for managing user accounts. You can reach this screen at any time by clicking the Home icon. Figure 19.3. The phpMyAdmin Home page provides serverwide configuration options.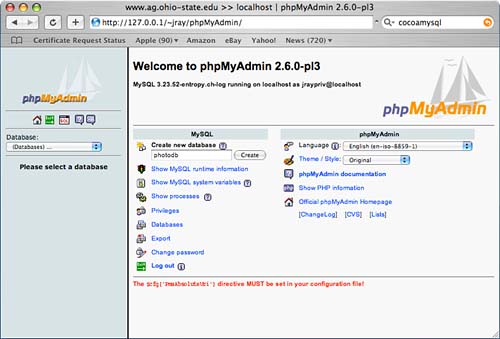 For most database-specific operations, the phpMyAdmin interface is divided into three primary areas, as shown in Figure 19.4. Figure 19.4. The phpMyAdmin interface is divided into sections for databases, tables, and overall Information.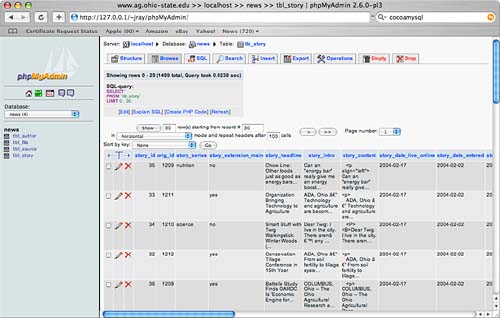 Choosing a database in the Databases area will refresh the browser to display the tables within that database. Choosing a table will, in turn, refresh to display information about the database on the right side of the screen. Use the tabs across the top of the information area to browse and edit the table contents, search the data, insert records, and more. A complete guide to using phpMyAdmin can be displayed by pointing your browser at the Documentation directory within the phpMyAdmin distribution. |
| < Day Day Up > |
EAN: 2147483647
Pages: 251