Communication Between Processes: Redirection, Pipes
| < Day Day Up > |
Using Common Process Management CommandsThere are many mechanisms for working with processes in Tiger. In this section we will cover some of the most useful tools at your disposal. Because process management and input/output control are intimately linked to the shell itself, there are some differences between how you do these things that depend on the shell you've picked. Fortunately, the capabilities of both csh and sh-type shells are similar with respect to basic process and input/output control, so the differences are mostly cosmetic. Listing Processes: psThe ps command is used for listing the process status report. This is the command-line version of the Process View utility. There are many options to ps, but you will probably find issuing ps with the a, u, and x options to be most useful (this combination produces one of the more complete and informative, yet relatively concise displays): ps -aux The following provides a sample of what to expect the output to look like: brezup:ray testing $ ps -aux USER PID %CPU %MEM VSZ RSS TT STAT STARTED TIME COMMAND williamr 483 11.4 4.2 349852 43580 ?? S 11:40PM 1:21.21 /Volumes/S williamr 451 10.2 0.5 94172 4892 ?? S 11:29PM 0:03.09 /Applicati williamr 186 0.1 1.5 66904 15228 ?? Ss 11:26PM 0:23.20 /System/Li root 82 0.0 0.1 28304 1264 ?? Ss 11:26PM 0:02.10 kextd root 104 0.0 0.2 29820 1872 ?? Ss 11:26PM 0:01.47 /usr/sbin/ root 105 0.0 0.1 27852 876 ?? Ss 11:26PM 0:00.61 /usr/sbin/ root 107 0.0 0.0 18064 104 ?? Ss 11:26PM 0:00.58 update . . . williamr 453 0.0 0.1 18648 760 std S 11:29PM 0:00.08 -bash williamr 480 0.0 0.4 29908 4000 ?? S 11:32PM 0:00.12 /System/Li williamr 484 0.0 1.1 92732 11156 ?? S 11:40PM 0:00.62 /Volumes/S root 488 0.0 0.0 18108 336 std R+ 11:44PM 0:00.00 ps -aux root 1 0.0 0.0 18080 300 ?? Ss 11:25PM 0:00.06 /sbin/init root 2 0.0 0.0 18616 200 ?? Ss 11:25PM 0:00.11 /sbin/mach root 76 0.0 0.0 18096 200 ?? Ss 11:26PM 0:00.07 /usr/sbin/ If your terminal window is narrower than the complete width of the output, it will be truncated on the right edge of your terminal. This is apparent in the previous output on most lines. If you want to see more of the command, you can add the w flag to ps, to cause it to ignore your terminal width and output 132 columns of information regardless of wrapping: brezup:ray testing $ ps -auxw USER PID %CPU %MEM VSZ RSS TT STAT STARTED TIME COMMAND williamr 483 16.0 4.5 326612 46884 ?? S 11:40PM 1:56.68_ /Volumes/Software If you have more wordy commands in deeper directories that need even more than 132 columns to display, the w flag can be specified twice (as in ps -auxww), causing ps to completely ignore column-width issues. The output from ps using these flags includes the owner of the process (USER), the process ID (PID), the percentage of the CPU (%CPU) and memory (%MEM) being consumed by the process, the virtual size of the memory space used by the program (VSZ) as well as the amount of that size that's resident in main memory (RSS), the controlling terminal (TT = ?? for no terminal), the run state of the process (STAT = R for running, S for short sleep, others), the time the process started (STARTED), the accumulated CPU time (TIME), and the command that is running (COMMAND). The output is sorted by the percentage of the CPU that's being used for each command. More display options and orderings are available with the ps command, and command options, syntax, and keyword definitions for ps are included in the command documentation table Table 12.1.
Listing Shell Child Processes: jobsThe term jobs and the term processes are frequently used interchangeably when discussing programs running on a Unix machine. But there is also a more specific meaning of jobs that has to do with processes that are run within, or by, a shell process. Unix processes have the notion of parent and child processes. For example, consider Terminal.app. If you run a shell in a terminal window (which is what you most frequently will do to get access to a shell), the running process that is that shell will be a child of Terminal.app. If you run a process in the shell, such as ls, or any other commands we discuss in this book, the process that is that command will be a child of the shell. Likewise, the shell will be the parent of the ls command run in it, and Terminal.app will be the parent of the shell. Terminal.app, in this case, is the child of the Window Server (which controls the Tiger user interface), and the Window Server is the child of /sbin/launchd. Every process in this way can trace its execution lineage back to the ancestor of all executing programs, /sbin/launchd, which will have process ID 1. Therefore, a user's jobs refers to all processes running on a machine that belong to a particular user. Shell jobs, on the other hand, refers to processes that are children of (that is, were run by) a particular running instance of a shell. The jobs command displays current processes that are children of the shell where the command is issued. This might not make much sense just yet because we haven't introduced any way for you to run a command and have it execute to completion before returning to the command prompt, but we will cover this material shortly. The jobs command gives you the ability to find out what jobs are present and what state they are in. For example, the shell shown in the following output has three jobs running in the background, and one job that is stopped: brezup:ray testing $ jobs [1] Running ./aaa.csh & [2] - Running ./bbbb.csh & [3] Running ./test.csh & [4] + Stopped ./test2.csh Stopped (tcsh uses the label Suspended instead of Stopped) jobs are jobs that are not executing for one reason or another. In this case, the suspended job was stopped with the Ctrl+Z shell key sequence (discussed shortly) and is waiting for the user to resume it, send it to the background, or kill it off. The + and - characters between the job number and the status indicate the most current job, and the previously most current job, respectively. Most current in this case means either the most recent job stopped that had been running in the foreground or the most recent job that was started into the background. The command documentation for jobs in Table 12.2 also includes information on how a job may be referenced, based on the output of jobs, for use in other job-control commands.
After you know what jobs belong to the current shell, there are several ways to construct a proper <jobspec> to refer to a job. % introduces a job name. Job number 1 is %1. An unambiguous string of characters at the beginning of the name can be used to refer to a job; the form is %<first-few-characters-of-job>. An unambiguous string of characters in the job name can also be used to refer to a job; for example, the form %?<text-string> specifies a job whose name contains <text-string>. These <jobspec> references can be used with a number of commands that interact with running processes to specify which, out of a collection of running jobs, the command needs to work with. If <jobspec> is supplied, the output is restricted to only that job. For example, assume that you have a stopped emacs job. You can match the job using just the first few characters with %ema: brezup:ray testing $ jobs %ema [1]+ Stopped emacs Alternatively, you can match based on any characters in the job name, such as %?mac: brezup:ray testing $ jobs %?mac [1]+ Stopped emacs With the -x <command> option, jobs functions as a meta-command, and rewrites, and then executes <command> such that any <jobspec> that appears in <command> or <args> is first replaced by the appropriate process ID. This gives you an easy way to use commands that want to work on process IDs with shell-job <jobspec>s. This usage is particularly useful with commands such as kill (discussed later in this chapter), which can be issued as jobs -x kill <jobspec> to execute kill against a particular job, instead of requiring the job's process ID. Output pertaining to the current job is marked with +; output from a previous job, -. %+, %, and %% refer to the current job. %- refers to the previous job.
Backgrounding Processes: bgThe bg command backgrounds a suspended job. The process continues, only in the background. The most noticeable effect for the user is the return of the command prompt. Backgrounding processes is particularly useful for commands and programs that do not produce command-line output. Although the user's prompt returns, the process continues. It does not make sense to background something like ls, which is trying to show you output to the terminal. On the other hand, backgrounding the process responsible for a long cp or compress can be very convenient. The usual method for suspending a running process is to press Ctrl+Z, which stops, but does not kill, the process. For example: brezup:ray testing $ jobs [1] - Running ./aaa.csh & [4] + Running ./test.csh & brezup:ray testing $ ./test2.csh ^Z [5] + Stopped ./test2.csh brezup:ray testing $ jobs [1] Running ./aaa.csh & [4] - Running ./test.csh & [5] + Stopped ./test2.csh brezup:ray testing $ bg [5] ./test2.csh & brezup:ray testing $ jobs [1] - Running ./aaa.csh & [4] + Running ./test.csh & [5] Running ./test2.csh & When stopped with Ctrl+Z, bash automatically lists the job you've just stopped, whereas tcsh provides the complete current list of jobs.
If there were multiple suspended jobs, I could pick which one to send to the background by the use of a job specifier <jobspec> (as defined in the discussion of the jobs command), using the syntax bg <jobspec>. Table 12.3 shows the bg command syntax.
Backgrounding Processes with &Processes can also be put in the background by using the & symbol at the end of the command line. Simply add this symbol to the end of any command line, and the resulting process will be run in the background automatically. brezup:ray testing 190$ jobs [1] - Running ./aaa.csh & [4] + Running ./test.csh & [5] Running ./test2.csh & brezup:ray testing 191$ ./bbbb.csh & [6] 691 brezup:ray testing 192$ jobs [1] - Running ./aaa.csh & [4] Running ./test.csh & [5] Running ./test2.csh & [6] + Running ./bbbb.csh & When a job is put into the background using the & suffix for a command line, it automatically prints out its job number and process ID. This syntax is also an abbreviation for the bg command as used on stopped jobs. brezup:ray testing 193$ ./ccc.csh ^Z [7] + Stopped ./ccc.csh brezup:ray testing 194$ jobs [1] Running ./aaa.csh & [4] Running ./test.csh & [5] Running ./test2.csh & [6] - Running ./bbbb.csh & [7] + Stopped ./ccc.csh brezup:ray testing 195$ %7 & [2]+ ./ccc.csh & brezup:ray testing 196$ jobs [1] Running ./aaa.csh & [4] Running ./test.csh & [5] Running ./test2.csh & [6] + Running ./bbbb.csh & [7] - Running ./ccc.csh Foregrounding Processes: fgThe command fg returns a job to the foreground, where it continues to run. The command may be either a background job or a suspended job. If you don't specify a <jobspec>, the current job (the one indicated by the + in the jobs listing) is brought to the foreground. brezup:ray testing 207$ jobs [1] - Running ./aaa.csh & [5] + Running ./test2.csh & brezup:ray testing 208$ fg %1 ./aaa.csh Table 12.4 shows the documentation for fg.
Stopping Processes, Sending Signals: kill, killallThe kill command sends a signal to a process or terminates a process. It is most commonly used in conjunction with ps, which provides the process ID of the process to which you want to send a signal. You will probably most often use this command either to terminate a process, or to send a hang up signal (HUP) to force a process to reread its configuration file. The syntax that you will probably most often use is one of the following forms: kill -9 <pid> kill -HUP <pid> In the first example, the -9 sends an explicit termination (KILL) signal to the process specified. This is a request that the operating system cause the process to stop, now, no questions asked. Unless the process is in such a state that it cannot be terminated (certain types of operations cannot be interrupted by design), it will cease to execute immediately. Effectively, this is much like pulling the power-plug for the process. In the second example, the -HUP sends a hangup signal to a process. This signal is frequently used by the operating system to indicate to programs that some other piece of software to which they've been speaking, has, so to speak, hung up the phone. Some programs interpret this as a sign that they should tidy up whatever they've been doing and then quit, whereas others have been designed to interpret HUP as an indication that they should reread their configuration files and restart themselves. You will see at least one example of this second behavior later in the book. Table 12.5 shows the command syntax and options for kill.
The killall command is similar to the kill command, except that it kills (or sends various signals to) processes by name, instead of by process ID. This can be considerably more convenient if you want to kill the execution of a command you've just run, or if you want to wipe all copies of some server running on your machine simultaneously. However, although it's usually more convenient for you to remember a command name than to look up a process number, killall is less specific than kill, in that it has no way to differentiate between multiple running copies of the same program. Instead, when you killall mail, you kill all running copies of mail owned by your user ID. If you're currently operating as root, you kill all copies of mail that anyone's running on the machine. Table 12.6 shows the command syntax and most interesting options for killall.
Listing Resource-Consuming Processes: topThe top command displays system usage statistics, particularly of those processes making the most use of system resources. Processes are displayed at one-second intervals. The top command can be useful for diagnosing unusual behavior with a process. It is worthwhile to run top from time to time so that you learn what the typical behavior for your system is. When top is displaying processes, it takes over your screen. You can quit the display by pressing the Q key. The following is a sample of what top output looks like: Processes: 49 total, 2 running, 47 sleeping.. 112 threads 22:00:10 Load Avg: 1.14, 0.96, 1.07 CPU usage: 74.8% user, 15.5% sys, 9.7% idle SharedLibs: num = 107, resident = 24.5M code, 2.80M data, 7.56M LinkEdit MemRegions: num = 3665, resident = 50.9M + 7.60M private, 69.7M shared PhysMem: 56.3M wired, 70.9M active, 132M inactive, 259M used, 764M free VM: 2.36G + 72.3M 18452(0) pageins, 0(0) pageouts PID COMMAND %CPU TIME #TH #PRTS #MREGS RPRVT RSHRD RSIZE VSIZE 990 top 3.8% 0:00.61 1 15 24 240K 428K 604K 26.9M 989 bash 0.0% 0:00.02 1 12 15 172K 880K 780K 18.2M 988 login 0.0% 0:00.05 1 12 35 140K 420K 508K 26.9M 963 pickup 0.0% 0:00.03 1 12 19 132K 512K 580K 26.9M 904 bash 0.0% 0:00.09 1 12 16 180K 880K 796K 18.2M 903 login 0.0% 0:00.05 1 12 35 140K 420K 508K 26.9M 878 sleep 0.0% 0:00.01 1 11 15 72K 340K 276K 17.6M 877 tcsh 0.0% 0:00.02 1 12 18 180K 644K 648K 22.1M 864 sleep 0.0% 0:00.00 1 11 15 72K 340K 276K 17.6M 863 tcsh 0.0% 0:00.03 1 12 18 180K 644K 648K 22.1M 848 Terminal 45.0% 0:35.40 4 70 156 1.94M+ 10.1M 7.39M+ 95.3M+ 668 lookupd 0.0% 0:01.16 2 33 55 340K 956K 1.11M 28.5M 596 Microsoft 0.7% 0:02.77 1 68 97 1.81M 7.90M 4.41M 90.5M 595 Microsoft 26.9% 24:30.31 4 89 240 25.2M 40.9M 40.5M 146M 396 Finder 0.0% 0:14.44 1 80 133 3.48M 15.2M 12.3M 112M 395 SystemUISe 0.0% 0:05.96 1 192 191 1.57M 8.48M 5.38M 93.3M Table 12.7 shows the command syntax and most interesting options for top.
TIP top, by default, often uses enough CPU time to place itself at the top of the list. A less resource-intensive means of invoking top is top -ocpu -R -F -s 2 -n30. You might want to consider aliasing this to something like ttop, with alias ttop='top -ocpu -R -F -s 2 -n30'. Automating Process Execution with cronOftentimes it isn't desirable to have to manually start processes in the Finder or at the command line. Automating repetitive tasks, after all, is one of the reasons we have computers in the first place. To this end, the crond service can be set to automatically run applications and scripts by adding entries to either a user or system crontab file. Let's start by looking at the system-level file, /etc/crontab: The default crontab file looks like this: # /etc/crontab SHELL=/bin/sh PATH=/etc:/bin:/sbin:/usr/bin:/usr/sbin HOME=/var/log # #minute hour mday month wday who command # #*/5 * * * * root /usr/libexec/atrun # # Run daily/weekly/monthly jobs. 15 3 * * * root periodic daily 30 4 * * 6 root periodic weekly 30 5 1 * * root periodic monthly At the start of the file, a handful of environment variables are set (SHELL, PATH, HOME), which are made available to the commands executing from the file. Additional environment variables can be added using the same syntax: <variable name>=<value>. One special crontab variable is the MAILTO variable, which can be set to a user account name. Output from the crontab commands (errors, and so on) is sent via email to that user's account. The body of the crontab file is laid out in seven columns, separated by spaces or tabs. These seven fields control different aspects of when a command is run:
Fields that contain an asterisk (*) indicate that the command will run whenever the other columns' values are matched. For example, assume that there is an asterisk in every column (except for the User and Command fields, obviously): * * * * * <my user> <my command> The command will be started every minute, of every hour, of every day, of every day of the week, and so on. In addition, you can set a command to run at multiple different intervals within a time period without having to use additional lines. Just use integers separated by commas to set off multiple times within one of the columns. For example, to run a command every 10 minutes, you could use 0,10,20,30,40,50 * * * * <my user> <my command> Even this, however, can be shortened to be a bit more manageable. Regular intervals can be shortened using the syntax */<interval length>. The previous example could be rewritten like this: */10 * * * * <my user> <my command> Additions made to the /etc/crontab file are read every minute without additional user interaction. Three jobs are run by default from the Tiger /etc/crontab file: periodic daily, periodic weekly, and periodic monthly. As the names suggest, these are run at repeating intervals each day, week, and month, respectively. The periodic program is used to execute periodic cron tasks in this case, daily, weekly, and monthly scripts located in the /etc/daily, /etc/weekly, and /etc/monthly files, respectively. They handle cleaning up temporary system files, log rotation, and other menial maintenance tasks. You can take advantage of these files or add additional script files to perform other common tasks.
Providing cron Services to Normal User AccountsThe systemwide /etc/crontab file should be used only for system tasks. Users, however, might want to add their own commands and scripts that are executed within their accounts. To do this, a user can create a crontab-style file within his directory. This file should contain all the fields as the previously documented /etc/crontab file, with one notable exception: there is no User field. Any commands executed from a personal crontab file are executed with the permissions of that user. For example: */15 * * * * /Users/jray/myscript.pl Putting this line in a file gives me a personal crontab that executes a Perl script in my home directory every 15 minutes. Unlike the system-level crontab file, personal crontab files are loaded into a privileged system area rather than run directly from the file you've created. To load a personal crontab file into the system, use the crontab utility followed by the name of your personal file: crontab <my crontab file>. Assuming that I've stored my crontab entries in mycrontab, I can load them into the system with brezup:jray jray $ crontab mycrontab After the file is loaded into the system, you can safely delete the local copy of your crontab file it is no longer needed. A user can display the loaded crontab information (and thereby regenerate the original file) by typing crontab -l: brezup:jray jray $ crontab -l # DO NOT EDIT THIS FILE - edit the master and reinstall. # (mycrontab installed on Sun Jul 1 10:01:20 2001) # (Cron version -- $FreeBSD: src/usr.sbin/cron/crontab/crontab.c,v 1.12 # 1999/08/28 01:15:52 peter Exp $) */15 * * * * /Users/jray/myscript.pl Users can also use the -e option to edit the currently stored crontab information, or use -r to remove it entirely.
Those wanting to access cron services from a GUI interface might want to check out the donation-supported CronniX application, shown in Figure 12.1. CronniX can create and edit crontab files for any user from within a point-and-click environment. Download it from http://h5197.serverkompetenz.net/cronnix/. Figure 12.1. The CronniX application can graphically edit system and user crontab files.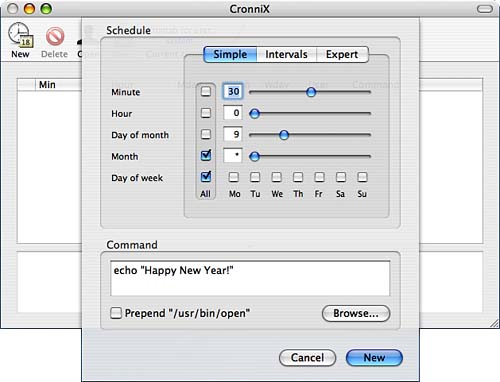 If you are at all hesitant about the format of the crontab file or interval scheduling, CronniX is highly recommended. A simple matter of mistyping an * where you didn't intend could ultimately result in serious performance issues or other problems on your system. Limiting Access to cron ServicesOn a system with many users, it isn't necessarily a good idea to give all of them access to cron services. You might find that your poor system performance is due to a few hundred copies of SETI@home that start automatically every night. To limit access to the crontab command for adding personal crontab entries, use either /var/cron/allow or /var/cron/deny. As you might infer, the allow file controls who is allowed to access crontab. Adding entries to this file denies access for anyone who isn't listed. Likewise, the deny file, if it exists, provides access to crontab for anyone who isn't listed. This isn't intentionally tricky, but it is important to note that the act of creating one of these files implicitly denies or allows access to all the accounts on the system. Obviously, you should not be running a system where both files exist simultaneously because it leads to an ambiguity of what happens to everyone else who isn't listed in one of the files. Over time, you'll discover that there are small tasks you carry out on a day-to-day basis. Using the power of the cron daemon along with shell scripts, Perl, or AppleScript can automate many of these processes. | ||||||||||||||||||||||||||||||||||||||||||||||||||||||||||||||||||||||||||||||||||||||||||||||||||||||||||||||||||||||||||||||||||||||||||||||||||||||||||||||||||||||||||||||||||||||||||||||||||||||||||||||||||||||||||
| < Day Day Up > |
EAN: 2147483647
Pages: 251