Installing ISA Server 2004 Enterprise Edition
To install ISA Server 2004 Enterprise Edition, look through the steps described in the "Before You Begin" section earlier, and then follow these directions:
This section assumes that you are installing ISA Server as a member of an Active Directory domain. For instructions on how to install ISA Server Enterprise Edition into a workgroup, see the steps in the next section.
-
Insert the ISA Server 2004 CD and click Install ISA Server 2004 on the Microsoft Internet Security And Acceleration Server 2004 page.
Note If Autorun is disabled, double-click ISAautorun.exe to launch the ISA Server 2004 Setup program.
-
On the Welcome To The Installation Wizard For Microsoft ISA Server 2004 page, click Next.
-
On the License Agreement page, click I Accept The Terms In The License Agreement, and click Next.
-
On the Customer Information page, enter your name and the name of your organization in the User Name and Organization text boxes. Enter your serial number in the Product Serial Number text boxes, and click Next.
-
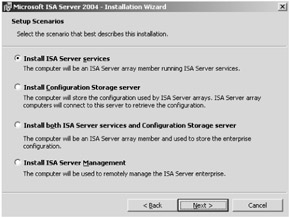
On the Setup Scenarios page, click Install ISA Server Services, Install Configuration Storage Server, Install Both ISA Server Services And Configuration Storage Server, or Install ISA Server Management, as illustrated in Figure 3-2, and click Next.
Note Depending on the installation option you choose, the following instructions may vary slightly. These instructions assume that you select the Install ISA Server Services option, having already installed the CSS.
-
On the Component Selection page click Change if you would like to change the location of the program files on the hard disk, and click Next.
Note The ISA Server 2004 software is installed on the %SystemDrive% by default.
-
On the Locate Configuration Storage Server page, type the name of your CSS server, or click Browse to find the CSS using the Select Computers page. If you click Browse, click OK when finished. Specify the connection credentials, and click Next.
Note If unable to connect to the CSS, the installation prompts you with an error. You must ensure connectivity to the CSS to continue and finish the install. See the section entitled "Ensuring Connectivity to CSS" earlier in the chapter.
-
On the Array Membership page, select to create a new array or join an existing array, and click Next.
-
On the Create A New Array page, type a name for the array in the Array text box and type a description in the Description text box, then click Next.
-
On the Configuration Storage Server Authentication Options page, select Windows Authentication or Authentication Over SSL Encrypted Channel, and click Next.
Note If you select SSL encrypted channel, you must use an existing trusted root CA certificate or install a trusted root CA certificate.
-
On the Internal Network page, click Add.
-
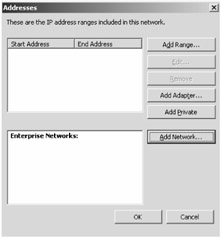
On the Addresses page, you can choose to add IP addresses ranges manually, by adding an adapter, or by selecting among the private IP ranges. You can also add Enterprise Networks if you had previously defined them before starting the installation as shown in Figure 3-3. Click OK, and then click Next.
-
On the Select Enterprise Policy page, from the Enterprise Policy drop-down list, select the enterprise policy to apply to the array, and click Next.
Note Default Policy is selected automatically.
-
On the Firewall Client Connection Settings page, if you have ISA Server 2000 firewall clients in the environment, you might need to provide backward compatibility. To do so, select the Allow Non-Encrypted Firewall Client Connections check box. This configuration means that you won't necessarily be taking advantage of the encryption provided by the new firewall client. Click Next.
-
On the Services Warning page, the SNMP service, FTP Publishing service, Network News Transfer Protocol (NNTP), IIS Admin Service, and World Wide Web Publishing service will be restarted during installation. Click Next to continue.
-
On the Ready To Install The Program page, click Install.
-
On the Installation Wizard Completed page, select the Invoke ISA Server Management When The Wizard Closes check box, and click Finish.

Figure 3-2: Select the components you wish to install on the Setup Scenarios page.

Figure 3-3: Enter the IP address ranges or Enterprise Networks that define your network.
Installing Firewall Share and Message Screener
The procedures in the section entitled "Installing the Firewall Client Installation Share and Message Screener" in Chapter 2 are identical for ISA Server Standard Edition and Enterprise Edition, except whereas ISA Server Standard Edition can be installed on a Windows 2000 server, ISA Server Enterprise Edition is only supported on Windows Server 2003. The dependency on an SMTP virtual server remains before you can install the Message Screener.
Adding Servers to the ISA Server Array
After establishing a new array as described in the earlier section, "Creating an ISA Server Array," or completing the ISA installation as described earlier in this chapter in the section entitled "Installing ISA Server 2004 Enterprise Edition," you can add additional servers by altering the following steps during an installation:
-
On the Array Membership page, click Join An Existing Array, then click Next.
-
On the Join An Existing Array page, type the name of the ISA array or click Browse to select the array from the list, and click Next.
EAN: 2147483647
Pages: 173
- Using SQL Data Definition Language (DDL) to Create Data Tables and Other Database Objects
- Using SQL Data Manipulation Language (DML) to Insert and Manipulate Data Within SQL Tables
- Performing Multiple-table Queries and Creating SQL Data Views
- Working with Functions, Parameters, and Data Types
- Retrieving and Manipulating Data Through Cursors