Publishing Windows SharePoint Services
Windows SharePoint Services allow companies to make file sharing and collaboration easier by allowing users to access critical company information anywhere. ISA Server can make these sites available on the Internet while maintaining the security and privacy of the internal network. You can take advantage of the Web publishing rules, access rules, and content caching to maintain the level of security required for the data being accessed.
Because SharePoint Portal Server 2003 is built on Windows SharePoint Services technology, we start by describing how to publish Windows SharePoint Services sites.
Publishing a Windows SharePoint Services site is similar to publishing a standard Web site. However, there are differences that make the Windows SharePoint Services site function properly when accessed using an external URL. Windows SharePoint Services uses absolute URLs within a site and these URLs will cause problems with some content on the site when accessed by a computer not on the corporate network. We use link translation on the Web publishing rule for the Windows SharePoint Services site to allow the external name of the site to work properly. Link translation and absolute URLs are explained in more detail in the next section.
In the following scenario, you configure ISA Server to publish the Windows SharePoint Services site. Because the scenario is very similar to a standard Web publishing rule, we only go into detail on the parts that are different. Creating a Web publishing rule is outlined in Chapter 8, "Configuring ISA Firewall Policy."
| Note | For a more detailed walkthrough of how to set up Windows SharePoint Services publishing with ISA Server, see the Microsoft TechNet article, "Publishing Windows SharePoint Services with Microsoft Internet Security and Acceleration (ISA) Server 2004," at http://www.microsoft.com/technet/prodtechnol/isa/2004/plan/isawss.mspx. |
Allow Windows SharePoint Services to Connect to the Internet
To allow Windows SharePoint Services to connect to the Internet, complete the following steps:
-
Create a computer set that contains the IP address range of your Windows SharePoint Services servers.
For step-by-step procedures on creating a computer set, see Chapter 7, "Configuring Toolbox Elements."
-
Create an access rule that allows the Windows SharePoint Services computer set to have access to All Networks.
Note For step-by-step procedures on creating an access rule, see Chapter 8.
-
Modify the Web.Config file. Web.Config must be modified as shown in the section entitled, "Modifying Web.Config File For Outbound Internet Access," later in this chapter.
Defining the Web Listener
The next step in publishing Windows SharePoint Services is to create a Web listener. To do so, follow these steps:
-
Create the Web listener for the Windows SharePoint Services site.
-
On the IP Addresses page, select the External check box to listen for requests from the Internet.
Note For step-by-step procedures on creating a Web listener, see Chapter 7.
Creating the Web Publishing Rule
Creating and configuring the Web publishing rule is one of the last actions you should take. To do so, follow these steps:
-
Create the Web publishing rule as described in Chapter 8.
-
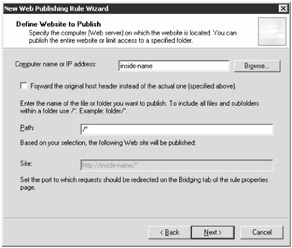
On the Define Website To Publish page, shown in Figure 17-1, type the internal name of the Windows SharePoint Services server and type the path to define the folder to publish. Click Next.
-
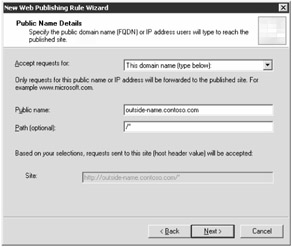
On the Public Name Details page, type the computer name or IP address reachable on the Internet, as shown in Figure 17-2. Click Next.
-
On the Select Web Listener page, select the Web listener you created in the section, "Defining the Web Listener," earlier in this chapter. Click Next.
-
On the User Sets page, click Next.
-
On the Completing The New Web Publishing Rule Wizard page, click Finish.
-
In the details pane, right-click the new Web publishing rule and select Configure HTTP.
-
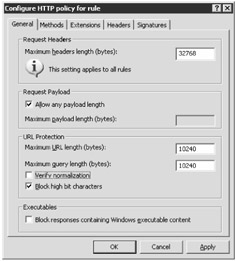
On the General tab, under URL Protection, clear the Verify Normalization check box, as shown in Figure 17-3. Click OK.
Important If you do not turn off normalization, ISA Server will block certain types of escape characters and this prevents the SharePoint document libraries from working properly.
-
In the details pane, right-click the new Web Publishing rule, select Properties, and click the Link Translation tab.
-
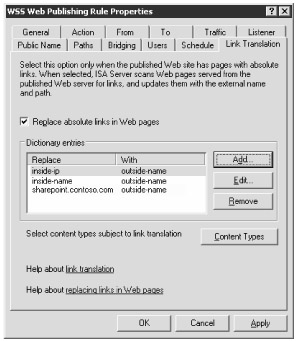
Add three dictionary entries for link translations, as shown in Figure 17-4, by selecting the Replace Absolute Links In Web Pages check box, clicking Add, and then typing in the following information in the Replace This Text and With This Text fields:
-
For the inside-name, use the name used to access the server on the internal network.
-
For the inside-ip, use the IP address used for the internal Windows Share-Point Services site.
-
For the outside-name, use the external Domain Name System (DNS) name used to access the Windows SharePoint Services site.
-
-
Click OK.
-
In the details pane, click Apply to save the changes, and then click OK.

Figure 17-1: You should define the internal name when publishing the SharePoint site.

Figure 17-2: This screen shot shows the publicly accessible name for the SharePoint site.

Figure 17-3: Ensure the Verify Normalization check box is cleared.

Figure 17-4: You should configure link translation in the Web Publishing Rule Properties dialog box.
Modifying the Web.Config File for Outbound Internet Access
Some Web parts on a Windows SharePoint Services site will make outbound Internet connections. If the firewall policy on ISA Server does not allow outbound port 80 access using Secure NAT, then the Windows SharePoint Services server has to be configured to use the proxy engine on the ISA Server. This requires modification of the SharePoint Services Web.config file, which is the central location for your Web application configuration. The Web.config file is stored in the root of the virtual server that has been extended with Windows SharePoint Services by default, for example, %SystemDrive%\Inetpub\Wwwroot.
To modify the Web.config file, complete the following steps:
-
Browse to the %SystemDrive%\Inetpub\Wwwroot folder and open the eb.config file with Notepad.
-
Locate the </Sharepoint> tag in the file. Immediately after the tag, insert the following code snippet:
WEB.CONFIG <system.net> <defaultProxy> <proxy proxyaddress="http://ISASERVER:8080" bypassonlocal="true" /> </defaultProxy> </system.net>
-
Change ISASERVER to the name or IP address of your ISA server, specify the port number, save the Web.config file, and close Notepad.
EAN: 2147483647
Pages: 173