Setting Up an E-Mail Client/Profile Before you can use SQL Mail or SQLAgentMail, a MAPI-enabled e-mail client must be installed on the same server as SQL Server 2000. Although this can be any MAPI-enabled mail provider, it is recommended that you install Outlook 2000. Next , you must have an e-mail account on an available mail server (either a Microsoft Exchange or Internet mail server) that is linked to the domain user account under which SQL Server is running. The following are the steps to follow for setting up an e-mail profile to support SQL Mail or SQLAgentMail: -
Install a MAPI-compliant mail client that can connect to your mail host. Outlook 2000 is recommended because it can connect to either Exchange servers or Internet Mail providers. -
Make sure that the SQL Server and SQL Agent services are configured to run under a user account that has access to the e-mail system rather than the default local System Account. This account, whether a domain user ID or local user ID, will need to have administrative rights on the SQL Server machine. For more information on setting up SQL Server and SQL Agent to run under a user account, see Chapter 8, "Installing and Upgrading SQL Server." -
Make sure an e-mail account is set up on your mail server for the SQL Server user account. Details on how to set up these accounts for Exchange Server, Internet Mail servers, and Lotus Notes are covered later in this section. -
Log into the server on which SQL Server is running using the user account specified as the startup account for SQL Server and SQL Agent. -
After you are logged in, open the Mail Control Panel and click on the Add button to create a mail profile for the SQL Server user account (see Figure 23.1). Choose a profile name that will be meaningful to the recipients of the e-mail messages. Configure an e-mail account for the mail profile that SQL Mail and SQLAgentMail will use for sending e-mail. This can be an account for an Exchange Server, a POP3 server, an IMAP server, an HTTP server, or another installed mail provider such as Lotus Notes. If any of your mail servers require a password for sending e-mail, be sure to save the password for the e-mail account in the mail profile when you set up the account as SQL Mail and SQLAgentMail. Do not prompt for a password when sending e-mail from SQL Server. Figure 23.1. Use the Mail Control Panel to create a new mail profile for SQL Mail and SQLAgentMail. 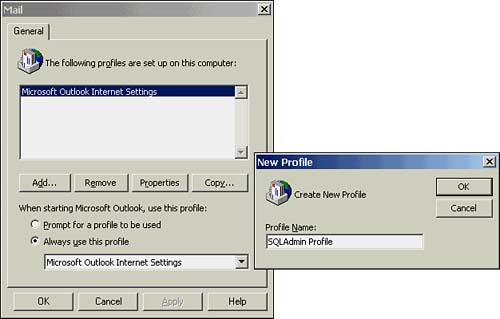 -
After the mail profile has been set up, start up your mail client using the newly created profile and test it. Send a test message addressed to the e-mail account set up in the profile to ensure that the mail client, mail profile, and e-mail provider are working properly. If your e-mail message does not appear right away, the e-mail client might not be configured to deliver mail immediately when it is sent. If you are using Outlook 2000, go to the Tools menu and choose the Options menu option. On the Mail Setup tab, make sure that the Send Immediately When Connected option is checked. How to Set Up SQL Mail with Exchange The following steps describe the process for setting up an e-mail account on Exchange Server to use with SQL Mail: -
On the Microsoft Exchange Server, create a mailbox that is associated with the user account that is used as the startup account for SQL Server and SQL Server Agent. This account must be a domain account with administrative rights on the SQL Server server. The mailbox created has to be mapped to the domain user ID so that NT authentication can be used to validate the user when sending e-mail messages. SQL Server cannot send mail using SQL Mail if a login ID and password have to be manually entered to connect to the Exchange Server. -
On the SQL Server machine, log on using the same user account that is to be used as the startup account for SQL Server and SQL Server Agent. -
Install an Exchange client on the SQL Server machine. This can be the Exchange client that ships with Microsoft Exchange Server, Microsoft Outlook 98, or preferably, Microsoft Outlook 2000. -
Start the mail client and configure it to connect to the Microsoft Exchange Server. Verify that you can send and receive mail interactively using the mail client. -
Open the Mail Control Panel and click Show Profiles to find the name of the profile that was created when you set up the mail client. If the profile name is longer than 32 characters or contains unusual characters (periods, hyphens, pound signs, and so forth), change the profile name to be less than 32 characters and remove the unusual characters. (Spaces are okay.) -
Configure SQL Mail and SQLAgentMail to use this mail profile name. More details on setting up SQLMail and SQLAgentMail are presented later in this chapter in the "Configuring SQL Mail" and "Configuring SQLAgentMail" sections. NOTE If no profiles appear in the drop-down list box for SQL Server 2000 or the profile name you type is not recognized, you probably have started SQL Server or SQL Server Agent under the Local System account. Change the service to start under the domain account associated with the mail profile, stop and restart SQL Server or SQL Server Agent, and then try to configure the mail profile again. | How to Set Up SQL Mail with an Internet Mail Server The steps for setting up SQL Mail with an Internet Mail server (POP3/SMTP) are not too different from setting up SQL Mail for an Exchange Server: -
Create a mailbox on the POP3 server for incoming e-mail for the user account that will be used by SQL Mail. You will also need to set up a mailbox for outgoing mail on the SMTP server if it is different from the POP3 server. -
On the SQL Server machine, log on using the same user account that is to be used as the startup account for SQL Server and SQL Server Agent. -
Install an Internet Mail client on the SQL Server computer that is supported by SQL Mail such as Microsoft Windows Messaging (which ships with Windows NT 4.0), Microsoft Outlook 97, Microsoft Outlook 98, or Microsoft Outlook 2000 (recommended). Microsoft Outlook Express cannot be used because it is a simple MAPI client and does not create a mail profile, which SQL Mail needs. -
Start the Internet Mail client and configure a profile to use the Internet Mail service and to connect to the POP3 (incoming) and SMTP (outgoing) servers. Specify the account name and password of the account set up in step 1 for access to the POP3/SMTP servers (the user ID and password are not necessarily the same as the user ID and password of the domain user account used to start SQL Server). Verify that you can send and receive mail interactively using the mail client. TIP If you are using Outlook 2000, you have the option when you set up your initial mail profile whether you want to set it up for Internet Only or for Corporate or Workgroup. Even though you might be setting it up to connect only to an Internet Mail server, choose the Corporate or Workgroup mode. You don't have to add an Exchange Server mail account. However, your mail profile will behave differently. In Corporate or Workgroup mode, SQL Mail will send e-mail messages immediately when they are generated, whether or not the Outlook client is running. For some reason, when configured for Internet Only mode, the mail messages go into limbo and are not sent unless the Outlook 2000 client is running, is online to the mail server, and is configured to automatically send and receive mail on a schedule (for example, every 2 minutes). I have found similar behavior using the Outlook XP mail client when it is configured with only Internet mail accounts. | NOTE To verify that SQL Mail will be able to successfully establish a connection to a POP3 mail server, you must be able to repeatedly connect and send mail, using the following steps: -
Start the mail client. -
Send an e-mail message through the configured POP3 mail server, specifying a recipient's e-mail address and message. -
Exit the mail client. -
Repeat steps 13 several times to simulate expected e-mail traffic from SQL Mail. If at any point while you are testing the e-mail client any dialog boxes appear that require a response, such as clicking OK to log on or a password prompt, then the e-mail user profile will not work with SQL Mail. For an Internet mail connection to work with SQL Mail, you must have 100% connectivity without user input. The reason for this is that SQL Mail cannot prompt for information and does not provide for retries when accessing a POP3 account. If SQL Mail cannot connect to the POP3 server on the first attempt, the Internet Mail connector normally opens a dialog box that prompts you to click OK to retry . If that should occur, SQL Mail, which is running as part of the SQL Server service, cannot see the dialog box and stops responding. You might have to use Task Manager to stop the Mapisp32.exe application or even restart the server to clear the problem. | -
Open the Mail Control Panel and click Show Profiles to find the name of the profile that was created when you set up the mail client. If the profile name is longer than 32 characters or contains unusual characters (periods, hyphens, pound signs, and so forth), change the profile name to be less than 32 characters and remove the unusual characters. (Spaces are okay.) -
Configure SQL Mail and SQLAgentMail to use this mail profile name. More details on setting up SQLMail and SQLAgentMail are presented in the "Configuring SQL Mail" and "Configuring SQLAgentMail" sections later in this chapter. As with setting up SQL Mail with Exchange, if no profiles appear in the drop-down list box, SQL Server or SQL Server Agent was probably started under the Local System account. NOTE Using SQL Mail with a Lotus Notes server is not a configuration that Microsoft currently supports. However, I realize that many of you might be working in an environment where Lotus Notes is the default mail system. You might not have an Exchange Server or POP3 Server available, but you would still like to send e-mail notifications from SQL Server Agent. I have been able to successfully configure Outlook 2000 with a Lotus Notes transport provider at one of my client sites that appears to be working successfully. However, because this is not a supported configuration, I cannot make guarantees that it will work successfully for everyone. I'm no Lotus Notes expert, but I was able to get it to work simply through trial and error. I'm providing the solution that worked for me here in the hopes that some of you might be able to make it work as well. | To set up SQL Mail with a Lotus Notes Server, do the following: -
Create an account in Lotus Notes for the user account that will be used by SQL Mail. -
On the SQL Server machine, log on using the same user account that is to be used as the startup account for SQL Server and SQL Server Agent. -
Install the Outlook 2000 e-mail client. -
Install the Lotus Notes client software. (Note: If you choose to use integrated security between Notes and Windows NT/2000, be sure you set up your Notes password to be the same as the domain user password.) -
Configure the Lotus Notes client to connect to the Notes server. Verify that it works to send and receive mail from the Lotus Notes server. -
Open the Mail Control Panel and click Show Profiles. Create a new e-mail profile and add a new e-mail account specifying Lotus Notes Mail as the server type. Provide a name for this profile that is 32 characters or less and contains no unusual characters (periods, hyphens, pound signs, and so forth). -
Start up the Outlook 2000 mail client. -
Set up contacts in the Contacts folder by creating e-mail usernames that map to Lotus Notes e-mail addresses. (SQL Mail cannot handle a Lotus Notes address directly, but it can send to an entry in the Outlook Address Book.) To be able to use the Contact names that you set up, right-click on the Contacts folder and choose Properties to bring up the Properties dialog. On the Outlook Address Book tab, make sure the Show This Folder as an E-Mail Address Book option is checked. When it comes time to specify an e-mail name for an operator (this is covered in the "Configuring SQL Mail" section later in this chapter), choose a name from the Outlook Contacts Address book, not from the Lotus Notes Address book. (It can help to set up Outlook to use the Contacts address list first so it shows up in the list first instead of the Lotus Notes address book.) -
Verify that you can send e-mail messages to the Lotus Notes recipients you have set up in Outlook 2000. The easiest way to test is to send an e-mail to the user account that you have set up for SQL Mail to use to send and receive Lotus Notes mail. If you are prompted at any point for a password to connect to the Lotus Notes server, then you likely installed and configured to the Notes client without using integrated security. This is fine, but SQL Mail will not work if it is prompted for a password. I have found that it seems to work okay if you start up the Outlook 2000 client first and get it connected to the Lotus Notes server and enter the password when prompted. If you leave the Outlook 2000 client running, it appears to keep the connection to Lotus Notes open and no additional password is required for SQL Mail to connect. -
Configure SQL Mail and SQLAgentMail to use the mail profile name you have set up in the preceding steps. (More details on setting up SQLMail and SQLAgentMail are presented later in this chapter.) What's Next After you have set up the mail profile and tested and confirmed that it works properly, the next phase is to set up SQL Server and SQL Agent to use the new mail profile.  |