Hack29.Automate Music File Tagging
Hack 29. Automate Music File Tagging
Why tag your music files one by one? Use the EasyTag program to automate the naming and tagging of your music. EasyTAG is a utility for viewing and editing tags for MP3, MP2, FLAC, Ogg Vorbis, MusePack, and Monkey's Audio files. Its simple and nice GTK+ interface makes tagging easy whether you're editing tags manually or taking advantage of EasyTAG's automatic tagging. This hack walks you through using EasyTAG to add tags to your audio files. To get EasyTAG, go to the official EasyTAG download page at http://easytag.sourceforge.net. This page contains packages for most major distributions or, alternatively, you can download and compile it from source. The program depends on the following libraries:
After EasyTAG is installed, launch it from your desktop menu or type easytag in a terminal. The main window (see Figure 2-9) is split into a tree browser on the left side that is used to select audio file directories, and a tag editing section on the right. In the tree browser, select the directory that contains your media files and EasyTAG will search for supported files. All the files it finds are displayed in the middle pane with a variable background color to show, at one glance, the files in the same directory. Figure 2-9. EasyTAG main window Another useful viewing mode organizes the files by artist and by album to provide a quick look at all the artists of your collection and all albums for each artist. Click Browser The interface displays basic file information taken from the file header, such as bitrate or duration. You can manually edit common tag fields like title, artist, album, year, track number, genre, and comment (which were available in both ID3v1.1 and ID3v2.3 tags), but you can also edit special ID3v2.3 fields like disc album, composer, original artist/performer, copyright, URL, encoder name, and attached pictures.
2.18.1. Three Ways to Tag and Rename FilesEasyTAG offers three ways to tag or rename your files: manually, automatically with the scanner, or automatically with CDDB. The following sections describe each one. 2.18.1.1. Manually.This mode should be used when:
If you have only a few albums to tag, this mode is very easy to use: you just type the information directly into each field. When working by albums, some values, such as album name, year, and genre are the same for all files. To save time, selectthe small button on the right of each field to apply this value to all selected files. The genre field can be selected from the drop-down list or typed in manually. The year field also offers a little speed improvement; type the last numbers and the rest will be filled automatically, according to the current century and decade. For example, typing 4 will display 2004, and 94 will display 1994. To number tracks quickly with the format track number/total tracks, use the first small button next to Track # to number each file according to its position in the list (so the order of files is important). The second small button is like a sticky button that applies the number of total tracks to each selected file.
To rename the files one by one enter the new filename in the MP3 File field in the right top of the main window (its name changes to reflect the file format you are working with). The previous name remains in the file list until the changes are saved. Any invalid characters you type (for Windows FAT partitions: '/', '+', etc) automatically will be replaced unless you disable the option "Replace illegal characters in filename (for Windows and CD-ROM)" in the Misc tab of the Preferences window. To rename the directory directly in the browser, right-click the directory and choose "Rename Directory." The change takes effect immediately, and you can't undo it.
2.18.1.2. Automatically with the Fill Tag scanner.This mode is best when:
The Fill Tag scanner uses a pattern to associate words in the filename and directories with the tag entries. Once you press the green scanner button in the toolbar, the associated words are automatically entered into the appropriate tag fields. If the tag is partially completed, use the option "Overwrite fields when scanning tag" in the Scanner tab of the Preferences window to replace all fields with the new values. This pattern uses a series of codes that correspond to a particular field and follow rules listed in Table 2-6.
Like when tagging manually, only the selected files are processed by the scanner. You can use the defined patterns in the list or write your own patterns to correspond to the format of your filenames and directories. To avoid mistakes when selecting the pattern, a preview area immediately shows the results before you apply the pattern. If you need help with the different codes, press the Help button (the life buoy) to display the legend of each code. If you want to save your own patterns or edit or sort the full list of patterns, press the Mask button to display an editor on the Scanner window (see Figure 2-10). The following examples show how to use patterns. Assume you have the following path and filename: /mnt/MP3/EVANESCENCEFallen (2003)Rock/01. Going Under.mp3 And you apply this pattern: %a - %b (%y) - %g/%n. %t You will fill the tag fields with the values shown in Table 2-7. Figure 2-10. EasyTAG scanner window edit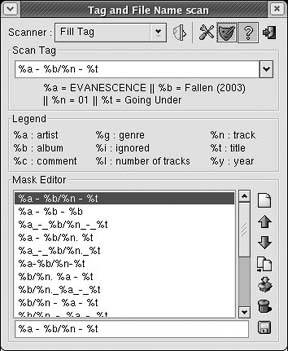
If you want to fix file and directory names along with ID3 information, choose the scanner mode "Rename File and Directory" from the drop-down menu, and you can easily fix names of lots of files and move them into new directories. The new filenames will be based on the tag values, so it is important to have correct tags. Like in the Fill Tag scanner, it uses the same codes to build the filename structure from the tag entries. This scanner also offers the ability to move the files in new or existing directories using an absolute or relative path.
2.18.1.3. Automatically with CDDB.Use this mode when:
To use tagging with the CD database, two modes are available. First try the automatic search, but if it fails to identify the album, try the manual search. The automatic search mode generates the CDDBID from the audio files and queries the database. Select all files of an album (and only a single album's files) in the same order as the CD and press the Search button. All the corresponding albums found in the CD database are then listed (see Figure 2-11). Select an album to display the tracks for the album on the right. To fill files with the corresponding tags, select the tracks for the album you want to change and press the Apply button. If no album was found with the automatic search, your last chance is to try a search using keywords such as artist name, album name, or track name. This search returns the same results as the search service on the freedb.org site and may return lots of lines. While browsing the albums list, the albums that already were displayed are shown in red. Press the red line button to keep these lines and remove the rest. When the right album is identified, follow the method for automatic search to select and apply the tags to your files. Figure 2-11. EasyTAG CDDB Scanner window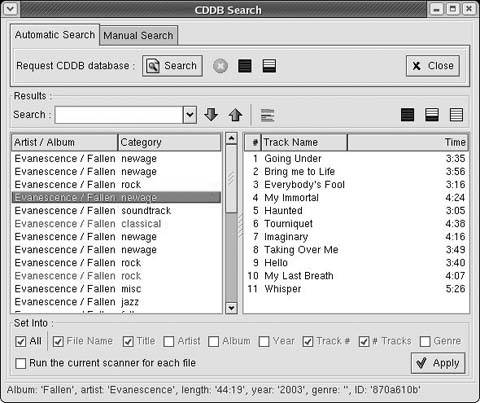 As for the tag fields, use the CDDB results to apply the new name to the file. With this method you can change only the filename and not the path. Activate the "Rename File" scanner, which will be run after applying the results. 2.18.2. Correct Tag Fields with the Process Fields ScannerHere are the conditions where this mode is best:
This feature is useful to normalize your filenames or tags. For example, you can fix the case or convert some characters in your filenames. To start this scanner, click Scanner If necessary, you can use one or both CDDB modes to fill your tags with FreeDB servers. You can also load the content of a simple text file containing filenames to set the name of each file. Jerome Couderc |
 Tree View | Artist-Album View to toggle between the two.
