Branding the Project


You've assembled the footage and animated its masks. Now it's time to add the logo, which is a Photoshop file. You'll set the logo behind the footage so that it teases the viewers by allowing them to see bits of the logo between the masks but never the entire thing:

1.

Go to time 0;00 in the Master Comp Timeline, and drag the Saleen_logo_layers.psd file from the Project window to the Timeline below the Sequence Comp layer.

2.

Duplicate the Saleen_logo_Layers layer, and add a 0% Opacity keyframe to both logo layers.

3.

Go to time 3;00, and change both layers' Opacity to 100%.

4.

Go to time 7;00, and add another 100% Opacity keyframe to both layers.

5.

Go to time 9;00, select only the bottommost logo layer (layer 4), and change the layer's Opacity to 0%.

Now parts of the logo appear as the masks move back and forth over the footage.

Animating and revealing the logo

So far you've set up the logo to only play peek-a-boo with the user, by hiding it behind the footage. Next you'll fade out the footage at the end of the project to reveal the entire logo. You'll also give the logo more life by stretching it over time and adding a halo look to it:

1.

Go to time 6;00, and add a 100% Opacity keyframe to the Sequence Comp layer.

2.

Go to time 7;00, and change the layer's Opacity to 0%. Now the logo is fully visible.

3.

Go to time 0;00, add a Scale keyframe to both logo layers, and set both keyframes to 85, 85%.

4.

Press the End key to go to the end of the Timeline (time 9;29). Change layer 3's Scale to 100, 100% and layer 4's Scale to 150, 150%.

5.

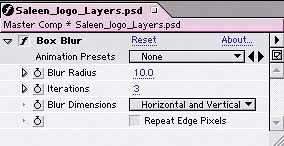
Select layer 4, and choose Effect > Blur & Sharpen >Box Blur. Set Iterations to 3 and Blur Radius to 10 in the Effect Controls window.

Save the project, and preview your results.

Settings for the Box Blur effect in the Effect Controls window

The logo, fully revealed

Tip

If you often use the same group of settings (or nearly the same) when you use a particular effect, then save that effect with those settings as a preset. To create the preset, set up the effect's settings as you want them, go to the Effect Controls window, and choose Save Selection As Animation Preset from the Animation Presets menu. (Despite the name Animation Preset, animation isn't required.) One way to then use your preset is to apply the effect as you normally would and choose your preset's name from the Animation Presets menu in the Effect Controls window.


    Adobe After Effects 6.5 Magic
    Adobe After Effects 6.5 Magic
    ISBN: 0321267230
    EAN: 2147483647
    Year: 2005
    Pages: 236

    flylib.com © 2008-2017.
    If you may any questions please contact us: flylib@qtcs.net