Adobe After Effects 6.5 Magic
Authors: Rankin J. Ullrich A
Published year: 2005
Pages: 72-74/236
Buy this book on amazon.com >>

Building the Car Sequence

The subject of this project's movie is a Saleen vehicle, which is featured in the ten pieces of footage you imported. In this section, you'll trim all that footage to the same duration, and then use a really quick method (just one step!) to distribute the footage across the Timeline and create a transition between the pieces:

1.

Drag all ten Saleen_Car movies from the Project window into the Sequence Comp Timeline.

2.

Go to time 2;00, select all the layers, and then press Alt + ] (Windows OS) or Option + ] (Mac OS) to trim the layers' Out point to the current time. (If you don't press Alt or Option, you'll move the layers ' Duration bars instead of trimming them.)

Trimming the layers

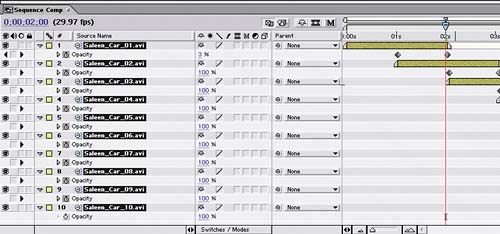
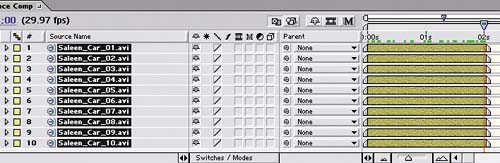
You want each layer of footage to fade into the next sequentially, so you'll stagger the layers in time and add a transition between each pair.

3.

Make sure all the layers are still selected. From the top of the application, choose Animation > Keyframe Assistant > Sequence Layers.

4.

In the Sequence Layers dialog, check the Overlap box, set the Duration to 1;00 second, and set Transition to Dissolve Front Layer.

Settings for the Sequence Layers command

5.

With all the layers still selected, press T on your keyboard to reveal their Opacity properties. Notice that Opacity keyframes were created for each layer to fade them out over a 1 second duration.

Click the Ram Preview button in the Time Controls palette to see the results. Each layer should play for a second and then fade away to display the next layer in the sequence.

With one step, all the layers are staggered and dissolve into one another.


Building the Layers

In this section, you'll assemble the master composition to contain all of the project's components (including the composition you made in the previous section). You'll also blend another piece of footage over the entire sequence that makes up the Sequence Comp and fade it in and then out of the composition:

1.

Create a new composition named Master Comp using the NTSC DV, 720x480 preset, and set the Duration to 10;00 seconds.

2.

Drag the Sequence Comp composition from the Project window to the Master Comp Timeline. Make sure the layer starts at time 0;00.

3.

Drag the Saleen_Car_01.avi file from the Project window into the Timeline, above the Sequence Comp layer.

4.

Change the Saleen_Car_01.avi layer's Blending Mode to Difference in the Modes column of the Timeline.

5.

Press T to display the Saleen_Car_01.avi layer's Opacity, and add a 0% Opacity keyframe to the layer at time 0;00.

6.

Go to time 1;00, and change the layer's Opacity to 100%.

7.

Go to time 5;00, and add another 100% Opacity keyframe to the layer.

8.

Press End to go to the end of the Timeline, and change the layer's Opacity to 0% to fade out the layer.

First stage of the Master Comp Timeline

Click the Ram Preview button in the Time Controls palette to view the results.


Building the Columns

It's time to create the animated masks that serve as sliding windows over the footage. To make it easier for you to keep track of which mask in the Timeline represents a mask in the composition, you'll turn on a preference that's new in After Effects 6.5:

1.

Choose Edit > Preferences > User Interface Colors, and select Cycle Mask Colors.

Now, every time you draw a new mask, one of five colors will be used to identify the mask in the Timeline and in the Composition or Layer window. This will come in handy in the next section when you begin animating the masks.

2.

Go to time 0;00, and double-click the Sequence Comp layer in the Master Comp Timeline to open it in a layer window. (Alternatively, you can complete this section in the Composition window; but the Layer window gives you more control.)

3.

Click the Rectangular Mask tool in the Tools palette. Draw a vertical column starting below the bottom edge of the composition area and extending above the top edge of the composition.

Drawing the first mask in the Sequence Comp's layer window

4.

Draw four more columns that also span beyond the top and bottom edge of the comp. Place them in other areas of the composition, and make them varying widths.

Five masks with unique colors in the Sequence Comp layer

Animating the columns

Your next task is to animate the masks horizontally and randomly across the screen. You'll use each mask's Mask Shape property as you would a Position property to animate its location over the Sequence Comp:

1.

At time 0;00, expand the Sequence Comp in the Timeline, select all the masks, and then press M to display their Mask Shape properties.

2.

With all the masks still selected, click the stopwatch next to any Mask Shape property to add a keyframe to all the masks.

3.

Go to time 2;00, and click Mask 1's name in the Timeline to select the mask.

4.

Using the Selection tool, drag Mask 1 to the opposite side of the comp.

5.

Move the other four masks to new locations on the layer.

Tip

Remember to select the mask's name in the Timeline first in order to select all four vertices before moving the mask. Otherwise, you'll reshape the mask instead of moving it.

6.

Go to time 4;00, and again move each mask to a new location.

7.

Select the Mask Shape keyframes for all five masks, and copy them.

8.

Go to time 6;00, and paste the keyframes.

Pasting all the Mask Shape keyframes

9.

To add some definition to the boundaries of the masked areas, go to the Master Comp Timeline, select the Sequence Comp layer, and choose Effect > Render > Stroke.

10.

Check the All Masks option in the Effect Controls window, and set Color to white (RGB: 255, 255, 255). Now each mask has a white outline.

Settings for the Stroke effect in the Effect Controls window

Adobe After Effects 6.5 Magic
Authors: Rankin J. Ullrich A
Published year: 2005
Pages: 72-74/236
Buy this book on amazon.com >>

Similar books on Amazon