| The transitions you'll build in this chapter are inspired by retro designs of the 1960s and 70s. There's a positive madness for all things retro these days, which just so happens to work well with solids that are left in their "natural" state. The orange transition The idea behind the transitions is simple: a set of concentric squares that radiates out to wipe the screen and then comes back in to reveal a new scene. Simple, yes, but really snazzy, too! You start with the squares: 1. | Generate a new comp named Orange Squares in the Elements folder, with dimensions 720x540, Frame Rate 29.97, and Duration 4;00.
| 2. | Create a new solid at 0;00 named Mid Orange (RGB: 255, 107, 15) with dimensions 720x720.
| 3. | Create a 0% Scale keyframe.
| 4. | Go to time 0;10, and change the Scale to 100%.
| 5. | Duplicate the layer twice. Change the color of layer 1 to light orange (RGB: 255, 139, 52) and the color of layer 2 to dark orange (RGB: 236, 82, 2), and then rename both layers according to their new color.
Adding the scale change and duplicating the layers  |
Right now the three squares scale simultaneously, but you only see the top light-orange layer. So, you'll stagger the In points of the layers to make the squares appear to radiate outward: 1. | Select layer 2, and go to time 0;03.
| 2. | Press [ to bring the layer's In point to time 0;03.
| 3. | Select layer 1, and go to time 0;06. Press [ to bring the layer's In point to time 0;06.
| 4. | Select all the layers, and copy them.
| 5. | Go to time 0;09, and paste the new layers.
| 6. | Press Shift while dragging the layers, and snap the first frame of the Mid Orange layer to the Current Time Indicator (CTI).
Duplicating the layers so there are six squares 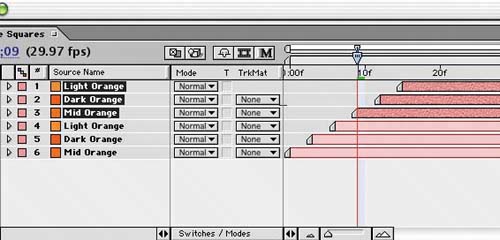
Scaling squares 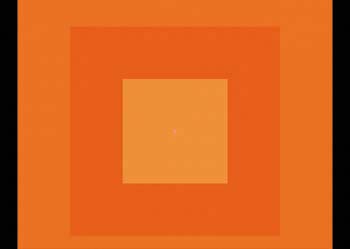
|
You should now have squares that radiate out from the center of the screen with a three-frame offset between each layer. Very cool. Of course, there's more to do! Now you'll make the squares collapse back inward: 1. | Go to time 1;05, and insert a 100, 100% Scale keyframe for layer 1.
| 2. | Go to time 1;15, and change the Scale to 0%.
| 3. | Copy these two keyframes.
| 4. | Go to time 1;08, and paste the keyframes on layer 2. Paste the keyframes again on the remaining layers at the following points in time:
Layer 3: 1;11 Layer 4: 1;14 Layer 5: 1;17 Layer 6: 1;20
The staggered Scale keyframes  |
The squares should now radiate out for 25 frames, hold for 10 frames, and then collapse into the center for 25 more frames. Save your work, and preview the animation. Generating the other transitions You need to create the same transition in the other three colors chosen for this spot: 1. | Duplicate the Orange Squares comp three times, and rename the copies Green Squares, Purple Squares, and Yellow Squares.
| 2. | Open the Green Squares comp. Rename and recolor the orange squares to the corresponding green hue: Light Green (RGB: 79, 217, 74), Dark Green (RGB: 45, 126, 43), and Mid Green (RGB: 67, 179, 63).
Changing the colors to shades of green 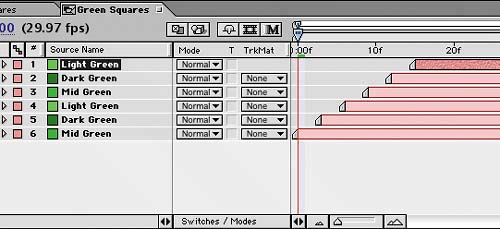 | 3. | Repeat this process for the Purple Squares and Yellow Squares comps: Light Purple (RGB: 154, 127, 255), Dark Purple (RGB: 99, 58, 190), and Mid Purple (RGB: 133, 79, 255); and Light Yellow (RGB: 250, 253, 85), Dark Yellow (RGB: 187, 165, 57), and Mid Yellow (RGB: 199, 201, 67).
|
Save your work. |