| You'll randomly animate your text layers' Scale and Position along the Z axis in this section so the layers appear scattered throughout space. There's no science to this part; you'll come up with your own settings by randomly scrubbing the values: 1. | Turn on the 3D switch for each text layer in the Timeline's Switches column.
| 2. | Go to time 4:00, and add a Position keyframe and a Scale keyframe to each layer.
| 3. | Go to time 0:00, and change each layer's Z Position value (only the Z value!) and Scale value so that no layer has the same Z Position or Scale value as another layer. Make half the Z Position values negative and half positive so that some layers are closer to the viewer (negative Z value) and others appear in the distance (positive Z value).
You don't want to skew the text when you modify a layer's Scale, so leave on the Constrain Proportions button to the left of each set of Scale values.
The Timeline after adding the Position and Scale keyframes 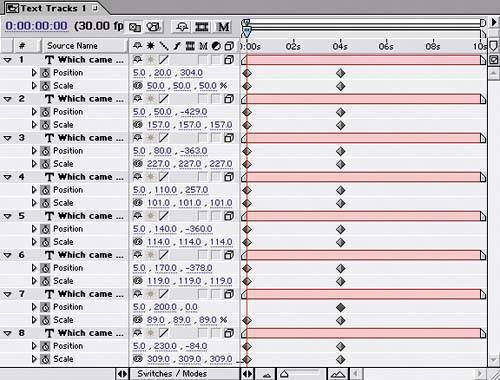 The Composition after adding the Position and Scale keyframes 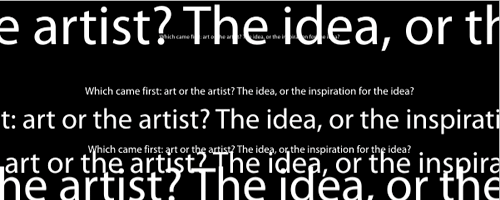
|
Animating more text So far, you've created only half the text layers you need for this project. Your next task is to create more lines of animated text by duplicating the composition you've already created and modifying the keyframes. The text layers in the new composition will appear in between the lines of text in the original composition. Here are the steps: 1. | Close the Text Track composition, and duplicate it in the Project window.
| 2. | Open the Text Tracks 2 composition, and go to time 4:00.
| 3. | Increase each layer's Y Position value by 15 pixels. This moves each layer vertically so that when you combine the two Text Tracks compositions into one, the layers of text won't overlap. The top layer's Y Position value will be 35, the second layer's 65, and so on.
| 4. | Go to time 0:00, randomly animate each layer's Scale (with proportions constrained), and change each layer's Z Position value to its opposite negative or positive value. (For example, change a Z Position value of 304 to 304.) Be certain to only change the Z value for each layer's Position.
|
Completing the text wall Your next task is to combine the two text comps into a new composition and modify one layer's Position so the lines of text appear staggered: 1. | Create a new composition named Master, using the Medium, 320x240 composition preset, with Duration 10:00 seconds.
| 2. | Add the Text Tracks and Text Tracks 2 compositions to the Timeline at time 0:00.
| 3. | Still at time 0:00, add a Position keyframe to each layer, and set each layer's Position to 300, 120.
| 4. | Press End to go to time 9:29, and then change each layer's Position to 20, 120.
| 5. | Click the Position property name of the Text Tracks 2 layer to select all of its keyframes. Choose Animation > Keyframe Assistant > Time-Reverse Keyframes to switch the layer's Position keyframes in time.
The text layers in their final positions 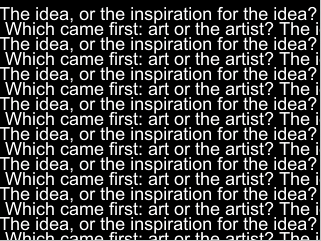
|
|