Creating and Calling a Package That Populates the SalesFact Table
Creating and Calling a Package That Populates the SalesFact Table
The data movement application currently includes the steps required to update the dimension tables but not the fact table. In a data warehouse, you will need to periodically add new fact data, as it becomes available, to the fact table. For example, every month you might want to add new sales data from your production database to the data warehouse. The new fact data is generally loaded into a staging table where it can be scrubbed before it is loaded into the fact table for the Analysis Services cube. The fact table can be loaded only after all dimension data has been updated, and the fact data in the staging table must be deleted before new fact data is loaded to avoid duplicate data entry.
Creating the Steps That Load Data into the SalesStage and SalesFact Tables
In the following procedures, you will create the UpdateSalesFacts subpackage using the StarterDTS package as a template. You will add a Bulk Insert task to this package that inserts new sales data from a delimited text file into the SalesStage table. You can change the data in this delimited text file on a weekly or monthly basis to include the sales data for the previous week or month. Next you will add a column to the SalesFact table to hold the BatchID value passed to the UpdateSalesFacts package from the MasterUpdate package. You will then add an Execute SQL task to this package that joins data from the SalesStage , ProductDim , CustomerDim , and TimeDim tables and inserts this data into the SalesFact table.
Create the UpdateSalesFacts subpackage based on the StarterDTS package
-
In SQL Server Enterprise Manager, switch to the StarterDTS package in DTS Designer.
-
Right-click an open area of the design sheet, and then click Package Properties.
-
On the Global Variables tab, locate the gsPackageName global variable in the Name column, type UpdateSalesFacts in the Value column, and then click OK.
-
On the Package menu, click Save As.
-
Type UpdateSalesFacts in the Description box, type mypassword in the Owner Password box, verify that Structured Storage File is selected in the Location list, type C:\Microsoft Press\SQL DTS SBS\DataMovementApplication\UpdateSalesFacts.dts in the File Name box, and then click OK.
-
Type mypassword in the Password box, and then click OK.
-
Click OK to continue saving without a user password.
Now that you have created the basic structure for the UpdateSalesFacts subpackage, you are ready to add a step to insert data from a delimited text file into the SalesStage table.
Add new sales data to the SalesFact table by creating a Bulk Insert task in the UpdateSalesFacts subpackage
-
On the Task menu, click Bulk Insert Task.
-
Type Load SalesStage Table in the Description box, select SBS_OLAPConnection in the Existing Connection list, and then select "SBS_OLAP"."dbo"."SalesStage" in the Destination Table list.
-
Type C:\Microsoft Press\SQL DTS SBS\DataMovementApplication\NewSalesData.txt in the Source Data File box.
-
Click Use Format File and then type C:\Microsoft Press\SQL DTS SBS\DataMovementApplication\SalesData.fmt in the Use Format File box.
-
Click OK to save this Bulk Insert task.
Now that you have created this Bulk Insert task to load new sales data into the SalesStage table from a delimited text file, you will add a BatchID column to the SalesFact table to store the BatchID value passed to the UpdateSalesFacts package by the MasterUpdate package.
Add the BatchID column to the SalesFact table to store BatchID values
-
Open SQL Query Analyzer and then connect to your local instance as a system administrator.
-
On the toolbar, click Load SQL Script.
-
In the Look In list, navigate to C:\Microsoft Press\SQL DTS SBS\Ch9\ChapterFiles, and then open the AddBatchIDColumnToSalesFactTable.sql script.
This script adds the BatchID column to the SalesFact table. This column will store the BatchID value for each row added to the SalesFact table by the UpdateSalesFacts subpackage.
-
Execute the AddBatchIDColumnToSalesFactTable.sql script to add this column.
Now that you have created the infrastructure to store the generated BatchID value with each row added to the SalesFact table, you are ready to add the step that adds data to the SalesFact table from the SalesStage table.
Add new sales data to the SalesFact table by adding a stored procedure to the SBS_OLAP database and an Execute SQL task to the UpdateSalesFacts subpackage
-
On the SQL Query Analyzer toolbar, click Load SQL Script.
-
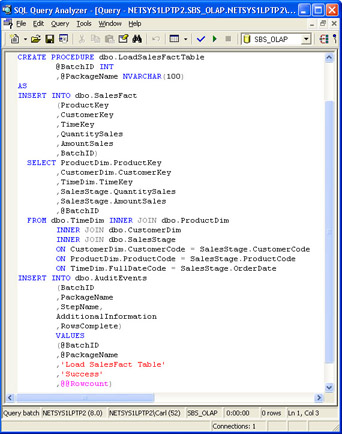
In the Look In list, navigate to C:\Microsoft Press\SQL DTS SBS\Ch9\ChapterFiles and then double-click LoadSalesFactTable.sql.
This script creates a stored procedure that inserts rows into the SalesFact table based on data in the SalesStage table joined with dimension key values from the ProductDim , CustomerDim , and TimeDim tables. This script also inserts a row into the AuditEvents table to log the package completion and the number of rows inserted. The INNER JOIN statement will drop rows in the SalesStage table that do not have corresponding entries in the dimension tables from the rowset that is inserted into the SalesStage table. For example, the TimeDim table must contain values for January 1998, and the ProductDim table must contain information about new products sold during January 1998, before you add new sales data for the month of January 1998.
After you execute the UpdateSalesFacts package, you need to review the entries in the AuditEvents table to determine if any rows were dropped. You will add these row reporting steps later in this chapter. If you determine that rows were dropped, you can create a new batch that adds the missing values to the dimension tables and then adds only the rows that were dropped by the JOIN statement to the SalesFact table. You will create a step in this package to write the error rows to a SalesError table to make this task easier. In Chapter 10, you will walk through steps demonstrating how to do this.
-
Execute the LoadSalesFactTable.sql script to add this stored procedure to the SBS_OLAP database.
-
Switch to the UpdateSalesFacts package in DTS Designer.
-
On the Task menu, click Execute SQL Task.
-
Type Load SalesFact Table in the Description box, select SBS_OLAPConnection in the Existing Connection list, and then type EXEC dbo.LoadSalesFactTable ?, ? in the SQL Statement box.
-
Click Parameters.
-
In the first row in the Input Global Variables list, select giBatchID.
-
In the second row in the Input Global Variables list, select gsPackageName and then click OK.
-
Click OK to save the Execute SQL Task.
Now that you have created the step that adds new rows from the SalesStage table to the SalesFact table, you will add dynamic configuration elements to the UpdateSalesFacts package.
Adding the Dynamic Configuration Elements to the UpdateSalesFacts Package
In the following procedures, you will add entries to the Config.ini initialization file specifying the location of the UpdateSalesFacts package, the name and location of the error log used by the UpdateSalesFacts package, and the name and location of the source and format files used by the Load SalesStage Table step in the UpdateSalesFacts package. You will then update the Properties From INI File step to use these new entries to update package and task properties. You will also update the Properties From GVs step to dynamically configure the maximum number of errors permitted by the Load SalesStage Table step.
Add dynamic configuration information to the Config.ini initialization file
-
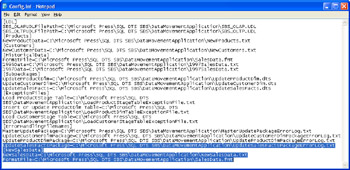
Using Windows Explorer, navigate to C:\Microsoft Press\SQL DTS SBS\DataMovementApplication, and then double-click Config.ini.
-
Locate the [Subpackages] section, add a new line, and then type UpdateSalesFacts=C:\Microsoft Press\SQL DTS SBS\DataMovementApplication\UpdateSalesFacts.dts .
This line adds the path that the MasterUpdate package will use to locate the UpdateSalesFacts package.
-
Locate the [ErrorHandlingFileNames] section, add a new line, and then type UpdateSalesFactsPackage=C:\Microsoft Press\SQL DTS SBS\DataMovementApplication\UpdateSalesFactsPackageErrorLog.txt .
This line adds the path to the error file that the UpdateSalesFacts package will use for logging.
-
Create a new line at the end of the file, and then type [NewSalesData] .
-
Create a new line in the [NewSalesData] section, and then type NewSalesData=C:\Microsoft Press\SQL DTS SBS\DataMovementApplication\NewSalesData.txt .
This line adds the path that the Bulk Insert task in the UpdateSalesFacts package will use to load new data.
-
Create a new line, and then type FormatFile=C:\Microsoft Press\SQL DTS SBS\DataMovementApplication\SalesData.fmt .
This line adds the path for the format file that the Bulk Insert task will use to interpret the data being added from the NewSalesData.txt file.
-
Save and close the Config.ini file.
Now that you have added the necessary information to the initialization file, you are ready to configure the UpdateSalesFacts package to read the new information in this initialization file by updating the Properties From INI File step.
Dynamically update task properties by updating the Properties From INI File step in the UpdateSalesFacts subpackage
-
Switch to the UpdateSalesFacts package in DTS Designer and then double-click the Properties From INI File step on the design sheet.
-
Click Add, and then select the Leave This Dialog Box Open After Adding A Setting check box.
-
Verify that UpdateSalesFacts is the focus in the left pane and then double-click LogFileName in the Property Name column in the right pane.
-
Select INI File in the Source list, type C:\Microsoft Press\SQL DTS SBS\DataMovementApplication\Config.ini in the File box, select ErrorHandlingFileNames in the Section list, select UpdateSalesFactsPackage in the Key list, and then click OK.
You can now dynamically change the log file location by editing the Config.ini file before the package is executed.
-
In the left pane, expand Tasks and then click DTSTask_DTSBulkInsertTask_1.
-
In the right pane, double-click DataFile in the Property Name column.
-
Select INI File in the Source list, type C:\Microsoft Press\SQL DTS SBS\DataMovementApplication\Config.ini in the File box, select NewSalesData in the Section list, select NewSalesData in the Key list, and then click OK.
You can now dynamically change the name and location of the file used by this Bulk Insert task to add new data to the SalesStage table by editing the Config.ini file before the package is executed.
-
In the right pane, double-click FormatFile in the Property Name column.
-
Select INI File in the Source list, type C:\Microsoft Press\SQL DTS SBS\DataMovementApplication\Config.ini in the File box, select NewSalesData in the Section list, select FormatFile in the Key list, and then click OK.
You can now dynamically change the name and location of the format file by editing the Config.ini file before the package is executed.
-
Click Close and then click OK.
Now that you have configured these dynamic properties from the initialization file, you will configure the Properties From GVs task to use the giMaxErrorCount global variable to set the MaximumErrors property for the Bulk Insert task.
Dynamically configure the MaximumErrors and the BatchSize properties for the Load SalesStage Table step in the UpdateSalesFacts subpackage
-
On the design sheet, double-click the Properties From GVs step and then click Add.
-
Select the Leave This Dialog Box Open After Adding A Setting check box.
-
In the left pane, expand Tasks and then click DTSTask_DTSBulkInsertTask_1.
-
In the right pane, double-click BatchSize in the PropertyName column.
-
Select Global Variable in the Source list, select giBatchSize in the Variable list, and then click OK.
-
In the right pane, double-click MaximumErrors in the PropertyName column.
-
Select Global Variable in the Source list, select giMaxErrorCount in the Variable list, and then click OK.
-
Click Close and then click OK to save the modified Properties From GVs step.
Important The Bulk Insert task does not log error-causing rows. If you need to capture this information, you must use the Transform Data task to record error- causing rows to an exception file. However, writing errors to an exception file will slow down the data transfer. Ensuring a clean source file will yield the best performance.
Now that you have added the dynamic configuration elements to the UpdateSalesFacts package, you will add branching steps.
Adding Branching Steps to the UpdateSalesFacts Package
In the following procedures, you will add a Load SalesFact Table Bypass step that will enable you to load data into the SalesStage table without also loading data from the SalesStage table into the SalesFact table each time you execute the UpdateSalesFacts subpackage. For example, you might want to load the SalesStage table weekly but load the SalesFact table only monthly. Incrementally loading the staging tables can save time and enable you to perform some error checking before you actually load the fact table and process the data into the Analysis Services cube. You will then add a Delete Or Add Staging Data step and a Delete Staging Data step that will enable you to delete staging data after you have verified that it has been successfully added to the SalesFact table. You will also modify the Bypass Package step to point to the Delete Or Add Staging Data step rather than the Properties From GVs step to enable the steps in this package to execute in the proper order.
Bypass the Load SalesFact Table step by creating an ActiveX Script task in the UpdateSalesFacts subpackage
-
On the Task menu, click ActiveX Script Task.
-
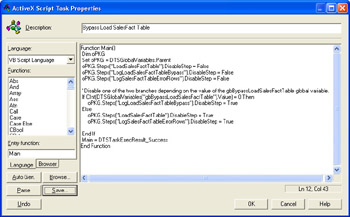
In the Description box, type Bypass Load SalesFact Table and then click Browse.
-
In the Look In list, navigate to C:\Microsoft Press\SQL DTS SBS\Ch9\ChapterFiles and then double-click BypassLoadSalesFactTable.bas.
This ActiveX script directs the execution of the UpdateSalesFacts package to the LoadSalesFactTable and LogSalesFactTableErrorRows steps or to the LogLoadSalesFactTableBypass step based on the value of the gbBypassLoadSalesFactTable global variable. By default, the LoadSalesFactStep and LogSalesFactTableErrorRows steps will execute in parallel.
-
Click OK to save this ActiveX Script task.
Now that you have created this branching step, you will create the global variable used in the branching step.
Add the global variable used by the Bypass Load SalesFact Table step in the UpdateSalesFacts subpackage
-
Right-click an open area on the design sheet and then click Package Properties.
-
On the Global Variables tab, type gbBypassLoadSalesFactTable in the Name column, select Boolean in the Type list, type in the Value box, and then click OK.
The Load SalesFact Table step will execute each time the UpdateSalesFacts package is executed unless the value of the gbBypassLoadSalesFactTable global variable is changed to something other than 0.
Now that you have added this branching step, you are ready to add a delete staging data branching step to this package.
Add a delete phase to the UpdateSalesFacts package by adding an ActiveX Script task and an Execute SQL task and modifying the Bypass Package step
On the task menu, click ActiveX Script Task.
-
In the Description box, type Delete or Add Staging Data and then click Browse.
-
In the Look In list, navigate to C:\Microsoft Press\SQL DTS SBS\Ch9\ChapterFiles and then double-click DeleteOrAddStagingData.bas.
This script is the same script used in the UpdateProductDim and UpdateCustomerDim packages because it performs the exact same function in this package.
-
Click OK to save this ActiveX Script task.
-
On the Task menu, click Execute SQL Task.
-
In the Description box, type Delete Staging Data , select SBS_OLAPConnection in the Existing Connection list, type TRUNCATE TABLE dbo.SalesStage in the SQL Statement box, and then click OK.
-
On the design sheet, delete the On Success constraint between the Bypass Package step and the Properties From GVs step and then double-click the Bypass Package step.
-
Change the phrase PropertiesFromGVs to DeleteOrAddStagingData each place it occurs in the ActiveX script and then click OK.
Now that you have added these branching steps to the UpdateSalesFacts package, you will add logging and error reporting steps to the package to enable you to easily determine the actions performed each time this package executes.
Adding Logging and Error Reporting Steps to the UpdateSalesFacts Package
In the following procedures, you will add logging and error reporting steps to create log entries in the AuditEvents table to record whether the delete or add staging data phase executed, the success or failure of the Load SalesStage Table step, whether the loading of the SalesFact table was bypassed, the success or failure of the Load SalesFact Table step, and the rows in the SalesStage table that were not successfully added to the SalesFact table.
Log whether the delete or add staging data phase executed by creating a Execute SQL task
On the Task menu, click Execute SQL Task.
-
In the Description box, type Log Delete Branch Executed , select SBS_OLAPAdditionalConnection in the existing connection list, and then click Browse.
-
Navigate to C:\Microsoft Press\SQL DTS SBS\Ch9\ChapterFiles in the Look In list and then double-click LogDeleteBranchExecuted.sql.
This script inserts logging information into the AuditEvents table to document that the delete branch of the UpdateSalesFacts package executed. You will configure this step to execute after the completion of the Delete Staging Data step.
-
Click Parameters, select giBatchID in the Input Global Variables list to map this global variable to Parameter 1, select gsPackageName to map this global variable to Parameter 2, and then click OK.
-
Click OK to save this Execute SQL task.
You have created a step that will add a record to the AuditEvents table if the delete phase of this package executes. Next you will add the steps to record whether the Load SalesStage Table succeeds or fails.
Log the success or failure of the Load SalesStage Table step
Switch to SQL Query Analyzer and then click Load SQL Script on the toolbar.
You will create a stored procedure that records the success or failure of the Load SalesStage Table step to the AuditEvents table along with a count of the number of rows in the SalesStage table.
-
In the Look In list, navigate to C:\Microsoft Press\SQL DTS SBS\Ch9\ChapterFiles, and then double-click LogLoadSalesStageTable.sql.
This script creates a stored procedure that enters a row in the AuditEvents table containing the BatchID value, the package name, the step name, the result of the package execution, and the number of rows in the SalesStaging table each time the stored procedure is called. The BatchID , package name, and execution result are passed to the stored procedure as input parameters. Entering the total number of rows in the SalesStage table into the AuditEvents table enables you to compare this value with the number of rows added to the SalesFact table by the Load SalesFact Table step, which you will add to this package. If you add data to the SalesStage table several times before you add these rows to the SalesFact table, you will receive a cumulative total of the rows in the SalesFact table, not the rows added by a particular iteration of the Load SalesStage Table step. If the number of rows added to the SalesFact table does not equal the number of rows in the SalesStage table, you have an error, which caused one or more rows to be dropped.
-
Execute the LogLoadSalesStageTable.sql script to add this stored procedure to the SBS_OLAP database.
-
Switch to the UpdateSalesFacts package in DTS Designer.
-
On the Task menu, click Execute SQL Task.
-
Type Log Load SalesStage Table Success in the Description box, select SBS_OLAPAdditionalConnection in the Existing Connection list, and then type EXEC dbo.LogLoadSalesStageTable ?, ?, 'Success' in the SQL Statement box.
-
Click Parameters, select giBatchID in the Input Global Variables list to map this global variable to Parameter 1, select gsPackageName to map this global variable to Parameter 2, and then click OK.
-
Click OK to save the Execute SQL Task.
-
On the Task menu, click Execute SQL Task.
-
Type Log Load SalesStage Table Failure in the Description box, select SBS_OLAPAdditionalConnection in the Existing Connection list, and then type EXEC dbo.LogLoadSalesStageTable ?, ?, 'Failure' in the SQL Statement box.
-
Click Parameters, select giBatchID in the Input Global Variables list to map this global variable to Parameter 1, select gsPackageName to map this global variable to Parameter 2, and then click OK.
-
Click OK to save the Execute SQL Task.
You have created the steps that will add a record to the AuditEvents table when the Load SalesStage Table step succeeds or fails. Next you will add a step that records whether the loading of new data into the SalesFact table is bypassed.
Log the bypassing of the Load SalesFact Table step
On the Task menu, click Execute SQL Task.
-
Type Log Load SalesFact Table Step Bypass in the Description box, select SBS_OLAPAdditionalConnection in the Existing Connection list, and then click Browse.
-
In the Look In list, navigate to C:\Microsoft Press\SQL DTS SBS\Ch9\ChapterFiles and then double-click LogLoadSalesFactTableBypassed.sql.
This script inserts a row into the AuditEvents table if the Load SalesFact Table step is bypassed.
-
Click Parameters, select giBatchID in the Input Global Variables list to map this global variable to Parameter 1, select gsPackageName to map this global variable to Parameter 2, and then click OK.
-
Click OK to save the Execute SQL task.
You have created the step that records whether the loading of the new data into the SalesFact table is bypassed. Next you will add a step that records the success or failure of the Load SalesFact Table step.
Log the success or failure of the Load SalesFact Table step
Switch to SQL Query Analyzer and then click Load SQL Script on the toolbar.
You will create a stored procedure that records the success or failure of the Load SalesFact Table step to the AuditEvents table.
-
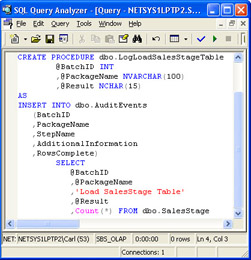
In the Look In list, navigate to C:\Microsoft Press\SQL DTS SBS\Ch9\ChapterFiles and then double-click LogLoadSalesFactTable.sql.
This script creates a stored procedure that enters a row in the AuditEvents table containing the BatchID value, the package name, the step name, and the result of the package execution each time the stored procedure is called. The BatchID , package name, and execution result are passed to the stored procedure as input parameters.
-
Execute the LogLoadSalesFactTable.sql script to add this stored procedure to the SBS_OLAP database.
-
Switch to the UpdateSalesFacts package in DTS Designer.
-
On the Task menu, click Execute SQL Task.
-
Type Log Load SalesFact Table Success in the Description box, select SBS_OLAPAdditionalConnection in the Existing Connection list, and then type EXEC dbo.LogLoadSalesFactTable ?, ?, 'Success' in the SQL Statement box.
-
Click Parameters, select giBatchID in the Input Global Variables list to map this global variable to Parameter 1, select gsPackageName to map this global variable to Parameter 2, and then click OK.
-
Click OK to save the Execute SQL Task.
-
On the Task menu, click Execute SQL Task.
-
Type Log Load SalesFact Table Failure in the Description box, select SBS_OLAPAdditionalConnection in the Existing Connection list, and then type EXEC dbo.LogLoadSalesFactTable ?, ?, 'Failure' in the SQL Statement box.
-
Click Parameters, select giBatchID in the Input Global Variables list to map this global variable to Parameter 1, select gsPackageName to map this global variable to Parameter 2, and then click OK.
-
Click OK to save the Execute SQL Task.
You have created the steps that will add a record to the AuditEvents table when the Load SalesFact Table step succeeds or fails. Next you will add a step that records rows that are not added from the SalesStage table to the SalesFact table to an error table.
Log error rows in the SalesStage table by creating the error table and a stored procedure and then creating an Execute SQL task
Switch to SQL Query Analyzer and then click Load SQL Script.
You will begin by creating an error table that will store rows that could not be inserted into the SalesFact table from the SalesStage table because a corresponding row is missing on one of the dimension tables.
-
In the Look In list, navigate to C:\Microsoft Press\
SQL DTS SBS\Ch9\ChapterFiles and then double-click
CreateSalesFactErrorRowsTable.sql.
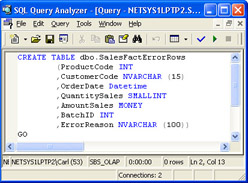
This script creates the SalesFactErrorRows table containing the details of each row that could not be inserted and the reason why the row could not be inserted.
-
Execute the CreateSalesFactErrorRowsTable.sql script to add this table to the SBS_OLAP database.
-
On the SQL Query Analyzer toolbar, click Load SQL Script.
You will create a stored procedure that will detect and insert error rows into the error table each time the stored procedure is executed.
-
In the Look In list, navigate to C:\Microsoft Press\SQL DTS SBS\Ch9\ChapterFiles and then double-click CreateSalesFactErrorRowsSP.sql.
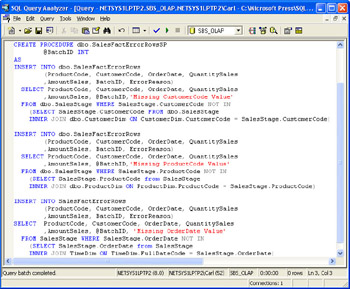
This script creates the SalesFactErrorRowsSP stored procedure that queries the SalesStage table for rows without corresponding entries in the ProductDim , CustomerDim , and TimeDim dimension tables and inserts these rows in the SalesFactErrorRows table.
-
Execute the CreateSalesFactErrorRowsSP.sql script to add this stored procedure to the SBS_OLAP database.
-
Switch to the UpdateSalesFacts package in DTS Designer.
-
On the Task menu, click Execute SQL Task.
-
Type Log SalesFact Table Error Rows in the Description box, select SBS_OLAPAdditionalConnection in the Existing Connection list, and then type EXEC dbo.SalesFactErrorRowsSP ? in the SQL Statement box.
You are using the SBS_OLAPAdditionalConnection connection object for this step because the Load SalesFact Table step, which will execute in parallel with this step, is using the SBS_OLAPConnection connection object.
-
Click Parameters, select giBatchID in the Input Global Variables list for Parameter 1, and then click OK.
-
Click OK to save the Execute SQL Task.
You have created the step that records rows dropped by the INNER JOIN statement into an error table. You are now ready to create user-friendly names for the new steps that you added to this package and ensure that the steps execute in the proper order by adding precedence constraints.
Configuring User-Friendly Names and Adding Precedence Constraints to Ensure That Steps Execute in the Proper Order
In the following procedures, you will configure user-friendly names for the steps referenced in the Bypass Load SalesFact Table step and then add precedence constraints to the steps you have added to the UpdateSalesFacts package to ensure that the steps execute in the proper order.
Change step names to user-friendly names in the UpdateSalesFacts subpackage
Right-click an open area of the design sheet and click Disconnected Edit.
-
In the left pane, expand Steps and then click DTSStep_DTSBulkInsertTask_1.
-
In the right pane, double-click Name in the Property Name column, change the name of this step to LoadSalesStageTable, and then click OK.
-
In the left pane, expand Steps and then click DTSStep_DTSExecuteSQLTask_1.
-
In the right pane, double-click Name in the Property Name column, change the name of this step to LoadSalesFactTable, and then click OK.
-
In the left pane, expand Steps and then click DTSStep_DTSActiveScriptTask_1.
-
In the right pane, double-click Name in the Property Name column, change the name of this step to BypassLoadSalesFactTable, and then click OK.
-
In the left pane, expand Steps and then click DTSStep_DTSActiveScriptTask_2.
-
In the right pane, double-click Name in the Property Name column, change the name of this step to DeleteOrAddStagingData, and then click OK.
-
In the left pane, expand Steps and then click DTSStep_DTSExecuteSQLTask_2.
-
In the right pane, double-click Name in the Property Name column, change the name of this step to DeleteStagingData, and then click OK.
-
In the left pane, expand Steps and then click DTSStep_DTSExecuteSQLTask_3.
-
In the right pane, double-click Name in the Property Name column, change the name of this step to LogDeleteBranchExecuted, and then click OK.
-
In the left pane, expand Steps and then click DTSStep_DTSExecuteSQLTask_4.
-
In the right pane, double-click Name in the Property Name column, change the name of this step to LogLoadSalesStageTableSuccess, and then click OK.
-
In the left pane, expand Steps and then click DTSStep_DTSExecuteSQLTask_5.
-
In the right pane, double-click Name in the Property Name column, change the name of this step to LogLoadSalesStageTableFailure, and then click OK.
-
In the left pane, expand Steps and then click DTSStep_DTSExecuteSQLTask_6.
-
In the right pane, double-click Name in the Property Name column, change the name of this step to LogLoadSalesFactTableBypass, and then click OK.
-
In the left pane, expand Steps and then click DTSStep_DTSExecuteSQLTask_7.
-
In the right pane, double-click Name in the Property Name column, change the name of this step to LogLoadSalesFactTableSuccess, and then click OK.
-
In the left pane, expand Steps and then click DTSStep_DTSExecuteSQLTask_8.
-
In the right pane, double-click Name in the Property Name column, change the name of this step to LogLoadSalesFactTableFailure, and then click OK.
-
In the left pane, expand Steps and then click DTSStep_DTSExecuteSQLTask_9.
-
In the right pane, double-click Name in the Property Name column, change the name of this step to LogSalesFactTableErrorRows, and then click OK.
-
Click Close.
You have given user-friendly names to the new steps that you added to the UpdateSalesFacts package. Now you are ready to add precedence constraints to ensure the package steps execute in the proper order.
Add precedence constraints to the UpdateSalesFacts subpackage
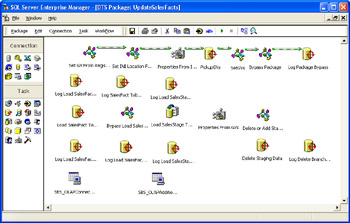
On the design sheet, arrange the steps according to their execution flow.
-
On the design sheet, click the Bypass Package step, and then hold down the Ctrl key and click the Delete Or Add Staging Data step.
-
On the Workflow menu, click On Success.
-
On the design sheet, click the Delete Or Add Staging Data step, and then hold down the Ctrl key and click the Delete Staging Data step.
-
On the Workflow menu, click On Success.
-
On the design sheet, click the Delete Staging Data step, and then hold down the Ctrl key and click the Log Delete Branch Executed step.
-
On the Workflow menu, click On Completion.
-
On the design sheet, click the Delete Or Add Staging Data step, and then hold down the Ctrl key and click the Properties From GVs step.
-
On the Workflow menu, click On Success.
-
On the design sheet, click the Properties From GVs step, and then hold down the Ctrl key and click the Load SalesStage Table step.
-
On the Workflow menu, click On Success.
-
On the design sheet, click the Load SalesStage Table step, and then hold down the Ctrl key and click the Log Load SalesStage Table Success step.
-
On the Workflow menu, click On Success.
-
On the design sheet, click the Load SalesStage Table step, and then hold down the Ctrl key and click the Log Load SalesStage Table Failure step.
-
On the Workflow menu, click On Failure.
-
On the design sheet, click the Load SalesStage Table step, and then hold down the Ctrl key and click the Bypass Load SalesFact Table step.
-
On the Workflow menu, click On Completion.
-
On the design sheet, click the Bypass Load SalesFact Table step, and then hold down the Ctrl key and click the Log Load SalesFact Table Bypass step.
-
On the Workflow menu, click On Success.
-
On the design sheet, click the Bypass Load SalesFact Table step, and then hold down the Ctrl key and click the Load SalesFact Table step.
-
On the Workflow menu, click On Success.
-
On the design sheet, click the Bypass Load SalesFact Table step, and then hold down the Ctrl key and click the Log SalesFact Table Error Rows step.
-
On the Workflow menu, click On Success.
-
On the design sheet, click the Load SalesFact Table step, and then hold down the Ctrl key and click the Log Load SalesFact Table Success step.
-
On the Workflow menu, click On Success.
-
On the design sheet, click the Load SalesFact Table step, and then hold down the Ctrl key and click the Log Load SalesFact Table Failure step.
-
On the Workflow menu, click On Failure.
-
On the toolbar, click Save and then close the UpdateSalesFacts package.
You have successfully created the UpdateSalesFacts package. Next you will add a step to the MasterUpdate package to call this package.
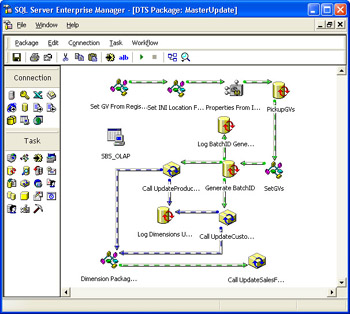
Calling the UpdateSalesFacts Subpackage from the MasterUpdate Package
The UpdateSalesFacts package is designed to be called from the MasterUpdate package after all the dimension update packages have completed. To accomplish this, you will first create an ActiveX Script placeholder task that will execute after all the dimension update packages complete. The ActiveX Script placement holder task will not actually perform any task; instead, it marks the completion of all prior steps. After the ActiveX Script placeholder task executes, each fact table update task will execute in parallel. In our data movement application prototype, only one fact table update package exists. However, in a real-world application, you could add a number of additional fact table update packages for additional Analysis Services cubes.
Add the placeholder step to the MasterUpdate package
In SQL Server Enterprise Manager, right-click Data Transformation Services in your local instance.
-
Click Open Package and then open the most recent version of the MasterUpdate package in the C:\Microsoft Press\SQL DTS SBS\DataMovementApplication folder using a password of mypassword .
-
On the Task menu, click ActiveX Script Task.
-
In the Description box, type Dimension Packages Complete and then click OK.
-
On the design sheet, click the Call UpdateProductDim Subpackage step, and then hold down the Ctrl key and click the Dimension Packages Complete step.
-
On the Workflow menu, click On Completion.
-
On the design sheet, click the Call UpdateCustomerDim Subpackage step, and then hold down the Ctrl key and click the Dimension Packages Complete step.
-
On the Workflow menu, click On Completion.
Now that you have configured this placeholder task to mark the successful completion of all dimension update packages, you are ready to add a step to call the UpdateSalesFacts subpackage.
Add a step to the MasterUpdate package to call the UpdateSalesFacts subpackage
On the Task menu, click Execute Package Task.
-
Type Call UpdateSalesFacts Subpackage in the Description box, select Structured Storage File in the Location list, type C:\Microsoft Press\SQL DTS SBS\DataMovementApplication\UpdateSalesFacts.dts in the File Name box, type UpdateSalesFacts in the Package Name box, and then type mypassword in the Password box.
-
Click the Outer Package Global Variables tab.
-
On the first line in the Variables box, select giBatchID in the Name list.
-
On the second line in the Variables box, select giConfigID in the Name list.
-
On the third line in the Variables box, select giMaxErrorCount in the Name list.
-
On the fourth line in the Variables box, select giBatchSize.
-
On the fifth line in the Variables box, select gbDeleteOrAdd and then click OK to save the Execute Package task.
-
On the design sheet, click the Dimension Packages Complete step, and then hold down the Ctrl key and then click the Call UpdateSalesFacts Subpackage step.
-
On the Workflow menu, click On Success.
-
On the toolbar, click Save and then close the MasterUpdate package.
Now that you have configured the tasks required to update the SalesFact table and record its success or failure, you are ready to test the execution of the data movement application.
Testing the Data Movement Application with the UpdateSalesFacts Package
In the following procedure, you will execute the LoadHistoricalData package to delete all test data from the dimension tables. You will then execute the MasterUpdate package and its subpackages using the delete all configuration to delete all staging data from the staging tables. Finally, you will execute the MasterUpdate package and its subpackages using the default configuration and then query the AuditEvents table to determine the number of rows inserted into the SalesFact table from the SalesStage table by the UpdateSalesFacts package.
Test the execution of the data movement application
In the SQL Server Enterprise Manager console tree, right-click Data Transformation Services in your local instance and then click Open Package.
-
Navigate to the C:\Microsoft Press\SQL DTS SBS\DataMovementApplication folder and then open the most recent version of the LoadHistoricalData package using a password of mypassword .
-
On the toolbar, click Execute.
Performing this step truncates all data in the dimension and fact tables, and then reloads the original historical data. By executing this task, it will be easier to observe the effect of executing the UpdateCustomerDim and UpdateProductDim packages again, followed by the UpdateSalesFacts package because the test data that you have previously loaded into the dimension tables is deleted.
-
Click OK and then click Done.
-
Close the LoadHistoricalData package in DTS Designer and then switch to Windows Explorer.
-
Navigate to the C:\Microsoft Press\SQL DTS SBS\DataMovementApplication folder, and then double-click DeleteAllStagingData.cmd.
Performing this step eliminates all data in the staging tables to make it easier to observe the effect of executing the UpdateCustomerDim and UpdateProductDim packages again because the test data that you have previously loaded into the staging tables is deleted.
-
After the batch file completes, double-click MasterUpdateDefaultConfiguration.cmd in the DataMovementApplication folder.
-
After the batch file completes its execution, switch to SQL Query Analyzer and click Clear Window on the toolbar.
-
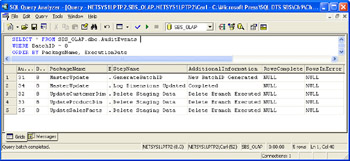
In the query pane, type SELECT * FROM SBS_OLAP.dbo.AuditEvents WHERE BatchID = 8 ORDER BY PackageName, ExecutionDate , and then click Execute on the toolbar.
The delete branch of all three packages executed. The existing delete- all configuration called the delete branch of the UpdateSalesFacts package because the gbDeleteOrAdd global variable was passed from the MasterUpdate package when it called the UpdateSalesFacts package.
-
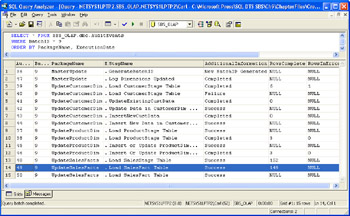
In the query pane, change the query to read SELECT * FROM SBS_OLAP.dbo.AuditEvents WHERE BatchID = 9 ORDER BY PackageName, ExecutionDate , and then click Execute on the toolbar.
The success or failure of the steps and packages in the data movement application are displayed. Notice that only 149 of the 152 rows of data in the SalesStage table were successfully copied to the SalesFact table.
-
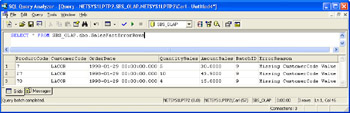
On the toolbar, click Clear Window, type SELECT * FROM SalesFactErrorRows in the query pane, and then click Execute on the toolbar.
Notice that the SalesFactErrorRows table enables you to determine that these three sales on January 29, 1998, were not added to the SalesFact table because the CustomerCode for LACOR was not in the CustomerDim table. Once you correct this error by adding this customer to the CustomerDim table, you can use the sales data captured in the SalesFactErrorRows table as the source for a new batch that is added to the SalesFact table. You will perform this exercise in Chapter 10.
You have successfully added the UpdateSalesFacts package to the data movement application. The final step in creating the data movement application prototype is to add an Analysis Services Processing task to process the data that has been added to the SBS_OLAP database into an Analysis Services cube.
EAN: 2147483647
Pages: 87