Setting Global Variable Values at Run Time
In previous chapters, you learned how to define global variables in DTS packages, use these global variable values in tasks , pass these global variables between packages by using the Execute Package task, and modify these global variable values at run time using the DTSRun command. In this chapter, you will learn how to use the ActiveX Script task to set global variable values at run time based on the value of each variable that is stored in a SQL table. You will take this concept one step further by creating a configuration ID column in the SQL table to permit you to store different possible values for the same global variable. When you retrieve global variable values at run time, you will retrieve the appropriate values based on the value of the configuration ID passed into the package by the DTSRun command. As the number of global variables and the number of packages in the data movement application increase, the ability to set variations of these values for multiple packages in one place and control which set of values are used at run time can save you a significant amount of time and confusion.
| Note | If you skipped Chapter 6, execute the IfYouSkippedChapter6.cmd batch file in the C:\Microsoft Press\SQL DTS SBS\Ch7\SkippedChapterFiles folder. This batch file restores the SBS_OLTP and SBS_OLAP databases and copies the DTS packages that would have been created in Chapters 1 through 6 into the appropriate folders. If you do not want this batch file to overwrite any packages that you created in Chapters 1 through 6, you must move them or rename them before you execute this batch file. |
Creating a Configuration Table in SQL Server
In the following procedure, you will create and populate a global variable configuration table in the SBS_OLAP database. In subsequent procedures, you will create tasks that read global variable values from this table to modify task properties at run time.
Create a global variable configuration table
-
Open SQL Query Analyzer and connect to your local SQL Server instance as a system administrator.
-
On the File menu, click Open.
-
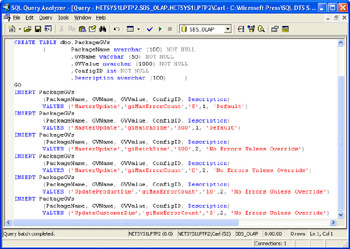
In the Look In list, navigate to C:\Microsoft Press\SQL DTS SBS\Ch7\ChapterFiles and then open the PackageGVs.sql script.
This script creates a five-column table to hold global variable names and values for each package in the data movement application. The ConfigID column enables you to store different values for the same package global variable, and the Description column enables you to describe each configuration. This script also loads six records into this new table. The first two records define a default configuration of the data movement application (the Default configuration). The next four records define an alternate configuration of global variable values (the No Errors Unless Override configuration). In the Default configuration, a value is set for each global variable in the MasterUpdate package, and this value carries to each subpackage. In the No Errors Unless Override configuration, a value is set for each global variable in the MasterUpdate package, and then a different value for the giMaxErrorCount global variable is specified for the UpdateCustomerDim and the UpdateProductDim subpackages.
-
Execute the PackageGVs.sql script to create this table and populate its values.
Now that you have created and populated this table, you are ready to modify the MasterUpdate package to connect to and read this table.
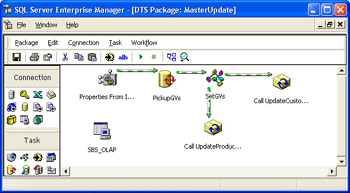
Updating Global Variable Values in the MasterUpdate Package from the Configuration Table
In the following procedures, you will add a dynamically configured connection object to the SBS_OLAP database and then create an Execute SQL task in the MasterUpdate package that will use this connection object to read the global variable configuration table at run time and store the rowset in a global variable. You will then create an ActiveX Script task in this package to read the stored rowset and update the package global variable values before executing the remaining tasks in the package.
Create a dynamically configured data link connection in the MasterUpdate package to the SBS_OLAP database
-
Open SQL Server Enterprise Manager and then right-click Data Transformation Services in your local instance.
-
Click Open Package and then open the most recent version of the MasterUpdate package in the C:\Microsoft Press\SQL DTS SBS\DataMovementApplication folder using a password of mypassword .
-
On the Connection menu, click Microsoft Data Link.
Before you can create an Execute SQL task, you must define a connection object for the Execute SQL task to use.
-
Type SBS_OLAP in the New Connection box, type C:\Microsoft Press\SQL DTS SBS\DataMovementApplication\SBS_OLAP.udl in the UDL File Name box, select Always Read Properties From UDL File, and then click OK to save the connection object.
-
On the Task menu, click Dynamic Properties Task, type Properties From INI File in the Description box, and then click Add.
Tip As you add objects to your data movement application, remember to set them up for dynamic configuration.
-
In the left pane, expand Connections and then click SBS_OLAP.
-
In the right pane, double-click UDLPath.
-
In the Add/Edit Assignment dialog box, verify that INI File is selected in the Source list, type C:\Microsoft Press\SQL DTS SBS\DataMovementApplication\Config.ini in the File box, select UDL in the Section list, select SBS_OLAPUDLFilePath in the Key list, and then click OK.
-
Click OK to save this Dynamic Properties task.
Now that you have configured a dynamic connection object in the MasterUpdate package to the SBS_OLAP database, you are ready to add an Execute SQL task to retrieve global variable values from the PackageGVs table.
Read the PackageGVs configuration table into a global variable in the MasterUpdate package
-
On the Task menu, click Execute SQL Task.
-
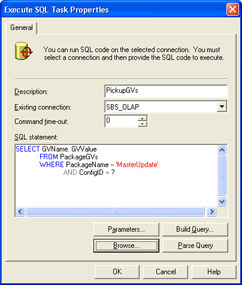
Type PickupGVs in the Description box and then click Browse.
-
In the Look In list, navigate to C:\Microsoft Press\SQL DTS SBS\Ch7\ChapterFiles and double-click PickupGVsMaster.sql.
Based on a configuration ID, this script retrieves each MasterUpdate package global variable and its value from the PackageGVs table. As you learned in Chapter 2, the question mark in this script represents a parameter that is populated from a global variable in the package.
-
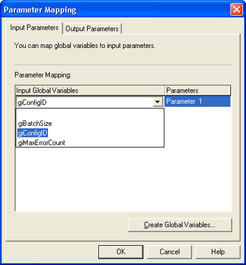
Click Parameters to create a global variable that will store the value for the configuration ID parameter and then map this global variable to the parameter in this query.
-
Click Create Global Variables on the Input Parameters tab, type giConfigID in the Name column, select Integer (1 byte) in the Type list, type 1 in the Value column, and then click OK.
Using a default value of 1 for this global variable specifies that only the global variable values in the PackageGVs table with a configuration ID of 1 will be retrieved, unless a different value for the giConfigID global variable is passed to the package at execution time.
Tip The prefix of gi used in the global variable naming will indicate to the ActiveX script you will use that the data type for this variable is an integer. Additional prefixes that you will use include gs for string data types, gb for Boolean data types, and go for other. Also, remember that global variable names are case sensitive, so make sure you type them exactly as they appear in this text to prevent the saved scripts that you use from failing.
-
Select giConfigID from the Input Global Variables list.
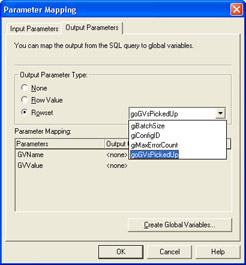
Click the Output Parameters tab, where you can map the output from the SQL query to none, one, or many global variables.
By default, no data is stored when you run an Execute SQL task and any output generated by the SQL statement is not preserved within the package. You can choose to either store each value returned in a separate global variable or store the entire rowset returned in a single global variable as a disconnected Microsoft ActiveX Data Objects (ADO) recordset. For the PickupGVs task, you will store the data returned in a single global variable that will be read by the ActiveX Script task that you will configure in the next procedure.
-
Click Create Global Variables, type goGVsPickedUp in the Name column, select String in the Type column, and then click OK. No default value applies in this context, and the prefix go signifies that this global variable is used to hold the output from a SQL query.
-
Click Rowset and then click goGVsPickedUp in the global variables list.
-
Click OK to save the parameter mapping for the query and then click OK to save the Execute SQL task.
Now that you have configured an Execute SQL task to retrieve global variable values from the PackageGVs table, you are ready to create an ActiveX Script task to read each of the records in the recordset stored in the global variable and update the applicable global variables in the MasterUpdate package.
Update global variable values in the MasterUpdate package by creating an ActiveX Script task
-
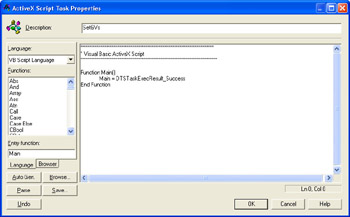
On the Task menu, click ActiveX Script Task and then type SetGVs in the Description box.
The default code in the ActiveX Script task executes in the Main phase, and since no code has been added to perform any action, the Main phase simply reports that the phase completed successfully and then exits.
-
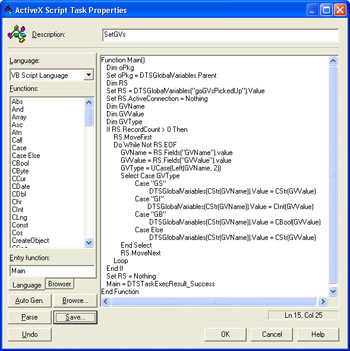
Click Browse, navigate to C:\Microsoft Press\SQL DTS SBS\Ch7\ChapterFiles, and then double-click SetGVs.bas.
This script begins by declaring a variable and placing a reference to the package into the variable. This script then declares a second variable to contain the disconnected recordset from the Execute SQL task (which is passed through the goGVsPickedUp global variable). This script then declares three additional variables for the retrieved information: the global variable name, the value, and the type. This script parses each row in the recordset and sets the value of the appropriate global variable in the package to the value retrieved from the PackageGVs table. This script uses the Case statement and VBScript type conversion functions ( CStr , CInt , or CBool ) to convert the global variable values retrieved from the recordset to the correct data type ( string , integer , or Boolean ) for the global variable. This script uses the first two characters of the global variable name to determine the appropriate data type to which to convert the retrieved value. This script also uses the CStr function to convert the variable name retrieved from the recordset to a string value.
Note Conversion functions are required in ActiveX scripts when working with the DTS object model because all variables within a VBScript data type are defined as variant. The conversion function ensures that the variable value is set to the appropriate data type.
-
Click OK to save the ActiveX Script task.
You have just configured tasks to read new global variable values from a SQL table and then update global variable values in the MasterUpdate package. Now you need to pass the giConfigID global variable as an outer package global variable to each subpackage. This enables you to set a configuration ID value for the MasterUpdate package and allow this value to be used by all subpackages to retrieve and update global variable values unique to each subpackage. You will also add another dynamic configuration step to the MasterUpdate package using information you will store in the initialization file.
Passing the giConfigID Value to Subpackages and Dynamically Configuring the Execute Package Tasks in the MasterUpdate Package
In the following procedures, you will configure each of the Execute Package tasks in the MasterUpdate package to pass the ConfigID global variable value from the MasterUpdate package to each subpackage. You will also add a Dynamic Properties task to the MasterUpdate package to read the location of each subpackage from the Config.ini initialization file.
Pass the giConfigID value from the MasterUpdate package to each subpackage by updating the Execute Package tasks
-
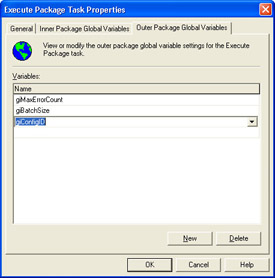
On the design sheet, double-click the Call UpdateProductDim Subpackage step and then click the Outer Package Global Variables tab.
To pass the value for the giConfigID global variable from the master package to the UpdateProductDim subpackage, you must specify this variable as an outer package global variable in the Call UpdateProductDim Subpackage step.
-
In the Name list, select giConfigID to add this global variable to the list of global variables passed to the UpdateProductDim subpackage.
-
Click OK and then double-click the Call UpdateCustomerDim Subpackage step.
-
On the Outer Package Global Variables tab, select giConfigID in the Name list to add this global variable to the list of global variables passed to the UpdateCustomerDim subpackage, and then click OK.
Before configuring precedence constraints between the newly added steps, you will modify the Properties From INI File step to read subpackage location information from the Config.ini initialization file. This will enable you to move the structured storage files for each subpackage to a new location without breaking the data movement application. To do this, you must first add an entry in the Config.ini file to point to each of these subpackages.
Add subpackage location information to the Config.ini initialization file
-
Using Microsoft Windows Explorer, navigate to C:\Microsoft Press\SQL DTS SBS\DataMovementApplication and then double- click Config.ini.
-
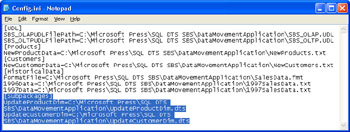
On a new line at the end of the file, type [SubPackages] and then press Enter.
-
Type UpdateProductDim=C:\Microsoft Press\SQL DTS SBS\DataMovementApplication\UpdateProductDim.dts and then press Enter.
-
Type UpdateCustomerDim=C:\Microsoft Press\SQL DTS SBS\DataMovementApplication\UpdateCustomerDim.dts and then click Save on the File menu. Do not close the Config.ini file.
Now that you have entries for the file locations of each subpackage called from the MasterUpdate package, you are ready to dynamically configure the FileName property in each Execute Package task in this package.
Read subpackage location information into the MasterUpdate package from the Config.ini initialization file
-
Switch to the MasterUpdate package in SQL Server Enterprise Manager.
-
On the design sheet, double-click the Properties From INI File step and then click Add.
-
Select the Leave This Dialog Box Open After Adding A Setting check box.
-
In the left pane, expand Tasks and then click DTSTask_DTSExecutePackageTask_1.
DTSTask_DTSExecutePackageTask_1 is the name for the Execute Package task called by the Call UpdateProductDim Subpackage step.
-
In the right pane, double-click FileName, verify INI is selected in the Source list, type C:\Microsoft Press\SQL DTS SBS\DataMovementApplication\Config.ini in the File list, select SubPackages in the Section list, select UpdateProductDim in the Key list, and then click OK.
-
In the left pane, click DTSTask_DTSExecutePackageTask_2 in the Tasks node.
DTSTask_DTSExecutePackageTask_2 is the name for the Execute Package task called by the Call UpdateCustomerDim Subpackage step.
-
In the right pane, double-click FileName, verify INI is selected in the Source list, type C:\Microsoft Press\SQL DTS SBS\DataMovementApplication\Config.ini in the File list, select SubPackages in the Section list, select UpdateCustomerDim in the Key list, and then click OK.
-
Click Close and then click OK.
Now that you have added these new steps to the MasterUpdate package, you need to configure the appropriate precedence constraints to ensure that they execute in the proper order.
Specifying Step Execution Order in the MasterUpdate Package and Testing the Package
In the following procedures, you will configure the step that sets the path to the SBS_OLAP database to execute first, followed by the step that reads updated global variable values from the PackageGVs table, and then the step that updates the global variable values from the rowset global variable. You will configure the step that dynamically updates the Execute Package tasks to execute after these steps complete, followed by the steps that call the subpackages. You will then test the execution of the MasterUpdate package as updated by the previous procedures.
Ensure package steps execute in the proper order by configuring precedence constraints in the MasterUpdate package
-
On the design sheet, click the Properties From INI File step, and then hold down the Ctrl key and click the PickUpGVs step.
Tip For easier viewing, as you are adding the precedence constraints, arrange the tasks on the design sheet in logical execution order.
-
On the Workflow menu, click On Success.
-
On the design sheet, click the PickupGVs step, and then hold down the Ctrl key and click the SetGVs step.
-
On the Workflow menu, click On Success.
-
On the design sheet, click the SetGVs step, and then hold down the Ctrl key and click the Call UpdateProductDim Subpackage step.
-
On the Workflow menu, click On Success.
-
On the design sheet, click the SetGVs step, and then hold down the Ctrl key and click the Call UpdateCustomerDim Subpackage step.
-
On the Workflow menu, click On Success.
-
On the toolbar, click Save.
Now that you have successfully configured the MasterUpdate package to read global variable values from the PackageGVs table in SQL Server and update them in the package, you are ready to test the execution of the MasterUpdate package.
Test the execution of the MasterUpdate package
-
On the toolbar, click Execute to execute the package tasks.
All tasks in the MasterUpdate package complete successfully, but one task in the UpdateCustomerDim subpackage failed. The UpdateCustomerDim package, which was called by the Call UpdateCustomerDim Subpackage step, processed all 29 rows (inserting 27 of these rows) of data because the giMaxErrorCount global variable value is set to 5 and the giBatchSize global variable is set to 500 for the MasterUpdate package by the SetGVs step, and these values are passed to the UpdateCustomerDim package as outer package global variables.
-
Click OK and then click Done.
-
Switch to SQL Query Analyzer and then click Load SQL Script on the toolbar.
-
Navigate to C:\Microsoft Press\SQL DTS SBS\Ch7\ChapterFiles in the Look In list and then double-click ModifyDefaultConfig.sql.
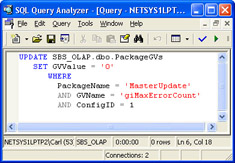
This script modifies the default configuration by setting the value of the giMaxErrorCount global variable to 0 for the MasterUpdate package where the ConfigID value is 1.
-
On the toolbar, click Execute to modify the default configuration and then switch to the MasterUpdate package in DTS Designer.
-
On the toolbar, click Execute to verify the execution of this package with this new configuration value for the giMaxErrorCount global variable.
One task fails.
-
Click OK and then double-click Call UpdateCustomerDim Subpackage in the Status window to verify the reason the task in the UpdateCustomerDim subpackage failed.
The UpdateCustomerDim package that was called by the Call UpdateCustomerDim Subpackage step did not process all 29 rows; the number of failing rows exceeded the maximum number specified. This is because the MasterUpdate package was executed using the default configuration. This configuration specifies that the giMaxErrorCount global variable value is 0 and that the giBatchSize global variable value is 500 for the MasterUpdate package. The SetGVs step in the MasterUpdate package sets these values at run time, and these values are passed to the UpdateCustomerDim and UpdateProductDim packages as outer package global variables.
-
Click OK and then click Done.
-
Close the MasterUpdate package in DTS Designer.
Now that you have verified that the MasterUpdate package can read global variable values from the PackagesGVs table in SQL Server and update them in the package, you are ready to configure the UpdateProductDim and UpdateCustomerDim packages to also read global variable values from the PackageGVs table. This will enable you to use different global variable values in each package if circumstances require this capability.
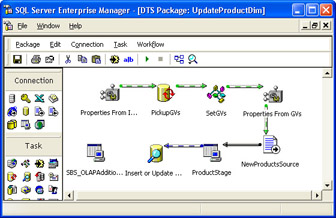
Updating Global Variable Values in the UpdateProductDim Package from the Configuration Table
In the following procedures, you will create an Execute SQL task in the UpdateProductDim package that will read the global variable configuration table at run time and store the rowset in a global variable. You will then create an ActiveX Script task in this package to read the stored rowset and update the package global variable values before executing the remaining tasks in the package.
Read the PackageGVs configuration table into a global variable in the UpdateProductDim package by creating an Execute SQL task
-
In the SQL Server Enterprise Manager console tree, right-click Data Transformation Services in your local instance.
-
Click Open Package and then open the most recent version of the UpdateProductDim package in the C:\Microsoft Press\SQL DTS SBS\ DataMovementApplication folder using a password of mypassword .
-
On the Task menu, click Execute SQL Task.
-
Type PickupGVs in the Description box, click SBS_OLAPAdditionalConnection in the Existing Connection list, and then click Browse.
You could select either of the connection objects to the SBS_OLAP database because neither of them will be in use when this task executes. This is because the PickupGVs task will complete before any other task needs either of the connection objects.
-
In the Look In list, navigate to C:\Microsoft Press\SQL DTS SBS\Ch7\ChapterFiles, and double-click PickupGVsUpdateProductDim.sql.
Based on a configuration ID, this script retrieves each UpdateProductDim package global variable and its value from the PackageGVs table.
-
Click Parameters to create a global variable that will store the value for the configuration ID parameter and then map this global variable to the parameter in this query.
-
Click Create Global Variables on the Input Parameters tab, type giConfigID in the Name column, select Integer (1 byte) in the Type list, type 1 in the Value column, and then click OK.
-
Select giConfigID in the Input Global Variables list.
-
Click the Output Parameters tab.
-
Click Create Global Variables, type goGVsPickedUp in the Name column, select String in the Type column, and then click OK.
-
Click Rowset, click goGVsPickedUp in the global variables list, click OK to save the parameter mapping for the query, and then click OK to save the Execute SQL task.
You have just configured an Execute SQL task to retrieve global variable values from the PackageGVs table. Now you are ready to create an ActiveX Script task to read each of the records in the rowset stored in the global variable, and update the applicable global variables in the UpdateProductDim package.
Set global variable values in the UpdateProductDim Package by creating an ActiveX Script task
-
On the Task menu, click ActiveX Script Task and then type SetGVs in the Description box.
-
Click Browse, navigate to C:\Microsoft Press\SQL DTS SBS\Ch7\ChapterFiles, and then double-click SetGVs.bas.
This code is identical to the code used in the MasterUpdate package because it performs exactly the same function in this package and the global variable holding the rowset has the same name in both packages.
-
Click OK.
Before configuring precedence constraints between these newly added steps, you will modify the Properties From INI File step to specify dynamically configured exception file paths for use by the Load ProductStage Table step and the Insert Or Update ProductDim Table step. Configuring dynamic paths for these exception files will enable you to specify valid paths if you move the data movement application. To do this, you must first add entries in the Config.ini file to point to the locations for these exception files.
Updating Exception File Location Information Dynamically for UpdateProductDim Package Tasks
In the following procedures, you will add exception file location information for the Load ProductStage Table and Insert Or Update ProductDim Table steps to the Config.ini initialization file. You will then modify the Properties From INI File step to read this information and update the appropriate steps before they are executed.
Add exception file location information to the Config.ini initialization file
-
Switch to the Config.ini file in Notepad.
-
On a new line at the end of the file, type [ExceptionFiles] and then press Enter.
-
Type Load ProductStage Table= C:\Microsoft Press\SQL DTS SBS\ DataMovementApplication\LoadProductStageTableExceptionFile.txt and then press Enter.
-
Type Insert or Update ProductDim Table=C:\Microsoft Press\SQL DTS SBS\DataMovementApplication\LoadProductDimTableExceptionFile.txt and then click Save on the File menu. Do not close the Config.ini file in Notepad.
Now that you have added these location entries to the Config.ini initialization file, you are ready to update the Properties From INI File step to use these entries to dynamically configure the ExceptionFileName property in the Load ProductStage Table step and the Insert Or Update ProductDim Table step.
Read exception file locations into the UpdateProductDim package from the Config.ini initialization file
-
Switch to the UpdateProductDim package in SQL Server Enterprise Manager.
-
On the design sheet, double-click the Properties From INI File step and then click Add.
-
Select the Leave This Dialog Box Open After Adding A Setting check box.
-
In the left pane, expand Tasks and then click DTSTask_DTSDataPumpTask_1.
DTSTask_DTSDataPumpTask_1 is the name for the Transform Data task called by the Load ProductStage Table step.
-
In the right pane, double-click ExceptionFileName, verify INI is selected in the Source list, type C:\Microsoft Press\SQL DTS SBS\ DataMovementApplication\Config.ini in the File list, select ExceptionFiles in the Section list, select Load ProductStage Table in the Key list, and then click OK.
-
Click Close and then click OK.
-
In the left pane, click DTSTask_DTSDataDrivenQueryTask_1.
DTSTask_DTSDataDriveQueryTask_1 is the name for the Data Driven Query task called by the Insert Or Update ProductDim Table step.
-
In the right pane, double-click ExceptionFileName, verify INI is selected in the Source list, type C:\Microsoft Press\SQL DTS SBS\ DataMovementApplication\Config.ini in the File list, select ExceptionFiles in the Section list, select Insert Or Update ProductDim Table in the Key list, and then click OK.
-
Click Close and then click OK to save these modifications to the Dynamic Properties task.
Now that you have added these new tasks, you need to ensure that they execute in the proper order.
Specifying Step Execution Order in the UpdateProductDim Package
In the following procedure, you will configure the step that reads the properties from the initialization file to execute first, followed by the step that reads updated global variable values from the PackageGVs table, and then the step that updates the global variable values from the rowset global variable. You will configure the step that updates task properties from global variables to execute after these steps are complete, followed by the step that updates the ProductStage table. You will then configure the step that updates the ProductDim table. However, the UpdateProductDim package currently contains a step that calls a single Dynamic Properties task that reads the values from the Config.ini initialization file and updates task properties from global variable values. You must split these operations into two separate steps by placing them in two separate Dynamic Properties tasks that are called at different points in the package execution.
Ensure package steps execute in the proper order by configuring precedence constraints in the UpdateProductDim package
-
On the design sheet, delete the On Success constraint between the Properties From INI File step and the NewProductsSource connection object. (To delete it, highlight the constraint and then press Delete.)
-
On the design sheet, double-click the Properties From INI File step, click MaximumErrorCount in the Destination Property column, and then click Delete.
-
Click InsertCommitSize in the Destination Property column, click Delete, and then click OK to save the modified Dynamic Properties task.
These two properties of the Transform Data task that load data into the ProductStage table must be dynamically configured in a separate Dynamic Properties task that is called later in the execution order.
-
On the Task menu, click Dynamic Properties Task, type Properties From GVs in the Description box, and then click Add.
-
In the left pane, expand Tasks and then click DTSTask_DTSDataPumpTask_1.
This is the task called by the Load ProductStage Table step.
-
Select the Leave This Dialog Box Open After Adding A Setting check box.
-
In the right pane, double-click MaximumErrorCount, click Global Variable in the Source list, click giMaxErrorCount in the Variable list, and then click OK.
-
In the right pane, double-click InsertCommitSize, select Global Variable in the Source list, select giBatchSize in the Variable list, and then click OK.
-
Click Close and then click OK to save this Dynamic Properties task.
-
On the design sheet, click the Properties From INI File step, and then hold down the Ctrl key and click the PickupGVs step.
-
On the Workflow menu, click On Success.
-
On the design sheet, click the PickupGVs step, and then hold down the Ctrl key and click the SetGVs step.
-
On the Workflow menu, click On Success.
Tip At this point, you will probably want to rearrange the visual display of these tasks on the design sheet to represent the actual workflow.
-
On the design sheet, click the SetGVs step, and then hold down the Ctrl key and click the Properties From GVs step.
-
On the Workflow menu, click On Success.
-
On the design sheet, click the Properties From GVs step, and then hold down the Ctrl key and click the NewProductsSource connection object.
-
On the Workflow menu, click On Success.
-
On the toolbar, click Save and then close the UpdateProductDim package in DTS Designer.
You have successfully configured the UpdateProductDim package to read global variable values from the PackageGVs table in SQL Server and update them in the package. Now you are ready to configure the UpdateCustomerDim package in the same manner.
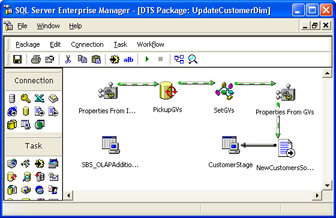
Updating Global Variable Values in the UpdateCustomerDim Package from the Configuration Table
In the following procedures, you will create an Execute SQL task in the UpdateCustomerDim package that will read the global variable configuration table at run time and store the rowset in a global variable. You will then create an ActiveX Script task in this package to read the stored rowset and update the package global variable values before executing the remaining tasks in the package.
Read the PackageGVs configuration table into a global variable in the UpdateCustomerDim package by creating an Execute SQL task
-
Switch to SQL Server Enterprise Manager, and then right-click Data Transformation Services in your local instance.
-
Click Open Package and then open the most recent version of the UpdateCustomerDim package in the C:\Microsoft Press\SQL DTS SBS\ DataMovementApplication folder using a password of mypassword .
-
On the Task menu, click Execute SQL Task.
-
Type PickupGVs in the Description box, select SBS_OLAPAdditionalConnection in the Existing Connection list, and then click Browse.
-
In the Look In list, navigate to C:\Microsoft Press\SQL DTS SBS\ Ch7\ChapterFiles, and double-click PickupGVsUpdateCustomerDim.sql.
Based on a configuration ID, this script retrieves each UpdateCustomerDim package global variable and its value from the PackageGVs table.
-
Click Parameters to create a global variable that will store the value for the configuration ID parameter and then map this global variable to the parameter in this query.
-
Click Create Global Variables on the Input Parameters tab, type giConfigID in the Name column, select Integer (1 byte) in the Type list, type 1 in the Value column, and then click OK.
-
Select giConfigID in the Input Global Variables list.
-
Click the Output Parameters tab.
-
Click Create Global Variables, type goGVsPickedUp in the Name column, select String in the Type column, and then click OK.
-
Click Rowset, select goGVsPickedUp in the global variables list, click OK to save the parameter mapping for the query, and then click OK to save the Execute SQL task.
You have just configured an Execute SQL task to retrieve global variable values from the PackageGVs table. Now you are ready to create an ActiveX Script task to read each of the records in the rowset stored in the global variable, and update the applicable global variables in the UpdateCustomerDim package.
Set global variable values in the UpdateCustomerDim package by creating an ActiveX Script task
-
On the Task menu, click ActiveX Script Task, and then type SetGVs in the Description box.
-
Click Browse, navigate to C:\Microsoft Press\SQL DTS SBS\ Ch7\ChapterFiles, and then double-click SetGVs.bas.
This code is identical to the code used in the MasterUpdate package because it performs exactly the same function in this package and the global variable holding the rowset has the same name in both packages.
-
Click OK.
Before configuring precedence constraints between these newly added steps, you will modify the Properties From INI File step to specify a dynamically configured exception file path for use by the Load CustomerStage Table step. Configuring a dynamic path for this exception file will enable you to specify a valid path if you move the data movement application. To do this, you must first add an entry in the Config.ini file to point to the location for this exception file.
Updating Exception File Location Information Dynamically for UpdateCustomerDim Package Tasks
In the following procedures, you will add exception file location information for the Load CustomerStage Table step to the Config.ini initialization file. You will then modify the Properties From INI File step to read this information and update the appropriate step before it is executed.
Add exception file location information to the Config.ini initialization file
-
Switch to the Config.ini file in Notepad.
-
On a new line at the end of the file, type Load CustomerStage Table=C:\Microsoft Press\SQL DTS SBS\DataMovementApplication\ LoadCustomerStageTableExceptionFile.txt and then click Save on the File menu.
Now that you have added this location entry to the Config.ini initialization file, you are ready to update the Properties From INI File step to use the entry to dynamically configure the ExceptionFileName property in the Load CustomerStage Table step.
Read exception file locations from the Config.ini initialization file
-
Switch to the UpdateCustomerDim package in SQL Server Enterprise Manager.
-
On the design sheet, double-click the Properties From INI File step, and then click Add.
-
In the left pane, expand Tasks and then click DTSTask_DTSDataPumpTask_1.
DTSTask_DTSDataPumpTask_1 is the name for the Transform Data task called by the Load CustomerStage Table step.
-
In the right pane, double-click ExceptionFileName, verify INI is selected in the Source list, type C:\Microsoft Press\SQL DTS SBS\DataMovementApplication\Config.ini in the File list, select ExceptionFiles in the Section list, select Load CustomerStage Table in the Key list, and then click OK.
-
Click OK to save these modifications to the Dynamic Properties task.
Now that you have added these new tasks, you need to ensure that they execute in the proper order.
Specifying Step Execution Order in the UpdateCustomerDim Package
In the following procedure, you will configure the step that reads the properties from the initialization file to execute first, followed by the step that reads updated global variable values from the PackageGVs table, and then the step that updates the global variable values from the rowset global variable. You will configure the step that updates task properties from global variables to execute after these steps complete, followed by the step that updates the CustomerStage table. In Chapter 8, you will add the steps that update and insert new data to the CustomerDim table. However, the UpdateCustomerDim package currently contains a step that calls a single Dynamic Properties task that reads the values from the Config.ini initialization file and updates task properties from global variable values. You must split these operations into two separate steps by placing them in two separate Dynamic Properties tasks that are called at different points in the package execution.
Ensure package steps execute in the proper order by configuring precedence constraints in the UpdateCustomerDim package
-
On the design sheet, delete the On Success constraint between the Properties From INI File step and the NewCustomersSource connection object.
-
On the design sheet, double-click the Properties From INI File step, click MaximumErrorCount in the Destination Property column, and then click Delete.
-
Click InsertCommitSize in the Destination Property column, click Delete, and then click OK to save the modified Dynamic Properties task.
These two properties of the Transform Data task that load data into the CustomerStage table must be dynamically configured in a separate Dynamic Properties task that is called later in the execution order.
-
On the Task menu, click Dynamic Properties Task, type Properties From GVs in the Description box, and then click Add.
-
Select the Leave This Dialog Box Open After Adding A Setting check box.
-
In the left pane, expand Tasks, and then click DTSTask_DTSDataPumpTask_1.
This is the task called by the Load CustomertStage Table step.
-
In the right pane, double-click MaximumErrorCount, click Global Variable in the Source list, click giMaxErrorCount in the Variable list, and then click OK.
-
In the right pane, double-click InsertCommitSize, select Global Variable in the Source list, select giBatchSize in the Variable list, and then click OK.
-
Click Close and then click OK to save this Dynamic Properties task.
-
On the design sheet, click the Properties From INI File step and then hold down the Ctrl key and click the PickUpGVs step.
-
On the Workflow menu, click On Success.
-
On the design sheet, click the PickupGVs step, and then hold down the Ctrl key and click the SetGVs step.
-
On the Workflow menu, click On Success.
Tip At this point, you will probably want to rearrange the visual display of these tasks on the design sheet to represent the actual workflow.
-
On the design sheet, click the SetGVs step, and then hold down the Ctrl key and click the Properties From GVs step.
-
On the Workflow menu, click On Success.
-
On the design sheet, click the Properties From GVs step, and then hold down the Ctrl key and click the NewCustomersSource connection object.
-
On the Workflow menu, click On Success.
-
On the toolbar, click Save and then close the UpdateCustomerDim package in DTS Designer.
You have configured these three packages to enable them to dynamically retrieve and update task and package values at run time from a SQL table and from an initialization file. Now you are ready to test the execution of these packages with these new configuration steps.
Testing Configuration Table Configurations
In the following procedures, you will execute the MasterUpdate package and its subpackages from DTS Designer using the default giConfigID value. You will then create a DTSRun batch file that sets a different giConfigID value and then execute these packages using this batch file to verify that the new dynamic configuration steps work properly.
Execute the MasterUpdate package from DTS Designer
-
In SQL Server Enterprise Manager console tree, right-click Data Transformation Services in your local instance.
-
Click Open Package and then open the most recent version of the MasterUpdate package in the C:\Microsoft Press\SQL DTS SBS\ DataMovementApplication folder using a password of mypassword .
-
On the toolbar, click Execute.
One task fails.
-
Click OK and then double-click Call UpdateCustomerDim Subpackage in the Status window to verify the reason the task in the UpdateCustomerDim subpackage failed.
The UpdateCustomerDim package that was called by the Call UpdateCustomerDim Subpackage step did not process all 29 rows; the number of failing rows exceeded the maximum number specified. This is because the MasterUpdate package was executed using the default configuration.
-
Click OK and then click Done.
-
Close the MasterUpdate package in DTS Designer.
Now that you have verified that the MasterUpdate package and its subpackages execute correctly while taking their settings from the Config.ini initialization file and the PackageGVs table, you are ready to create a DTSRun batch file to execute these packages using different configuration values.
Create and execute a DTSRun batch file
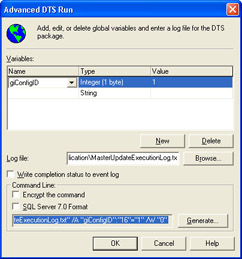
To execute the MasterUpdate package and its subpackages with different configuration values, you will create a batch file that will enable you to easily modify the value of the giConfigID global variable at run time, which in turn changes the values retrieved from the PackageGVs table by each package in the data movement application.
-
On the Windows Start menu, click Run, type DTSRunUI in the Open box, and then click OK.
-
In the Location list, select Structured Storage File, and then type C:\Microsoft Press\SQL DTS SBS\DataMovementApplication\MasterUpdate.dts in the File Name box .
-
Click the ellipsis next to the Package Name text box, and then double-click MasterUpdate.
-
Click Advanced, type mypassword in the Password box, and then click OK.
-
Click the first row in the Name column, and then select giConfigID in the Name list.
-
Type C:\Microsoft Press\SQL DTS SBS\DataMovementApplication\MasterUpdateExecutionLog.txt in the Log File text box.
-
Click Generate, and copy the generated DTSRun statement to the clipboard.
-
Click Cancel, and then click Cancel again.
-
Open Notepad, and then click Paste on the Edit menu.
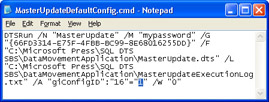
Notice that the value for the giConfigID variable is 1.
-
Click Save As on the File menu.
-
Navigate to C:\Microsoft Press\SQL DTS SBS\DataMovementApplication in the Save In list, type MasterUpdateDefaultConfig.cmd in the File Name box, select All Files in the Save As Type box, and then click Save. Do not close Notepad.
-
Using Windows Explorer, navigate to the C:\Microsoft Press\SQL DTS SBS\DataMovementApplication folder and then double-click MasterUpdateDefaultConfig.cmd.
The MasterUpdate package executes. To verify the tasks and packages that executed, you need to look at the log files for each package.
-
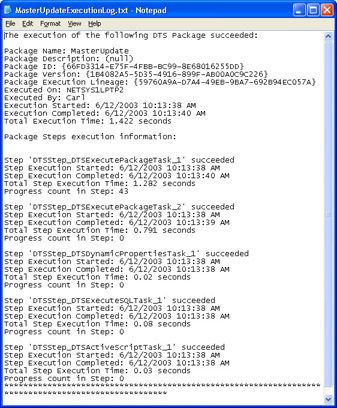
In the C:\Microsoft Press\SQL DTS SBS\DataMovementApplication folder, double-click the MasterUpdateExecutionLog.txt file.
Notice that this log indicates that each task in the MasterUpdate package succeeded. However, this log file does not tell you anything about the success or failure of individual tasks in the subpackages. Remember that by default the failure of a task in a package does not cause the package to fail. To determine the success or failure of each task in a subpackage, you must look at the log for each subpackage.
-
Close the MasterUpdateExecutionLog.txt file in Notepad and then double-click the LoadCustomerStageTableExceptionFile.txt file in the C:\Microsoft Press\SQL DTS SBS\DataMovementApplication folder.
-
Scroll down in this file to the most recent execution of the UpdateCustomerDim package.
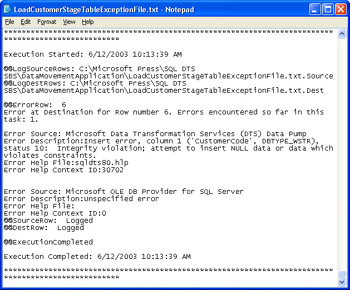
Notice that one error row was encountered in this task. However, you cannot tell from this error log whether this error caused the task to terminate or continue until a specific number of errors were encountered (unless you happen to know that the source file also contained an error in row 14, which was not processed). This log file is the error log for the Transform Data task called by the Load CustomerStage Table step, not an error log for the UpdateCustomerDim package.
-
Close the LoadCustomerStageTableExceptionFile.txt file in Notepad.
You have successfully enabled the packages in the data movement application to be updated at run time from a SQL Server configuration table.
Adding Package Logging and Error Handling Steps to Packages
To enable you to detect the success or failure of the individual tasks in each subpackage when you execute the data movement application from a DTSRun batch file, you need to configure logging and error handling in each package in the data movement application. Only the PopulateTimeDim and LoadHistoricalData packages have been enabled for package logging and error handling.
| Note | You cannot enable package logging for subpackages called from a master package by using the /L switch in the DTSRun command. You must enable logging in each subpackage. For more information, see Chapter 3. |
In the following procedure, you will enable package logging and error handling in the MasterUpdate package. You will enable the locations of the error log files for each package in the data movement application to be configured dynamically by adding entries to the Config.ini initialization file and then configuring the Properties From INI File step in the MasterUpdate , UpdateProductDim , and UpdateCustomerDim packages to read the appropriate value from the initialization file and update the LogFileName property in each package. Finally, you will test the execution of these packages with different configuration values and review the generated error log files.
Enable package logging and error handling in the MasterUpdate package
-
Switch to SQL Server Enterprise Manager, and then right-click Data Transformation Services in your local instance.
-
Click Open Package and then open the most recent version of the MasterUpdate package in the C:\Microsoft Press\SQL DTS SBS\ DataMovementApplication folder using a password of mypassword .
-
On the Package menu, click Properties.
-
On the Logging tab, select the Log Package Execution To SQL Server check box, verify that (local) appears in the Server list box, and then verify that Use Windows Authentication is selected.
-
In the Error File text box, type C:\Microsoft Press\SQL DTS SBS\ DataMovementApplication\MasterUpdatePackageErrorLog.txt , and then click OK.
-
Switch to the Config.ini initialization file in Notepad.
-
On a new line at the end of the file, type [ErrorHandlingFileNames] and then press Enter.
-
Type MasterUpdatePackage=C:\Microsoft Press\SQL DTS SBS\DataMovementApplication\MasterUpdatePackageErrorLog.txt and then press Enter.
-
On the new line, type UpdateCustomerDimPackage=C:\Microsoft Press\SQL DTS SBS\DataMovementApplication\ UpdateCustomerDimPackageErrorLog.txt and then press Enter.
-
On the new line, type UpdateProductDimPackage=C:\Microsoft Press\SQL DTS SBS\DataMovementApplication\ UpdateProductDimPackageErrorLog.txt and then click Save on the File menu.
-
Close the Config.ini file in Notepad and switch to the MasterUpdate package in SQL Server Enterprise Manager.
Now that you have a location entry for the error handling file used by the MasterUpdate package, you are ready to dynamically configure the LogFileName property in this package.
-
On the design sheet, double-click the Properties From INI File step and then click Add.
-
Click MasterUpdate in the left pane, and then double-click LogFileName in the right pane.
-
Verify INI is selected in the Source list, type C:\Microsoft Press\SQL DTS SBS\DataMovementApplication\Config.ini in the File list, select ErrorHandlingFileNames in the Section list, select MasterUpdatePackage in the Key list, click OK, and then click OK again to save the modification to the Dynamic Properties task.
-
On the toolbar, click Save, and then close the MasterUpdate package.
Now that you have enabled package logging and error handling in the MasterUpdate package, you need to do the same in the UpdateCustomerDim and UpdateProductDim packages.
Enable package logging and error handling in the UpdateCustomerDim package
-
In the SQL Server Enterprise Manager console tree, right-click Data Transformation Services in your local instance.
-
Click Open Package and then open the most recent version of the UpdateCustomerDim package in the C:\Microsoft Press\SQL DTS SBS\DataMovementApplication folder using a password of mypassword .
-
On the Package menu, click Properties.
-
On the Logging tab, select the Log Package Execution To SQL Server check box, verify that (local) appears in the Server list box, and then verify that Use Windows Authentication is selected.
-
In the Error File text box, type C:\Microsoft Press\SQL DTS SBS\ DataMovementApplication\UpdateCustomerDimPackageErrorLog.txt box, and then click OK.
-
On the design sheet, double-click the Properties From INI File step and then click Add.
-
Click UpdateCustomerDim in the left pane, and then double-click LogFileName in the right pane.
-
Verify that INI is selected in the Source list, type C:\Microsoft Press\SQL DTS SBS\DataMovementApplication\Config.ini in the File list, select ErrorHandlingFileNames in the Section list, select UpdateCustomerDimPackage in the Key list, click OK, and then click OK again to save the modification to the Dynamic Properties task.
-
On the toolbar, click Save and then close the UpdateCustomerDim package.
Now that you have enabled package logging and error handling in the MasterUpdate and UpdateCustomerDim packages, you need to do the same in the UpdateProductDim package.
Enable package logging and error handling in the UpdateProductDim package
-
In the SQL Server Enterprise Manager console tree, right-click Data Transformation Services in your local instance.
-
Click Open Package and then open the most recent version of the UpdateProductDim package in the C:\Microsoft Press\SQL DTS SBS\ DataMovementApplication folder using a password of mypassword .
-
On the Package menu, click Properties.
-
On the Logging tab, select the Log Package Execution To SQL Server check box, verify that (local) appears in the Server list box, and then verify that Use Windows Authentication is selected.
-
In the Error File text box, type C:\Microsoft Press\SQL DTS SBS\ DataMovementApplication\UpdateProductDimPackageErrorLog.txt , and then click OK.
-
On the design sheet, double-click the Properties From INI File step and then click Add.
-
Click UpdateProductDim in the left pane, and then double-click LogFileName in the right pane.
-
Verify that INI is selected in the Source list, type C:\Microsoft Press\SQL DTS SBS\DataMovementApplication\Config.ini in the File list, select ErrorHandlingFileNames in the Section list, select UpdateProductDimPackage in the Key list, click OK, and then click OK again to save the modification to the Dynamic Properties task.
-
On the toolbar, click Save and then close the UpdateProductDim package.
Now that you have enabled package logging and error handling in the MasterUpdate , UpdateCustomerDim , and UpdateProductDim packages, you are ready to test the DTSRun batch file with different configuration ID values.
Execute the DTSRun batch file with different configuration values
-
Using Windows Explorer, navigate to the C:\Microsoft Press\SQL DTS SBS\DataMovementApplication folder and then double-click MasterUpdateDefaultConfig.cmd.
After this batch file finishes executing, notice that the MasterUpdatePackageErrorLog.txt, UpdateProductDimPackageErrorLog.txt, and UpdateCustomerDimPackageErrorLog.txt files appear in the DataMovementApplication folder in Windows Explorer.
-
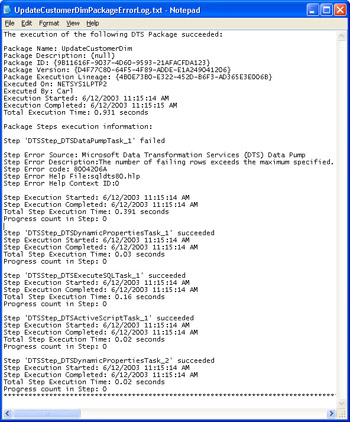
Double-click UpdateCustomerDimPackageErrorLog.txt in the C:\Microsoft Press\SQL DTS SBS\DataMovementApplication folder.
Notice that the DTSStep_DTSDataPumpTask_1 failed to copy any rows because the number of rows specified exceeded the maximum number specified. The giConfigID global variable has a value of 1, and no rows are added to the CustomerDim table because the MaximumErrorCount property is set to zero.
Tip The step names that appear in these log files are the generated step names, not the user-friendly step names. Later in this chapter, you will learn how to change these generated step names to user -friendly step names to make it easier to interpret these log files.
-
Close the UpdateCustomerDimPackageErrorLog.txt file in Notepad.
-
Switch to the MasterUpdateDefaultConfig.cmd file in Notepad.
-
Change the value for the giConfigID global variable from 1 to 2 (the value of 16 immediately after giConfigID indicates the type of the parameter ”integer (1 byte)), and then click Save As on the File menu.
-
In the File Name box, change the file name to MasterUpdateConfig2.cmd , select All Files in the Save As Type list, and then click Save.
-
Close the MasterUpdateConfig2.cmd file in Notepad.
-
In the DataMovementApplication folder, double-click MasterUpdateConfig2.cmd to execute the MasterUpdate package and its subpackages with the global variable values associated with configuration ID 2.
-
After the batch file completes, double-click the UpdateCustomerDimPackageErrorLog.txt file in the DataMovementApplication folder. Scroll down to the end of the file to see the logging information for the most recent execution (package execution appends new logging data to the file).
The MasterUpdate package and its subpackages executed using the global variable values associated with the ConfigID value of 2 in the PackageGVs table. This resulted in the MaximumErrorCount property being set to 5 for the UpdateCustomerDim package and all 29 rows being processed because there were only two errors in the source file. Notice, however, that there is no way to tell from this error log that two rows were not inserted.
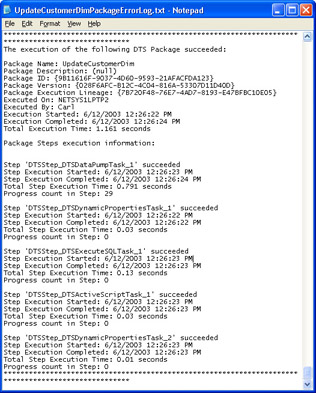
Tip To determine if any rows were not inserted by a Transform Data task or a Data Driven Query task if the number of rows failing did not exceed the value for the MaximumErrorCount property for the task, you must look at the exception file for each Transform Data and Data Driven Query task in the package. In Chapter 8, you will learn some additional error handling routines to simplify the task of tracking package and task errors in a single location.
-
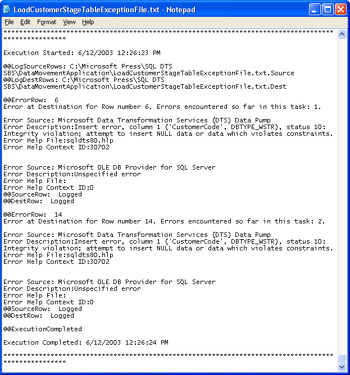
Close the UpdateCustomerDimPackageErrorLog.txt file in Notepad and then open the LoadCustomerStageTableExceptionFile.txt file in the DataMovementAppplication folder.
The LoadCustomerStageTableExceptionFile.txt file contains the error information for each of the rows that failed. To determine the actual error rows, you can look at the LoadCustomerStageTableExceptionFile.txt.Source file, which contains the source row that caused the error, and the LoadCustomerStageTableExceptionFile.txt.Dest file, which contains the transformed row that DTS attempted to insert into the CustomerStage table.
Tip Since logging to SQL Server was enabled for the MasterUpdate package and its subpackages, you could also view the package log for each package using SQL Server Enterprise Manager (right-click Local Packages in the Data Transformation Services nodes and then click Package Logs). However, the only way to capture the actual rows that failed is to configure exception files for each Transform Data and Data Driven Query task.
-
Close the LoadCustomerStageTableExceptionFile.txt file in Notepad.
You have successfully configured the packages in the data movement application and their tasks to be dynamically configured using values in an initialization file and a SQL table.
EAN: 2147483647
Pages: 87