Lesson 2: Creating Jobs
3 4
Using SQL Server Agent, you can create and schedule jobs that automate routine administrative tasks. In this lesson, you learn to create simple and complex jobs. You learn to configure permissions for jobs owned by users who are not members of the sysadmin server role. You learn to execute these jobs manually or according to a schedule. You also learn to use operators for notification of the success, failure, or completion of a job. Finally, you learn to review job properties and job execution history.
After this lesson, you will be able to
- Create jobs using single or multiple step jobs
- Create schedules for jobs
- Enable and disable jobs and schedules
- Use operators with jobs for notification of success, failure, or completion
- Troubleshoot job execution problems
- Review jobs and job history
Estimated lesson time: 45 minutes
Implementing Jobs
Database administrators create jobs to perform predictable administrative functions (such as backing up databases or importing data) either according to a schedule or in response to events and conditions. Jobs can be simple operations containing only a single job step or can be extremely complex operations containing many job steps with control of flow logic. SQL Server Agent is responsible for the management and execution of all jobs. SQL Server Agent must be running for jobs to be executed. Jobs can be created on the local server or on one or more target servers in a multiserver administration configuration. Multiserver jobs are covered in Lesson 5 of this chapter.
Types of Job Steps
SQL Server 2000 supports jobs containing operating system commands, CmdExec commands, Transact-SQL statements, Microsoft ActiveX scripts, and replication tasks. Replication jobs are covered in Chapter 15. A single job can contain all of these types of commands, although each job step can contain only a single type of command.
Operating system commands (such as .bat, .cmd, .com, or .exe) must contain the absolute path to the executables, the executable command (including switches and options), and a process exit code. All operating system commands issue an exit code upon completion of execution indicating the success or failure of the command. An exit code of zero indicates that the command completed successfully. Any other exit code indicates a type of command failure. Responses to different types of failures can be programmed into the job logic.
Transact-SQL statements must identify the database in which the statement will execute and provide the statement, function, stored procedure, or extended stored procedure to be executed. A single job step can contain multiple batches of Transact-SQL statements with embedded GO commands. Members of the sysadmin role can write job steps to run on behalf of another database user.
ActiveX scripts must identify the scripting language used by the job step and provide the ActiveX script commands. An ActiveX script can also be compiled and run as a CmdExec executable.
Permissions and Ownership of Jobs
By default, jobs are owned by the creator of the job and operate in the security context of that login, regardless of who executes the job. Members of the sysadmin server role can assign ownership to any valid login. Ownership of a job does not grant the right to execute any particular job step. Permission to execute each Transact-SQL job step is verified by the SQL Server service using permissions granted within SQL Server. By default, permission to execute CmdExec and ActiveX job steps is granted only to jobs owned by members of the sysadmin server role. These job steps run in the security context of the SQL Server Agent service account. Permission to run CmdExec and ActiveX scripting job steps can be granted to users who are not members of the sysadmin fixed server role. These job steps owned by non-sysadmins run in the security context of a specified Windows account called a proxy account and inherit the rights granted to that account. To configure the proxy account in SQL Server Enterprise Manager, expand the Management container in the instance, right-click SQL Server Agent, and then click Properties. In the SQL Server Agent Properties dialog box, click the Job System tab. When you clear the check box in the Non-SysAdmin Job
Step Proxy Account group box, the SQL Agent Proxy Account dialog box appears so that you can then configure the proxy account.
Note
SQL Server Agent jobs on Windows Me and Windows 98 always run in the context of the logged-in user.
Multiple Job Steps and Job Responses
A job step either succeeds or fails. On the success of a job step, you can configure the job step to continue to the next step or a specific job step. You can also configure the job step to quit and report success or failure. For example, a job step can succeed in its programmed action and report either success or failure based on the logic of the job. On the failure of a job step, you can also configure a subsequent step or quit the job and report success or failure. See Figure 13.4.
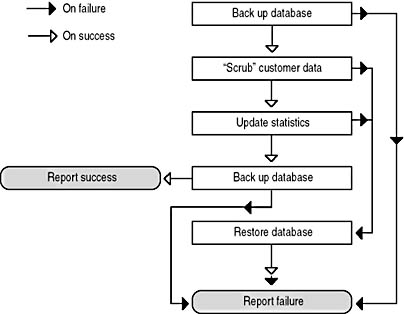
Figure 13.4
Flow chart showing job step sequence configuration.
Figure 13.4 illustrates the backing up of a database before importing data. If the initial database backup fails, the job quits reporting the failure. If the initial database backup succeeds, the job continues and imports new data to the database using DTS (scrubbing and cleansing the data in the process). If the data import job step succeeds, a statistics update job step executes followed by the execution of another database backup job step (which backs up the database containing the new data). If either the data import job step or the update statistics job step fails, a restore database job step executes and a notification of failure is reported. If the job successfully imports new data, updates the statistics, and then backs up the database, this success is reported. Notice that the restore database job step reports failure to a defined operator regardless of the success or failure of the restore job step. If the restore job step is executed, the job (whose function is to import new data on a regular schedule) has failed. The restore job step succeeds only in restoring the database to its condition prior to the attempted data import. A database administrator must manually determine the cause of the failure at this point.
You must configure operators to be notified of the success, failure, or completion of the job. Without operators being designated to receive notification, the reports of success and failure of the job do not get transmitted to users. By default, failure of a job is automatically logged to the Windows application log, which can be viewed in Event Viewer.
Note
If you want to pass data between job steps, you must use permanent tables, global temporary tables, or operating system files.
Scheduling Jobs
Although you can manually run each job (generally just for testing jobs and job steps), you normally create one or more schedules for a job to fully automate the task. Various types of schedules are available. Jobs can be configured to run continuously (such as certain monitoring jobs), whenever the processor is considered idle (based on your definition), or at recurring intervals (such as hourly, daily, or weekly). Jobs can also be scheduled to run a single time only or in response to a defined alert. Alerts are covered in Lesson 3.
Multiple schedules enable you to have jobs execute on a certain schedule during the workday and on a different schedule in the evening or on weekends. Each schedule can be enabled or disabled. If all schedules are disabled for a particular job, a job can still be executed manually or in response to an alert.
Note
If a job is disabled, it will not execute in response to any alerts or schedules. However, it can still be executed manually. When troubleshooting, verify that the job and all applicable schedules are enabled.
If you configure jobs to execute during periods of low processor utilization, you must first define the CPU idle condition and verify the local administrator permissions of the service account of the SQL Server Agent service. Next, determine how much processor resources each job requires using SQL Profiler and Windows 2000 System Monitor. These monitoring tools are covered in Chapter 14. Define the CPU idle condition to accommodate the processor resources required by all jobs configured with a CPU idle schedule. All such jobs will execute when the CPU idle condition is reached.
Note
SQL Server Agent must be running at the time a job is scheduled in order for the job to execute when scheduled.
Creating Jobs
You can create jobs using the Create Job Wizard or directly by using SQL Server Enterprise Manager. You can also create jobs with Transact-SQL system stored procedures.
Using the Create Job Wizard
You can start the Create Job Wizard from the Wizards list or by clicking Job Scheduling from the Tools menu in SQL Server Enterprise Manager. The Create Job Wizard is a simple way to begin creating and scheduling jobs. Click Next in the Welcome To The Create Job Wizard page to begin. See Figure 13.5.
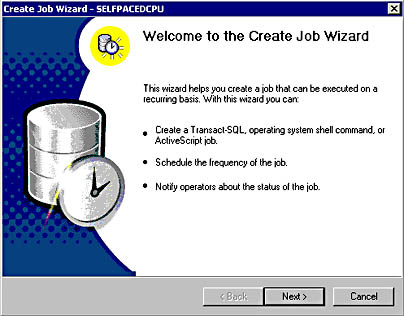
Figure 13.5
Starting the Create Job Wizard.
In the Select Job Command Type page, you select the type of job you want to create. You can only create single-step jobs using the Create Job Wizard. See Figure 13.6.
You have a choice between three types of commands that the job can execute. If you click the Transact-SQL Command option button and then click Next, the Enter Transact-SQL Statement page appears, which enables you to select the database and enter the statement. You can click the Parse button to parse the Transact-SQL statement to verify that the syntax is valid. See Figure 13.7. You can also open a file containing the statement you want to use.
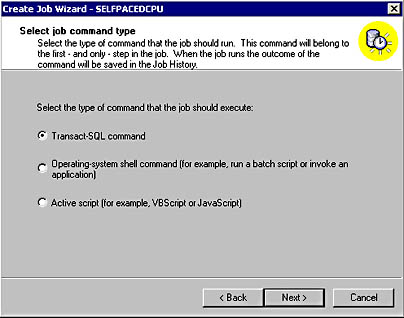
Figure 13.6
Selecting the type of command for the job to run.
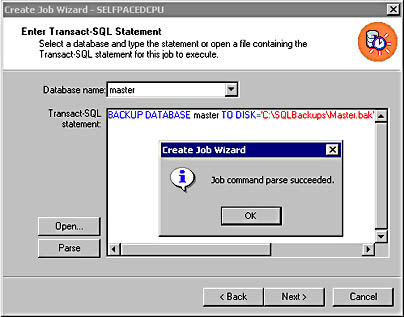
Figure 13.7
Entering and then parsing a Transact-SQL command.
If you click the Operating-System Shell Command option button and then click Next, the Enter Operating-System Shell Command page appears, which enables you to enter the command for this job to execute. See Figure 13.8.
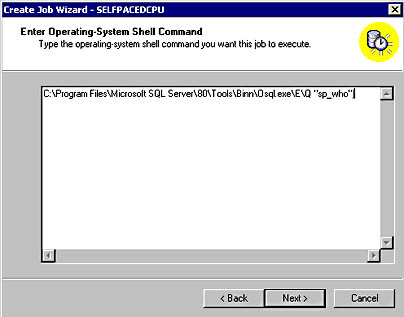
Figure 13.8
Entering an operating system shell command.
If you click the Active Script option button and then click Next, the Enter Active Script Command page appears, which enables you to enter the Visual Basic script for this job to execute. You can click the Parse button to parse the Visual Basic script to verify that the syntax is valid. See Figure 13.9. You can also open a file containing the script you want to use.
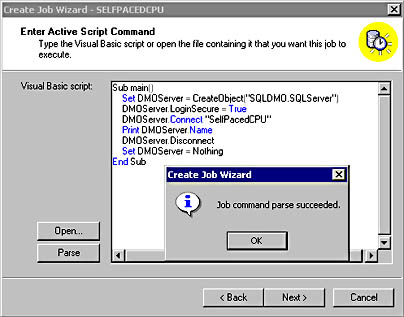
Figure 13.9
Parsing an Active Script command.
After selecting the type of job and entering the job information, you can specify a job schedule (including running the job immediately) in the Specify Job Schedule page. See Figure 13.10.
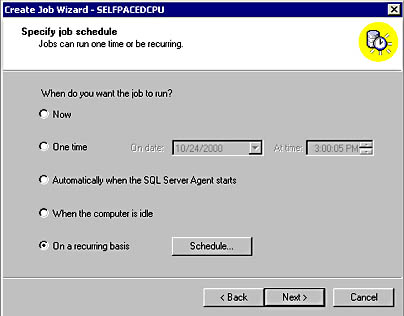
Figure 13.10
Specifying a job schedule.
If you click the On A Recurring Basis option button, you can click the Schedule button to define this recurring schedule in the Edit Recurring Job Schedule dialog box. You can specify daily, weekly, or monthly and select specific hours, days, or days of the month (such as first Sunday of each month). See Figure 13.11.
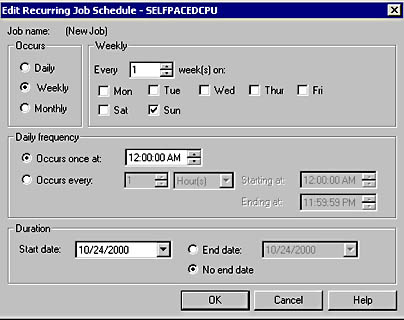
Figure 13.11
Editing a recurring job schedule.
Next, in the Job Notifications page, you can select an operator to notify via either NET SEND or e-mail. You must select from existing operators. You cannot create a new operator or use pager notification from within the Create Job Wizard. See Figure 13.12.
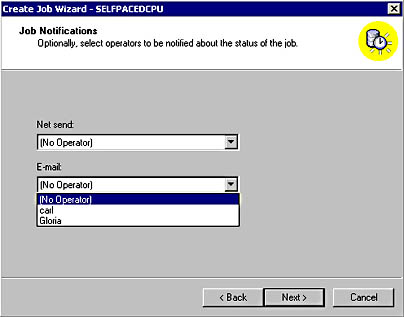
Figure 13.12
Selecting an operator to notify.
Finally, in the Completing The Create Job Wizard page, you are given the opportunity to specify a name for the new job and to review the selections you have made before you actually create the new job. You can click the Back button to change any parameter you want to change. Click the Finish button to create the job. See Figure 13.13.
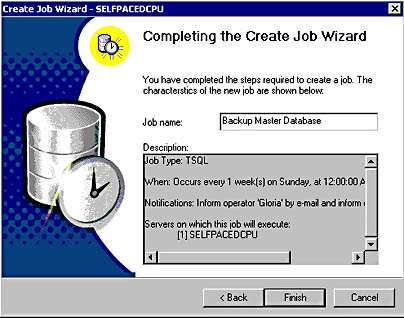
Figure 13.13
Naming the new job.
Practice: Creating a Job Using the Create Job Wizard
In this practice you use the Create Job Wizard to create a job to back up the master database.
To create a job using the Create Job Wizard
- Ensure that you are logged on to the SelfPacedSQL.MSFT domain controller as Administrator.
In the SQL Server Enterprise Manager console tree, the Management container and the SQL Server Agent container for the default instance should still be expanded from the previous practice.
- In the SQL Server Enterprise Manager console tree, click the SQL Server Agent container for the default instance.
- On the Tools menu, click Job Scheduling.
The Welcome To The Create Job Wizard page appears.
- Click Next.
The Select Job Command Type page appears.
- Verify that the Transact-SQL Command option button is clicked, and then click Next.
The Enter Transact-SQL Statement page appears.
- Verify that master is selected in the Database Name drop-down list, and then type BACKUP DATABASE master TO DISK = 'C:\SQLBackups\MasterDB.bak' in the Transact-SQL Statement text box. (If you did not create the C:\SQLBackups folder in Chapter 9, you must create it now.)
- Click the Parse button.
A Create Job Wizard message box appears stating that the job command parse succeeded.
- Click OK.
- Click Next.
The Specify Job Schedule page appears.
- Click the On A Recurring Basis option button, and then click the Schedule button.
The Edit Recurring Job Schedule - SelfPacedCPU dialog box appears.
- In the Occurs group box, click the Daily option button, and then click OK.
- Click Next.
The Job Notifications dialog box appears.
- In the Net Send drop-down list, click Operator, and then click Next.
The Completing The Create Job Wizard page appears.
- In the Job Name text box, type Backup Master Job, and then click the Finish button.
A Create Job Wizard message box appears stating that the job was created successfully.
- Click OK.
- In the console tree, click the Jobs container.
- In the details pane, right-click Backup Master Job, and then click Start Job.
After a few moments, a Messenger Service message box appears delivering a message to SelfPacedCPU stating that the Backup Master Job succeeded and providing details about the completion of the job.
- Click OK.
- In the details pane, right-click Backup Master Job, and then click Refresh Job.
Notice that the Last Run Status column indicates that the job succeeded and that the Next Run Date is the following day at 12:00:00 AM.
- Leave SQL Server Enterprise Manager running.
Using SQL Server Enterprise Manager Directly
To create a job using SQL Server Enterprise Manager directly, you can either right-click SQL Server Agent in the Management container, point to New and then click Job, or right-click Jobs in the SQL Server Agent container and then click New Job. The New Job Properties dialog box appears, as illustrated in Figure 13.14.
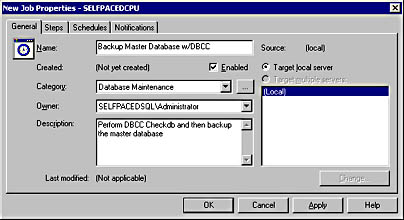
Figure 13.14
Specifying properties for a new job.
In the General tab, notice that you can specify the owner of the job (this option will be grayed out if you are not a member of the sysadmin server role). You can also specify a category for the job. The default is uncategorized local. However, if you group jobs into categories, you can locate all jobs in a specified category by clicking the ellipsis next to the Category drop-down list. To save the job, you must supply a name for the job in the Name text box.
Click the Steps tab and then click the New button to display the New Job Step dialog box that you use to create job steps. See Figure 13.15.
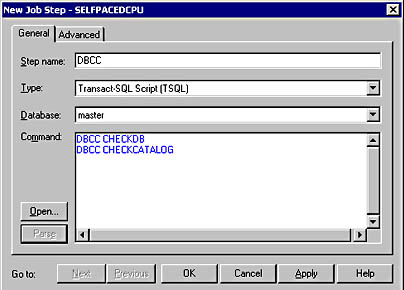
Figure 13.15
Creating a new job step.
Enter a step name, select the type of job step (the default is Transact-SQL Script), and then enter the appropriate statement, script, or command. A step name is required to continue. Click the Advanced tab to review and set properties of this job step. See Figure 13.16.
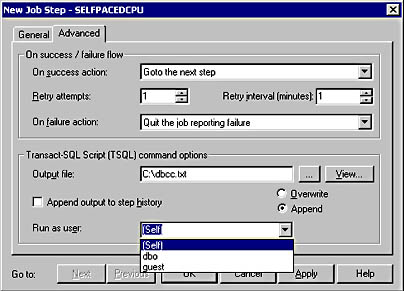
Figure 13.16
Reviewing properties for a job step.
The default for each job step is to continue to the next step on success and to quit the job on failure and report a failure. If there is no next step, the job quits with success and reports success. You can specify a number of retry attempts (to allow for a connection timeout error, for example) and a time interval between retries. You can also specify an operating system file in which to store the results of a Transact-SQL or CmdExec job step. You can click the View button to view the contents of any existing output file when creating the job step and choose to have the job step append or overwrite the contents of the output file each time the job step runs. You can also choose to have the results of the Transact-SQL script written to the step history along with the report of the success or failure of the job. Finally, you can choose to have this job step run as a user other than the job owner. For example, CmdExec job steps might need different permissions than Transact-SQL statements.
If you have created multiple job steps, you can then review the steps in the Steps tab, edit them, insert new steps, and change the order of steps. See Figure 13.17.
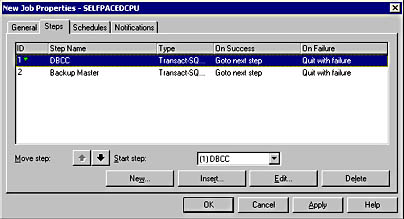
Figure 13.17
Reviewing and modifying job step order.
You can modify the order of steps and designate a step other than the first step in the list as the starting step (allowing a step to be skipped temporarily without deleting it). The starting step is indicated by the green start flag and also by the step displayed in the Start Step drop-down list. After you complete the job steps, click the Schedules tab to create one or more schedules for the job. See Figure 13.18.
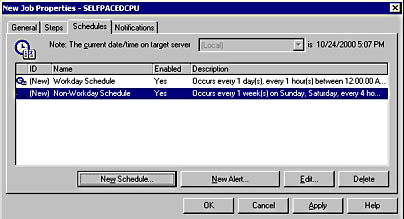
Figure 13.18
Creating schedules for the job.
Notice that you can also click the New Alert button to define a new alert that executes this job in response to an alert. Alerts are covered in the next lesson. After completing the schedules (and alerts if applicable), click the Notifications tab to designate operators for notifications of the completion, success, and/or failure of a job. See Figure 13.19.
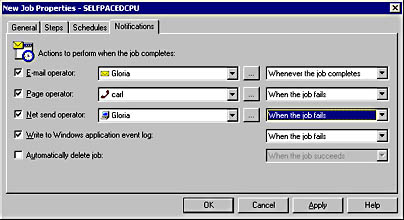
Figure 13.19
Designating operators for notifications of job status.
Notice that you can select to notify different operators using different mechanisms whenever the job completes, succeeds, or fails. By default, job failures are also written to the Event Viewer application log. You can also choose to have the job automatically deleted after successful completion (such as for a one-time job).
Practice: Creating a Job Using SQL Server Enterprise Manager Directly
In this practice you use the SQL Server Enterprise Manager to create a job directly.
To create a job using SQL Server Enterprise Manager directly
- Ensure that you are logged on to the SelfPacedSQL.MSFT domain controller as Administrator.
In the SQL Server Enterprise Manager console tree, the Management container and the SQL Server Agent container for the default instance should still be expanded from the previous practice.
- In the SQL Server Agent container, right-click Jobs, and then click New Job.
The New Job Properties - SelfPacedCPU dialog box appears. Notice that the default owner for this job is SelfPacedSQL\Administrator.
- In the Name text box, type Backup SSEMDB Tlog, and then click the Steps tab.
- Click the New button.
The New Job Step - SelfPacedCPU dialog box appears.
- In the Step Name text box, type Backup TLog Step.
- Verify that the step type is Transact-SQL Script (TSQL), and then click the Database drop-down list and click SSEMDB.
- In the Command text box, type BACKUP LOG SSEMDB TO DISK = 'C:\SQLBackups\SSEMDB.trn'.
- Click the Parse button.
A New Job Step - SelfPacedCPU message box appears stating that the parse succeeded.
- Click OK to close the message box.
- Click OK to close the New Job Step - SelfPacedCPU dialog box.
- Click the Schedules tab.
- Click the New Schedule button.
The New Job Schedule - SelfPacedCPU dialog box appears.
- In the Name text box, type Workday Schedule.
- Click the Change button.
The Edit Recurring Job Schedule - SelfPacedCPU dialog box appears.
- In the Occurs group box, click the Daily option button.
- In the Daily Frequency group box, click the Occurs Every option button.
- Click OK to close the Edit Recurring Job Schedule - SelfPacedCPU dialog box.
- Click OK to close the New Job Schedule - SelfPacedCPU dialog box.
- Click the Notifications tab.
- Select the Page Operator check box, and then select Operator from the Page Operator drop-down list.
- Select Whenever The Job Completes from the drop-down list, and then click OK.
In the details pane for the Jobs container, notice that two jobs appear.
- In the details pane, right-click Backup SSEMDB Tlog, and then click Start Job.
- After a few moments, right-click Backup SSEMDB Tlog, and then click Refresh Job. Notice that the Last Run Status column will either display Executing or Succeeded. Do not continue until the column indicates that the job succeeded. Click Refresh Job again to update the displayed information, if necessary. Notice that a network pop-up message was not received. You will review job history in the next practice to determine why you did not receive a message.
- Leave SQL Server Enterprise Manager running.
Using Transact-SQL
You can also create jobs using the sp_add_job, sp_add_jobstep, sp_add_jobschedule, and sp_update_jobstep system stored procedures.
Note
Although you can use Transact-SQL system stored procedures, use of the SQL Server Enterprise Manager graphical interface is recommended.
Configuring the Proxy Account
If you plan to create jobs containing CmdExec and ActiveX job steps that will be owned by (or executed in the context of) users who are not members of the sysadmin server role, you must configure the proxy account. Right-click SQL Server Agent in the Management container for the instance, and then click Properties. In the SQL Server Agent Properties - SelfPacedCPU dialog box, click the Job System tab. See Figure 13.20.
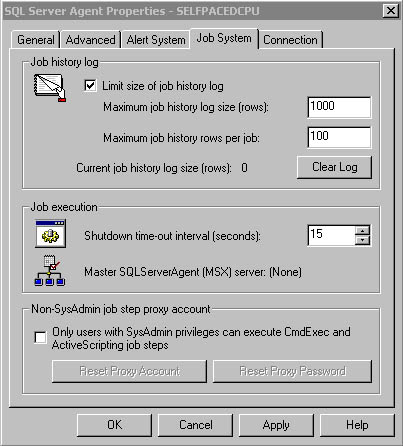
Figure 13.20
Configuring the proxy account.
Clear the check box in the Non-SysAdmin Job Step Proxy Account group box to allow users without sysadmin privileges to execute CmdExec and ActiveX scripting job steps. You are then prompted, in the SQL Agent Proxy Account dialog box, to provide the name of the proxy account that SQL Server Agent will use to execute these jobs. All CmdExec and ActiveX scripting job steps for non-sysadmins will be executed by SQL Server Agent in the security context of this account. You must provide an existing local or domain user account. Assign this account the permissions you want non-sysadmins to inherit when their jobs are run. If the service account used by the SQL Server service does not have administrator privileges, you must first provide a valid administrator account to access the security account list. See Figure 13.21.
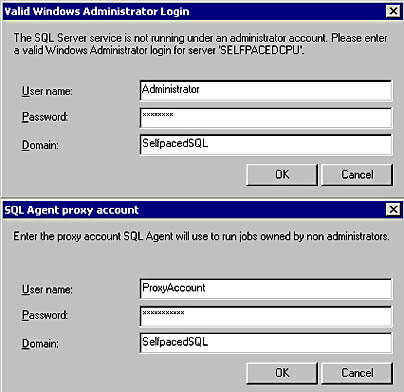
Figure 13.21
Providing a valid administrator account.
Reviewing Jobs and Job History
The details pane of the Jobs container in SQL Server Enterprise Manager displays information regarding all jobs for the SQL Server 2000 instance. See Figure 13.22.
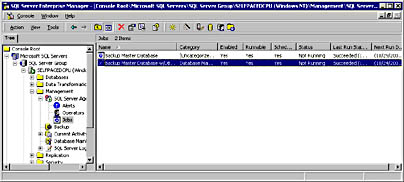
Figure 13.22
Displaying job information for the current instance of SQL Server 2000.
Information regarding each job is displayed in columns. Click on a column heading to sort the jobs based on that column. Notice the Enabled column. If you are troubleshooting a job that does not run, verify that it is enabled. Information is displayed regarding the status of a job (such as executing or not running), the last time a job ran, and the next time it is scheduled.
Note
Because SQL Server Enterprise Manager is a client application, information displayed must be refreshed to view the most recent information (particularly status, last run, and next run information).
Job Properties
To view or modify the properties of a job, right-click the job, and then click Properties (or double-click the job). Users who are not members of the sysadmin server role can only view or modify jobs they own.
Job History Log
To review the execution history of a job, right-click the job, and then click View Job History. See Figure 13.23.
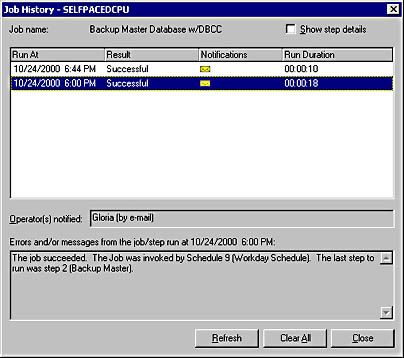
Figure 13.23
Reviewing the execution history of a job.
Information is displayed regarding each time the job was run, its result, who invoked the job, and operators notified. Select the Show Step Details check box to view the details of each step. Viewing step details displays important information for troubleshooting a job. For example, if a job fails because SQL Server Agent lacked proper permissions, this information will be displayed in the step details. See Figure 13.24.
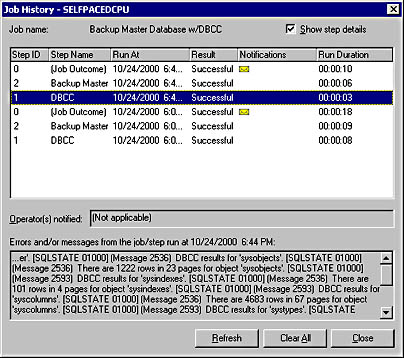
Figure 13.24
Viewing details about each step of a job.
You can control the size of the job history log. Right-click the SQL Server Agent container, click Properties, and then click the Job System tab. See Figure 13.25.
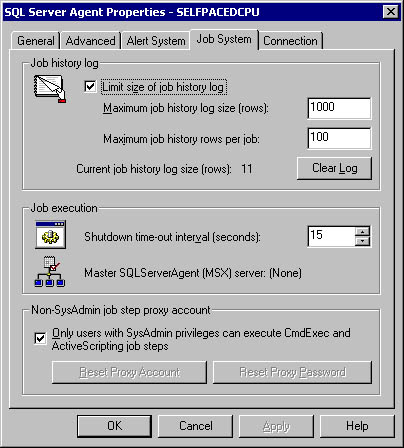
Figure 13.25
Controlling the history log size.
Notice that the default size of the job history log for each job is 100 rows, and for all jobs combined, the default size is 1000 rows. Notice that you can click the Clear Log button to clear the entire log.
Practice: Reviewing and Modifying a Job and Viewing Job History
In this practice you use the SQL Server Enterprise Manager to view and modify a job and to view job history.
To review and modify a job and view job history
- Ensure that you are logged on to the SelfPacedSQL.MSFT domain controller as Administrator.
In the SQL Server Enterprise Manager console tree, the Management container and the SQL Server Agent container for the default instance should still be expanded from the previous practice.
- In the SQL Server Agent container, click Jobs.
- In the details pane, double-click Backup Master Job.
The Backup Master Job Properties - SelfPacedCPU dialog box appears.
- Click the Steps tab.
- Click the New button.
The New Job Step - SelfPacedCPU\Backup Master Job dialog box appears.
- In the Step Name text box, type DB Consistency Step.
- Verify that the step type is Transact-SQL Script (TSQL) and the Database is master.
- In the Command text box, type DBCC CHECKDB.
- Click OK to close the New Job Step - SelfPacedCPU\Backup Master Job dialog box.
Notice that two steps now appear. Notice that Step 1 executes first and that the DB Consistency Step will never execute because Step 1 quits with success and with failure. Notice also the green start flag that indicating Step 1 is the starting step. If you attempt to apply or save the job at this point, you will receive a warning stating that the DB Consistency Step will not execute.
- Click DB Consistency Step in the Start Step drop-down list.
- Click the Move Step arrow button to move the DB Consistency Step to the first step in the list.
- Click OK to close the Backup Master Job Properties - SelfPacedCPU dialog box.
- In the details pane, right-click Backup Master Job, and then click Start Job.
The Start Job On SelfPacedCPU dialog box appears. Notice that you can choose the step with which to start the job.
- Verify that the DB Consistency Step is selected, and then click the Start button.
After a few moments, a Messenger Service message box appears delivering a message to SelfPacedCPU stating that the Backup Master Job succeeded and providing details about the completion of the job.
- Click OK.
- In the details pane for the Jobs container, right-click Backup Master Job, and then click View Job History.
The Job History - SelfPacedCPU dialog box appears. Notice that the two jobs appear in the job history log. Also notice, under Errors And/Or Messages From The Job/Step, that the most recently completed job had two steps and that the first time the job ran it only had one step.
- Select the Show Step Details check box.
Notice that five lines now appear. In the Step ID column, 0 displays the job outcome information for each time the job ran. Step ID 1 displays information regarding the details of the first step that ran. Step ID 2 displays information regarding the details of the second step that ran.
- Click Step ID 1 from the most recent run of the job.
Notice that information from the DBCC CHECKDB statement is displayed under Errors And/Or Messages From The Job/Step.
- Click Close.
- In the details pane for the Jobs container, right-click Backup SSEMDB TLog, and then click View Job History.
The Job History - SelfpacedCPU dialog box appears. Notice the details of the job. In particular, notice that no operators were notified because Operator was not on duty. The fail-safe Operator was not paged because fail-safe operations are used only for alerts (not job outcome notifications).
- Click Close.
- Leave SQL Server Enterprise Manager running.
SQL Server Agent Error Log
SQL Server Agent records information, warnings, and errors in the SQL Server Agent error log. SQL Server 2000 maintains up to nine SQL Server Agent error logs. The default name and location for the SQL Server Agent error log is C:\Program Files\Microsoft SQL Server\Mssql\Log\Sqlagent.out. The current error log has a filename extension of .OUT and each archive has an extension number between one and nine (with one being more recent than nine). SQL Server Agent recycles these logs as necessary. To view the error log from within SQL Server Enterprise Manager, right-click the SQL Server Agent container, and then click Display Error Log. Figure 13.26 illustrates the SQL Server Agent Error Log dialog box.
In the Type drop-down list, you can filter errors based on the error type (error, warning, or information) and/or by specific text contained in the error message. In Figure 13.26, notice the last warning message listed in the Contents box for the Sqlagent.out log, which informs you that an idle CPU condition has not yet been defined.
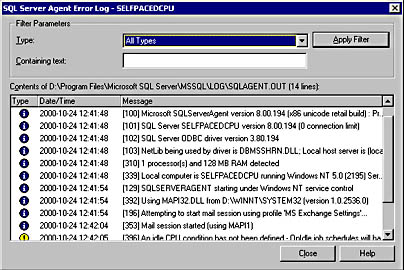
Figure 13.26
Viewing the error log.
Note
You can use any text editor to view the SQL Server error log.
Transact-SQL
You can also view job properties using the sp_help_job and sp_help_jobstep system stored procedures. You can view job history using the sp_help_jobhistory system stored procedure.
Lesson Summary
Jobs can be created to automate many routine administrative tasks. You can create jobs with multiple job steps using Transact-SQL statements, ActiveX scripts, operating system commands, and replication tasks. Each job step can contain flow logic that specifies actions based on the success or failure of the step. You can configure jobs to notify operators of their success, failure, or completion. You can also create one or more schedules defining when SQL Server Agent will run a job.
EAN: N/A
Pages: 126