Lesson 3: Creating and Managing Logins
3 4
Before a user can perform tasks within SQL Server 2000, the user must be granted SQL Server 2000 access through a login and database access through a user account. In this lesson, you will learn to grant access to SQL Server 2000 and its databases using SQL Server Enterprise Manager and Transact-SQL statements. You will also learn to view SQL Server 2000 and database access information using SQL Server Enterprise Manager and Transact-SQL statements.
After this lesson, you will be able to
- Use SQL Server Enterprise Manager to create logins
- Use Transact-SQL statements to create logins
- View the SQL Server 2000 access information
- View database access information
Estimated lesson time: 45 minutes
Granting Access Using SQL Server Enterprise Manager
SQL Server Enterprise Manager provides a simple graphical interface to interactively link an existing Windows 2000 (or Windows NT 4.0) user or group to a login, or to create a SQL Server 2000 login for a SQL Server 2000 security account. You can create a login directly with SQL Server Enterprise Manager, or you can use the Create Login Wizard.
Note
You can only create one login at a time using SQL Server Enterprise Manager.
Using the Create Login Wizard
The SQL Server Enterprise Manager wizards are available from the Tools menu, and are also available from any taskpad view. Figure 10.6 displays the Select Wizard dialog box, from which you can select a variety of wizards, including the Create Login Wizard.
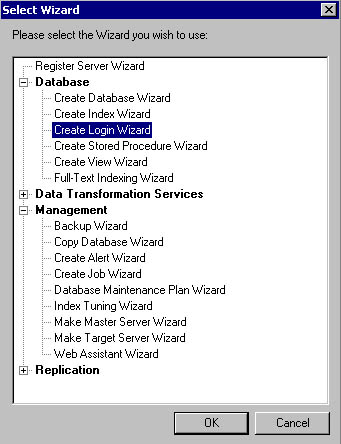
Figure 10.6
Selecting the Create Login Wizard in the Select Wizard dialog box.
After you start the Create Login Wizard, you are asked to select the authentication mode to use for the login you are creating in the Select Authentication Mode For This Login page. See Figure 10.7.
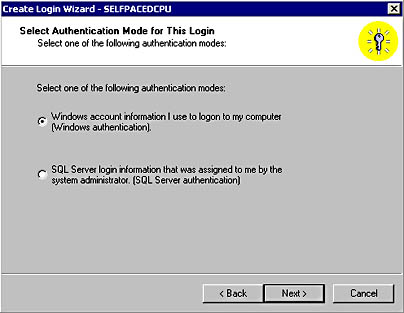
Figure 10.7
Selecting an authentication mode for the login being created.
If you select Windows authentication, you can link this login ID to an existing Windows 2000 (or Windows NT 4.0) user or group in the Authentication With Windows page. Notice that you can either grant this user or group access to the server, or you can deny them access. See Figure 10.8.
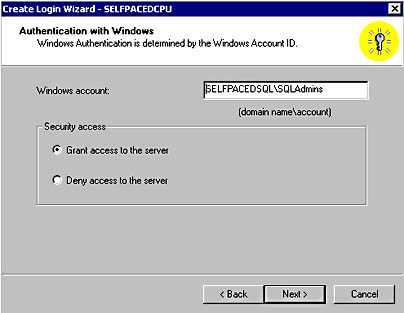
Figure 10.8
Granting or denying a new login access to the server.
If you select SQL Server authentication, you will create a SQL Server 2000 security account in the Authentication With SQL Server page. You must specify a login name and a password. To deny a SQL Server login, you simply remove the login from the Logins container in SQL Server Enterprise Manager (or the sysxlogins table in the master database). See Figure 10.9.
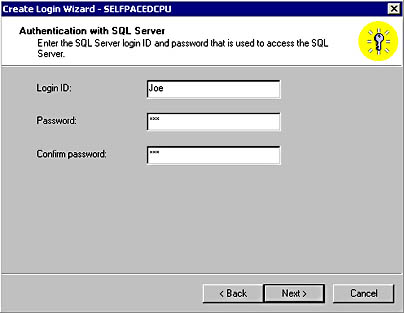
Figure 10.9
Specifying a login name for a SQL Server 2000 security account.
After you specify the type of login and either link or create the security account, you specify the server role (if any) for this login in the Grant Access To Security Roles page. If the user will not be a server-wide administrator, do not select any server roles. See Figure 10.10.
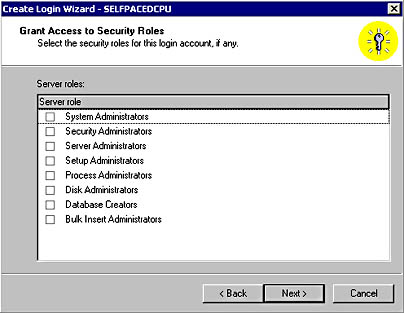
Figure 10.10
Specifying the server role for the login being created.
Next, you specify the databases (if any) to which this user will have access in the Grant Access To Databases page. Remember that most server roles do not provide database access (other than the sysadmin role). See Figure 10.11.
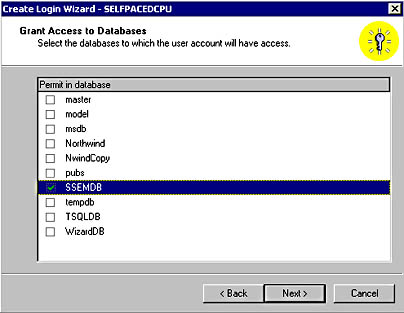
Figure 10.11
Specifying the databases that the new login may access.
Finally, you are given the opportunity to review the selections you have made before actually creating this new login in the Completing The Create Login Wizard page. You can click the Back button to change any parameter you want to change. Click the Finish button to create the login. See Figure 10.12.
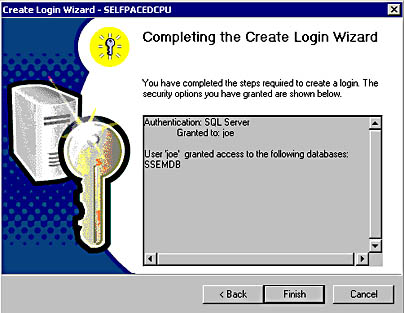
Figure 10.12
Completing the Create Login Wizard.
Practice: Creating a Login Using the Create Login Wizard
In this practice you use the Create Login Wizard to create a SQL Server login.
To create a login using the Create Login Wizard
- Ensure that you are logged on to the SelfPacedSQL.MSFT domain controller as Administrator.
- Click Start, point to Programs, point to Microsoft SQL Server, and then click Enterprise Manager.
SQL Server Enterprise Manager appears displaying the Microsoft SQL Servers and the Event Viewer (Local) console trees in the console root.
- In the console tree, expand the Microsoft SQL Servers container, expand the SQL Server Group container, and then click the default instance.
- On the Tools menu, click Wizards.
The Select Wizard dialog box appears.
- Expand Database and then double-click Create Login Wizard.
The Welcome To The Create Login Wizard page appears.
- Click Next.
The Select Authentication Mode For This Login page appears.
- Click the SQL Server Login Information That Was Assigned To Me By The System Administrator (SQL Server Authentication) option button and then click Next.
The Authentication With SQL Server page appears.
- In the Login ID text box, type Joe.
- In the Password and Confirm Password text boxes, type password and then click Next.
The Grant Access To Security Roles page appears.
- Click Next. Do not select any security roles.
The Grant Access To Databases page appears.
- Select the SSEMDB check box to permit access to this database only, and then click Next.
The Completing The Create Login Wizard page appears. Review the details of the login you have defined.
- Click the Finish button.
After the login is created, a Wizard Complete! message box appears.
- Click OK to close the Wizard Complete! message box.
- In the console tree, expand the Security container, and then click Logins.
In the details pane, notice that Joe appears as a standard type of login.
- On the Tools menu, click SQL Query Analyzer.
- On the File menu, click Connect.
The Connect To SQL Server dialog box appears.
- Click the SQL Server Authentication option button.
- In the Login name text box, type Joe.
- In the Password text box, type password and then click OK.
Notice that you can log on to the default instance of SQL Server 2000 using the SQL Server login Joe. Notice that the title bar indicates that you are connecting as Joe.
- On the toolbar, select SSEMDB from the database drop-down list.
Notice that the list contains only those databases to which Joe has access, including system databases. All other databases are hidden.
- In the query pane, type SELECT * FROM Customer.
- Click the Execute Query button.
Notice that although Joe has access to the SSEMDB database, Joe does not have SELECT permission on the Customer object. Chapter 11 will cover permissions in more detail.
- Close SQL Query Analyzer. Do not save any changes.
- Do not close SQL Server Enterprise Manager.
SQL Query Analyzer appears. You are connected using Windows authentication.
Using SQL Server Enterprise Manager Directly to Create a Login
To create a login using SQL Server Enterprise Manager directly, right-click Logins in the Security container for the SQL Server 2000 instance, and then click New Login. The General, Server Roles, and Database Access tabs in the SQL Server Login Properties – New Login dialog box allow you to provide the same type of login information discussed in the preceding section with respect to the Create Login Wizard (such as authentication type, server role, and database access). However, they also allow you to configure the login with additional information. When you click the Name ellipsis button in the General tab, an additional SQL Server Login Properties - New Login dialog box appears enabling you to select a Windows domain from a drop-down list, and then browse the names of users and groups in the domain. See Figure 10.13.
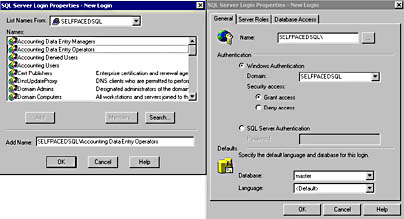
Figure 10.13
Browsing domain user accounts when creating a new login account.
You can also select the default database and language in the General tab. The default database will be the current database when a user logs in. The default for new logins is master, but you will generally change this to a specific user database. The default language will be the default language of the SQL Server 2000 instance, unless specified otherwise (such as Spanish).
Note
You can also deny a Windows 2000 (or Windows NT 4.0) user or group access to SQL Server 2000. This overrides any other access of the user or group (such as through membership in another group that has a different login).
On the Server Roles tab, you select the server role (if any) for this login. A description of each server role is provided in the Description group box for your convenience. See Figure 10.14.
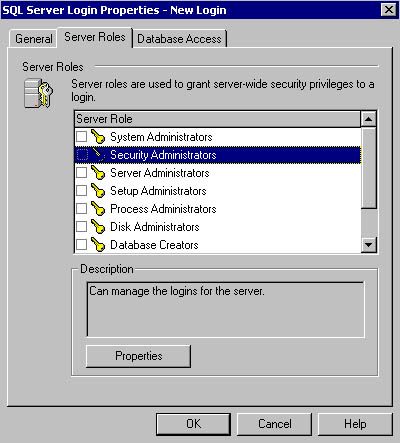
Figure 10.14
Selecting the server role for the login being created.
If you select a server role and then click the Properties button, you can view a list of all logins that are currently members of that role in the General tab of the Server Role Properties – Sysadmin dialog box. You can also add or remove additional logins to this role from this interface. See Figure 10.15.
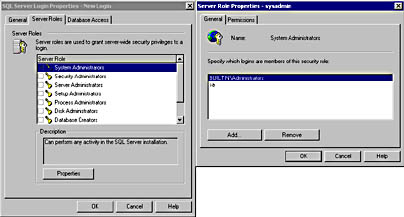
Figure 10.15
Viewing the logins that are members of a role.
Notice that if the System Administrators server role is selected, you can see that the Windows 2000 built-in Administrator group, and the SQL Server login, sa, are members of the sysadmin server role. If you click the Permissions tab, you can view the permissions granted to the sysadmin server role. See Figure 10.16.
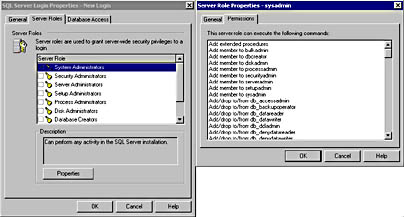
Figure 10.16
Viewing the permissions of a server role.
On the Database Access tab in the SQL Server Login Properties – New Login dialog box, you can select the databases to which this login will have access, along with the database role to which this login will belong. See Figure 10.17.
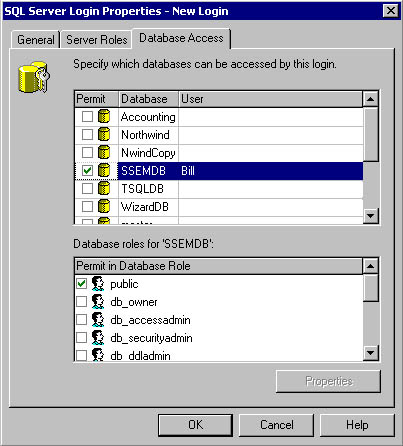
Figure 10.17
Selecting the databases that the new login may access.
When you select a database, notice that the login is automatically made a member of the public role in each database. You cannot remove a login from the public role.
Practice: Creating a Login Directly Using SQL Server Enterprise Manager
In this practice you use the SQL Server Enterprise Manager directly to create a login for a Windows 2000 user.
To create a login directly using SQL Server Enterprise Manager
- Open Windows Explorer.
- Double-click Add_AD_Users1.vbs in the C:\SelfPacedSQL\CH_10 folder.
A Windows Script Host message box appears to tell you that the script has added a single user to the Users container. The Windows Script Host script adds a single user, Bill, to the Users container in the SelfPacedSQL domain with a password of Bill (actually, it will create the user in your current domain).
- Click OK to close the Windows Script Host message box.
- Switch to SQL Server Enterprise Manager.
- In the SQL Server Enterprise Manager console tree, expand the Security container of the default instance.
- Right-click Logins, and then click New Login.
The SQL Server Login Properties – New Login dialog box appears, with the General tab selected.
- To the right of the Name text box, click the ellipsis (.) button.
- Click Bill in the Names list box for the SelfPacedSQL domain.
- Click the Add button and then click OK.
Notice that the Name text box is automatically completed for you.
- In the Database drop-down list, select SSEMDB.
- Click the Server Roles tab.
- Select the Security Administrators check box.
- Click the Properties button.
The Server Role Properties – Securityadmin dialog box appears, with the General tab selected.
- Click the Permissions tab.
Notice the commands that members of this server role can execute.
- Click Cancel and then click the Database Access tab.
- Select the SSEMDB check box.
- In the Database Roles For 'SSEMDB' list box, select the Db_owner check box and then click OK.
Notice that SelfPacedSQL\Bill appears in the details pane for the Logins container as a Windows user.
- Switch to Windows Explorer.
- Double-click Rights.cmd in the C:\SelfPacedSQL\CH_10 folder.
A Command Prompt window will open briefly to execute the Rights.cmd batch file. The batch file will grant Windows 2000 users the right to log on locally. This is required to test user access permissions in the rest of this chapter and in Chapter 11.
- Close Windows Explorer and SQL Server Enterprise Manager, and then log off Windows 2000.
- Log on to the SelfPacedSQL domain controller with a user name of Bill and a password of password.
- Click Start, point to Programs, point to Microsoft SQL Server, and then click Query Analyzer.
The Connect To SQL Server dialog box appears.
- Click the Windows Authentication option button to connect to SelfPacedSQL using Windows authentication.
- Click OK.
SQL Query Analyzer appears. Notice that the title bar indicates that you are connecting as SelfPacedSQL\Bill. Also notice that the current database is SSEMDB.
- In the query pane, type SELECT * FROM SSEMDB.dbo.Customer.
- Click the Execute Query button.
Notice that Bill was able to execute this query because Bill is a member of the database owner role in the SSEMDB database.
- Close SQL Query Analyzer. Do not save any changes.
- Click Start, point to Programs, point to Microsoft SQL Server, and then click Enterprise Manager.
SQL Server Enterprise Manager appears displaying the Microsoft SQL Servers container in the console root. Notice that Event Viewer does not appear. Bill has his own profile, and thus can customize his own version of the SQL Server Enterprise Manager console.
- In the console tree, expand the Microsoft SQL Servers container, expand the SQL Server Group container, expand the default instance container, and then expand Security.
- Right-click Logins and then click New Login.
The SQL Server Login Properties - New Login dialog box appears, with the General tab selected.
- In the Name text box, type Ana.
- Click the SQL Server Authentication option button.
- In the Password text box, type password and then click OK.
The Confirm Password dialog box appears.
- In the Confirm New Password text box, type password and then click OK.
In the details pane, notice that Ana appears as a standard type of login.
- In the Security container, right-click Linked Servers.
Notice that Bill is not able to create a linked server. He is able to create a new login because he is a member of the securityadmin server role and he is not able to create a new linked server because he is not a member of the setupadmin server role.
- Close SQL Server Enterprise Manager and then log off Windows 2000.
- Log on to Windows 2000 as Administrator with a password of password.
Creating a User-Defined Database Role Using SQL Server Enterprise Manager
To create a user-defined database role using SQL Server Enterprise Manager, expand the Databases container for the SQL Server 2000 instance and then expand the database in which you want to create the new database role. Right-click the Roles container, and then click New Database Role. When the Database Role Properties – New Database Role dialog box appears, click the Add button for a list of members that you can add to this new role. See Figure 10.18.
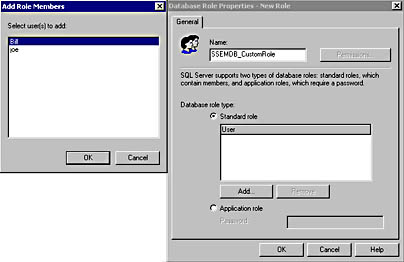
Figure 10.18
Creating a user-defined database role.
To create a user-defined database role, simply type the name you want to give the new database role in the Name text box. You can add users to the role now, or at a later time by clicking the Add button. Notice also that you can create a standard role or an application role. Application roles are covered in Chapter 11. Finally, notice that the Permissions button is grayed out. You cannot assign permissions to a user-defined database role until after you create it. Assigning permissions to a user-defined database role is covered in Chapter 11.
Granting Access Using Transact-SQL Statements
You can also grant access to SQL Server 2000 and its databases using Transact-SQL system stored procedures. The syntax is relatively simple, and you can create multiple logins in a single script. You can also add logins to server roles and database roles in the same script, as well as create and populate user-defined database roles.
Windows Logins
The system stored procedures shown in Table 10.5 are used to grant, deny, revoke, or modify a login associated with a Windows user or group. Only members of the sysadmin or securityadmin server roles can execute these system stored procedures.
Table 10.5 System Stored Procedures for Administering User or Group Logins
| System Stored Procedure | Description |
| Sp_grantlogin 'login' | Creates a login for a Windows 2000 (or Windows NT 4.0) user or group. |
| Sp_revokelogin 'login' | Revokes the login entries from SQL Server for a Windows 2000 (or Windows NT 4.0) user or group. Does not explicitly prevent a revoked user or group from accessing SQL Server 2000, however. For example, if a revoked user is a member of a Windows 2000 or Windows NT 4.0 group that has been granted access to SQL Server 2000, that user can still connect to SQL Server. |
| Sp_denylogin 'login' | Prevents a Windows 2000 (or Windows NT 4.0) user or members of a Windows group from connecting to SQL Server 2000. Prevents the denied user or group from accessing SQL Server 2000 through another login linked to a Windows user or group. |
| Sp_defaultdb 'login' , 'database' | Changes the default database for a login. |
| Sp_defaultlanguage 'login', 'language' | Changes the default language for a login. |
Sp_grantlogin 'SelfPacedSQL\Bill'
The preceding example grants the Windows 2000 user, Bill, in the SelfPacedSQL domain access to SQL Server 2000.
SQL Server Logins
The system stored procedures shown in Table 10.6 are used to grant, revoke, and modify a login associated with a SQL Server security account. Only members of the sysadmin or securityadmin server roles can execute these system stored procedures.
Table 10.6 System Stored Procedures for Administering Security Account Logins
| System Stored Procedure | Description |
| Sp_addlogin 'login' , ['password' , 'database' , 'language', 'sid', encryption_option'] | Creates a new SQL Server login. Password is NULL if not specified. The default database is master if not specified. The default language is the current server language if not specified. By default, the password is in the master database. |
| Sp_droplogin 'login' | Drops a SQL Server login. |
| Sp_password 'old_password', 'new_password', 'login' | Adds or changes a password for a SQL Server login. |
| Sp_defaultdb 'login', 'database' | Changes the default database for a login. |
| Sp_defaultlanguage 'login', 'language' | Changes the default language for a login. |
Sp_addlogin 'Joe' , 'Joe123' , 'Northwind'
The preceding example creates a new SQL Server login, Joe, with a password of Joe123 and a default database of Northwind.
Server Roles
The system stored procedures shown in Table 10.7 are used to add or drop a login to a server role. Only members of the sysadmin server role can add logins to any server role. Members of a server role can add logins to that server role.
Table 10.7 System Stored Procedures for Adding or Dropping a Login to a Server Role
| System Stored Procedure | Description |
| Sp_ addsrvrolemember 'login' , 'role' | Adds a login as a member of a server role. |
| Sp_dropsrvrolemember 'login' , 'role' | Drops a login as a member of a server role. |
Sp_addsrvrolemember 'Joe' , 'securityadmin'
The preceding example adds the login Joe to the server role Security Administrator.
Database Access
The system stored procedures shown in Table 10.8 are used to add or drop an existing login or a Windows 2000 user or group as a permitted user in the current database. Unlike using SQL Server Enterprise Manager, you can grant a Windows 2000 (or Windows NT 4.0) group access to a database without first creating an explicit login entry in the sysxlogins table. Only members of the sysadmin server role, and the db_accessadmin and db_owner fixed database roles can execute these system stored procedures.
Table 10.8 System Stored Procedures for Adding or Dropping Logins, Users, or Groups as Permitted Users
| System Stored Procedure | Description |
| Sp_grantdbaccess 'login' , 'name_in_db' | Adds a login as a user in the current database. Although the user name in the database can be different from the login name, this practice is not recommended (generally too confusing). |
| Sp_revokedbaccess 'name' | Removes a login as a user in the current database. |
USE Northwind EXEC Sp_grantdbaccess 'Joe'
The preceding example grants the login Joe access to the current database, using the user name Joe in the Northwind database.
Database Roles
The following system stored procedures are used to change the database owner, add (or drop) a security account to an existing database role, or create (or drop) a user-defined database role (see Table 10.9).
Use Northwind EXEC Sp_addrolemember 'db_securityadmin' , 'SelfPacedSQL\Bill'
The preceding example adds the SelfPacedSQL\Bill security account to the db_securityadmin database role in the Northwind database.
Table 10.9 System Stored Procedures for Changing a Database Owner, Adding or Dropping a Security Account, or Creating a User-Defined Database Role
| System Stored Procedure | Description |
| Sp_changedbowner 'login', remap_alias_flag | Changes the owner of a user database. Only members of the sysadmin server role or the current database owner can change a database owner. |
| Sp_addrolemember 'role' , 'security_account' | Adds a security account to a database role in the current database. You can add a user-defined database role to a fixed or user-defined database role. Only members of the sysadmin server role and the db_owner and db_security fixed database roles can add members to any database role. Members of a database role can add members to that database role. |
| Sp_droprolemember 'role' , 'security_account' | Drops a security account from a database role in the current database. Only members of the sysadmin server role and the db_owner and db_security fixed dababase roles can remove members from any database role. Members of a database role can remove members from that database role. |
| Sp_addrole 'role' , 'owner' | Adds a new user-defined database role in the current database. Although you can specify an owner of the role, using the default of dbo is recommended. Members of the sysadmin server role and the db_securityadmin and db_owner fixed database roles can create user-defined database roles. |
| Sp_droprole 'role' | Drops a user-defined database role in the current database. Members of the sysadmin server role db_securityadmin and the db_owner fixed database roles can create user-defined database roles. |
Practice: Granting SQL Server 2000 and Database Access Using Transact-SQL
In this practice you use the Transact-SQL system stored procedures to grant SQL Server 2000 and database access to Windows 2000 users and groups.
To grant SQL Server 2000 and database access using Transact-SQL
- Open Windows Explorer.
- Double-click Add_AD_Users2.vbs in the C:\SelfPacedSQL\CH_10 folder.
- A Windows Script Host message box appears to tell you that the process has completed. The Windows Script Host script will add a new Organizational Unit (OU) within Active Directory called SQL Server 2000. Within this new OU, it will add user accounts and three security groups: SQL Server Users, SQL Server Administrators, and Accounting Users. Within the SQL Server Users group, it will add 15 new Windows 2000 users. Within the SQL Server Administrators group, it will add 2 of the 15 Windows 2000 users. Within the Accounting Users group, it will add 3 of the 15 Windows users. Click OK to close the Windows Script Host message box.
- Click Start, point to Programs, point to Microsoft SQL Server, and then click Query Analyzer.
The Connect To SQL Server dialog box appears.
- Click the Windows Authentication option button to connect to SelfPacedSQL using Windows authentication.
- Click OK.
- On the toolbar, click the Load SQL Script button.
The Open Query File dialog box appears.
- Open SQL_Access.sql in the C:\SelfPacedSQL\CH_10 folder.
A Transact-SQL script appears, which will create a new database, Accounting, and a new table, Customer. It will populate the Customer table with 21 customers from the NewCustomerData1.txt file using a BULK INSERT statement. It will then grant the Windows 2000 group SQL Server Users permission to log in to SQL Server 2000. Next, it will add the Windows 2000 group, SQL Server Administrators, to the sysadmin server role. Next, it will grant access to the Accounting database to the Windows 2000 group, Accounting Users. Finally, it will create a user-defined database role, Data Entry Managers, and add the Windows 2000 user Elba to that role.
- Click the Execute Query button to execute the SQL_Access.sql statement.
In the results pane, notice that the Accounting database was created and 21 rows added. The SQL Server Users group was granted login access. The SQL Server Administrators group was added to the sysadmin role. Database access was granted to Accounting Users. The Data Entry Managers database role was created and Elba was added to it.
- Close SQL Query Analyzer.
Viewing Access Information
As a database administrator, you will need to view your SQL Server 2000 installation to determine the users and groups that have login access, as well as the server roles to which they belong. In addition, you will need to view the databases to which they have access, as well as the database roles to which they belong. You might need to modify access to grant greater or lesser rights as job responsibilities for users change over time. You can view SQL Server 2000 and database access information using SQL Server Enterprise Manager and Transact-SQL system stored procedures.
Using SQL Server Enterprise Manager
When viewing access information using SQL Server Enterprise Manager, start with the Security container for the SQL Server 2000 instance. This container holds a Logins container and a Server Roles container. The Logins container displays all users permitted to access the SQL Server 2000 instance. See Figure 10.19.
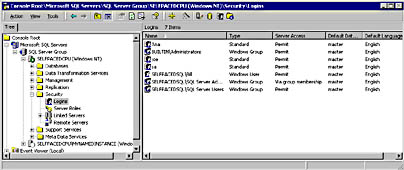
Figure 10.19
Viewing the logins shown in the Logins container.
Notice both SQL Server logins and Windows 2000 users and groups. Also notice that the SelfPacedSQL\SQL Server Administrators group has access via group membership. This Windows group has login access because it is a member of the sysadmin server role. To delete any login, click the login and then press Delete on your keyboard. To view or modify the details of any login, including server roles and database access, double-click the login to access the SQL Server Login Properties dialog box. See Figure 10.20.
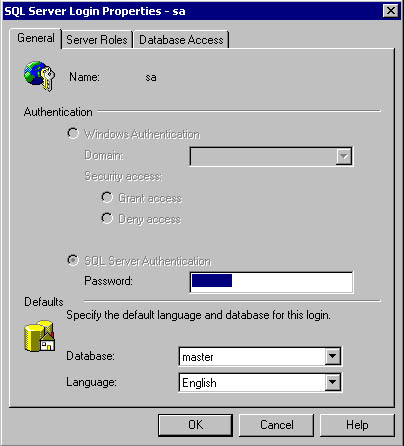
Figure 10.20
Viewing the details of a login.
Note
A system administrator can change the password of any SQL Server security account.
The Server Roles container displays the server roles. See Figure 10.21.
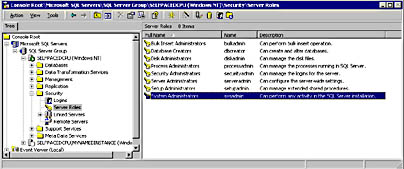
Figure 10.21
Viewing the server roles.
Double-click any server role to list, add, or remove logins from the server role. See Figure 10.22.
To view database access permissions, you can either view them on a per-user basis or you can view them on a per-database basis. Expand a database container and then click the Users container to view the list of all users permitted to access the database. See Figure 10.23.
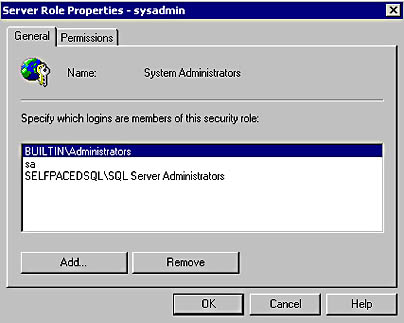
Figure 10.22
Modifying members of a server role.
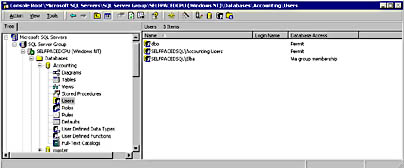
Figure 10.23
Viewing the list of users who have access to a database.
In Figure 10.23, notice that members of the Windows SelfPacedSQL\Accounting Users group, and the Windows user, SelfPacedSQL\Elba, are permitted to access the Accounting database (in addition to the members of the dbo role). SelfPacedSQL\Elba has access via group membership. To determine Elba's group membership, double-click SelfPacedSQL\Elba to display the Database User Properties - SelfPacedSQL\Elba dialog box. See Figure 10.24.
In Figure 10.24, notice that Elba has access by virtue of membership in the Data Entry Managers user-defined database role. Click the Permissions button to view Elba's permissions. Select a database role and then click the Properties button to view each role, its members, and the permissions of the role. Permissions are covered in Chapter 11.
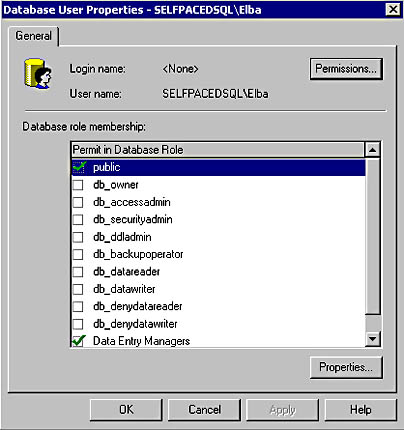
Figure 10.24
Determining the database role memberships of a user.
To review each database role, click the Roles container in the console tree. See Figure 10.25.
Double-click a database role to list, add, or remove security accounts from the database role. See Figure 10.26.
Using Transact-SQL
You can also view SQL Server 2000 access information using Transact-SQL system stored procedures. The system stored procedures listed in Table 10.10 return information regarding logins, server role members, database access, and database role members. Only members of the sysadmin or securityadmin server roles can execute the sp_helplogins system stored procedure. Members of the public role can execute all other system stored procedures in this list.
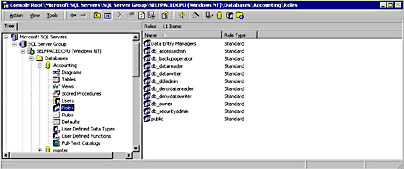
Figure 10.25
Viewing database roles.
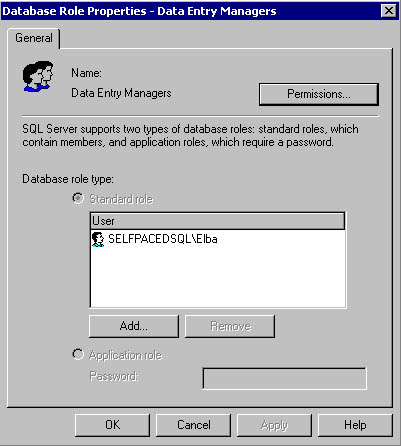
Figure 10.26
Modifying members of a database role.
Note
A Windows user can access SQL Server 2000 through membership in one Windows group and can access a database through membership in another Windows group.
Table 10.10 System Stored Procedures That Return Access Information
| System or Extended Stored Procedure | Description |
| Sp_helplogins [ 'login' ] | Returns information regarding all logins or a specified login, including the databases to which a login has access and database roles of which the login is a member. |
| Sp_helpsrvrolemember [ 'role' ] | Returns information regarding all server roles and their members or all members in a specified server role. |
| Sp_helpuser [ 'security_account' ] | Returns information regarding all users or a specified user in the current database, including all database role memberships. |
| Sp_helprolemember [ 'role' ] | Returns information regarding all database roles or all memberships in a specified database role within the current database. |
| Sp_helpntgroup [ 'name' ] | Returns information regarding all Windows 2000 (or Windows NT 4.0) groups or a specified group within the current database. |
Practice: Viewing SQL Server 2000 Access Information
In this practice you use SQL Server Enterprise Manager and Transact-SQL system stored procedures to view SQL Server 2000 access information.
To view SQL Server 2000 access information
- Ensure that you are logged on to the SelfPacedSQL.MSFT domain controller as Administrator.
- Click Start, point to Programs, point to Microsoft SQL Server, and then click Enterprise Manager.
- In the console tree, expand the Microsoft SQL Servers container, expand the SQL Server Group container, expand your default instance, expand the Security container, and then click Logins.
In the details pane, notice the Windows 2000 users and groups, and the SQL Server logins, that have access to SQL Server 2000. Only members of the SelfPacedSQL SQL Server Users group or the SQL Server Administrators group can log in to this SQL Server 2000 instance.
- In the details pane, double-click SelfPacedSQL\SQL Server Users.
The SQL Server Login Properties – SelfPacedSQL\SQL Server Users dialog box appears, with the General tab selected.
- Click the Server Roles tab.
Notice that this Windows group is not a member of any server role.
- Click the Database Access tab.
Notice that this Windows group does not have any database access.
- Click Cancel.
- On the Tools menu, click SQL Query Analyzer.
- On the toolbar, click the Load SQL Script button.
The Open Query File dialog box appears.
- Open Logins.sql in the C:\SelfPacedSQL\CH_10 folder.
A Transact-SQL script appears containing the sp_helplogins system stored procedure.
- Click the Execute Query button to execute the Logins.sql statement.
In the results pane, notice two result sets. The first set displays the logins with access to this SQL Server 2000 instance. The second set displays the databases to which each login has access. Notice that neither the SelfPacedSQL\SQL Server Users group nor the SelfPacedSQL\SQL Server Administrators shows any database access.
- Switch to SQL Server Enterprise Manager.
- In the details pane, double-click SelfPacedSQL\SQL Server Administrators.
The SQL Server Login Properties - SelfPacedSQL\SQL Server Administrators dialog box appears. On the General tab, notice that this group has login access through group membership (in the sysadmin server group).
- Click the Server Roles tab.
Notice that this Windows group is a member of the System Administrators server role.
- Click the Database Access tab.
Notice that this Windows group does not have any database access. No explicit database access is required because a sysadmin has full access by definition.
- Click Cancel.
- Switch to SQL Query Analyzer.
- On the toolbar, click the Load SQL Script button.
- Open ServerRoleMembers.sql in the C:\SelfPacedSQL\CH_10 folder.
A Transact-SQL script appears containing the sp_helpsrvrolemember system stored procedure, which specifies the sysadmin server role.
- Click the Execute Query button to execute the ServerRoleMembers.sql statement.
In the results pane, notice that the sysadmin server role contains three members, the two default members and the SelfPacedSQL\SQL Server Administrators group.
- Switch to SQL Server Enterprise Manager.
- In the console tree, right-click the Databases container and then click Refresh.
- In the console tree, expand the Databases container, expand the Accounting database, and then click Users.
In the details pane, notice that one SelfPacedSQL group and one SelfPacedSQL user can access this database. Also notice that neither this user nor this group has explicit access to this SQL Server 2000 instance. To access this SQL Server 2000 instance, this user and members of this group must belong to the SQL Server Users group. Although we could have granted this user and this group explicit permission to log in to this SQL Server 2000 instance, there are good reasons for this structure. Chapter 11 will cover strategies for using login groups, data access groups, and permissions.
- In the details pane, double-click SelfPacedSQL\Elba.
The Database User Properties – SelfPacedSQL\Elba dialog box appears. Notice that Elba is a member of the public role and the Data Entry Managers role. Also notice that no login name exists for this user. She must log in by group membership.
- Click the Permissions button.
Notice that Elba has no permissions. In Chapter 11, you will grant permissions to the Data Entry Managers role and the public role.
- Click Cancel.
- Click Cancel in the Database User Properties – SelfPacedSQL\Elba dialog box.
- Switch to SQL Query Analyzer.
- On the toolbar, click the Load SQL Script button.
The Open Query File dialog box appears.
- Open DatabaseAccess.sql in the C:\SelfPacedSQL\CH_10 folder.
A Transact-SQL script appears containing three system stored procedures that query regarding the Accounting database. The sp_helpuser system stored procedure queries regarding the SelfPacedSQL\Accounting Users Windows groups. The sp_helprolemember system stored procedure queries regarding the Data Entry Managers user-defined database role. The sp_helpntgroup system stored procedure queries regarding all Windows groups with access to the current database.
- Click the Execute Query button to execute the DatabaseAccess.sql statement.
In the results pane, notice that the SelfPacedSQL\Accounting Users group is a member of the public role in this database. Also notice that SelfPacedSQL\Elba is a member of the Data Entry Managers group. Also notice that the SelfPacedSQL\Accounting Users group is the only Windows group with database access.
Lesson Summary
You can use SQL Server Enterprise Manager to grant Windows users and groups access to a SQL Server 2000 instance. As part of the same process, you can grant them authorization to perform server-wide tasks, grant them access to specific databases, and add them to database roles. You must perform this process one user at a time. You can use Transact-SQL system stored procedures to perform the same tasks for many users in a single script. You can view SQL Server access and database access rights for users with either SQL Server Enterprise Manager or Transact-SQL.
EAN: N/A
Pages: 126