15.3 Types of Style Sheets
| There are several ways to define style sheets within a document:
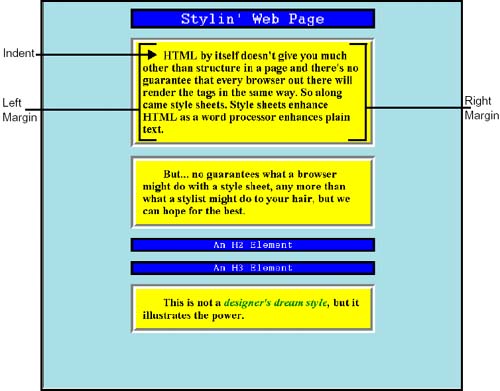
15.3.1 The Embedded Style SheetA style sheet that is created with the HTML <style></style> tags right in the current document is called an embedded style sheet. The <style> TagThe <style></style> tags were introduced into HTML to allow the style sheets to be inserted right into an HTML document. They are used to create a set of rules to define the style of an HTML element(s). The <style></style> tags are placed between the <head></head> tags in the document, as shown here: <html><title>CSS Example</title> <head> <style> h1 { color: blue ; } </style> </head> The type AttributeBecause it is possible to have more than one style sheet language, you can tell the browser what type of style sheet you are using with the type attribute of the HTML <style> tag. When the browser loads the page, it will ignore the style sheet if it doesn't recognize the language; otherwise it will read the style sheet. The following example specifies that the type is text/css ; that is, text and cascading style sheet. FORMAT <style type="style sheet language"> Example: <style type="text/css"> Example 15.8 <html> <head><title>Cascading Style Sheets</title> 1 < style type="text/css" > <!-- 2 body { background-color: lightblue; } 3 p { background:yellow; text-indent:5%; margin-left: 20%; margin-right: 20%; border-width:10px; border-style:groove; padding: 15px; font-family: times,arial; font-size:150%; font-weight:900 } 4 h1, h2, h3 { text-align: center; background:blue; border-width:5px; border-style:solid; border-color:black; margin-left:20%;margin-right:20%; font-family:courier, arial; font-weight:900; color: white; } 5 h2,h3 { font-size:24; } 6 em { color: green; font-weight: bold } --> 7 </style> </head> <body> 8 <h1><center>Stylin' Web Page</center></h1> 9 <p>HTML by itself doesn't give you much other than structure in a page and there's no guarantee that every browser out there will render the tags in the same way. So along came style sheets. Style sheets enhance HTML as a word processor enhances plain text. <p>But... no guarantees what a browser might do with a style sheet, any more than what a stylist might do to your hair, but we can hope for the best. 10 <h2><center>An H2 Element</center></h2> <h3><center>An H3 Element</center></h3> 11 <p>This is not a <em>designer's dream style</em>, but it illustrates the power. </body> </html> EXPLANATION
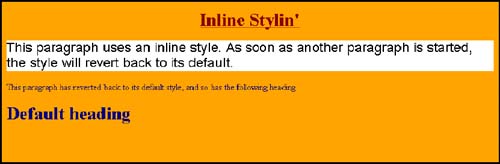
15.3.2 The Inline Type and the <style> AttributeInline style sheets are also embedded within an HTML document, but are assigned as an attribute of the <style> tag in the body of the document and are useful for overriding an already exisiting style for a particular element in a linked style sheet. On the negative side, they have to be redefined for any element that requires that style, element by element. For example, if the h1 element has been defined to be blue and you want to temporarily change it to red, you can define the style as an attribute of the style tag for that element: <h1 style= "color: red; "> This is red text</h1> Example 15.9 <html><head><title>Inline Style Sheets</title> 1 <style type="text/css"> 2 body { background-color: orange; color:darkblue; /* color of text */ } </style> </head> <body> 3 <h1 style="color:darkred; text-align:center; text-decoration:underline;" >Inline Stylin'</h1> 4 <p style="color:black; background:white; font-family:sans-serif;font-size:large"> This paragraph uses an inline style. As soon as another paragraph is started, the style will revert back to its default. 5 <p> This paragraph has reverted back to its default style, and so has the following heading. <h1>Default heading</h1> </body> </html> EXPLANATION
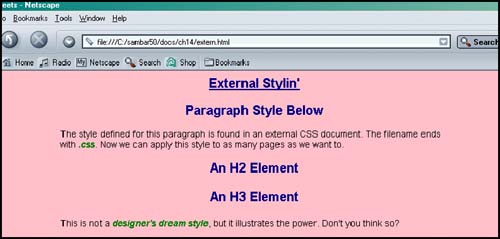
15.3.3 The External Type with a LinkExternal style steets are the most powerful type if you want the style to affect more than one page; in fact, you can use the same style for hundreds, thousands, or millions of pages. As the name implies, external style sheets are stored in an external file, not the current HTML file. The filename for the external style sheet has a .css extension, just as the HTML file has an .html or .htm extension. To link the external file to the existing HTML file, a link is created as shown here: < link rel =stylesheet href ="style_file.css" type ="text/css"> The following examples demonstrate the use of external style sheets. The first example is the HTML file containing a link to the external file and the second example is the .css file. It contains the style sheet. Example 15.10<html> <head> <title>External Style Sheets</title> 1 <link rel=stylesheet type="text/css" href="extern.css"> <!-- Name of external file is extern.css. See Example 15.11 --> 2 </head> 3 <body> <h1><u>External Stylin'</u></h1> <h2>Paragraph Style Below</h2> <p>The style defined for this paragraph is found in an external CSS document. The filename ends with <em>.css</em>. Now we can apply this style to as many pages as we want to. <h2>An H2 Element</h2> <h3>An H3 Element</h3> <p>This is not a <em>designer's dream style</em>, but it illustrates the power. Don't you think so?<p> </body> </html> EXPLANATION
Example 15.11 (The external extern.css file) 1 body { background-color: pink; } 2 p { margin-left:20%; margin-right:20%; font-family: sans-serif; font-size: 14 3 } h1, h2, h3 { text-align: center; font-family: sans-serif; color: darkblue } 4 em { color: green; font-weight: bold } EXPLANATION
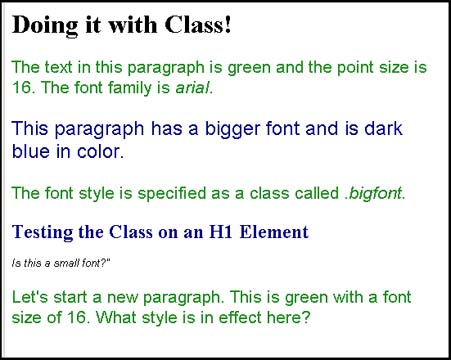
15.3.4 Creating a Style ClassRather than globally defining a style for an element, you can customize the style by defining a class. The class style can be applied to individual tags when needed. The class name, called the class selector, is preceded by a period and followed by the declaration enclosed in curly braces. FORMAT .classname { style rules; } Example: .header { font-family: verdana, helvetica ; } Once you have defined a class, it can be used on any of the HTML elements in the body of the document as long as that element understands the style you have applied to it. To apply the class, you use the class attribute. The class attribute is assigned the name of the class; for example, for the <p> tag, you would stipulate <p class=name> where name is the name of the class. Example 15.12 <html><title>CSS Class Name</title> 1 <head> 2 <style> 3 p { margin-right: 30%;font-family: arial; font-size: 16pt; color:forestgreen; } 4 .bigfont { font-size: x-large; color:darkblue; font-style:bold;} 5 .teenyfont {font-size:small; font-style: italic;color:black;} </style> </head> <body> 6 <p>The text in this paragraph is green and the point size is 16. The font family is <em>arial</em>. 7 < p class="bigfont" > This paragraph has a bigger font and is dark blue in color. 8 <p>The font style is specified as a class called <em>.bigfont</em>. 9 < h1 class="bigfont" >Testing the Class on an H1 Element</h1> 10 < p class="teenyfont" >Is this a small font?" <p>Let's start a new paragraph. This is green with a font size of 16. What style is in effect here? </body></html> EXPLANATION
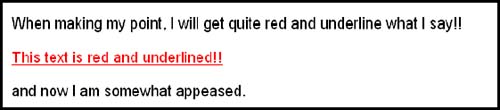
15.3.5 The ID SelectorThe ID selector is another way to create a style that is independent of a specific HTML tag. By using the ID selector, you can choose the style for the element by assigning it a unique ID. The name of the ID selector is always preceded by a hash mark (also called a pound sign, #). The declaration block, consisting of properties and values, follows the ID selector and is enclosed in curly braces. FORMAT #IDselector { declaration ; } Example: #menu1 { font-family: arial; font-size: big; color: blue; } To apply an ID to an HTML tag, use the id attribute. The attribute will be assigned the same name given to the ID selector; so, to apply an ID selector to a <p> tag, you would stipulate <p id=name> where name is the name of the ID selector. (See Example 15.13.) When JavaScript enters the picture, the id attribute is used to identify each element as a unique object so that it can be manipulated in a JavaScript program. The ID should be unique for an element and not used more than once on a page. If you need to use the style more than once for multiple elements, it would be better to use the class selector instead. The ID selector can be used with a class selector of the same name, as #big, .big { } . Example 15.13<html><head><title>ID's</title> 1 <style type="text/css"> 2 p { font-family:arial,sans-serif,helvetica; font-style:bold; font-size:18 } 3 #block { /* The ID selector */ color: red; text-decoration:underline; } </style> </head> <body > 4 <p> When making my point, I will get quite red and underline what I say!!</p> 5 <p id="block"> This text is red and underlined!!</P> 6 <p>and now I am somewhat appeased. </body> </html> EXPLANATION
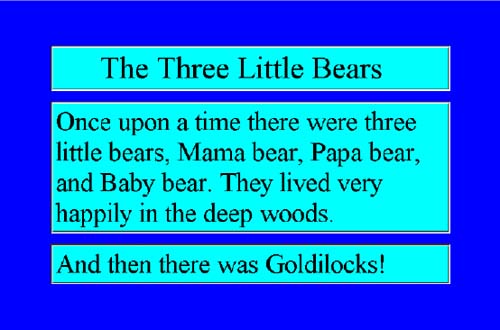
15.3.6 The <span> TagThe <span></span> tags are used if you want to change only a selected portion of text. By doing so, you can create an inline style that will be embedded within another element and apply only to that portion of the content. In this way you can add or override a style to an element for which a style has already been defined. Carriage returns and breaks in the text will not occur with these tags. In the following example, the paragraph style has been defined in a CSS. But later in the body of the document, the <span> tag is used to override the font size and to add margins to the text. Example 15.14<html><head><title>Margins</title></head> <style type="text/css"> 1 body { margin:10%; border-width: 10px; border-style:solid; border-color: white; padding:5px;} 2 p { color=black; font-size: 22pt; margin-left:10; margin-right:10; padding:5px; border-style:groove; border-color:white; background-color:cyan;} </style> <body bgcolor=blue> <p> 3 <span style="margin-left:10%;font-size:26pt;"> The Three Little Bears </span> 4 </p> Once upon a time there were three little bears, Mama bear, Papa bear, and Baby bear. They lived very happily in the deep woods. <p>And then there was Goldilocks!</p> </body> </html> EXPLANATION
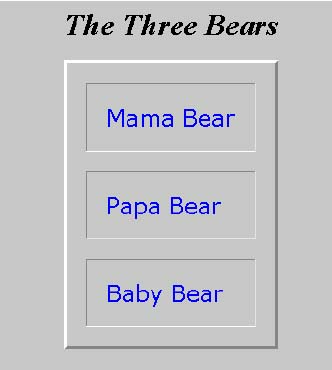
15.3.7 Contextual SelectorsContextual selectors have an inheritance basis. For example, if a <b> tag is nested withing a <p> tag, then the <b> tag takes on the characteristics assigned to its parent. If the <p> is green, than the bold text will also be green. If a bullet list <ul> has <li> tags nested within it, the bullets take on the characteristics of its parent. If the ul element is red, then all the bullets and the accompanying text will be red. When you create a contextual selector, the last element in the selector list is the one that is affected by the style when it is used in context of the elements preceding it. For example, if you have a selector list: table td em { color: blue ;} , then the em element, the last in the list, will be affected by the style only when it is inside a table cell , td , at which point the table cell will be contain blue italic text. Example 15.15<head><title>Contextual Selector</title> <style type="text/css"> 1 table td { color: blue; /* Table cells will take this style */ font-size: 18pt; font-family: verdana; } </style> </head> <body bgcolor=silver><center> <h1><em>The Three Bears</em></h1> <table cellspacing="20" cellpadding="20%" border="3"> <tr> 2 <td>Mama Bear</td> <tr> 3 <td>Papa Bear</td> <tr> 4 <td>Baby Bear</td> </tr> </table> </center> </body> </html> EXPLANATION
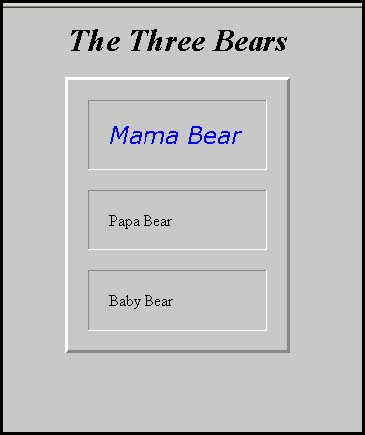
Figure 15.15. A table with stylized cells. Example 15.16<html> <head><title>Contextual Selector</title> <style type="text/css"> 1 table td em { color: blue; /* Table cells take this style */ font-size: 18pt; font-family: verdana; } </style> </head> <body bgcolor=silver><center> 2 <h1><em> The Three Bears</em></h1> <table cellspacing="20" cellpadding="20%" border="3"> <tr> 3 <td><em> Mama Bear</em></td> <tr> 4 <td> Papa Bear</td> <tr> 5 <td> Baby Bear</td> </tr> </table> </center> </body> </html> EXPLANATION
15.3.8 Positioning Elements and LayersOne of the most important features of CSS is the ability to position objects on a page, to size them, and to make them either visible or invisible. This feature makes it possible to move objects to different sections of a page, move text and images, create animation, tool tips, scrolling text, and more. Normally when you place tags in an HTML document, the flow is from top to bottom. Now, with style sheets, you can set the position of an element, even layering one on top of the other. A note about Netscape layers. Netscape 4 introduced layer ( <layer><ilayer> ) tags, a prototype of CSS positioning, to control the position and visibility of elements on a page, and then with Netscape 6 abandoned the whole thing. This book does not address the Netscape 4 layer technology since it is fast becoming a thing of the past. However, the term "layer" is still in use, and is used to refer to objects using the id attribute. Table 15.9. Positioning styles.
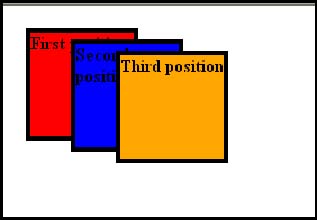
Absolute PositioningAbsolute positioning places an element in a specific location on the page and can be used to achieve full animation; for instance, moving an image across a page. It is used to specify the absolute coordinates ( x,y ) of the element in terms of the browser window itself. The top and left properties are used to determine the coordinates. (See Figure 15.17.) If not specified, the browser will assume the top left corner of the browser window, where x is 0 and y is 0. The top left corner of the window is position 0,0 and the bottom right corner depends on the resolution of the screen. If the screen resolution is set to 800 pixels in width and 600 pixels in height, the bottom right corner is positioned at coordinates 800, 600. Figure 15.17. Absolute positioning. If an absolutely positioned element is nested within another absolutely positioned element, it will be positioned relative to that element. Example 15.17<html> <head> <title>layers</title> <style type="text/css"> <!-- 2 #first { background-color: red; border-style: solid; font-weight:bold; top: 20; 2 position: absolute; left: 20; height: 100; width: 100; } 3 #second { background-color: blue; border-style: solid; font-weight:bold; top: 30 ; position: absolute; left: 60; height: 100; width: 100; } 4 #third { background-color: orange; border-style: solid; font-weight:bold; top: 40 ; position: absolute; left: 100; height: 100; width: 100; } </style> 5 <body> 6 <p id="first"> First position </p> 7 <p id="second"> Second position </p> 8 <p id="third"> Third position </p> </body> </html> EXPLANATION
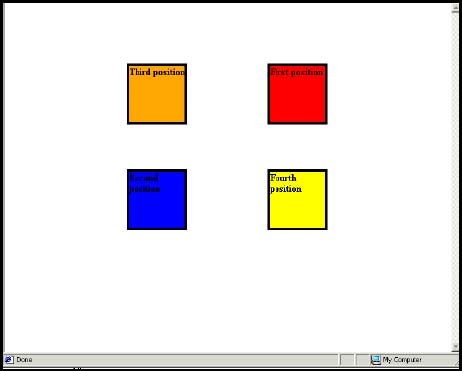
Top, Left, Bottom, Right ”Absolute PositionsAs shown in the previous example, once the position has been set, the left, top, right , and bottom attributes can be used to specify exactly where on the page the element should be located. Although we used left and top to define the position of the element within the body of the document, right and left bottom can also position the element on the page. In the following example, four elements are placed in four corners of the document. Example 15.18 <html> <head> <title>layers</title> <style type="text/css"> <!-- 1 #first{ background-color: red; border-style: solid; font-weight:bold; position: absolute; top: 100; right: 200; height: 100; width: 100; } 2 #second{ background-color: blue; border-style: solid; font-weight:bold; position: absolute; bottom:200; left:200; height: 100; width: 100; } 3 #third{ background-color: orange; border-style: solid; font-weight:bold; position: absolute; top: 100 ; left: 200; height: 100; width: 100; } 4 #fourth{ background color: yellow; border-style: solid; font-weight:bold; position: absolute; bottom: 200 ; right: 200; height: 100; width: 100; } </style> 5 <body> 6 <p id="first"> First position </p> 7 <p id="second"> Second position </p> 8 <p id="third"> Third position </p> 9 <p id="fourth"> Fourth position </p> </body> </html> EXPLANATION
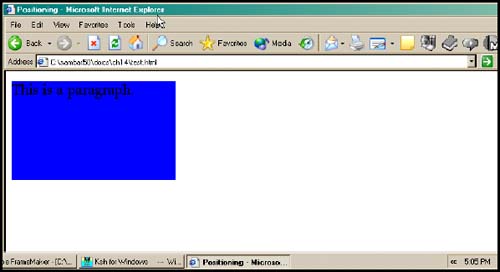
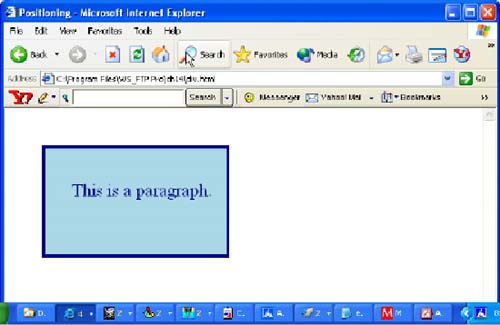
The <div> TagOne of the most important containers is the <div> tag. It serves as a container where you can put other elements, give them color, borders, margins, etc. The <div> tag is also used for absolute positioning of a block of text that separates itself from other content in the document. It allows you to create a paragraph style independent of the <p> tag. Within the block, the <span> tags can be used to introduce other styles. In the following example, the <div> tag is used to create a block. It is absolutely positioned in the window at position 0,0, which is the top, left-hand corner. Example 15.19<html><head><title>Positioning</title> </head> 1 <style> 2 .divStyle {background-color:blue; 3 position: absolute; width: 250px; height: 150px; } </style> </head> <body> <font size="+2"> 4 <div class="divStyle"> 5 <p> This is a paragraph. </p> </div> </body> </html> EXPLANATION
Relative PositioningRelative positioning places the element in a position relative to the element where it is defined in the document. In the following example the .ParaStyle class is positioned relative to where it should be placed within its container, a div block. Example 15.20<html><head><title>Positioning</title> </head> 1 <style> 2 .divStyle { background-color:lightblue; 3 position: absolute; 4 width: 250px; height: 150px; border-style: solid; border-color: darkblue; } 5 .paraStyle { color:darkblue; 6 position: relative; } </style> </head> <body> <font size="+2"> 7 <div style="left:50px; top:50px" class="divStyle"> 8 <p style="left:15%; top:30%" class="paraStyle"> This is a paragraph. </p> </div> </body> </html> EXPLANATION
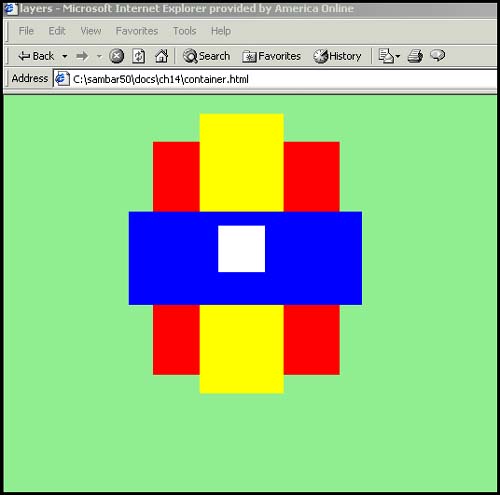
The z-index and Three DimensionsThe last type of position sets the precedence of a stack of overlapping elements. The absolute position properties include three coordinates: x, y, and z , where x is the left side of an object, y is the right side, and z is the value of the stacking position. If you have three containers layered on top of each other, the z position of the bottom layer is 0; the next layer, 1; and the top layer in the stack is layer 2. In the next section, JavaScript will allow us to move these objects around, rearranging the stacking order dynamically, by manipulating the z -position. Example 15.21<html><head><title>layers</title></head> <body bgcolor=lightgreen> 1 <span style="position: absolute; z-index:0; background-color: red; width: 200;height:250; top: 50px; left:160px;"></span> 2 <span style="position: absolute; z-index:1 ; background-color:yellow; width: 90;height:300; top: 20px; left:210px;"></span> 3 <span style="position: absolute; z-index:2 ; background-color: blue; width: 250;height:100; top: 125px; left:134px;"></span> 4 <span style="position: absolute; z-index:3 ; background-color: white; width: 50;height:50; top: 140px; left:230px;"></span> </body></html> EXPLANATION
Figure 15.22. Three dimensions and the z-index . |
EAN: 2147483647
Pages: 150
- Article 250 Grounding and Bonding
- Article 362 Electrical Nonmetallic Tubing Type ENT
- Article 384 Strut-Type Channel Raceway
- Article 500 Hazardous (Classified) Locations, Classes I, II, and III, Divisions 1 and 2
- Example No. D8 Motor Circuit Conductors, Overload Protection, and Short-Circuit and Ground-Fault Protection