| The Manage Enterprise Features function allows you to run the build process for the Online Analytical Processing (OLAP) cube, update resource availability information, check in projects and resources, and add or delete project versions. In some cases, you may want to allow more than just administrators to run some of these functions, other than updating the OLAP cube. For example, you might want to allow resource managers to be able to check in resources who have been checked out of the Enterprise Resource Pool. However, you will want to guard the permissions for running of the OLAP cube and updating of the resource tables: These functions can significantly slow down the Project Server if they are run during the day, especially as your Project Server database gets larger. The following sections describe each of the functions available. The Update Resource Tables and OLAP Cube Under the Update Resource Tables and OLAP Cube feature, there are two particular functions you can perform: - Updating the OLAP cube, which brings in the latest resource and project information from the Project Server database to Portfolio Analyzer views you have created. The Portfolio Analyzer views show static data based on this update process.
- Updating resource availability, which updates the availability information in View Availability in the Resource Center of PWA and other reporting locations in Project Server.
The two functions may be run separately. For example, you may want to show availability information for resources frequently, but the static view from the OLAP cube may need to be run only once a week. TIP Set up and follow written standards to indicate when you will update the Portfolio Analyzer views and the resource availability for your organization.
Figures 19.29 and 19.30 show you the sections of the Update Resource Tables and OLAP Cube screen where you update the OLAP cube and resource availability. Figure 19.29. Updating the OLAP cube. 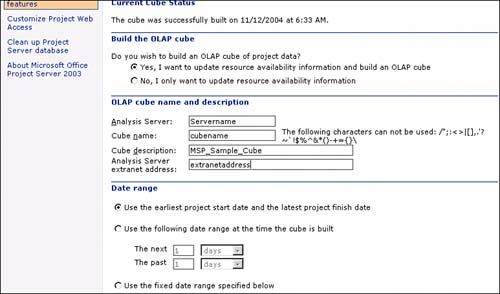
Figure 19.30. Section to update resource availability. 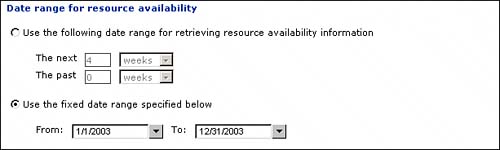
First, it's important to understand how the OLAP cube works. The OLAP cube is created by an additional service called Analysis Services, which is part of SQL Server 2000. Data displays in the Portfolio Analyzer views, only after tables in Analysis Services are updated from the Project Server database. These tables are updated only from project information being published into the Project Server database and the OLAP cube function being run (by clicking Update Now or by scheduled updates being set on this Update Resource Tables and OLAP Cube screen). It's also important to understand that the data being published to the Analysis Services tables may be limited by your entering a date range for the data. If you have a lot of data, it is probably a good idea to limit the date range for the data that can be shown in Portfolio Analyzer. NOTE Some organizations do not understand the importance of the Publish function in Project Server. Project managers must use the Collaborate, Publish function in Project Professional to include project information in Portfolio Analyzer views. Saving a project is not enough.
NOTE You must set up the Analysis Services correctly and set permissions for users and groups on the Analysis Services server for everyone needing access to Portfolio Analyzer. Many organizations forget this part of the process after they have run the OLAP cube. If users have not been given permission on Analysis Services or if it has not been installed correctly, users will see a message saying that they do not have permission for the Portfolio Analyzer view after they select it on the Resource Center or Project Center pages.
Building the OLAP Cube You must build the OLAP cube to update the data for a Portfolio Analyzer view. To build an OLAP cube, follow these steps: 1. | Select Manage Enterprise Features under the Admin tab.
| 2. | Select Update Resource Tables and OLAP Cube under Enterprise Options in the upper-left side pane.
| 3. | Click on the radio button for Yes, I Want to Update Resource Availability Information and Build an OLAP Cube under the Build the OLAP Cube section.
| 4. | Complete the information for the Analysis Server and the cube you are building under OLAP Cube Name and Description as follows:
- Analysis Server Enter the name of the server running Analysis Services.
- Cube Name Enter a name to describe the cube. This can be any name you want to help you identify the cube. You can have more than one cube, so you will want to make this distinctive.
NOTE When you are updating a cube to get more current information, make sure that the correct cube name is in this field. You may have more than one cube, and you could accidentally update the data for the wrong cube. - Cube Description Enter a more detailed description of the purpose of the cube.
- Analysis Server Extranet Address Enter the Analysis Services server's extranet address. This is optional; use this only if Portfolio Analyzer may be accessed from an extranet.
| 5. | Enter the date range for the projects that will be in the cube in the Date Range field. You have three options for entering the date range:
- Use the Earliest Project Start Date and Latest Project Finish Date Builds a cube for all projects within Project Server. This may be useful when you first start using Project Server, but if you start having large and numerous projects over time, you might want to consider one of the other options to limit the processing time for building the cube.
- Use the Following Date Range at the Time the Cube Is Built Enter the number of days (or weeks or months) before and after today's date to indicate the date range for the projects in the cube. Selecting this option and setting a date range that provides your organization the best forward and backward project visibility is the recommended approach.
- Use the Fixed Date Range Specified Below Enter the exact date range in the From and To fields to indicate the dates of the project data you want to be reflected in the cube.
| 6. | Enter the date range for reflecting resource availability in the Date Range for Resource Availability field:
NOTE If you enter a date range for building the cube and you enter a date range for resource availability that is smaller than the cube's date range, the cube's date range will be used for resource availability. - Use the Following Date Range for Retrieving Resource Availability Information Enter the number of days (or weeks or months) before and after today's date to indicate the date range for the resource availability to be reflected in the cube.
- Use the Fixed Date Range Specified Below Enter the exact date range in the From and To fields to indicate the availability data to be reflected in the cube.
| 7. | Set how often you want the OLAP cube to be updated. You can set a date/time when you want to have the cube updated automatically, or you can update the cube manually. You have two options:
Enter the number of days, weeks, or months in the Update Every fields, and enter the date and time the first build should occur in the Start Update On field. Click the radio button for Update Only When Specified, and click Update Now if you want to manually update the cube. You might use this when you first start using Project Server, but eventually you will want to set a scheduled date and time.
| 8. | Click Save Changes.
|
You can also just update resource availability without building the OLAP cube for all the other information in the Project Server databases, and thus it will take less time to run. To do so, you go through the same process described previously, but under the Build the OLAP Cube section, select the radio button for No, I Only Want to Update Resource Availability and make sure that you set the date range as described previously. TIP Consider how often you need the data for resource availability and Portfolio Analyzer views to be updated. You might want to run the cube once a week during hours the system is not used much. Make sure that you document when and why you update the cube when you do.
Check In Enterprise Projects This function allows an administrator to force a check-in of a project to the Project Server database. The project reverts to the last version saved to the database, and any changes since that save will be lost. This may be required if the client or server goes down, such as during a network outage, when the project is checked out. TIP Make sure that you educate the project managers so that they can check in their own projects in the Project Center using the Check in My Projects feature.
 PAGE 345. PAGE 345.
To check in a project, follow these steps: 1. | Select Manage Enterprise features under the Admin tab.
| 2. | In the side pane under Enterprise Options, select Check in Enterprise Projects. The Check in Enterprise Projects page displays, which consists of a grid listing projects currently checked out.
| 3. | Select the project (or projects) that you want to check in, and then click Check-In.
|
Check In Enterprise Resources This function allows an administrator to force a check-in of a resource to the Project Server database. The resource data reverts to the last version saved to the database, and any changes to a checked-out resource will be lost. This may be required if the client or server goes down when the resource is checked out. To check in a resource, follow these steps: 1. | Select Manage Enterprise Features under the Admin tab.
| 2. | In the side pane under Enterprise Options, select Check in Enterprise Resources. The Check in Enterprise Resources page displays, which consists of a grid listing resources currently checked out.
| 3. | Select the resource (or resources) that you want to check in, and then click Check-In.
|
Using Versions A version is a complete copy of a project that is saved to the Project Server database. Versions can be created for a project only if a published version is in the Project Server database. Versions are best used to create snapshots of project data over time and to evaluate schedule options for a particular project. Follow these steps to add a custom version: 1. | Under the Admin tab, select Manage Enterprise Features.
| 2. | In the side pane under Enterprise Options, select Versions. The Versions page appears, which consists of a grid listing the available versions, as shown in Figure 19.31.
Figure 19.31. The Versions page. 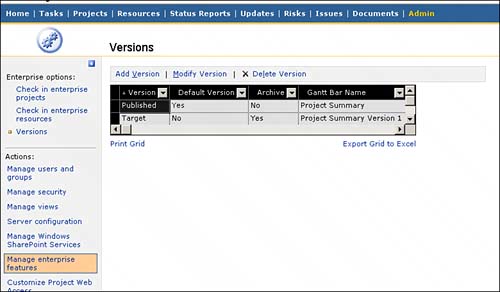
| 3. | Select Add Version from the top menu. This displays the Add Version page to name the version, set the archive option, and set the Gantt Bar name to indicate the bar format you want, as shown in Figure 19.32.
Figure 19.32. The Add Version page. 
| 4. | Enter a name for the version.
| 5. | Select Yes or No in the Version Archived drop-down list.
NOTE If you set the version as an archived version, a project saved as that version shows the resource assignments as they existed at the point the project was saved to the version. The next time this version of the project is opened, the project will not show the current assignments of the resources. If you save the project as a nonarchived version, the summary resource assignments will be updated to reflect current resource allocations. | 6. | Select a Gantt Bar Name from the list. The Gantt Bar Name displays a particular Gantt Bar format when the project version is displayed in the Project Center.
NOTE Predefined Gantt Bar formats are available for five versions. The published version uses the Project Summary format. Gantt Bar formats are described further in "Using the Customize Project Web Access Function" later in this chapter. | 7. | Click Save Changes.
|
Follow these steps to modify a version: 1. | Under the Admin tab, select Manage Enterprise Features.
| 2. | In the side pane under Enterprise Options, select Versions. The versions page displays, which consists of a grid listing the available versions.
| 3. | Highlight the version to modify and select Modify Version from the top menu. This displays the Modify Version page to change the name of the version, set the archive option, and select the name for the Gantt Bar format.
NOTE You cannot change the name of the version if a published project is also saved to the version. | 4. | Enter a new name for the version.
| 5. | Select Yes or No in the Version Archived drop-down list.
| 6. | Select a Gantt Bar Name from the list.
| 7. | Click Save Changes.
|
To delete a version, do the following: 1. | Under the Admin tab, select Manage Enterprise Features.
| 2. | In the side pane under Enterprise Options, select Versions. The Versions page displays, which consists of a grid listing the available versions.
| 3. | Highlight the version to delete and select Delete Version from the top menu.
NOTE You cannot delete a version if a published project is also saved to the version. Use Cleanup Project Server database to delete the projects saved to the version prior to taking this action. | 4. | Click OK to remove the version from the database.
|
|