Exporting Grouped Data
| < Day Day Up > |
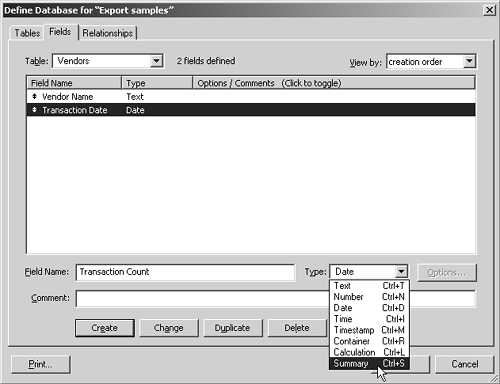
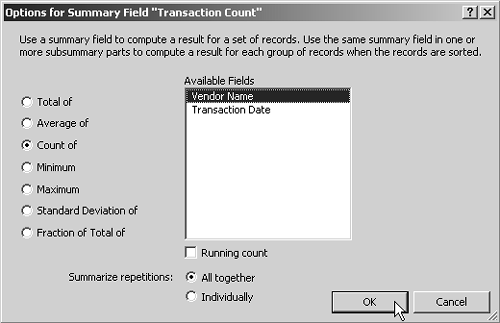
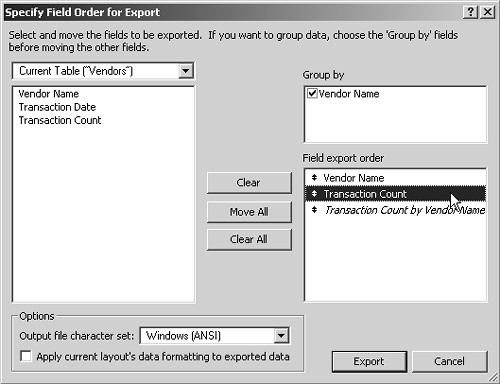
| Sometimes you don't need to export all the raw data that resides in your database. You might need to export only grouped or summarized information, the kind that you might display in a summary report. For example, you might want to list a count of the number of customers in each state, rather than listing all customers. A summarized export is also a great way to "de-duplicate" data. Suppose you want to create a master vendor list from a database that contains every vendor transaction that has ever been. Any one vendor might have several transactions. You want to get a list that shows each vendor only once. For the sake of this example, let's also suppose that you'd like to get a count of the number of transactions for each vendor. The first step is to create a new summary field called Transaction Count, as shown in Figure 20.6. Figure 20.6. A summary field can be used to count the number of members in a group of data. Click Create to open the Options for Summary Field dialog shown in Figure 20.7. Figure 20.7. Summary fields can be used to compute values across a found set of records. Many of the summary options, such as Total of or Average of, can work only with number fields. The Count of option can work with any type of field, as long as there is a value in that field. Empty fields are not counted. Click the Count of option, select Vendor Name , and click OK to exit the Options for Summary Field dialog. Click OK again to exit the Define Database dialog. The next step is to get the appropriate found set of Transaction records (in this case, all records) and then sort them by Vendor Name. Next , select F ile, E xport Records to bring up the Export Records to File dialog. For this particular example, it would be logical to export the data in the FileMaker format because the FileMaker format preserves the names of fields during export and because the exported data will ultimately be used in a FileMaker format. Select FileMaker Pro as the Type, name the file, and click Save to bring up the Specify Field Order for Export dialog shown in Figure 20.8. Figure 20.8. When the database has been sorted, the Group By box lists the fields used in the current sort order. The Group By box has Vendor Name in it because the database was sorted by Vendor Name prior to starting the export. Check Vendor Name. Move Vendor Name and Transaction Count into the Field Export Order by double-clicking them. Notice that as soon as Transaction Count moves into the export order, it spawns another field called Transaction Count by Vendor Name. If we were to leave both Transaction Count fields in the export order, the Transaction Count field would display the count of all records in the found set on each exported record. The Transaction Count by Vendor Name field would display the number of records for that particular Vendor Name, which is the result you want. Select the Transaction Count field and clear it from the export order, leaving only the Vendor Name and Transaction Count by Vendor Name fields. Click Export to export the database. Open the exported file and view it in table view. The result should look like the file shown in Figure 20.9. Figure 20.9. The summarized data displays each distinct value only once, along with a count of the number of records associated with that value. |
| < Day Day Up > |
 For more information on field types,