Customizing Fields
| < Day Day Up > |
| Every project has its own characteristics and requirements for data storage. The custom fields in Project provide reserved spaces that enable you to use a project file as a central data repository for your plan. Perhaps you have an internal code for identifying every task on a project. This might be a cost code, a work product code, or a code provided by a customer to facilitate information exchange. These codes might actually be alphanumeric descriptive text that doesn't fit a pattern. Costs might also be associated with the project that are not easily included in the resource or fixed-cost fields. It is also common to need to identify the status of a task as other than percentage complete, such as approved/not approved. Project provides a variety of custom fields and field types to accommodate storing these and other types of specialized data. Project provides a set of custom fields for storing task information and another set for storing resource information. The names and lists of these fields are identical; the context of the use of a custom field (in a text-oriented view or a resource-oriented view) determines with which set you are working. Table 21.1 describes the custom fields that are available. Table 21.1. Custom Fields
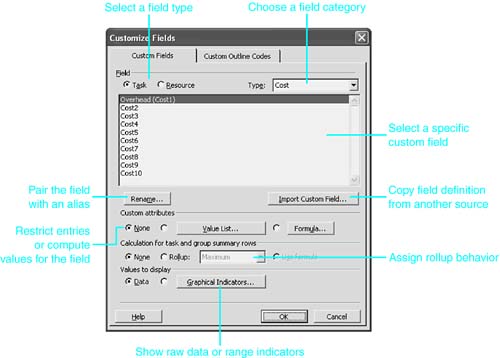
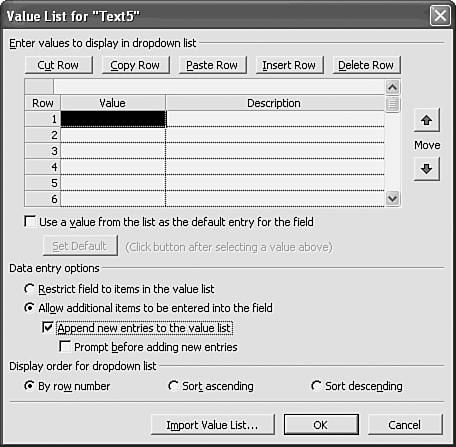
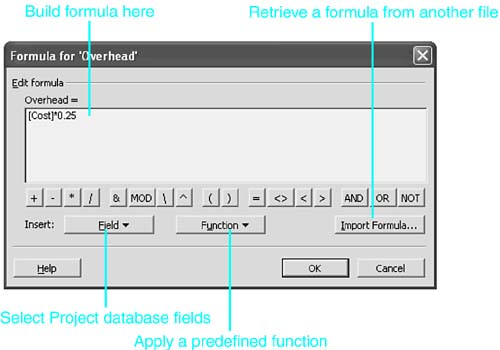
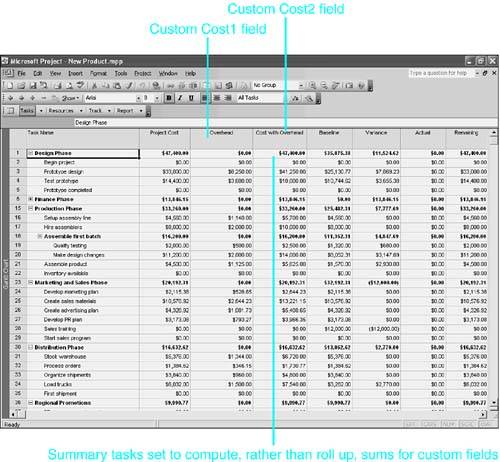
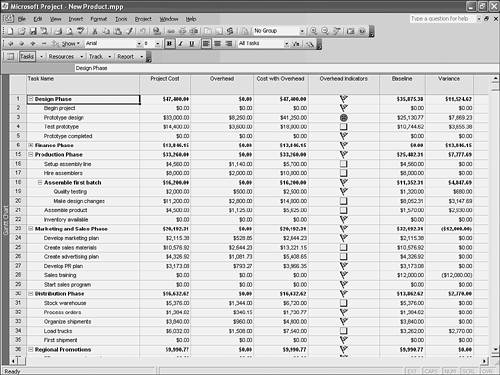
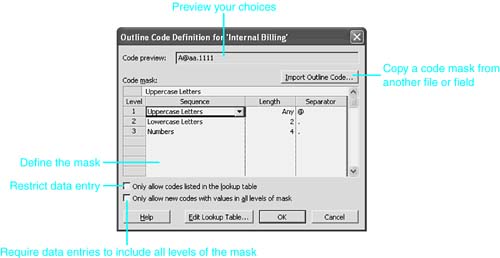
Project uses task Start/Finish fields when you are saving interim schedule information for tasks . Similarly, the numbered Baseline fields allow you to capture complete plan snapshots (not just Start and Finish dates). You can use these fields for your own purposes only if you do not need them for baseline storage. Similar data can be stored in other custom fields. NOTE The complete list of custom Project fields is available through online help. On the Help menu, select Contents and Index. In the Reference section, select Microsoft Project reference, and then select Fields Reference in the side pane. Project enables you to create name aliases for the fields so that they consistently appear with descriptive field names anywhere you use them. Also, custom fields can calculate and store values according to formulas you create or import. Accessing the Custom FieldsCustom field names appear in any drop-down list in which the predefined fields are accessible. For example, when you are inserting a new column on a table, the field choices for the column include all the custom field names, even if the fields have not yet been used for data storage. Changes to a custom field, including changes to the field's name and rollup behaviors, are made in the Customize Fields dialog box. Choose Tools, Customize, Fields to display the dialog box shown in Figure 21.13. Figure 21.13. Renaming a custom field in the Customize Fields dialog box permanently pairs the field with its alias. In the Customize Fields dialog box, custom field names are listed by type. To work with a particular field, select the general type (Task or Resource) first. Then use the Type drop-down list to select a particular category of custom field (for example, Text, or Number). When the list of available fields of that category appears on the left side of the dialog box, you can click on one field of interest to begin changing custom settings. Naming Custom FieldsTypically, field names are shown as column headings. You can temporarily rename a field with a more descriptive label by editing the column definition. You might want the data in Text1 to be displayed under the heading Dept Code, for example. However, edits made on a single table stay with that table definition. If you later display Text1 in another table, it is again labeled Text1. To avoid having to change the name labels for every display of a custom field, you can give the custom field an alias. To do so, click the Rename button in the Customize Fields dialog box and supply a more descriptive name for the field. In Figure 21.13, the Cost1 custom field has been renamed Overhead, and both labels (Cost 1 and Overhead) appear in the list of fields. After an alias is established, any place the custom field is usedbefore or after the field is renamedthe new name label appears instead of the generic custom field name. The custom field name/alias pair appear together in drop-down field lists, as well. In Project 2003, custom fields with aliases are available for data entry on the new Custom Fields tab in the Task Information dialog box. Creating Calculated FieldsIt is possible to create and apply calculations or formulas to fields in previous versions of Project without developing macro code. Data in custom fields can be derived from values in other fields in the project. The Custom Attributes area of the Customize Fields dialog box enables you to specify value behaviors in custom fields. By default, all custom fields contain no entries and no formulas and can accept any valid entry for the field type. You can use the Value List option to restrict entries in a field to a specified list of values, as shown in Figure 21.14. Figure 21.14. Users can be restricted to entering values from a predefined list, or the list can be allowed to grow. In the Value List dialog box, you can enter acceptable values on as many rows as necessary, and you can add optional descriptions of the values to assist users in selection. Below the list you build is the option Use a Value from the List as the Default Entry for the Field. You can set the Data Entry Options section of the dialog box to Restrict Field to Items in the Value List to prohibit unacceptable field entries, or you can choose Allow Additional Items to Be Entered into the Field. You can also control the display order of the value list: by row number (the order in which the rows were entered), or in ascending or descending value order. You can also use the Value List dialog box to import a list of values that exist in another project file. The supplying file must be open and the incoming data must be located in a corresponding field type (for example, cost into cost, text into text). A powerful use of custom fields is the ability to define formulas for them that compute and populate values. Choosing the Formula option in the Custom Attributes area of the Customize Fields dialog box brings up the Formula dialog box for the field, as shown in Figure 21.15. This dialog box might look familiar to users of other Microsoft applications such as Access. Figure 21.15. Formulas for custom fields can compute new values that are not provided in the Project database. The formula in Figure 21.15 computes an overhead value for Cost1 that equals 25% of the task cost. A formula is built by typing directly into the Edit Formula area, by selecting fields and functions from the provided drop-down lists and operator buttons , or by choosing to import a formula that was previously created in another project file. The Insert Field drop-down list gives access to all the allowable Project fields. The fields are displayed in cascading menus of logical groups, such as date fields, number fields, and so on. The Function drop-down list displays all the possible predefined functions that can be used in custom field calculations. These functions are also displayed in cascading menus by groups, such as date/time functions and conversion functions. NOTE Do not include the equal sign (=) in the Edit Formula area. Project automatically adds it to any formula. NOTE You can access a detailed discussion of custom field formulas and available functions through online help. Click the Help button in the lower left of the Formula dialog box, or open the Help menu, and select Contents and Index. On the Index tab, search for formula , and choose Formula Dialog Box from the results. To produce Figure 21.16, a customized cost table was created and applied to a Gantt Chart. The Project Cost column shows the normal total cost figure for each task, as calculated by Project. The Overhead column contains values generated by a formula for the Cost1 field and was renamed to the field alias, Overhead (refer to Figure 21.13). An additional cost field has been created: Cost2 has been renamed Cost with Overhead and assigned the simple formula [Cost] + [Overhead]. Figure 21.16. You can add a calculated custom field to any task table. Controlling Field BehaviorsFor custom fields with values of any kind (text entries are not considered values), you need to take into account one more consideration when defining a field. The area in the Customize Fields dialog box labeled Calculation for Task and Group Summary Rows enables you to control custom field calculations for summary rows and for use in custom groups. By default, no value is entered on summary or group rows for custom fields. However, you can set the summary and group-level fields to use the formula set for the field, or you can set them to perform simple mathematical operations at the rollup level. The choices for math operations are Average, Maximum, Minimum, Sum, and Average First Sublevel. The Average First Sublevel option, which is applicable to grouping, prevents a field value from being carried up in the calculations from very detailed groups into less detailed groups. In Figure 21.17, the summary and rollup behavior for both custom fields is set to Use Formula, forcing Project to calculate every value instead of summing individual task values. Figure 21.17. You can choose images from a predefined list and substitute them for actual values in custom fields. Creating Indicator FieldsFor issues of confidentiality, or to avoid raw data overload, you might choose to display graphic symbols in a custom field rather than display the actual data values. The bottom of the Customize Fields dialog box offers options for values to display for each customized field. By default, the actual keyed-in or computed values are displayed. You can substitute a variety of symbols for ranges of the actual values. In the Customize Fields dialog box, click the Graphical Indicators button to display the Graphical Indicators dialog box. Figure 21.17 shows the Graphical Indicators dialog box set to display images instead of values for a third customized field, Cost3. This field has been renamed Overhead Indicators and contains the formula =[Cost1] to simply copy all values from Overhead into this Cost3 field. The test section of the Graphical Indicators dialog box lists the logical tests and test values for ranges of Cost3 (Overhead Indicators) data. As you can see in Figure 21.17, a low overhead value displays a flag; a medium overhead value displays a box; and a high overhead value displays a frowning face. Figure 21.18 illustrates the results of these settings. Figure 21.18. A customized table can display both values and indicators for custom fields. TIP If you have already created a set of tests, values, and corresponding images in another project fileor even in another custom field within the same fileyou can import those settings rather than re-create them. To do so, click Import Indicator Criteria on the Graphical Indicators dialog box. Creating and Using WBS Code FormatsMany companies label and identify tasks by using some structure other than the task numbering system in a project file. A code field in Project automatically creates a numbered structure for your use. This code field is called WBS , which stands for Work Breakdown Structure. By default, the WBS code is an exact duplicate of the project's outline numbers , but you can key in to the WBS field any number or letter combination that is suitable for your company. By creating a custom WBS structure, you can ensure that any user entries conform to the correct pattern. Creating and Using Custom Outline FieldsYou can create other coded numbering systems besides the automatic outline structure and custom WBS codes. Project provides 10 custom Outline Code fields. Different people in your organization might have different coding and reporting requirements. (For example, you might need to create a custom outline code field that is based on your organization's cost codes and sort the task list by that code when needed.) Multiple structures have typically been created in custom text fields. The limitation with using text fields for this purpose is the inability to control input so that it conforms to the outline code structure. To create custom outline codes, you create a mask for the outline code field you plan to use. Unlike with calculated custom fields, Project doesn't populate the outline field with default codesyou must enter them manually. Users can select a code for each task from a lookup table that you provide or they can type in outline codesthey can even create their own codes (which you can optionally require to conform to the mask). The lookup table guarantees that the code conforms to the mask, and it enables users to choose the correct codes by looking at descriptions for the codes in the lookup table. The steps to creating custom outline structures are a combination of the steps used for customizing fields and those used for creating custom WBS codes. The actual definition of the outline takes place through the Customize Fields dialog box. Specifications for an outline code include sequence, values, and separators, just as in defining a custom WBS code. Creating an Outline MaskTo create a custom outline code mask, follow these steps:
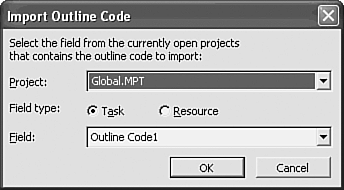
You might have previously created an outline code in another file or in another custom field in this file. Instead of creating an outline code from scratch, you can import an existing definition. To import an outline code definition, follow these steps:
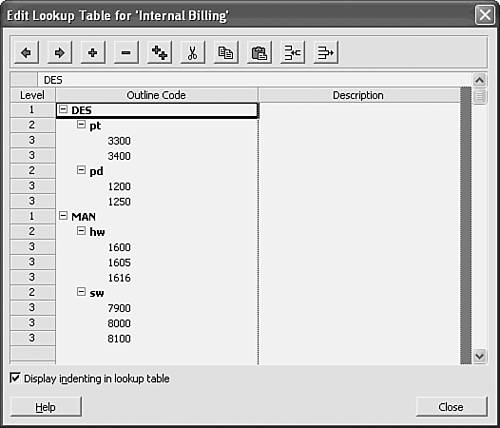
Click OK in the Custom Outline Codes tab of the Customize Fields dialog box to complete the definition of the mask. If you already have the field displayed in the task view, you will see the new alias appear as the column heading. Creating an Outline Code Lookup TableYou can define a value lookup table for users so that they can accurately enter the custom outline code. Basically, you type in an outline structure that fits your company's requirements. The steps for editing a lookup table are as follows:
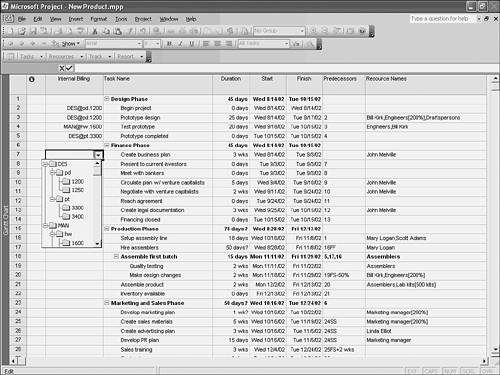
Using Custom Outline CodesStandard tables in Project do not include custom fields. You must modify a table to view the custom outline codes as well as other custom fields. See the section "Using and Creating Tables," earlier in this chapter, for more information. In Figure 21.23, a copy of the Entry table has been modified to include the new custom outline code column that was renamed Internal Billing. Notice the drop-down list in the column; the outline code settings demand that the user choose values from the lookup table. Figure 21.23. For this custom field, data entry is restricted to values from the outline code drop-down list. NOTE Outline codes you have defined are available for data entry on the Custom Fields tab of the Task or Resource Information dialog box. Figure 21.23 shows the final results of several steps in the example described in this chapter:
Managing Custom FieldsAfter you have defined any custom fieldtext, numeric, cost, WBS, and so onyou should copy the field definition to the Global template to make it readily available for all your project documents that are based on the Global template. |

 To learn about customizing WBS codes,
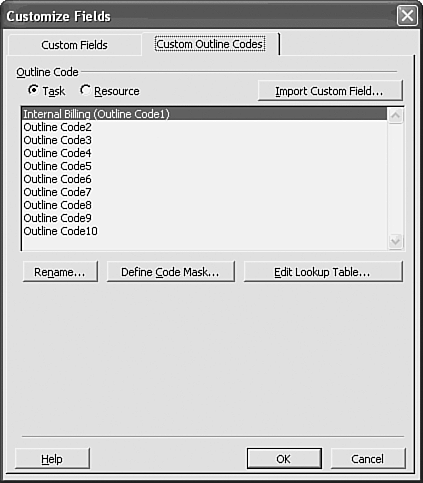
| < Day Day Up > |
EAN: 2147483647
Pages: 283