Home Mortgage Web Page
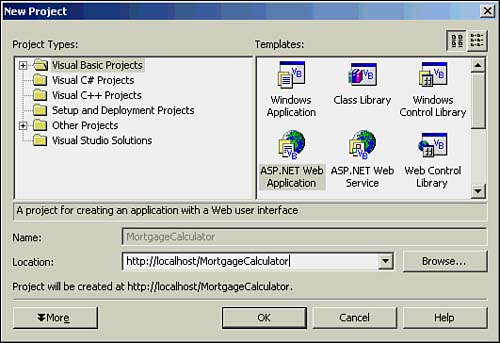
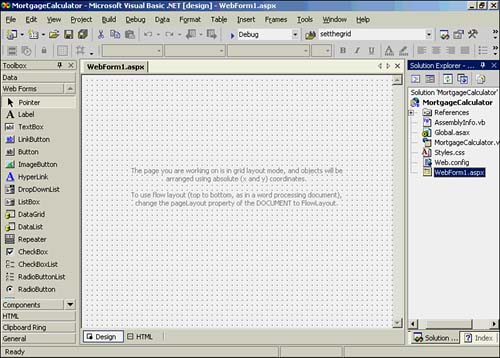
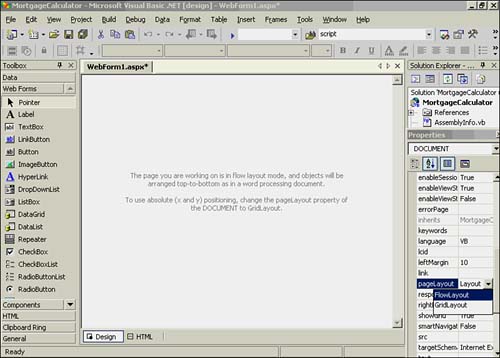
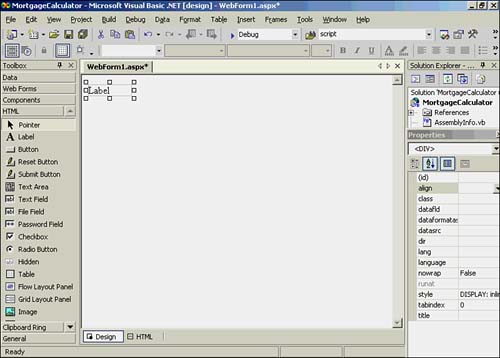
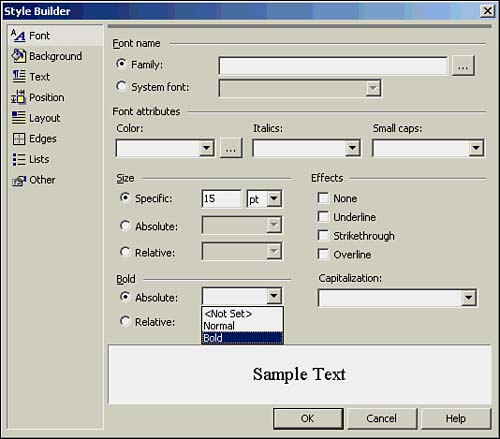
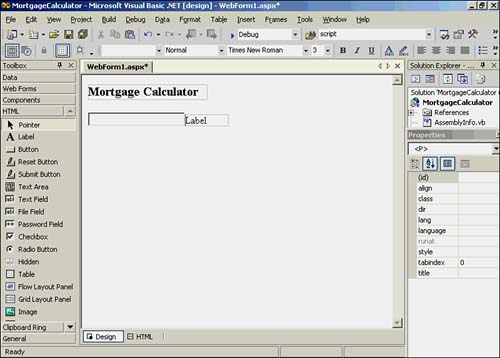
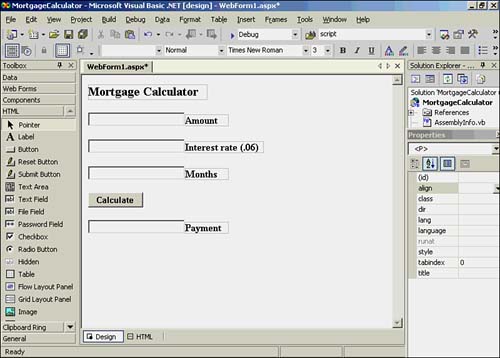
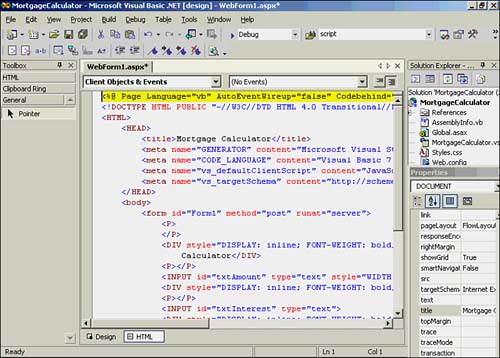
| You've probably seen Web pages that enable you to enter information and, based on what you entered, provide some form of answer after you click a button on the page. In this section, you're going to write a Web page that asks the user for mortgage loan information and then displays the monthly payment. Create a new project, but this time we want to create a Web-based program. Start a new project and select an ASP.NET Web Application, as shown in Figure 26.10. Figure 26.10. Starting a new Web-based application project. In the Location field shown in Figure 26.10, type in MortgageCalculator for the name of the project and click the OK button. Depending on the speed of your computer, Visual Basic .NET will grind away for up to a minute setting things up for Web programming. Eventually, your screen will look similar to Figure 26.11. Figure 26.11. The Visual Basic .NET IDE for Web-based application programming. Differences in the Web-Based IDEThere are a number of things to notice when Web programming is being done. First, the design window in the center of the screen looks different. The text in the middle of the design window tells you that you can design a Web page using either a grid layout or a flow layout. Using a flow layout, any controls we may place on the form are added without absolute positioning coordinates. Controls are added to the form one after another, flowing from the Toolbox to the form in much the same way as words flow onto a letter. A Web browser, therefore, arranges the controls in whatever order they occur on the page. When a grid layout is used, absolute positioning coordinates are used for any controls that may be present on the page. A second thing to notice is that there are two tabs at the bottom of the design window. In Figure 26.11, the Design tab is highlighted. This is similar to the design mode you've used in earlier chapters. The second tab, named HTML, is new. If you click on the HTML tab, you'll see the skeleton HTML code that Visual Basic .NET has generated for the current (empty) Web page. A third thing to notice is that the toolbox headings have changed. Rather than seeing a tab named Windows Forms, you now see a tab named Web Forms. Another tab you haven't seen before is the one named HTML, which contains HTML controls. Obviously, neither of these new tabs was needed in our earlier programming efforts. There are a few other things that are different about the IDE, and we'll discuss those as you write the mortgage calculator program. Let's get started writing our dynamic Web page. The Mortgage CalculatorThe first thing you need to do is put the Design mode window into the Flow layout mode. Click on the Design mode window and press the F4 key to bring up the Properties window. Scroll the window down to the pageLayout attribute and select FlowLayout . The grid dots will disappear from the form, as can be seen in Figure 26.12. Figure 26.12. Setting the Design mode to Flow Layout. Because we are in the Flow Layout mode, controls are added to the Web page at the point where the cursor is currently located. For that reason, if you place the cursor anywhere on the page and click, the cursor is automatically positioned near the upper-left corner of the display. This confirms what we said earlier about Flow Layout mode: You cannot position a control at a fixed location on the Web page. Instead, the control is positioned at the current cursor location. We want to place an HTML control on the page, so click on the HTML tab in the Toolbox to reveal the HTML controls. Now double-click on the HTML Label control. Your form will look like Figure 26.13. Figure 26.13. Adding an HTML label control to the Web page. Move the cursor into the label and backspace over the word Label and type in Mortgage Calculator . Because the new text is longer than the label box, select the sizing button and lengthen the label box so that the new text does not fold. While the label control still has the focus, move to the Properties window, click in the Style attribute field, and then click the ellipsis button. This causes Visual Basic .NET to display the Style Builder dialog box, as shown in Figure 26.14. Figure 26.14. The Style Builder dialog box. In Figure 26.14, notice that we have set the Size-Specific attribute to 15 points and that we have also set the Bold attribute. These two changes increase the size of the font and set it to use boldface for display. After you have done this, click the OK button. (Because we've increased the size of the font, you may need to stretch the label a little more to prevent the text from folding.) You can see that the cursor is still on the same line as the label control you just added. Again, this is because we are in Flow Layout mode. You can try to move the cursor to another position on the page and click, but the cursor remains fixed on the right edge of the label. However, we want to add a text box now, so press the Enter key to move the cursor to the next line of the page. Now double-click on the control named Text Field on the HTML control tab. A text box will appear on the Web page. Unlike Windows forms, a Web control does not have a Name attribute in the Properties window. Instead, the name of the control is assigned by filling in the ID attribute in the Properties window. Type in txtAmount in the ID field of the Properties window. Now click back on the Web page. The cursor will be sitting at the right edge of the text box you just named txtAmount . Now double-click on the Label control on the HTML tab. Even though the cursor was at the end of the text box, the new label is placed on a new line. Not a problem. Move the cursor back to the end of the txtAmount text box and press the Delete key, and the label will move to the right edge of the text box as shown in Figure 26.15. Figure 26.15. Adding a Label control after a text box control. Change the text in the Label control to read Amount. Use the Style attribute in the Properties window to change the font to bold using the Style Builder dialog box. Continue to add text boxes and labels until your Web page looks like that shown in Figure 26.16. Moving from top to bottom, the remaining text boxes are named txtInterest , txtMonths , and txtResult . The button is named btnCalculate and its Value property is set to Calculate . I also used btnCalculate 's Style property to change the font to bold. Figure 26.16. The Web page after all controls have been added. Be careful that you select the correct button control from the HTML tab. You do not want to select either the Reset or Submit button styles because they serve different purposes. The Calculate button used in your program should be the plain button style. The HTML Script for the Mortgage CalculatorNow select the HTML tab at the bottom of the Design window to see the HTML script that has been generated by Visual Basic .NET. Your display should look similar to that shown in Figure 26.17. Figure 26.17. The HTML script for the mortgage calculator. If you look closely at the script between the HEAD tags you will see a series of meta tags. These are special tags that Visual Basic .NET uses to process the HTML script properly. In particular, the line <meta name="vs_defaultClientScript" content="JavaScript"> tells Visual Basic .NET to use the default scripting language as JavaScript. Although the JavaScript scripting language is widely used, it isn't what we want to use in our program. Programmer's Tip
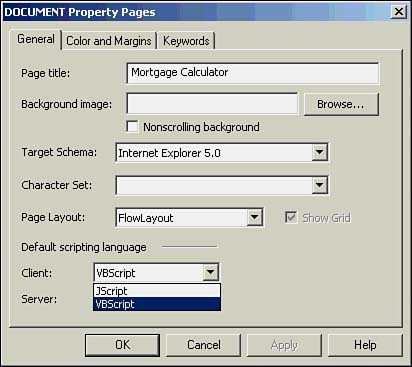
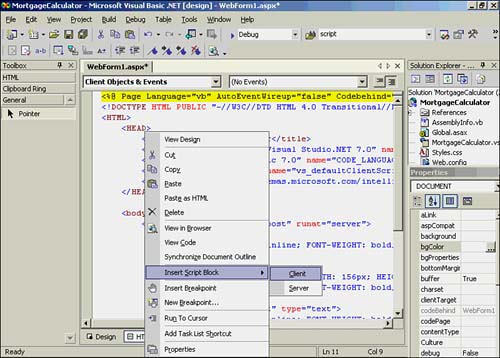
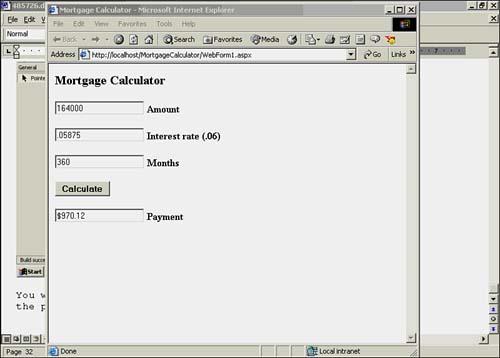
We need to change the meta line to process VBScript instead of JavaScript. The best way to do this is to highlight and then right-click the line we need to change. This process presents you with a menu of options; select the Properties option. Your screen will now look like that shown in Figure 26.18. Change the Default scripting language for the Client to VBScript as shown in Figure 26.18. Figure 26.18. Changing the default scripting language. After you click the OK button, you'll see that the meta line now reads <meta name="vs_defaultClientScript" content="VBScript"> which is exactly what we want. If you look closely at Figure 26.17, you will see the </HEAD> and <BODY> tags positioned together. Move the cursor after the </HEAD> tag and press the Enter key to create an empty line in the script between the two tags. Now right-click on the line to open a menu selection as shown in Figure 26.19. Figure 26.19. Adding a client-side script block. Select the Insert Script Block, Client option. This causes the following empty script block to be added to the HTML script: <script language=vbscript> <!-- --> </script> Notice how the scripting language is now VBScript. What remains to be done, however, is to add the code necessary to perform the mortgage calculation after the user has supplied the required information in the text boxes. In other words, we need to add the code associated with the btnCalculate click event. Place the cursor between the comment markers (that is, the !-- and the --> characters ) and then select the Client Objects and Events drop-down box at the top of the HTML window. Select the btnCalculate object. Now move to the events list box and select the onclick event. Visual Basic .NET automatically supplies the shell stub for the click event. The code for the subroutine stub should look like the following code fragment: Sub btnCalculate_onclick dim result, answer, interest, months, amount, term amount = document.all.txtAmount.value interest = document.all.txtInterest.value months = document.all.txtMonths.value interest = interest / 12 term = (1.0 + interest) ^ months answer = interest * amount * (term / (term - 1.0)) document.all.txtresult.value = FormatCurrency(answer) End Sub There are several things that need to be explained in the code fragment. First, unlike normal Visual Basic .NET code, no type specifier is associated with a Dim statement; in this case, no type fits all. This Dim statement appears to use the Variant data type from earlier versions of Visual Basic. Other things that must be explained are the statements that contain the document.all specifier. Actually, every Web page is a document object. In our case, the document object happens to contain a form object. Within the form object are the HTML controls that you placed on the form. Because we cannot access these form controls directly, we must go through the document object first. We do this by using the All collection of the document object. Therefore, to access any individual control, we must fully qualify the object using the document.all specifier to unambiguously define the control we want to use. The code in the btnCalculate click event simply calculates the monthly mortgage payment using the data supplied by the user. The complete HTML script is shown in Listing 26.2. The listing begins with server-side script tags <% and %> . Like other tag pairs, everything between these two tags is to be processed by the server. The @ Page directive supplies information to the server about how the page is to be processed. For example, the @ Page directive tells the server that Visual Basic ( vb ) is the language. The Codebehind attribute informs the server that the code for the form is found in a file named WebForm1.aspx.vb . The DOCTYPE attribute simply defines the version of HTML that's being used by the page. The actual HTML script begins after that attribute. The meta attributes are informational and used by Visual Studio to properly process the server- and client-side scripts. These meta attributes play an important role in processing the VBScript code contained within the HTML script. Listing 26.2 The HTML Script for the Mortgage Calculator<%@ Page Language="vb" AutoEventWireup="false" _ Codebehind="WebForm1.aspx.vb" _ Inherits="MortgageCalculator.WebForm1"%> <!DOCTYPE HTML PUBLIC "-//W3C//DTD HTML 4.0 Transitional//EN"> <HTML> <HEAD> <title>Mortgage Calculator</title> <meta content="Microsoft Visual Studio.NET 7.0" _ name="GENERATOR"> <meta content="Visual Basic 7.0" name="CODE_LANGUAGE"> <meta content="VBScript" name="vs_defaultClientScript"> <meta content="http://schemas.microsoft.com/ _ intellisense/ie5" name="vs_targetSchema"> <script id=clientEventHandlersVBS language=vbscript> <!-- Sub btnCalculate_onclick dim result, answer, interest, months, amount, term amount = document.all.txtAmount.value interest = document.all.txtInterest.value months = document.all.txtMonths.value interest = interest / 12 term = (1.0 + interest) ^ months answer = interest * amount * (term / (term - 1.0)) document.all.txtresult.value = FormatCurrency(answer) End Sub --> </script> </HEAD> <body> <form id="Form1" method="post" runat="server"> <P></P> <DIV style="DISPLAY: inline; FONT-WEIGHT: bold; _ FONT-SIZE: 15pt; WIDTH: 191px; HEIGHT: 25px" _ ms_positioning="FlowLayout">Mortgage Calculator</DIV> <P></P> <INPUT id="txtAmount" style="WIDTH: 143px; HEIGHT: _ 22px" type="text"> <DIV style="DISPLAY: inline; FONT-WEIGHT: bold; WIDTH: _ 70px; HEIGHT: 15px" ms_positioning="FlowLayout"> _ Amount</DIV> <P></P> <INPUT id="txtInterest" type="text"> <DIV style="DISPLAY: inline; FONT-WEIGHT: bold; WIDTH: _ 126px; HEIGHT: 19px" ms_positioning="FlowLayout"> _ Interest rate (.06)</DIV> <P></P> <INPUT id="txtMonths" type="text"> <DIV style="DISPLAY: inline; FONT-WEIGHT: bold; WIDTH: _ 70px; HEIGHT: 15px" ms_positioning="FlowLayout"> _ Months</DIV> <P></P> <P title="Mortgage Calculator"> <INPUT id="btnCalculate" style="FONT-WEIGHT: bold; _ WIDTH: 88px; HEIGHT: 24px" type="button" _ value="Calculate"> </P> <INPUT id="txtResult" type="text"> <DIV style="DISPLAY: inline; FONT-WEIGHT: bold; WIDTH: _ 70px; HEIGHT: 15px" ms_positioning="FlowLayout"> _ Payment</DIV> </form> </body> </HTML> The body tags surround the HTML that's associated with the text boxes, labels, and the Calculate button. If you examine the attributes contained within the tags, you can figure out what each attribute does for its tag member. Assuming that you've added the code for the btnCalculate click event, you can now compile and run the program in the usual manner (press the F5 key). A sample run is shown in Figure 26.20. Figure 26.20. A sample run of the mortgage calculator. You'll notice that Visual Basic .NET automatically supplied the proper URL to run your Web page. It knows how to find your Web page by using the setup information you supplied at the beginning of the chapter. |
EAN: 2147483647
Pages: 238