Accessing SQL Server Using HTTP
|
|
You can access SQL Server using HTTP (Hypertext Transfer Protocol). This allows you to run SQL statements from a browser. For example, you can run a SELECT statement that returns XML, and SQL Server will display the results in your browser. You can use XPath statements to locate data in the returned XML, and use XSL stylesheets to format the returned XML. I'll show you how to do all of these things in this section.
| Warning | You can even run INSERT, UPDATE, and DELETE statements-but you'll need to be careful about restricting the ability to run these types of statements because an errant user could easily wreck your database. |
Before you can access SQL Server using HTTP, you'll need to configure SQL XML support for IIS (Internet Information Server).
Configuring SQL XML Support for IIS
To configure SQL XML support for IIS, select Start ➣ Programs ➣ Microsoft SQL Server ➣ Configure SQL XML Support in IIS. This starts the IIS Virtual Directory Management for SQL Server console, as shown in Figure 16.6. You use this console to define a virtual directory through which you access SQL Server via HTTP.
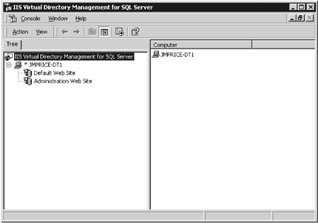
Figure 16.6: The IIS Virtual Directory Management for SQL Server console
To define a virtual directory, expand the node for your computer using the + icon (I've expanded the node for my computer-which is named JMPRICE-DT1-in Figure 16.6).
Next, right-click on Default Web Site and select New ➣ Virtual Directory from the pop-up menu. You'll need to set the properties for your virtual directory using the New Virtual Directory Properties window. This window contains six tabs, the first of which is named General, which you use to set your Virtual Directory Name (the name through which you access SQL Server) and Local Path (the actual directory in your computer's file system where you store files, such as XML and XSLT files). I've set my Virtual Directory Name to Northwind and my Local Path to F:\Northwind, as shown in Figure 16.7.
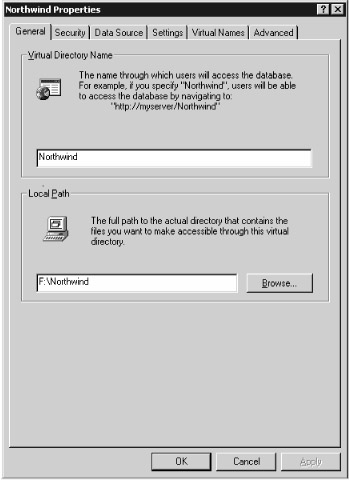
Figure 16.7: Setting the Virtual Directory Name and Local Path
| Warning | The directory you specify for your Local Path must already exist in your computer's file system. Create it using Windows Explorer, and then browse to that directory using the Browse button. |
Next, you use the Security tab to set the details of how to authenticate the user when accessing SQL Server. I've used the sa SQL Server account, as shown in Figure 16.8.
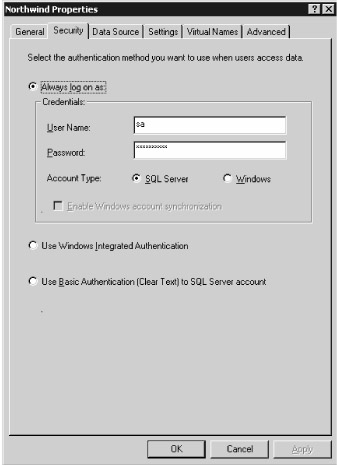
Figure 16.8: Setting the authentication details
| Warning | In a production system, you'll want to use an account that has limited permissions in the database. For example, you'll probably want to grant read access only to tables. |
Next, you use the Data Source tab to set which SQL Server you want to use, along with the database you want to access. I've picked the local SQL Server and the Northwind database, as shown in Figure 16.9.
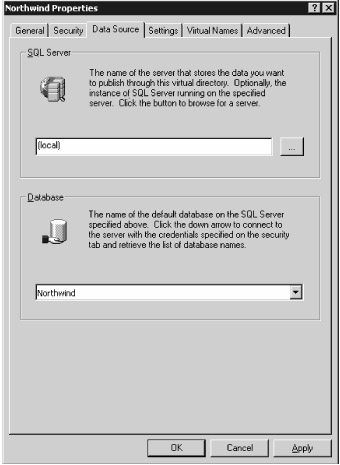
Figure 16.9: Setting the data source
Next, you use the Settings tab to specify the type of access to SQL Server you want to provide. Check the following boxes: Allow URL Queries (allows direct execution of SQL statements), Allow Template Queries (allows the use of XML and XSLT files to retrieve and format results from the database), and Allow XPath Queries (allows execution of queries with XPath expressions), as shown in Figure 16.10.
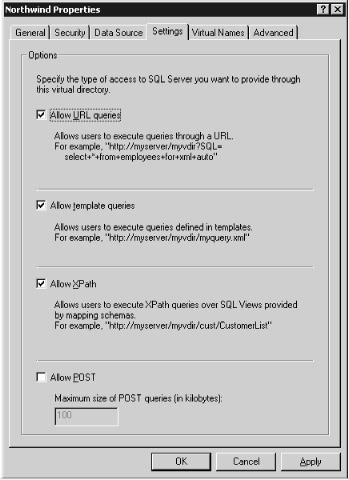
Figure 16.10: Setting the type of access
| Warning | In a production system, you'll want to restrict access to Allow Template Queries only. That way, users can execute only queries defined in an XML template file. |
Next, you use the Virtual Names tab to map a database schema, a template directory containing XML and XSLT files, or a database object (dbobject) to a path relative to your virtual directory. Click the New button and set your Virtual Name to Templates, the Type to template, and your Path to a subdirectory named Templates in your Northwind directory , as shown in Figure 16.11. You'll need to create the Templates folder first.
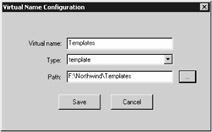
Figure 16.11: Setting the virtual name configuration
| Warning | The Templates subdirectory you specify in your Path must already exist in your computer's file system. Create it using Windows Explorer, and then browse to that directory using the ellipsis (…) button to the right of the Path field. |
Click Save to continue. You won't be changing anything in the Advanced tab, but feel free to examine it if you want to. Click OK to save your settings across all the tabs. Your new virtual directory is then created and will appear in the IIS Virtual Directory Management for SQL Server console.
Running Direct SQL Statements Using a Browser
In this section, you'll learn how to run direct SQL statements using a browser. I'll be using Internet Explorer in the examples, but you can use whatever browser you wish.
Running SELECT Statements
In this section, you'll see how to run a SELECT statement. For example, point your browser to the following URL, which contains an embedded SELECT statement:
http://localhost/Northwind?sql=SELECT+*+FROM+Customers+WHERE+CustomerID+IN+('ALFKI' ,'ANATR')+FOR+XML+AUTO&root=ROOT As you can see, the SELECT statement in this URL retrieves two rows from the Customers table. The first part of the URL is
http://localhost/Northwind
This contains the name of the server (localhost) and the virtual directory (Northwind). The second part of the URL is
?sql=SELECT+*+FROM+Customers+WHERE+CustomerID+IN+('ALFKI','ANATR')+FOR+XML+ AUTO&root=ROOT This contains the embedded SELECT statement. Because URLs don't allow spaces, you use plus (+) characters instead. The root parameter at the end of the URL supplies a name for the root element in the XML returned by the SELECT statement; I've supplied a root name of ROOT in the previous example, but you can use whatever name you want. Figure 16.12 shows the result of running the SELECT statement in Internet Explorer.
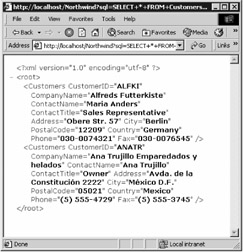
Figure 16.12: Selecting customers and displaying results
| Warning | If you omit the root parameter in your URL, then you'll get the following error: Only one top level element is allowed in an XML document. |
Spaces aren't the only characters you'll need to replace in your URL. Table 16.4 shows some of the special characters you might use in a SQL statement and the replacement you use in your URL.
| CHARACTER IN SQL STATEMENT | REPLACEMENT IN URL |
|---|---|
| Space | + |
| / | %2F |
| ? | %3F |
| % | %25 |
| # | %23 |
| & | %26 |
For example, if you wanted to use LIKE 'C%' in your SELECT statement, then you would use LIKE+'C%25', as shown in the following URL:
http://localhost/Northwind?sql=SELECT+*+FROM+Customers+WHERE+CompanyName+LIKE+'C%25 '+FOR+XML+AUTO&root=ROOT
The SELECT statement in this URL retrieves the rows from the Customers table that has a CompanyName starting with C.
Running INSERT, UPDATE, and DELETE Statements
You can embed SQL INSERT, UPDATE, and DELETE statements in a URL. The following example uses an INSERT statement to add a new row to the Customers table:
http://localhost/Northwind?sql=INSERT+INTO+Customers(CustomerID,CompanyName)+VALUES +('J9COM','J9+Company')&root=ROOT Figure 16.13 shows the result of running this INSERT statement in Internet Explorer.
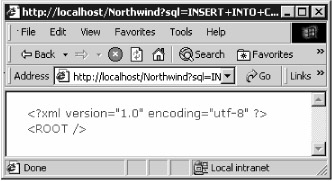
Figure 16.13: Adding a new row to the Customers table
The next example uses a DELETE statement to remove the new row:
http://localhost/Northwind?sql=DELETE+FROM+Customers+WHERE+CustomerID= 'J9COM'&root=ROOT
| Warning | You'll almost certainly want to prevent users from running INSERT, UPDATE, and DELETE statements over HTTP on your production server. You can do this by preventing users from running direct SQL statements, as described in the previous section, or by restricting the permissions assigned to the database user. You could also allow access to the database using only stored procedures; you'll see how to run a stored procedure using a URL in the next section. |
Running Stored Procedures
You can also run stored procedures from a URL. Listing 16.11 contains a script that creates a stored procedure named CustomersFromCountry(). This procedure retrieves the rows from the Customers table with a Country matching the @MyCountry parameter that is passed to CustomersFromCountry().
Listing 16.11: CUSTOMERSFROMCOUNTRY.SQL
/* CustomersFromCountry.sql creates a procedure that retrieves rows from the Customers table whose Country matches the @MyCountry parameter */ CREATE PROCEDURE CustomersFromCountry @MyCountry nvarchar(15) AS SELECT * FROM Customers WHERE Country = @MyCountry FOR XML AUTO
You run this stored procedure using the following URL:
http://localhost/Northwind?sql=EXECUTE+CustomersFromCountry+@MyCountry='UK' &root=ROOT
Figure 16.14 shows the result of running the stored procedure.
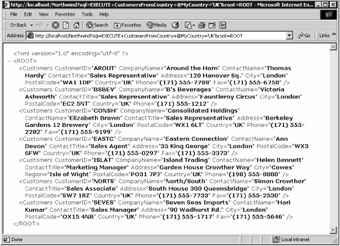
Figure 16.14: Running a stored procedure
Running SQL Statements Using an XML Template
You can also execute SQL statements using an XML template, which is just an XML file containing your embedded SQL statement. Listing 16.12 shows an example file named Customers.xml that contains an embedded SELECT statement.
Listing 16.12: CUSTOMERS.XML
<?xml version="1.0"?> <Northwind xmlns:sql="urn:schemas-microsoft-com:xml-sql"> <sql:query> SELECT TOP 2 CustomerID, CompanyName, City, Country FROM Customers ORDER BY CustomerID FOR XML AUTO, ELEMENTS </sql:query> </Northwind>
| Note | You'll find the Customers.xml file-and the other XML and XSLT files used in the next section-in the xml\Northwind\Templates directory. You'll need to copy these files into the Templates directory you set up earlier for your SQL Server virtual directory. |
Notice that the SELECT statement is placed within sql:query and /sql:query tags. The outer Northwind tag is the root node for the XML.
To run the Customers.xml file, point your browser to the following URL:
http://localhost/Northwind/Templates/Customers.xml
Figure 16.15 shows the result of running the Customers.xml file in Internet Explorer.
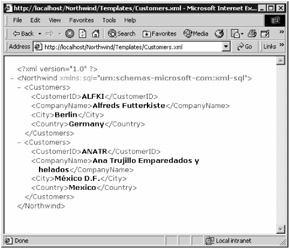
Figure 16.15: Running the Customers.xml file
Formatting XML Output Using an XSL Stylesheet
As you'll learn in this section, you can format the XML output generated by SQL Server using an XSL stylesheet. Specifically, you'll see how to format the XML shown earlier in Figure 16.14. Listing 16.13 shows an XSL stylesheet file named CustomersStylesheet.xsl.
Listing 16.13: CUSTOMERSSTYLESHEET.XSL
<?xml version="1.0"?> <xsl:stylesheet xmlns:xsl="http://www.w3.org/1999/XSL/Transform" version="1.0"> <xsl:template match="/"> <HTML> <HEAD> <TITLE>Customers</TITLE> </HEAD> <BODY> <xsl:for-each select="Northwind/Customers"> <p> <b>Customer:</b> <br><xsl:value-of select="CustomerID"/></br> <br><xsl:value-of select="CompanyName"/></br> <br><xsl:value-of select="PostalCode"/></br> <br><xsl:value-of select="Country"/></br> <br><xsl:value-of select="Phone"/></br> </p> </xsl:for-each> </BODY> </HTML> </xsl:template> </xsl:stylesheet>
Notice that the select XPath expression in the xsl:for-each tag is set to Northwind/Customers. Northwind is the root node from the generated XML, and Customers are the child nodes from the root. Therefore, this XPath expression selects all the Customers nodes from any XML generated by SQL Server.
Listing 16.14 shows an XML file named CustomersUsingStylesheet.xml, which uses the CustomersStylesheet.xsl file. CustomersUsingStylesheet.xml retrieves the top two rows from the Customers table.
Listing 16.14: CUSTOMERSUSINGSTYLESHEET.XML
<?xml version="1.0"?> <Northwind xmlns:sql="urn:schemas-microsoft-com:xml-sql" sql:xsl="CustomersStylesheet.xsl"> <sql:query> SELECT TOP 2 CustomerID, CompanyName, PostalCode, Country, Phone FROM Customers ORDER BY CustomerID FOR XML AUTO, ELEMENTS </sql:query> </Northwind>
To run the CustomersUsingStylesheet.xml file, point your browser to the following URL:
http://localhost/Northwind/Templates/CustomersUsingStylesheet.xml?contenttype= text/html
Notice that the contenttype parameter at the end of this URL is set to text/html, which indicates that the content is to be interpreted as HTML.
| Warning | If you omit the contenttype parameter, then you'll get the following error: End tag 'HEAD' does not match the start tag 'META'. |
Figure 16.16 shows the result of running the CustomersUsingStylesheet.xml file in IE. Notice that the output is formatted using the rules defined in the CustomersStylesheet.xsl file.

Figure 16.16: Running the CustomersUsing-Stylesheet .xml file
|
|
EAN: 2147483647
Pages: 181