| When undesired changes are made in Active Directory or the Active Directory database is corrupted on a domain controller, recovering the Active Directory database may be necessary. Restoring Active Directory can seem like a difficult task, unless frequent backups are performed and the administrator understands all the restore options. Restoring the Active Directory Database The Active Directory database contains all the information stored in Active Directory. The global catalog information is also stored in this database. The actual filename is ntds.dit and is by default located in the c:\Windows\NTDS\ directory. When a domain controller is restored from server failure, the Active Directory database is restored with the system state. If no special steps are taken when the server comes back online, it will ask any other domain controllers for a copy of the latest version of the Active Directory database. This situation is called a nonauthoritative restore of Active Directory. When a change in Active Directory needs to be rolled back or if the entire database needs to be rolled back up across the enterprise or domain, an authoritative restore of the Active Directory database is necessary. Active Directory Nonauthoritative Restore When a domain controller is rebuilt from a backup after a complete system failure, simply recovering this server using a restore of the local drives and system state is enough to get this machine back into the production network. When the machine is back online and establishes connectivity to other domain controllers, any Active Directory and SYSVOL updates will be replicated to the restored server. Nonauthoritative restores are also necessary when a single domain controller's copy of the Active Directory database is corrupt and is keeping the server from booting up properly. To restore a reliable copy of the Active Directory database, the entire system state needs to be restored, and if additional services reside on the domain controller, restoring the previous configuration data for each of these services may be undesirable. In a situation like this, the best option is to try to recover the Active Directory database using database maintenance and recovery utilities such as Esentutl.exe and Ntdsutil.exe. These utilities can be used to check the database consistency, defragment, and repair and troubleshoot the Active Directory database. For information on Active Directory maintenance practices with these utilities, refer to the Windows Server 2003 Help and Support. To restore the Active Directory database to a single domain controller to recover from database corruption, perform the following steps: 1. | Power up the domain controller and press the F8 key when the boot loader is displayed on the screen.
| 2. | When the advanced boot options are displayed, scroll down, select Directory Services Restore Mode, and then press Enter to boot the server. This mode boots the Active Directory database in an offline state. When you choose this boot option, you can maintain and restore the Active Directory database.
| | | 3. | When the server boots up, log on using the username Administrator and the Restore mode password specified when the server was promoted to a domain controller. To change the Restore mode password on a domain controller running in Normal mode, use the Ntdsutil.exe utility; this process is covered in Chapter 32.
| 4. | Click Start, Run.
| 5. | Type NTBackup.exe and click OK.
| 6. | When the Backup or Restore window opens, click the Advanced Mode hyperlink.
| 7. | Select the Restore and Manage Media tab.
| 8. | Select the appropriate backup media, expand it, and check the system state. If the correct media are not available, the file must be located, or the tape must be loaded in the tape drive and cataloged before it can be used to restore the system state.
| 9. | Choose to restore the data to the original location and click the Start Restore button in the lower-right corner of the backup window.
| 10. | A pop-up window indicates that restoring the system state to the original location will overwrite the current system state. Click OK to continue.
| 11. | A confirm restore window opens in which you can choose advanced restore options. Click OK to initiate the restore of the system state.
| 12. | When the restore is complete, a system restart is necessary to update the services and files restored during this operation. Because only a nonauthoritative restore of the Active Directory database is necessary, click Yes to restart the server.
| 13. | After the server reboots, log in as a Domain Administrator.
| 14. | Check the server event log and Active Directory information to ensure that the database has been restored successfully and log off the server when completed.
|
Active Directory Authoritative Restore When a change made to Active Directory is causing problems or when an object is modified or deleted and needs to be recovered to the entire enterprise, an Active Directory authoritative restore is necessary. To perform an authoritative restore of the Active Directory database, perform the following steps: 1. | Power up the domain controller and press the F8 key when the boot loader is displayed on the screen.
| 2. | When the advanced boot options are displayed, scroll down, select Directory Services Restore Mode, and press Enter to boot the server. This mode boots the Active Directory database in an offline state. When you choose this boot option, you can maintain and restore the Active Directory database.
| | | 3. | When the server boots up, log in using the username Administrator and the Restore mode password specified when the server was promoted to a domain controller. To change the Restore mode password on a domain controller running in Normal mode, use the Ntdsutil.exe utility; this process is covered in Chapter 32.
| 4. | Click Start, Run.
| 5. | Type Ntbackup.exe and click OK.
| 6. | When the Backup or Restore window opens, click the Advanced Mode hyperlink.
| 7. | Select the Restore and Manage Media tab.
| 8. | Select the appropriate backup media, expand it, and check the system state. If the correct media are not available, the file must be located, or the tape must be loaded in the tape drive and cataloged before it can be used to restore the system state.
| 9. | Choose to restore the data to the original location and click the Start Restore button in the lower-right corner of the backup window.
| 10. | A pop-up window indicates that restoring the system state to the original location will overwrite the current system state. Click OK to continue.
| 11. | A confirm restore window opens in which you can choose advanced restore options. Click OK to initiate the restore of the system state.
| 12. | When the restore is complete, a system restart is necessary to update the services and files restored during this operation. Because an authoritative restore of the Active Directory database is necessary, click No.
| 13. | Close the backup window and click Start, Run.
| 14. | Type cmd.exe and click OK to open a command prompt.
| 15. | At the command prompt, type nTDsutil.exe and press Enter.
| 16. | Type Authoritative restore and press Enter.
| 17. | Type Restore Database and press Enter to restore the entire database. Depending on whether this domain controller is in the forest root domain, a tree root domain, or a child domain in the Active Directory partitions, such as the schema partition and/or the domain naming context partition, the information will be replicated to all the other appropriate replication partner domain controllers.
| 18. | An authoritative restore confirmation dialog box appears; click Yes to start the authoritative restore.
| 19. | The command-prompt window displays whether the authoritative restore was successful. Close the command prompt and reboot the server.
| 20. | Boot up the server in Normal mode, log in, and open the correct Active Directory tools to verify whether the restore was successful. Also, check on other domain controllers to ensure that the restore is being replicated to them.
| | | 21. | When you're done, perform a full backup of the domain controller or at least the system state; then log off the server when the backup is complete.
|
Partial Active Directory Authoritative Restore Most Active Directory authoritative restores are performed to recover from a modification or deletion of an Active Directory object. For example, a user account has been deleted instead of disabled, or an organizational unit's security has been changed and the administrator is locked out. Recovering only a specific object, such as a user account or an organizational unit or a container, requires the distinguished name (DN) of that object. To find the distinguished name, the administrator can use the Ntdsutil utility; however, if an LDIF dump of Active Directory exists, this file would be most helpful. If no LDIF file exists and the DN of the object to be recovered is unknown, recovery of the single object or container is not possible. To simplify the steps to partial recovery, we will use an example of recovering a single user account using the logon Khalil that was previously contained in the Users container in the Companyabc.com domain. To restore the user account, follow these steps: 1. | Power up the domain controller and press the F8 key when the boot loader is displayed on the screen.
| 2. | When the advanced boot options are displayed, scroll down, select Directory Services Restore Mode, and press Enter to boot the server. This mode boots the Active Directory database in an offline state. When you choose this boot option, you can maintain and restore the Active Directory database.
| 3. | When the server boots up, log in using the username Administrator and the Restore mode password specified when the server was promoted to a domain controller. To change the Restore mode password on a domain controller running in Normal mode, use the Ntdsutil.exe utility; this process is covered in Chapter 32.
| 4. | Click Start, Run.
| 5. | Type Ntbackup.exe and click OK.
| 6. | When the Backup or Restore window opens, click the Advanced Mode hyperlink.
| 7. | Select the Restore and Manage Media tab.
| 8. | Select the appropriate backup media, expand it, and check the system state. If the correct media are not available, the file must be located, or the tape must be loaded in the tape drive and cataloged before it can be used to restore the system state.
| 9. | Choose to restore the data to the original location and click the Start Restore button in the lower-right corner of the backup window.
| 10. | A pop-up window indicates that restoring the system state to the original location will overwrite the current system state. Click OK to continue.
| | | 11. | A confirm restore window opens in which you can choose advanced restore options. Click OK to initiate the restore of the system state.
| 12. | When the restore is complete, a system restart is necessary to update the services and files restored during this operation. Because only a nonauthoritative restore of the Active Directory database is necessary, click No.
| 13. | Close the backup window and click Start, Run.
| 14. | Type cmd.exe and click OK to open a command prompt.
| 15. | At the command prompt, type ntdsutil.exe and press Enter.
| 16. | Type Authoritative restore and press Enter.
| 17. | Type Restore Object "cn=Khalil,cn=Users,dc=companyabc,dc=com" and press Enter, as shown in Figure 33.7.
Figure 33.7. Restoring a single user account. 
| 18. | The success or failure of the restore appears in the command prompt. Now type quit and press Enter. Repeat this step until you reach the C: prompt.
| 19. | Close the command-prompt windows and reboot the server.
| 20. | Log on to the server with a Domain Administrator account and verify that the account has been restored. Then log off the server.
|
Rebuilding the Global Catalog There are no special restore considerations for restoring a global catalog server other than those outlined for restoring Active Directory in the previous sections. The global catalog data is re-created based on the contents of the Active Directory database. Restoring the SYSVOL Folder The SYSVOL folder contains the system policies, Group Policies, computer startup/shutdown scripts, and user logon/logoff scripts. If a previous version of a script or Group Policy Object is needed, the SYSVOL folder must be restored. As a best practice and to keep the process simple, the SYSVOL folder should be restored to an alternate location where specific files can be restored. When the restored files are placed in the SYSVOL folder, the File Replication Service will recognize the file as new or a changed version, and it will replicate it out to the remaining domain controllers. If the entire SYSVOL folder needs to be pushed out to the remaining domain controllers and the Active Directory database is intact, a primary restore of the SYSVOL is necessary. To perform a primary restore of the SYSVOL folder, follow these steps: 1. | Power up the domain controller and press the F8 key when the boot loader is displayed on the screen.
| 2. | When the advanced boot options are displayed, scroll down, select Directory Services Restore Mode, and press Enter to boot the server. This mode boots the Active Directory database in an offline state. When you choose this boot option, you can maintain and restore the Active Directory database.
| 3. | When the server boots up, log in using the username Administrator and the Restore mode password specified when the server was promoted to a domain controller. To change the Restore mode password on a domain controller running in Normal mode, use the Ntdsutil.exe utility; this process is covered in Chapter 32.
| 4. | Click Start, Run.
| 5. | Type Ntbackup.exe and click OK.
| 6. | When the backup or restore window opens, click the Advanced Mode hyperlink.
| 7. | Select the Restore and Manage Media tab.
| 8. | Select the appropriate backup media, expand it, and check the system state. If the correct media are not available, the file must be located, or the tape must be loaded in the tape drive and cataloged before it can be used to restore the system state.
| 9. | Choose to restore the data to the original location and click the Start Restore button in the lower-right corner of the backup window.
| 10. | A pop-up window indicates that restoring the system state to the original location will overwrite the current system state. Click OK to continue.
| 11. | A confirm restore window opens in which you can choose advanced restore options. Click the Advanced button to view the advanced restore options.
| | | 12. | Check the box labeled When Restoring Replicated Data Sets, Mark the Restored Data as the Primary Data for All Replicas, as shown in Figure 33.8.
Figure 33.8. Choosing to perform a primary restore. 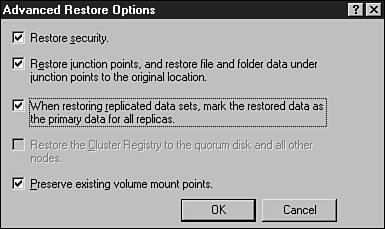
| 13. | Click OK to return to the Confirm Restore page and click OK to start the restore.
| 14. | When the restore is complete, a system restart is necessary to update the services and files restored during this operation. Because only a nonauthoritative restore of the Active Directory database is necessary, click Yes to restart the server.
| | | 15. | After the server reboots, log in using an account with Domain Administrator access.
| 16. | Check the server event log and the SYSVOL folder to ensure that the data has been restored successfully and log off the server when you're finished.
|
|