The WebLogic Server Deployment Tools
| WebLogic Server provides a set of tools for deploying applications to WebLogic Servers and clusters. The following tools are provided:
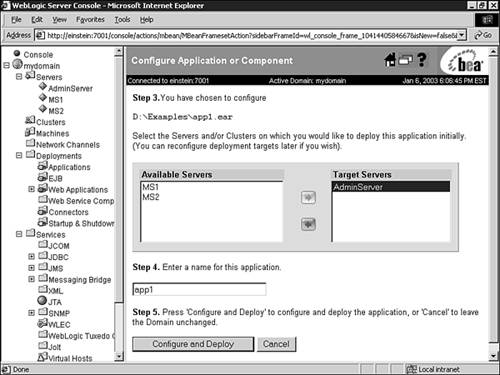
This section discusses each of these tools and how they can be used to deploy applications in detail. Using the Administration Console to Deploy ApplicationsThe Administration Console provides a browser-based GUI to configure, administer, and monitor the WebLogic Server domain. Administration Console is a Web-based application that's deployed on the Administration Server. This subsection shows how you can use the Administration Console to configure and deploy applications to the WebLogic Server domain. Configuring and Deploying J2EE Applications Using the Administration ConsoleFollow these steps to configure a new J2EE application using the Administration Console:
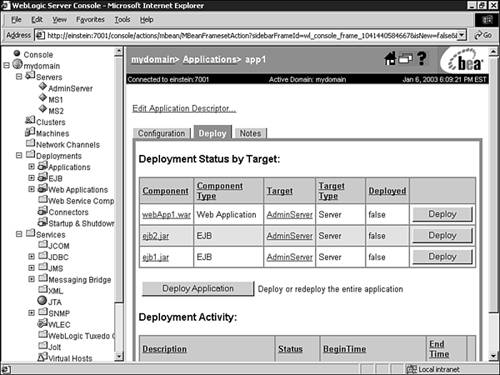
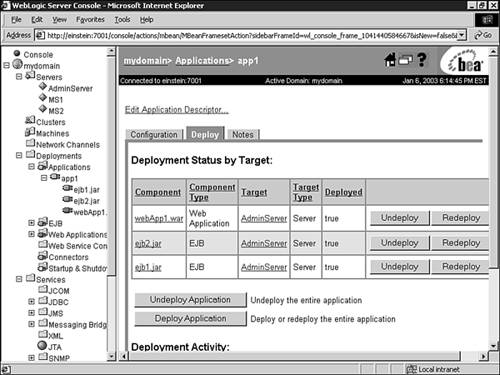
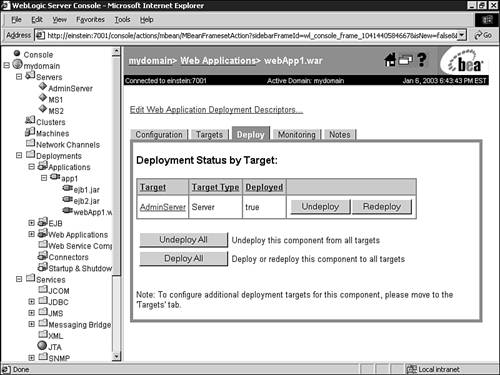
After your application is deployed, the Deployed column of the Deployment Status by Target table shows Deployed next to each of the deployed J2EE component(s). For example, Figure 27.8 shows the three components that were packaged in the app1 application have all been successfully deployed to their target server. Figure 27.8. The Deployment Status by Target table indicates a successful deployment. From the Deployment Panel, you can undeploy or redeploy an entire application or its individual components. By selecting one of the deployed application components in the Deployment Panel, you're provided with a Deployed Component screen, similar to Figure 27.9, from which you can perform the actions in the list that follows the figure. Figure 27.9. The Deployed Component screen.
If you need to reconfigure a deployed application, such as adding or removing target server(s) or changing the staging mode or deployment order, you can perform these tasks directly from the Administration Console screens shown in Figures 27.8 and 27.9, respectively. To reach these screens after you've deployed your application, select the node of the application or component you want to reconfigure from the left pane of the Administration Console. Application components are listed as subnodes of their application name node, which you assigned during their deployment. For example, in Figure 27.8, app1 is the application name node in the Administration Console that contains the following deployed components:
Undeploying Components with the Administration ConsoleIn WebLogic Server, you can deploy a component that's part of an enterprise application, or deploy an independent component that is not within an enterprise application. The Administration Console also enables you to undeploy components that have been deployed either way. To undeploy a component with the Administration Console, follow these steps:
This action undeploys the component from the target server. The console also refreshes to show the new deployment state and displays the status of the undeployment activity in the deployment activity table. Note Undeploying a component doesn't remove or delete the component from the server. The application is only deactivated and unprepared on the server it was undeployed from. That means the application classes are unloaded from the server and left in a state from which they can be reloaded again, if needed. Neither are the class files removed from the staging directory of the server. Deleting Applications and Components with the Administration ConsoleTo delete applications from the WebLogic domain, follow these steps:
Deleting the application permanently deletes the application from the domain configuration. If the application is active on some servers in the domain, it's first undeployed and then deleted. To delete a component, go to the node of which the component is a type and follow the same procedure you would to delete an application. Viewing a List of Components Through the Administration ConsoleTo view a list of components and their deployment status through the Administration Console, follow these steps:
If you click on an application archive within the Application node, you'll see the deployment status for each component within that application. If you click on a component, you'll see the deployment status for that particular component only. Using the weblogic.Deployer Utility to Deploy ApplicationsThe weblogic.Deployer tool is a utility that can be used to deploy applications to the WebLogic server and cluster from the command line. This utility has been developed primarily for administrators and developers who prefer to deploy applications from the command line, using shell scripts instead of using the GUI-based console. To start the weblogic.Deployer tool, follow these steps:
The following commands provide more information on using the weblogic.Deployer utility:
Table 27.1 lists some of the main actions that can be performed with the weblogic.Deployer utility. Table 27.1. Main Actions Passed on to weblogic.Deployer
Deploying a New Application to the Administration ServerThis section and subsequent sections related to the weblogic.Deployer utility will describe how to use the weblogic.Deployer utility to deploy and redeploy a simple application named app1. The app1 application is packaged in an enterprise archive named app1.ear and contains the following archives:
In the examples, the weblogic.Deployer utility will be targeting a WebLogic Server domain with the following configuration:
You can substitute your own application, WebLogic domain, and WebLogic Server names where appropriate to follow the weblogic.Deployer examples. For example, to deploy the app1 application to the AdminServer (Administration Server), you can issue the following command: java weblogic.Deployer -adminurl http://einstein:7001 -user wls -password einstein -source app1.ear -name app1 -activate This command deploys and activates the application named app1 (specified by -name and located in the current directory) to the Administration Server (specified by - adminurl ). The output from issuing this command is shown in Figure 27.10. Figure 27.10. The output from deploying an application (app1) successfully to an Administration Server. After the app1.ear application has been successfully deployed to the Administration Server, you can verify the deployment of the application and its components through the Administration Console. Deploying a New Application to Managed ServersIf you need to target your deployment to specific managed servers in your domain, you must use the -targets option to specify those target deployment servers. For example, the following command activates the application named app1.ear (specified by -name ) on the managed servers MS1 and MS2 (specified by -targets ): java weblogic.Deployer -adminurl http://einstein:7001 -user wls -password einstein -source app1.ear -name app -targets MS1,MS2 -verbose activate Caution The -targets option is a comma-separated list of the targeted WebLogic Server. If you place a space between the targeted servers, the application will be deployed to only the fist server in the list. In the preceding command, the -verbose option was used to provide additional progress messages, which is helpful if you want to understand the tasks that are initiated by the Administration Server to deploy your application. The output from issuing this command is shown in Figure 27.11. Figure 27.11. The output from successfully deploying an application (app1) to the managed servers MS1 and MS2 using the -verbose option . Tip It's good practice to use the -verbose option when deploying an application to multiple WebLogic Servers, especially a WebLogic cluster, because you can validate the prepare and activate phases of your deployment (the two-phase deployment model). Redeploying an Application to Targeted WebLogic ServersIf you need to redeploy a new version of an existing deployed application, you must use the weblogic.Deployer command with the -source and the -targets options, which specify the location of the modified files and the target servers to redeploy the new application to, respectively. If you don't provide the -source option or a list of updated files, the Administration Server assumes that nothing has been changed in the application and the deployment operation has no effect. For example, the following command redeploys and activates a new version of the application named app1, located in a directory specified by the -source option, to the MS1 managed server specified by the -targets option: java weblogic.Deployer -adminurl http://einstein:7001 -user wls -password einstein -source app1.ear -name app -targets MS1 -verbose -activate The output from issuing this command is shown in Figure 27.12. Figure 27.12. The output from redeploying app1 to the MS1 managed server. Deploying a New Module to a Deployed EAR ApplicationYou can add a new module to an existing application that's already deployed on WebLogic Server without redeploying the entire application. To add a new module, you must first add the appropriate entry in the application's application.xml deployment descriptor and then repackage the application. For example, to add a new module webApp2.war without redeploying the existing modules within the application app1.ear in the MS1 managed server, use the following command: java weblogic.Deployer -adminurl http://einstein:7001 -user wls -password einstein -name app1 -source app1.ear -targets webApp2.war@MS1 -activate Deactivating an Application on Active TargetsTo deactivate an application on a deployed WebLogic Server, you must use the weblogic.Deployer utility with the -deactivate option. For example, the following command deactivates the application named app1 on the managed server MS2: java weblogic.Deployer -adminurl http://einstein:7001 -user wls -password einstein -name app1 -targets MS2 -deactivate However, the application is not removed from the server MS2, but is left in a state from which it can be reactivated again quickly, if needed. After deactivating an application on a specific WebLogic Server, it isn't accessible to clients on that server. The output from issuing the deactivate command is shown in Figure 27.13. Figure 27.13. The output from deactivating app1 on the MS2 managed server. Deactivating an Application on All Deployed WebLogic ServersIf you need to deactivate an application from all the WebLogic Servers in a domain that the application has been deployed to, you can use the weblogic Deployer utility with the -deactivate option. This time, however, you do so without specifying the -targets option. For example, the following command deactivates the app1 application on all the WebLogic Servers to which it has been deployed: java weblogic.Deployer -adminurl http://einstein:7001 -user wls -password einstein -name app1 -deactivate Reactivating a Deactivated ApplicationTo reactivate an application that has been deactivated on a WebLogic Server instance, you can use the weblogic.Deployer utility with the -activate and -targets option. For example, the following command activates the application app1, which was deployed to the managed server MS2, but was deactivated: java weblogic.Deployer -adminurl http://einstein:7001 -user wls -password einstein -name app1 -targets MS2 -activate The output from issuing this command is shown in Figure 27.14. Figure 27.14. The output from reactivating app1 on the MS2 managed server. It's important to understand that to activate a deactivated application, you don't need to specify the -source option. Because the application was already configured on a WebLogic Server instance, the application files are staged there and the deactivation task doesn't delete the application files. Removing a Deployed ApplicationThe process of removing an application involves deactivating an application from its target WebLogic Server and removing any resources and files that were staged for that application. To remove an application using the weblogic.Deployer utility from a targeted WebLogic Server, you must use the -remove and -targets options. For example, the following command deactivates the application app1 as well as removes all the files related to the application from the managed server MS2: java weblogic.Deployer -adminurl http://einstein:7001 -user wls -password einstein -name app1 -targets MS2 -remove The output from issuing this command is shown in Figure 27.15. Figure 27.15. The output from removing app1 from the MS2 managed server. To remove an application from all the WebLogic Servers it has been deployed to, you can use the weblogic.Deployer utility with the -remove option, but without specifying the -targets option. This removes the application files from the staging directory of all the WebLogic Servers to which it was deployed. For example, the following command removes the app1 application from all of its deployed WebLogic Servers: java weblogic.Deployer -adminurl http://einstein:7001 -user wls -password einstein -name app1 -remove Refreshing Parts of an Exploded ApplicationIf you've deployed an exploded Web application to WebLogic Server, you can also use the weblogic.Deployer utility to redeploy or refresh parts of the Web application. For example, the following command refreshes the index.jsp file within a sample Web application deployed in an exploded directory on WebLogic Server: java weblogic.Deployer -adminurl http://einstein:7001 -user wls -password einstein -name exampleWebApp -activate .\index.jsp The path specified after the -activate option is relative to the root of the application from which it was originally deployed. In addition, you can also refresh static content in an exploded Web application. Listing All Deployment TasksYou can summarize your deployment activity using the weblogic.Deployer utility by using the -list option as follows: java weblogic.Deployer -adminurl http://einstein:7001 -list A sample output from issuing this command is shown in Figure 27.16. Figure 27.16. A sample output from issuing a weblogic.Deployer command with the -list option. The output shows a list of deployment tasks that have been recently performed by the Administration Server. Canceling a Deployment TaskIf you ever need to cancel a deployment task that has been started incorrectly or is taking a long time to complete, you can issue a weblogic.Deployer command with the -cancel and -id options. Every time you issue a task for WebLogic Server to execute, that task is assigned a TaskID by the Administration Server. This TaskID is displayed in the output of issuing every weblogic.Deployer command. For example, to cancel a weblogic.Deployer task with the TaskID 7, you can issue the following command: java weblogic.Deployer -adminurl http://einstein:7001 -user wls -password einstein -cancel -id 7 The cancellation command has to be invoked from another command shell, different from the one that's executing the weblogic.Deployer task you want to cancel. Using WebLogic Builder to Build and Deploy J2EE ApplicationsWebLogic Builder is a new GUI-based deployment tool that's provided with the WebLogic Server installation to assist you in deploying your developed J2EE applications to WebLogic Server. The primary deployment tasks you can perform with WebLogic Builder are as follows:
The following sections describe how you can use WebLogic Builder as an application build and deployment tool. Starting WebLogic BuilderTo start the weblogic.Deployer tool, follow these steps:
Opening a J2EE Application Using WebLogic BuilderYou can open an archived module or an exploded application in WebLogic Builder by choosing File, Open from the main menu. WebLogic Builder pops up a frame that enables you to navigate through the file system to select the desired application archive, as shown in Figure 27.17. Figure 27.17. Open an enterprise application archive in WebLogic Builder. To demonstrate WebLogic Builder, we'll use an existing enterprise application archive named app1.ear , which has all the deployment descriptors already defined. When you open an enterprise archive, WebLogic Builder examines the EAR file and creates a hierarchical tree of the modules and the deployment descriptors contained in the application in the left pane. You can navigate the tree and click on any node to see the corresponding deployment descriptor fields in the right pane. Figure 27.18 shows WebLogic Builder with app1.ear open. Figure 27.18. WebLogic Builder with the app1.ear archive opened. The left pane shows the components within app1.ear , which are webApp1.war, ejb1.jar , and ejb2.jar. webApp1.war has one servlet called CookieCounter. If the CookieCounter node is selected, WebLogic Builder opens up the deployment parameters related to the servlet in the right pane. You can change these parameters and click File, Save in the main menu so that WebLogic Builder saves the changes to the appropriate deployment descriptor file. WebLogic Builder displays errors and messages in the bottom pane, which can be displayed by selecting the Errors and/or Messages options from the View menu. You can also load an application or a component that does not have any deployment descriptors defined for it using WebLogic Builder. In such a scenario, WebLogic Builder examines the application archive or exploded directory, and intelligently creates the required deployment descriptors using a best-guess principle. For this reason, it's always necessary to verify the integrity of auto-created deployment descriptors using WebLogic Builder. Editing Web Application Deployment Descriptors with WebLogic BuilderWebLogic Builder provides a very intuitive way of adding elements to deployment descriptor files. In this section, you learn how you can add a new servlet with a URL mapping to the webApp1.war component of the app1.ear enterprise application archive. To add a new servlet to a deployment descriptor file, follow these steps:
Editing EJB Deployment Descriptors with WebLogic BuilderTo generate the deployment descriptors automatically for an EJB20 CMP bean using WebLogic Builder, follow these steps:
To add a new CMP field to the EJB20 CMP bean, follow these steps:
You can similarly use WebLogic Builder to add finders as well as relations. Other Useful Features Provided by WebLogic BuilderWebLogic Builder can validate a component, connect to a running WebLogic Server instance, and deploy a module to a server. The Builder tool can also be used to view the deployment descriptor files. This section looks at each of these actions. Connecting to WebLogic ServerTo deploy an application or module to WebLogic Server, WebLogic Builder must be connected to the target WebLogic Server. To connect to a WebLogic Server instance from WebLogic Builder, follow these steps:
This connects WebLogic Builder to the specified WebLogic Server instance. Validating a ComponentTo validate a component (for example ejb1.jar of the enterprise application archive named app1.ear ), use the following procedures:
WebLogic Builder begins validating the component and produces the appropriate messages in the bottom pane. During validation, the tool checks for the J2EE compliance of the bean and runs ejbc on the bean. As shown in Figure 27.22, WebLogic Builder generates messages in the bottom pane that indicate the various actions WebLogic Builder performs during the validation process and the result (if the validation is successful). Figure 27.22. Use WebLogic Builder to validate your J2EE components. Viewing Deployment Descriptor XML FilesWebLogic Builder also enables you to view the XML source of the deployment descriptor files. To do so, follow these steps:
This opens a frame, as shown in Figure 27.23, which shows the source of all the deployment descriptors present for that component. Figure 27.23. The WebLogic Builder interface for viewing the deployment descriptor XML files. Deploying an Application Using WebLogic BuilderTo deploy an application using WebLogic Builder, follow these steps:
The application will be deployed to the WebLogic Server instance to which the WebLogic Builder is connected. You can also undeploy an application from a WebLogic Server instance by using WebLogic Builder as follows:
Using Auto-DeploymentAuto-deployment is a deployment strategy that enables developers to quickly deploy or redeploy an application to the Administration Server and test it. This feature improves the efficiency of the typical develop-deploy-test harness that's common during the development phase of any J2EE application. Auto-deployment is a development time convenience feature, and is not recommended for use on production servers. In addition, this feature is meant for a single-server environment and therefore it isn't recommended for the deployment of components on managed or clustered servers. The Administration Server in any WebLogic domain can be started in one of two modes: development mode or production mode. Development ModeThis mode enables the auto-deployment feature. By default, a WebLogic Server instance runs in development mode. However, you can explicitly set a WebLogic Server into development mode as follows:
In this mode, the Administration Server starts an application poller that continuously polls the \ domainName \applications directory to detect whether any new applications have been deployed or any existing application has been modified or undeployed. On detecting a change, it takes the necessary deployment actions. Production ModeThis mode disables the auto-deployment feature. The server does not poll the \ domainName \applications directory and therefore any changes in that directory are not detected . Because the auto-deployment feature is disabled in this mode, you must use the weblogic.Deployer tool, WebLogic Builder, or the Administration Console to perform any deployment tasks. Applications should be deployed to WebLogic Server in this mode after you have developed and tested them. To start WebLogic Server in production mode, you can either set the -Dweblogic.ProductionModeEnabled property to true while starting the server, or you can set the STARTMODE variable in the startup script to true. Deploying Applications in the Auto-Deployment ModeTo deploy an application when the server is started in development mode, just copy the application to the \applications directory of the Administration Server. This directory is present inside the domain directory; for example, mydomain \applications . You can copy either a bundled archive or an exploded application to the \applications directory. In the case of exploded applications, all components within the application also should be exploded. As soon as the Administration Server detects that a new application has been copied to the \applications directory, it deploys the application automatically. If the Administration Server isn't running when an application is copied to the \applications directory, the application will be deployed the next time the Administration Server is started. When the application has been detected and deployed by the Administration Server, the configuration of the application is also persisted to the config.xml file. Undeploying Applications in Auto-Deployment ModeBecause the Administration Server continuously polls the \applications directory, undeploying an application using the Administration Console or weblogic.Deployer utility will not truly undeploy the application. As far as the Administration Server is concerned , there is still an application in the applications directory. For this reason, to undeploy an application from WebLogic Server in development mode, the best technique is just to delete the application archive or the exploded directory from the \applications directory. The Administration Server will detect this change and automatically undeploy the application. Redeploying Archived Applications in Auto-Deployment ModeIf an archived application (EAR, JAR, or WAR) is already deployed to the server through the \applications directory, you can dynamically redeploy it just by copying the new version of the archive to the \applications directory. The server updates the application automatically. During the development cycle, a developer can perform this copying as the last step in his build process. When the new version of the archive is copied to the \applications directory, it's automatically updated and the developer can immediately test itwithout restarting the server. Redeploying Exploded Applications in Auto-Deployment ModeWhen an application or component has been deployed through the \applications directory in an exploded format, the Administration Server periodically checks the timestamp on a file named REDEPLOY in the exploded application. If the timestamp on the file has changed since the previous check, the Administration Server redeploys the application. To redeploy or update an exploded application, follow these steps:
The application poller in the Administration Server detects the change in timestamp of the REDEPLOY file and updates or redeploys the contents of the exploded application. |

 For an example of an auto-generating deployment descriptor for a Web application,
EAN: 2147483647
Pages: 360