| WebLogic Server 7 provides security for all its resources in the context of a single active Security Realm , which consists of a set of configured security providers, users, groups, roles, and security policies. By default, WebLogic Server provides two default security realms myrealm and Compatibility realm. If you are upgrading to WebLogic Server 7 from WebLogic Server 6.x, the Compatibility realm is used to access the existing WebLogic Server 6.x security configuration. Otherwise, myrealm is used as the active security realm. As an administrator, you have the option of creating multiple security domains to protect your WebLogic resources; however, only one active realm can be used to provide server security at any given time. You can view the realms defined for your WebLogic Server via the Administration Console by selecting the Realms node in the left pane, as shown in Figure 26.12. Figure 26.12. View your security realms using the Administration Console. 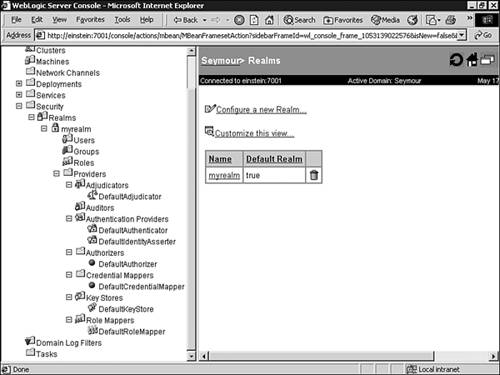 As shown in Figure 26.12, in addition to the Security providers discussed earlier in this chapter, a realm also consists of the following configurable resources: -
Users Entities defined and authenticated in the security realm to access WebLogic resources, such as an application end user , a client application, or even other instances of WebLogic Server. The security realm supports only unique users. -
Groups Logical sets of users that can be used to represent organizational boundaries; for example, groups can be created for different categories of WebLogic end users, with each category sharing a common set of security privileges. Therefore, groups present an efficient mechanism for managing a large number of users. Users can be defined as individual WebLogic users as well as members of a group. However, the access permissions associated with an individual user override any group access permissions. Groups can also be assigned to other groups (nested groups); however, each defined group must be unique within a security realm. -
Roles Privileges granted to users or groups based on conditions such as username, group membership, or context of the request. Similar to groups, roles enable you to restrict access to WebLogic resources for several users at once. In WebLogic Server 6.x, security roles applied only to Web and EJB resources. However, in WebLogic Server 7, roles can be scoped as follows : -
To a specific WebLogic resource within a single application, such as an EJB methodthis is called resource scoped. -
To all WebLogic resources deployed within a security realmthis is called globally scoped . The circumstances under which a security role (global or scoped) is granted to a user or group are known as role conditions . The relationship between users, groups, and roles is depicted in Figure 26.13, which describes the process flow for protecting a WebLogic resource. Figure 26.13. The process flow for protecting a WebLogic resource.  The following are aspects of the process flow shown in Figure 26.13: -
A WebLogic Administrator creates users and statically assigns them to one or more groups. -
A WebLogic Administrator creates a role statement based on business procedures the WebLogic application must abide by. The role statement includes a role condition that specifies when a group should be granted a security role. -
At runtime, the WebLogic Security Service compares groups against the role condition to determine whether they should be dynamically granted a security role. This process is referred to as role mapping . -
A WebLogic Administrator creates a policy statement that includes a policy condition specifying when a security role should be granted access to a protected WebLogic resource. -
At runtime, the WebLogic Security Service uses current users, their membership in groups, the security roles they are granted, and the WebLogic resource to determine whether the security policy for the requested access is granted. Only users who are members of the group granted the security role can access the WebLogic resource. The following sections describe the administration tasks related to a WebLogic security realm. Managing Your Security Realm By default, you are provided with a preconfigured security realm named "myrealm" with default users, groups, and roles. WebLogic Security providers are also supplied by default, which is an excellent starting point for becoming familiar with the operation and capabilities of the new WebLogic Security Service. You can manage the myrealm security realm (or any other realm, for that matter) from the Administration Console by clicking its respective node in the left pane to display the myrealm window (shown in Figure 26.14). This window serves as a central point for managing your security realm through the General, User Lockout, Contents, and Providers tabs. Figure 26.14. Manage your security realm from the Administration Console.  The General Tab The General tab enables you to specify whether WebLogic Server reads role and credential information from the weblogic.xml , weblogic-ejb-jar.xml , and weblogic-ra.xml deployment descriptors on application deployment to populate the Authorization and Credential Mapping providers configured for the security realm. After this role and credential information is in the Authorization and Credential Mapping providers, changes made via the Administration Console are not persisted to deployment descriptors. For this reason, before you redeploy a application you need to enable the Ignore Security Data in Deployment Descriptors attribute, or the old data in the weblogic.xml , weblogic-ejb-jar.xml , and weblogic-ra.xml files will overwrite any changes made through the Administration Console. The User Lockout Tab The User Lockout tab, shown in Figure 26.15, enables you to apply security measures against username and password guessing. Figure 26.15. The User Lockout tab for setting the user account lockout behavior. 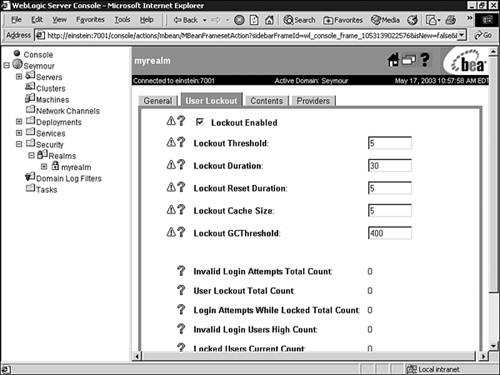 You can use the User Lockout tab to set the following attributes: -
Lockout Enabled Indicates whether the user lockout mechanism is enabled for a WebLogic server, meaning its operation depends on the attribute values set in the User Lockout tab. -
Lockout Threshold The maximum number of consecutive invalid login attempts before a user account is locked out. (The default is 5.) -
Lockout Duration The number of minutes that a user account is locked out. (The default is 30 minutes.) -
Lockout Reset Duration The number of minutes within which consecutive invalid login attempts cause the user account to be locked out. (The default is 5 minutes.) -
Lockout CacheSize The number of invalid login records that the server places in a cache. The server creates one record for each invalid login. (The default is 5 records.) -
Lockout GCThreshold The maximum number of invalid login records WebLogic Server keeps in memory. When this threshold value is reached, WebLogic Server's garbage collection service purges the records associated with a user who has been locked out. The User Lockout tab also provides statistics on the number of user lockouts since the last server reboot. If a user account becomes locked, you can unlock the account by following these steps: -
Select the Users node under your security realm. -
In the displayed Users table, a locked account is identified by the Details link under the Locked column. For example, in Figure 26.16, the user Seymour is identified as being a locked account. Figure 26.16. Identify a locked user account.  -
Click the Details link to unlock the user account. The Contents Tab The Contents tab provides shortcut text links to manage users, groups, and roles within your security realm, which is discussed later in this chapter. The Providers Tab The Providers tab, shown in Figure 26.17, provides shortcuts to the tabs used for configuring security providers for the new security realm. Figure 26.17. The Providers tab for managing security providers. 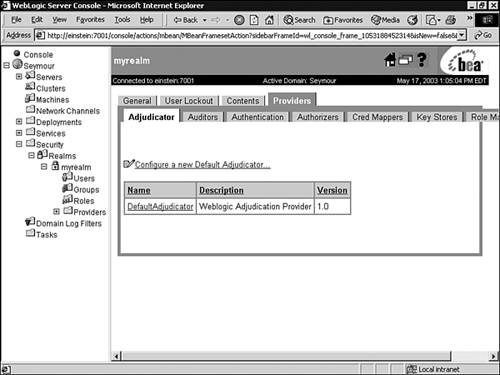 If you configure a new security realm from the Realms node in the Administration Console, you can use the Providers tab as a central point for configuring your security providers. Table 26.1 describes the types of security providers required when creating a new security realm. Table 26.1. Required Security Providers | Security Provider | Required | | Authentication | Yes | | Principal Validation | Yes | | Identity Assertion | Only if using perimeter security | | Authorization | Yes | | Adjudication | Only if multiple Authorization providers are configured | | Role Mapping | Yes | | Auditing | No | | Credential Mapping | Yes | | Keystore | No | When configuring a new security realm, the WebLogic Security providers are selected by default. Configuring New User Accounts By default, the WebLogic Authentication provider defines one user during the installation of WebLogic Server. This user serves as the initial system administration user account and is a member of the Administrators group. To create additional WebLogic users in the Administration Console, follow these steps: -
Click the Users node under your realm to display the Select Users window, which lists the users defined in the default Authentication provider. Tip You can use the Filter option in the Select Users window to search for users who match a search criteria. The asterisk (*) is used as a wildcard character. -
Click the Configure a New User link. -
In the General tab, shown in Figure 26.18, enter values for the following attributes: Figure 26.18. Create a new WebLogic Server user account.  -
Name Enter Sean as the name of the WebLogic user. -
Description Enter a description for the user, such as the job title or role the user performs in the business. This step is optional. -
Password Enter the password for this user, and enter the password again in the Confirm Password text box. -
Click Apply to save your changes. The new user is added to the list of users in the Select Users window. When creating a WebLogic user, adhere to the following guidelines: -
Usernames are case sensitive. -
Do not use blank spaces, commas, hyphens, or any character in this comma-separated list: \t , < > , # , , & , ~ , ? , ( ) , { } . -
The password must meet the minimum password length specified by your Authentication provider. Figure 26.19 shows this setting for the default WebLogic Authentication provider. Figure 26.19. The minimum password length specified by the Authentication provider. 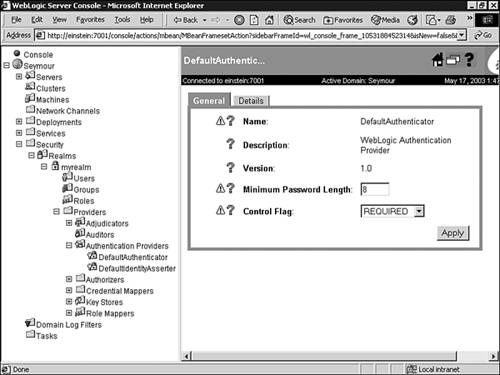 The Guest and Anonymous Users In previous releases of WebLogic Server, an anonymous user (an unauthenticated user) was identified as a user called "guest." To prevent a potential security risk, WebLogic Server 7 no longer provides the guest user as a default user and distinguishes between a guest and an anonymous user by assigning the anonymous user the name <anonymous> . However, you can still configure WebLogic Server to use the guest user to identify an anonymous connection by following these steps: -
Create a user named guest . -
Add the following WebLogic property when WebLogic Server is started: -Dweblogic.security.anonymousUserName=guest Caution The guest user should not be used in production WebLogic Server environments.
Configuring New Groups By default, the WebLogic Authentication provider defines the following groups: -
Administrators Users assigned to this group are granted the Admin security role by default. -
Deployers Users assigned to this group are granted the Deployer security role by default. -
Operators Users assigned to this group are granted the Operator security role by default. -
Monitors Users assigned to this group are granted the Monitor security role by default. -
Users Users assigned to this group include any users who have identified themselves through a login mechanism. -
Everyone Users assigned to this group include all users, regardless of whether they have logged into WebLogic Server. To create additional WebLogic groups, use the following steps in the Administration Console: -
Click the Groups node under your realm to display the Select Groups window, which lists the groups defined in the default Authentication provider. Tip You can use the Filter option in the Select Groups window to search for groups that match a search criteria. The asterisk (*) is used as a wildcard character. -
Click the Configure a New Group link. -
In the displayed General tab, shown in Figure 26.20, enter values for the following attributes: Figure 26.20. Create a new WebLogic Server group account.  -
Name Enter WebApp as the name for your group. Note Ideally, the name should be aligned with a real-world business group that will be using an application hosted on WebLogic Server. -
Description If the name of the group is not self-explanatory, you can enter a brief note further describing this group's membership. -
Click Apply to save your changes. Adding Users to Groups After you have configured the WebApp group, you can add the user Sean to that group by following these steps in the Administration Console: -
Click the Users node under your security realm to display the Select Users window, which lists all the users currently defined in the WebLogic Authentication provider's database. -
Click the hyperlinked name of the Sean user. -
Click the Groups tab. All groups available in the WebLogic Authentication provider's database appear in the Possible Groups list box, and all groups to which the user belongs appear in the Current Groups list box, as shown in Figure 26.21. Figure 26.21. Add a user to a group. 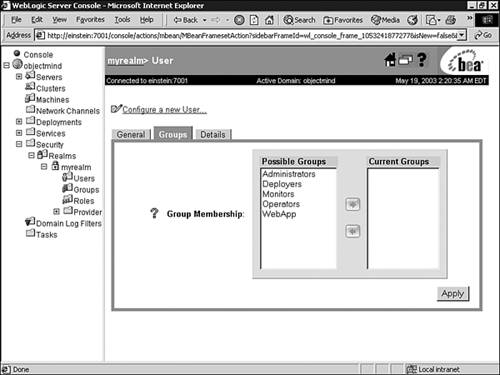 -
In the Possible Groups list box, click the name of the WebApp group to highlight it, and click the right-arrow button to move the group to the Current Groups list box. Tip You can use Ctrl+click to select more than one group in the Possible Groups list box. -
Click the Apply button to save your changes. Configuring Roles By default, WebLogic Server provides the following global roles to protect administrative and server resources: Note WebLogic Server does not provide any scoped roles by default.
-
Admin This role grants the following privileges by default to the Administrators group: -
View the server configuration, including the value of encrypted attributes. -
Modify the entire server configuration. -
Deploy applications, EJBs, startup and shutdown classes, J2EE connectors, and Web service components . -
Edit deployment descriptors. -
Start, resume, and stop servers. -
Deployer This role grants the following privileges by default to the Deployers group: -
View the server configuration, except for encrypted attributes. -
Deploy applications, EJBs, startup and shutdown classes, J2EE connectors, and Web service components. -
Edit deployment descriptors. -
Operator This role grants the following privileges by default to the Operators group: -
View the server configuration, except for encrypted attributes. -
Start, resume, and stop servers. -
Monitor This role grants the following privilege by default to the Monitors group: Note The Anonymous role is granted to all WebLogic user accounts (the Everyone group) by default.
You can view these default roles by selecting the Roles node under your security realm, which displays the Select Roles window. For each role you create, you need to specify the condition (role condition) under which that security role (global or scoped) is granted to a user or group. These are the role conditions provided with WebLogic Server: -
User Name of the Caller This creates a condition based on a username. For example, you can create a condition indicating that only the user Sean is granted the EndUserAccess security role. Note Multiple users can be granted the same role; however, for ease of management, BEA recommends adding users to a group and then granting the role to the group.
-
Caller Is a Member of the Group This creates a condition based on a group. For example, you can create a condition indicating that only users in the myWebApp group can be granted the EndUserAccess security role. -
Hours of Access Are Between This creates a condition based on a specified time period. For example, you might create a condition indicating that the EndUserAccess security role can be granted to users only during normal working hours. These role conditions, along with the specific information you supply for the condition (such as an actual username, a group, or start/stop times), are called expressions . The following is an example of an expression: Caller is a member of the group WebApp A role statement is a collection of expressions that define how a security role is dynamically granted. Being able to define multiple expressions for a role statement enables you to create complex business rules to meet your organization's security requirements. To relate expressions together to form a role statement, you use the following standard operators between these expressions: -
and is used to specify that all expressions must be true for the security role to be granted. -
or is used to specify that at least one of the expressions must be true for the security role to be granted. The entire role statement must be true for a user or group to be granted the security role. The following is an example of a role statement: Caller is a member of the group WebApp And Hours of access are between 09:00:00 and 17:00:00 The way you use the WebLogic Server Administration Console to create security roles differs , depending on whether you want to create a global role or a scoped role. You create global roles at the security realm level and scoped roles at the WebLogic resource level. Note You must keep track of the scoped roles you create, as there is currently no listing mechanism for previously created scoped roles in the Administration Console. However, you can create global roles and apply those roles to a WebLogic resource for ease of management.
Creating a Global Role To create a global role named EndUserAccess with the following role statement: Caller is a member of the group WebApp And Hours of access are between 09:00:00 and 17:00:00 follow these steps using the Administration Console: -
Click the name of the security realm you are configuring the role forfor example, myrealm. -
Click the Roles node to display the Select Roles window listing all roles defined in the default Role Mapping provider. -
Click the Configure a New Role link. -
In the displayed General tab, enter EndUserAccess as the name for the role you want to create. Note Do not use blank spaces, commas, hyphens, or any characters in this comma-separated list: \t , < > , # , , & , ~ , ? , ( ) , { } . Security role names are also case sensitive. -
Click Apply to save your changes. -
Click the Conditions tab to display the role editor window, as shown in Figure 26.22. Figure 26.22. The role editor window. 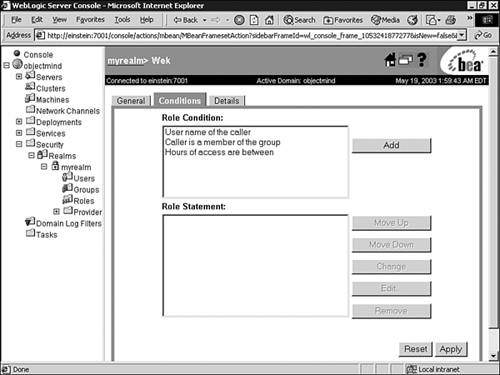 -
In the Role Condition list box, select the Caller Is a Member of the Group condition and click Add. -
In the Groups dialog box, enter WebApp as the name of the group, and click Add to include the group in the role condition, as shown in Figure 26.23. Figure 26.23. Adding groups to the Caller Is a Member of the Group condition. 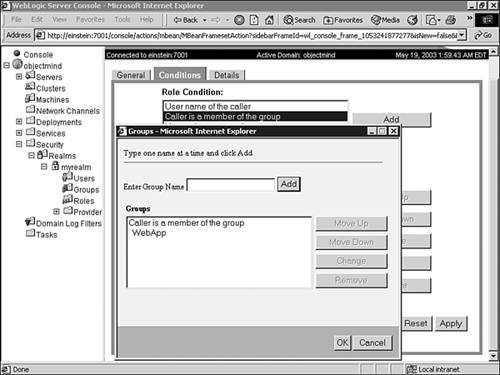 Note You can add multiple groups to a condition from the Groups dialog box and switch between the and/or operators by using the Change button. -
Click OK to add the expression to the role statement. -
In the Role Condition list box, select the Hours of Access Are Between condition, and click Add. In the Time Constraint dialog box, enter the start and end times shown in Figure 26.24. Figure 26.24. Specify a time constraint for a role condition. 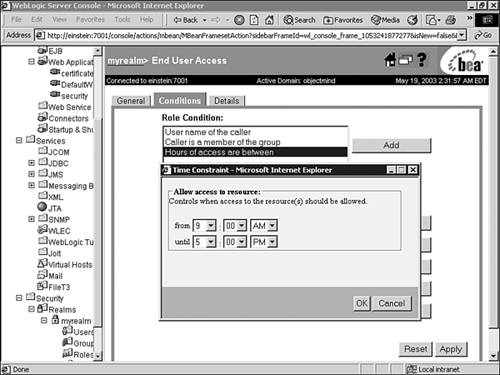 -
Click OK to add the expression to the role statement. Note Because more restrictive expressions should come later in a role statement, you can change the ordering of expressions in a role statement by using the Move Up and Move Down buttons . -
Click Apply to save your changes. The EndUserAccess role is stored in a Role Mapping provider. By default, the Role Mapping provider is configured and the role information is stored in the embedded LDAP server. Creating a Scoped Role Creating a scoped role follows the same procedure as creating a global role, except that it is applied at a WebLogic resource level. The procedures for defining a scoped role for a WebLogic resource differ , depending on the level of the scoped role and the type of resource. For example, to create a scoped role for all Web applications (WARs), use these steps: -
Right-click the Web Applications node in the left pane of the Administration Console. -
Select the Define Role option, shown in Figure 26.25, to display the Select Roles window listing the scoped roles currently defined for this WebLogic resource. Figure 26.25. Define a scoped role for all Web applications. 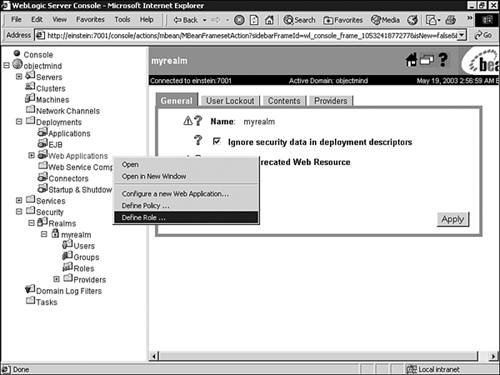 -
Click the Configure a New Role link to begin defining the role. In comparison, to create a scoped role for a specific WAR or a component within a WAR, use these steps: -
Right-click the target WAR for which you want to define a scoped role under the Web Applications node in the left pane of the Administration Console. -
Select the Define Role option. -
Enter a URL pattern in the text box. A URL pattern is a path to a specific component within a WAR. For example, you can use the following: -
Click the Define Role button, which displays the scoped roles defined for that URL pattern. -
Click the Configure a New Role link to begin defining the role. Similar procedures can be used for defining a scoped role for all EJB applications (JARs), for a specific EJB JAR, or for an EJB within a JAR. Note To define a scoped role for a bean within a JAR, right-click the EJB JAR and select the Define Policies and Role for Individual Beans option.
Configuring Security Policies A security policy is an association you define between a WebLogic resource and one or more users, groups, or security roles. It protects the WebLogic resource against unauthorized access. By default, WebLogic Server secures each WebLogic resource type with a default security policy based on the default global roles and groups. These security policies are inherited by all instances of that WebLogic resource type. For example, server resources are protected by the policies associated with the Admin and Operator roles. Configuring a policy is similar to creating a scoped role, as a policy is also defined at the WebLogic resource level and composed of conditions, expressions, and policy statements, with the following differences: -
When you create a policy, you also have the Caller Is Granted the Role condition, which enables you to create a condition based on a existing role you have defined. -
You can apply a policy to the methods and actions of a specific WebLogic resource. For example, to view the default policy defined for your WebLogic Server instance, right-click your server node in the Administration Console and select the Define Policy option. As shown in Figure 26.26, policy restrictions can be applied to the boot, shutdown, lock, and unlock actions. The policy is also applied to the Admin and Operator roles. Figure 26.26. Viewing the security policy for a WebLogic Server instance.   |