Working with Notes
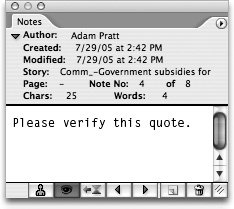
| Although tracking changes is a really helpful tool in the iterative process of writing and editing, it doesn't easily accommodate all the communication needed among writers, editors, and proofreaders. Another limitation of tracked changes is that when a graphic designer places an InCopy story in an InDesign layout, they cannot see the tracked changes. Inserting notes in InCopy stories solves both of these problems. Users on the editorial side can use notes to communicate with each other, and graphic designers also benefit because they can view and create notes in InDesign that transfer seamlessly between InDesign and InCopy. Notes in an InCopy story don't add to the word count of an InCopy document and don't affect copyfit calculations. Unlike tracked changes, which are only visible in Galley and Story views, notes can be created and seen in all three InCopy view modes and in InDesign. To create a note in a story, insert your cursor at the desired location and choose Notes > New Note. Or you can choose the Notes tool Figure 5.6. Notes are easy to create in InCopy and are a great way for writers and editors to communicate with their designer counterparts who use InDesign.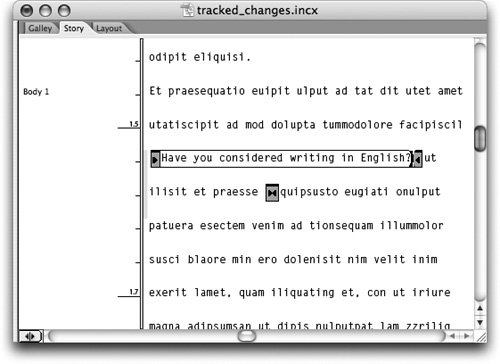 Using the Notes PaletteTo get basic information about a note, hover over it with your cursor. A small tool tip appears with the author name and the time and date the note was last modified. If you want even more information about a note, click to insert your cursor in the note and open the Notes palette from the Window menu. The Notes palette gives you the same basic information as the tool tip (author name, modified time, and modified date) but also includes the creation time and date, page number, note number, and number of characters and words in the selected note (Figure 5.7). The Notes palette is especially useful when you're reviewing notes that are collapsed and the note text isn't readily visible (see "Expanding and Collapsing Notes" later in this chapter). Figure 5.7. Use the Notes palette to view and navigate notes in a story. Tip When you create a note in Layout view, the Notes palette opens automatically. The Notes palette is an efficient way to read through a bunch of notes in an InCopy story, but it's easy to lose the visual connection between the note you're reading and the location of the note in the text flow. To find the anchor location of the current note, click the Go to Note Anchor button Expanding and Collapsing NotesTo expand or collapse a single note, click one bookend of the note Navigating NotesNow that you know how to collapse all the notes in a story, you might be wondering why in the world you would want to do that. Notes are harder to find and read when they are collapsed, so why do that on purpose? In the Notes palette (opened from the Window menu), the Go to Previous Note Tip You can also navigate between notes with the Previous Note and Next Note commands in the Notes menu, but the buttons in the Notes palette are normally a speedier way to accomplish the same task. Converting NotesAs you navigate through notes in a document, you might find notes that are draft comments that the author isn't confident should be included in the text. To turn a note into regular text, make sure the cursor is inserted in the note and choose Notes > Convert to Text. You can also select the Convert to Text command from the Notes palette menu. On the flip side, you might come across some text in a story that is questionable, or that needs, say, to be run by the legal department. Instead of deleting the text with the track changes feature, you can select the text and choose Notes > Convert to Note. Converting it to a note retains the text in a way that both InCopy and InDesign users can see, attracts extra attention from editors, and can be easily converted back to normal text. Tip If you select only part of a note and convert the selection to text, the unselected part of the note remains as a note. Splitting NotesIn some cases you might want to split one long note into two or more notes. For example, imagine that you're editing an InCopy story and write a really long note at the beginning of the document. As you read more of the story you realize that part of your first note would be more relevant in a later paragraph. Instead of retyping your comments or copying and pasting into new notes, just insert the cursor at an appropriate breakpoint in the first note and choose Notes > Split Note (Figure 5.8). Now you can click one bookend of the newly divided note and drag it to a different location in the story. If you later find yet another section where you want a remaining part of your first note to go, you can split it again. Figure 5.8. Split notes to move them to different locations in a story. Deleting NotesNormally when you want to delete an object in a software application, you select the object and hit the Delete key on the keyboard. That works in InCopy, but you can't select notes with the Notes tool, and trying to select just the note with the Type tool can be tricky. Instead of selecting a note to delete it, try inserting your cursor inside the note and choosing Notes > Delete Note. If the cursor is in the note, you can also Control-click (Mac) or right-click (Windows) anywhere in the note and choose Delete Note from the contextual menu (Figure 5.9). Navigating to a note and clicking the trash can icon at the bottom of the Notes palette is another option. To delete all the notes in a story at once, choose Notes > Remove Notes from Story or right-click anywhere in the story and choose Remove Notes from Story. If you've opened an InDesign document or an InCopy assignment with several stories, choose Notes > Remove All Notes to delete all the notes in all stories that have been checked out (see Chapter 8 for more about checking in and checking out stories). Figure 5.9. Delete notes in the Notes menu, the Notes palette, or with the contextual menu.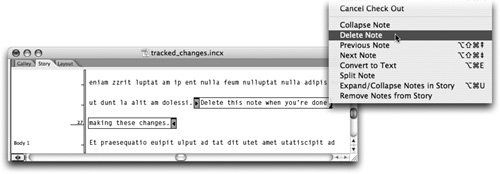 Notes ModeNow that you understand the fundamentals of the notes feature in InCopy, we want to introduce you to an interesting way to use notes in a super-efficient editing mode. You can use all the notes features as already described, but when you choose Notes > Notes Mode, InCopy assumes you're ready to do nothing but work with notes and kicks into high gear. For example, insert your cursor in text and choose the Notes Mode command or use the keyboard shortcut (F8), and InCopy will insert a new note for you. If you have text selected and invoke Notes Mode, the text is converted to a note. On the other hand, select a note and invoke Notes Mode, and the note is converted back to text. Click in the middle of a note and invoke Notes Mode again, and the note is split in two. Think of Notes Mode as a rapid-fire way to work with notes without having to use a bunch of different menu commands or memorize a slew of keyboard shortcuts. |
EAN: 2147483647
Pages: 122