Ensuring Consistency with Character and Paragraph Styles
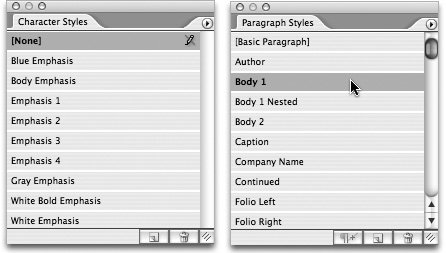
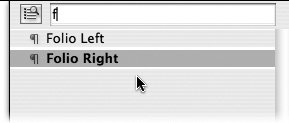
| Manually formatting text isn't difficult, but it sure is tedious if you need to format a lot of it. And what guarantee do you have that you and all your co-workers will format text consistently? When you consider changing the formatting of every single headline or caption throughout a publication, it's enough to make you scream. That's why you need to understand how to use character and paragraph styles. In most cases, the character and paragraph styles for an InCopy document are created by a graphic designer using InDesign, but even if you're not the person who creates the styles you need to understand how they're created and how to apply them to your text. Tip Change the default formatting of text in InCopy by double-clicking the [Basic Paragraph] style in the Paragraph Styles palette and making changes in the Paragraph Style Options dialog. Open the Character Styles and Paragraph Styles palettes from the Window > Type & Tables submenu to see all the styles available in the active document (Figure 3.16). To apply a character style, select a range of text as small as one character and click the style name in the Character Styles palette. To apply a paragraph style to a single paragraph, insert your cursor anywhere in the paragraph and click the style name in the Paragraph Styles palette. You can apply a paragraph style to multiple paragraphs if all the paragraphs are selected first. Figure 3.16. Use the Character Styles and Paragraph Styles palettes to apply styles to your text with just a click. Tip If you import existing content from Microsoft Word, make sure you read Chapter 2 to understand how to manage text styles when placing Word documents in InCopy. If you're editing an InCopy Assignment file (see Chapter 8), you're not allowed to view or change style definitions. But with a stand-alone InCopy document, you can see how a style was created. To see all the formatting options for a style in an InCopy document, double-click the style name to open the Style Options dialog (Figure 3.17). From here you can browse the categories on the left and see what attributes have been used. You can change style attributes, including the name of the style, but make sure to discuss any changes with the rest of your co-workers first. A simple alteration such as changing the name of a style can cause a lot of problems in a publishing workflow if everybody involved isn't anticipating the change. Figure 3.17. View character and paragraph style options by double-clicking the style name.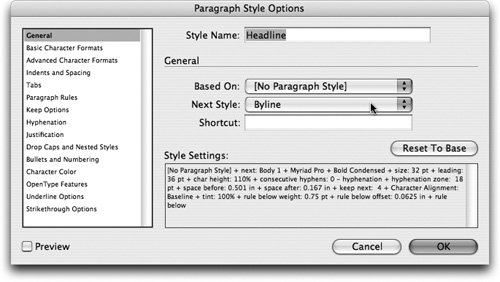 Tip You can apply character and paragraph styles in any document view, but you can only see regular, bold, and italic in Galley and Story views. Switch to Layout view to see all the formatting changes. Using Next StyleTwo powerful options for paragraph styles you should know about are Next Style and Nested Styles. The Next Style option, set in the General section of the Paragraph Style Options (Figure 3.17) dialog, chooses which paragraph style to apply to the following paragraph. For example, you can create a paragraph style called Headline that has a Next Style option set to another paragraph style called Byline. Now, when you type a paragraph with the Headline style and press Return/Enter, the next paragraph is automatically formatted with the Byline paragraph style. You can string multiple styles together with the Next Style option, such as setting the Next Style for Byline to Body. This is great if you type all your text in InCopy, and if you always plan ahead, but we realize that's not how the process always works. In cases where you import text from other sources or wait to apply styles until after the text has already been typed, there's a great trick for applying Next Styles you need to know about. First, select all the related paragraphs that need a sequence of next styles. Then Control/right-click on the name of the first paragraph style in the Paragraph Styles palette and choose Apply [Style Name] then Next Style. This instantly applies the first paragraph style and any other Next Style definitions and saves you a lot of time. Using Nested StylesAnother powerful paragraph style option is the Nested Style feature, which strings together multiple character styles into one intelligent paragraph style. We're not going to explain all the details of creating Nested Styles, but we want to make sure you're aware of the feature and are not surprised when you see one for the first time. For example, a nested paragraph style could use a bold character style through the first comma, an italicized character style through the first colon, and then plain text until the end of the paragraph (Figure 3.18). This is a very efficient way to style repetitive text such as a photo caption without having to apply each character style individually. Figure 3.18. Nested styles eliminate repetitive character formatting by combining multiple character styles into an intelligent paragraph style.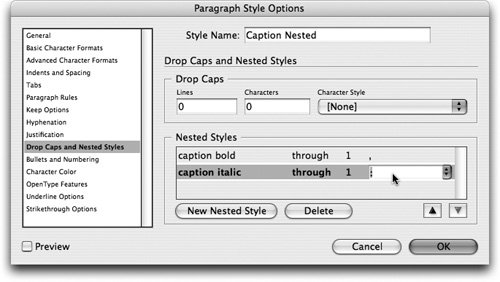 Perhaps the best aspect of Nested Styles is that once the style is applied to the paragraph, the nested character formatting is applied automatically at the pre-determined break points. If one of the break points, such as the comma or colon in the preceding example, is moved or deleted, the Nested Style updates automatically, and no new formatting is required. Using Quick Apply to Apply StylesCharacter and paragraph styles save you time, ensure consistency, and make future updates much easier, but the traditional method of applying styles by selecting text and clicking on the style name in the Style palettes can be tedious. Some documents may have as many as 150 or more styles, which makes the situation even more unwieldy. Enabling the Small Rows option in the palette menu for the Character Styles and Paragraph Styles palettes lets you squeeze more styles into the same space (Figure 3.19), but scrolling through that many styles to find the correct one can still be a drag. Figure 3.19. The Small Palette Rows option can squeeze more styles into the Styles palettes, but the new Quick Apply feature makes the whole process of styling text more efficient.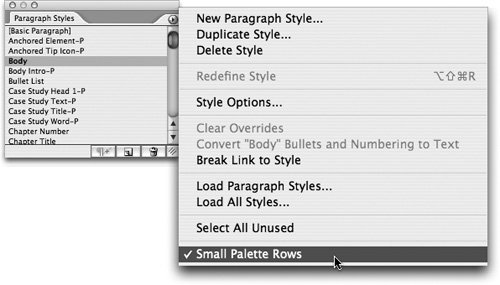 Applying styles while you type can interrupt your typing and therefore your thought process. It's also a hassle to be forced to take your hands of the keyboard, grab the mouse, scroll, apply the style, put your hands back on the keyboard, and start typing again. What if you could skip all those steps and apply character and paragraph styles with just a few taps on the keyboard? This is where the new Quick Apply feature saves the day. Select text you want to style and press Command-Return (Mac) or Control-Enter (Windows) to open the Quick Apply window in the top-right corner of the screen (Figure 3.20). Next, start typing letters and numbers that you know are part of the style name you want to apply. For example, if you type the letter "f" the list of styles in the Quick Apply list narrows to show only styles with the letter "f" in them. You don't need to type complete text strings, or even type them in order, so typing the letters "f" and "r" would quickly narrow the long list of styles to "Proofreading" as well as "Folio Right." If you narrow the list of styles to a short list, you can start navigating the list with the up and down arrow keys. When you highlight the style you're looking for, press Return/Enter to apply the style to the selected text and return the focus of the cursor back to the text you're editing. Figure 3.20. Quick Apply makes it easy to apply character and paragraph styles quickly and without taking your hands off the keyboard. Because we've written this entire book using InCopy, we've really fallen in love with this new Quick Apply feature. It's saved us a lot of annoying mousing around because we've been able to apply all the styles with the keyboard. We're also grateful for the extra screen real estate we have because we don't have to have any palettes open in order to apply the styles. Eliminating Manual OverridesSometimes when you apply paragraph styles to text you'll notice a plus mark (+) next to the style name in the Paragraph Styles palette. This plus mark indicates there's a manaul override on the selected text that you might want to eliminate. When you apply a paragraph style to text that already has custom formatting, the custom formatting is retained as an override to the applied paragraph style. Option/Alt-click on the style name in the Paragraph Styles palette to eliminate the override. This resets the selected text to the active style definition, and the plus mark (+) goes away. Tip You can also click the Clear Overrides button Managing Character and Paragraph StylesWhen there's a character or paragraph style in one InCopy file that you want to use in another file, you have two options. You could try to recreate the style from scratch in your InCopy file, but that process is tedious and prone to mistakes. The point of sharing styles is to ensure they are identical, so instead of recreating text styles, you should import styles directly from one InCopy document into another by following these steps:
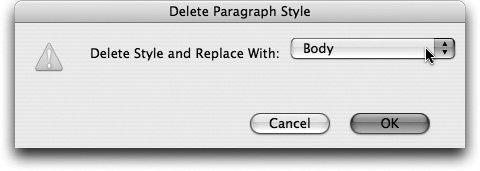
Figure 3.21. Select styles to load from one document into another.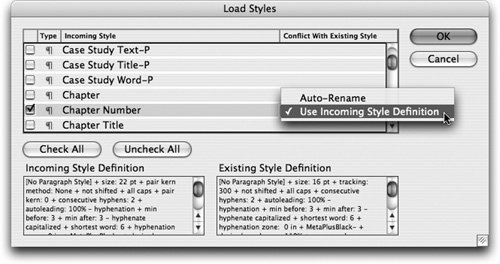 In some cases, you'll notice styles with a floppy disk icon If you find that your InCopy stories include lots of text styles you never use, consider paring down your styles. To find all the unused styles in a document, open the Character Styles and Paragraph Styles palettes from the Window menu and choose Select All Unused from the palette menu. Now you can delete the unused styles by clicking the trash can icon Figure 3.22. You must remap a used style before it can be deleted. You've learned how to edit, format, and style your text, but that's only part of the equation. In the next chapter we explore many other features that help you automate your writing workflow with powerful tools such as dynamic spelling, auto-correction, and text macros. |
EAN: 2147483647
Pages: 122