Shadow Copy Settings
|
| One reason ASP.NET applications are easier to deploy and manage than their Active Server Pages (ASP) counterparts is because of a feature called shadow copy. Using shadow copy enables ASP.NET Web applications to be updated dynamically without shutting down and restarting the Web server. Because the application can be updated without affecting the status of the Web server, ASP.NET can support sites that must be continuously available. In this section, I describe how to configure your application domains to take advantage of shadow copy. After describing how to implement shadow copy, I walk through a sample application so you can see it in action. Shadow copy works by making copies of the files it is requested to load. The copy is then loaded, leaving the original file untouched. By default, when an assembly file is loaded from disk, it is locked by the CLR and the Windows file system. The file cannot be replaced with a new version until the file is unloaded. The only way to unload a file in the CLR is to unload the application domain into which the file has been loaded. Unloading a domain just to unlock a file is rarely feasible in applications that must be highly available and that support a constant stream of users. As described, the shadow copy feature solves this problem by making a copy of the requested file and loading the copy, thereby leaving the original file unlocked. As a result, the original file can be replaced on the fly. It's important to note, however, that shadow copy applies only to assemblies privately deployed with the application. Assemblies stored in the global assembly cache (GAC) are never copied using shadow copy. Four properties on AppDomainSetup enable you to configure the shadow copy feature when creating a new domain: ShadowCopyFiles, CachePath, ApplicationName, and ShadowCopyDirectories. At a minimum, you must use ShadowCopyFiles. The other three properties are used to customize the way shadow copy works. To enable shadow copy for an application domain, complete the following steps:
These steps are described in detail in the sections that follow. Turning on Shadow CopyShadow copy is off by default. To turn it on, you must set the value of the ShadowCopyFiles property on AppDomainSetup to any non-null string. ShadowCopyFiles is a string value and not a boolean as you'd probably expect. As a result, setting the value to any string enables shadow copy, although most implementations set the value to "true" for clarity. You can turn shadow copy on after a domain has been created by calling the AppDomain.SetShadowCopyFiles() method. The following code snippet demonstrates how to enable shadow copy using the AppDomainSetup object. using System; AppDomainSetup setup = new AppDomainSetup(); setup.ShadowCopyFiles = "true"; AppDomain newAD = AppDomain.CreateDomain("Shadow Copy Domain",), null, setup);Specifying the Location for the Copied FilesAs described, shadow copy works by making a copy of each file it is asked to load. As a result, after you've enabled shadow copy, you need to decide where you'd like the CLR to store the copied files. By default, the CLR will copy the files to a location in the downloaded files cache. This is the same cache that is used to store files that have been downloaded from another machine while running an application. If you'd rather not use the downloaded files cache, you can specify a directory in which the CLR will place the copied files by using the CachePath and ApplicationName properties on AppDomainSetup. Note
Whether you choose to use the downloaded files cache or to specify a custom location depends on your scenario. The primary advantage of storing the copied files in the downloaded files cache is that you don't have to worry about cleanup. The cache has a size limit that, when reached, causes the files used least recently to be deleted. As a result, you're free to cause files to be copied into the cache and they will eventually get deleted automatically. If you specify a custom directory in which to store the files, you're responsible for deleting them when they're no longer used. Using the downloaded files cache does have its disadvantages, however. First, because the CLR cleans up the cache based on size quotas, you can't control the lifetime of the copied files. If your application generates a lot of copies, you might find that the CLR tries to remove a file from the cache before you are ready for it to be removed. Second, your application must have the correct security permissions to write to the directory in which the CLR will copy the files. Specifically, the user account that your application is running under must have Write access to its user profile directory. If it doesn't, the CLR will not be able to copy files into the downloaded files cache. If you decide that a custom location works better for your scenario, you must set both the CachePath and ApplicationName properties on AppDomainSetup when you create a new domain. The CLR concatenates the values of these two properties to obtain the directory into which the copied files will be placed. A common way to use these two properties is to keep the value of CachePath consistent throughout your application, but provide a new value for ApplicationName for each application domain you create. In this way, all shadow copy files you create are stored under the same root directory, but subdirectories identify from which domain the files come. This makes it easy to delete the files for a particular domain when the time comes. It's also worth noting that because you can set CachePath and ApplicationName separately for each domain, files for more than one domain can be copied by shadow copy to the same location. This is useful to reduce the number of copies made if you create multiple application domains that run the same code. For example, ASP.NET might create multiple application domains (maybe even in separate processes) to run the same Web application based on a number of scalability factors, including the number of users accessing the application. In this case, ASP.NET logically uses the name of the Web application as the value of ApplicationName so all running instances of that application share the same location for files copied by shadow copy, thereby reducing the number of copies that must be made. Always remember that if you use CachePath and ApplicationName to specify a custom shadow copy location, you're responsible for deleting those directories when they are no longer needed. In part because shadow copy target directories don't map one-to-one with application domains, the CLR has no idea when it's OK to clean up the copied files. So it's up to you to decide when no running domains rely on a particular shadow copy location so you can delete the directory. Specifying Which Files Are CopiedBy default, all assemblies the CLR loads out of a domain's ApplicationBase directory structure are shadow copied. This includes assemblies found by the CLR's default loading rules (that is, those in the ApplicationBase and those in subdirectories named by version and culture) as well as any assemblies located in subdirectories specified using the PrivateBinPath property of AppDomainSetup. If you don't want all privately located assemblies shadow copied, you can use the ShadowCopyDirectories property of AppDomainSetup to customize this behavior. ShadowCopyDirectories takes a semicolon-delimited set of subdirectories containing files that you do want to leave unlocked through shadow copy. If you specify a list of subdirectories using ShadowCopyDirectories, all files loaded out of directories not on the list, including the ApplicationBase itself, will not be copied before being loaded. For example, the following code creates an application domain such that only those files in the bin subdirectory of ApplicationBase are shadow copied: using System; AppDomainSetup setup = new AppDomainSetup(); setup.ShadowCopyFiles = "true"; setup.ShadowCopyDirectories = "bin"; AppDomain newAD = AppDomain.CreateDomain("Shadow Copy Domain", null, setup);The System.AppDomain class also has a method called SetShadowCopyPath that you can use to set the list of directories copied by shadow copy after the application domain has been created. The Shadow Copy SampleThe shadowcopy.exe sample included with this book is a Windows Forms application that shows how to use the ShadowCopyFiles, CachePath, and ApplicationName properties of AppDomainSetup to configure the shadow copy feature. Shadowcopy.exe creates secondary application domains configured for shadow copy based on the options you pick in the user interface. For example, shadowcopy.exe allows you to select either the default or a custom location in which the CLR will place the copied files. The shadowcopy.exe application is shown in Figure 6-2. Figure 6-2. The shadowcopy.exe sample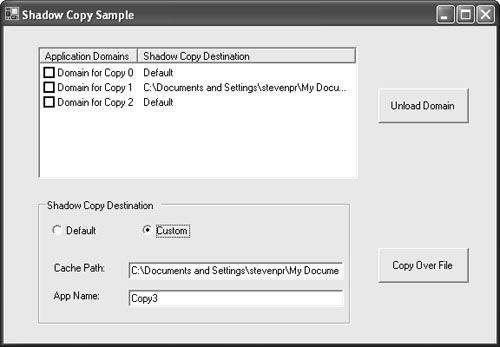 Shadowcopy.exe determines when to create a new application domain by using the System.IO.FileSystemWatcher class to monitor changes made to a particular assembly. Each time the file is changed, a new domain is created in which to load the new file. As domains are created, their friendly names and target copy locations are added to the table in the user interface. After you build the shadowcopy project in Microsoft Visual Studio 2005, you'll end up with the following directory structure: C:\<project directory>\bin\Debug\ ShadowCopy.exe CopySampleAppBase\ CopiedFile.dll Note that under the location into which shadowcopy.exe is built is a subdirectory called CopySampleAppBase. This directory serves as the ApplicationBase for all new domains created by shadowcopy.exe. In the CopySampleAppBase directory is a file called copiedfile.dll. This is the file containing the assembly that the FileSystemWatcher class is configured to monitor. Copiedfile.dll can be replaced in a few different ways. First, you can open a command window or use Windows Explorer simply to copy a new version of copiedfile.dll over the existing one. Remember, the existing file is left unlocked because the application domains in which it is loaded are configured for shadow copy. Alternatively, you can click the Copy Over File button in the user interface. This button is just a convenience that replaces copiedfile.dll for you so you don't have to do it manually. When a new domain is created based on a change to copiedfile.dll, shadowcopy.exe sets the target location for the copied files based on the values of the controls in the Shadow Copy Destination group box in the user interface. If the Default radio button is selected, the shadow-copied files will end up in the downloaded files cache. If you select the Custom radio button, you must supply values for the CachePath and ApplicationName properties by filling in the appropriate text boxes. When you run shadowcopy.exe in the Visual Studio debugger, you can use the Output window to verify that the files are being copied to the location you expect. You can tell by reading the debug output that shows the directory from which the CLR loaded copiedfile.dll. For example, if copiedfile.dll is loaded from the downloaded files cache, the Output window in the debugger will include a line such as the following: 'Domain for Copy 0': Loaded 'c:\documents and settings\stevenpr\ local settings\application data\assembly\dl2\78kokvbt.qmq\m96q78ev.m4o\ 7c177d03\20791c6f_4a37c301\copiedfile.dll', Symbols loaded. A few interesting characteristics about this path are worth pointing out. First, the path points to a location under your user profile. As described earlier, the downloaded files cache is stored per user, so saving the files in your profile directory is a natural choice. Second, the file that has been copied (copiedfile.dll) is "hidden" several levels down in your profile's directory structure. These extra directories are just part of the layout of the downloaded files cache. Most of this indirection is done to make the location of the files in the cache unpredictable so that files downloaded from other machines cannot easily be found on your machine. In contrast, if you specify a custom copy location, the CLR will load copiedfile.dll from that directory. Assuming that you've told the CLR to save the copied files to c:\program files\extapp\shadow\401k, the debugger's Output window will include the following line: 'Domain for Copy 0': Loaded 'c:\program files\extapp\shadow\401k\assembly\dl2\ 7c177d03\20791c6f_4a37c301\copiedfile.dll', Symbols loaded. As described, each new application domain created by shadowcopy.exe is displayed in the user interface. Next to the table containing the list of domains is a button you can use to unload a particular domain from the process. When a domain is unloaded, shadowcopy.exe looks to see if a custom copy location was specified by looking at the CachePath and ApplicationName properties on the AppDomainSetup object associated with the domain. If a custom location was specified, the directory containing the copied files is deleted after the application domain has been unloaded. To summarize, the shadowcopy.exe sample works as follows:
The code for shadowcopy.exe is shown in the following listing. I've deleted much of the Windows Forms boilerplate code that has more to do with laying out the user interface than with the actual functionality of the application. Listing 6-1. shadowcopy.exe Source Codeusing System; using System.Drawing; using System.Collections; using System.ComponentModel; using System.Windows.Forms; using System.Data; using System.IO; using System.Diagnostics; using System.Threading; using System.Reflection; using CopiedFile; namespace ShadowCopy { public class frmShadowCopy : System.Windows.Forms.Form { // Windows Forms locals omitted... private FileSystemWatcher m_watcher; private String m_copyAppBase; private int m_numCopies; public static frmShadowCopy ShadowCopyAppForm ; public static DateTime eventTime; // This event handler receives the "File Changed" event generated by // FileSystemWatcher when copiedfile.dll gets overwritten. Three events // get raised for every file copy so I use time to make sure I don't // process the "extra" events. private static void OnFileChanged(object source, FileSystemEventArgs e) { TimeSpan t = DateTime.Now - frmShadowCopy.eventTime; if (t > (new TimeSpan(TimeSpan.TicksPerSecond))) { frmShadowCopy.ShadowCopyAppForm.CreateDomainForNewFile(); } frmShadowCopy.eventTime = DateTime.Now; } public frmShadowCopy() { // Required for Windows Forms Designer support InitializeComponent(); // Initialize a private string to hold the name of the ApplicationBase // for all new domains I create. m_copyAppBase = AppDomain.CurrentDomain.BaseDirectory + "CopySampleAppBase"; // Initialize the event time so we handle only one FileChange event from // the FileSystemWatcher. frmShadowCopy.eventTime = DateTime.Now; // I keep track of the number of copies made just as a convenience for // assigning friendly names to application domains and to initialize the // the "Application Name" field in the UI with a reasonable // value for the next copy. m_numCopies = 0; } [STAThread] static void Main() { frmShadowCopy frm = new frmShadowCopy(); frmShadowCopy.ShadowCopyAppForm = frm; Application.Run(frm); } private void frmShadowCopy_Load(object sender, System.EventArgs e) { // Initialize the FileSystemWatcher so OnFileChanged is called each time // copiedfile.dll is overwritten. m_watcher = new FileSystemWatcher(); m_watcher.Path = m_copyAppBase; m_watcher.Filter = "CopiedFile.dll"; m_watcher.NotifyFilter = NotifyFilters.LastWrite; m_watcher.Changed += new FileSystemEventHandler(OnFileChanged); m_watcher.EnableRaisingEvents = true; // Initialize the CachePath and ApplicationName text boxes to point to a // directory under the AppBase. txtCachePath.Text = m_copyAppBase; txtAppName.Text = "Copy" + m_numCopies.ToString(); } private void btnCopy_Click(object sender, System.EventArgs e) { // Copy over copiedfile.dll. This causes the FileSystemWatcher // to raise an event that we'll catch to begin the process // of creating a new application domain. File.Copy(AppDomain.CurrentDomain.BaseDirectory + "CopiedFile.dll", m_copyAppBase + "\\CopiedFile.dll", true); } // This method gets called from the OnFileChanged event handler. It // contains all the logic to create a new application domain // configured for shadow copy. public void CreateDomainForNewFile() { String copyLocation; // Create a new instance of AppDomainSetup and turn shadow copy on by // setting ShadowCopyFiles. AppDomainSetup setup = new AppDomainSetup(); setup.ApplicationBase = m_copyAppBase; setup.ShadowCopyFiles = "true"; // Determine where the files should be copied to. Initialize CachePath // and ApplicationName appropriately. if (rbCustom.Checked) { if ((txtCachePath.TextLength == 0) || (txtAppName.TextLength == 0)) { MessageBox.Show("You must enter values for Cache Path and Application Name when specifying a custom copy location"); return; } setup.CachePath = txtCachePath.Text; setup.ApplicationName = txtAppName.Text; copyLocation = setup.CachePath + "\\" + setup.ApplicationName; } else { copyLocation = "Default"; } // Create a new domain. AppDomain newAD = AppDomain.CreateDomain("Domain for Copy " + m_numCopies.ToString(), null, setup); // Load the assembly into the domain. As a side effect of this // call to Load, copiedfile.dll will be copied to the "copied files // location" and will be loaded from there, thereby leaving the // original unlocked so it can be overwritten. Assembly asm = newAD.Load("CopiedFile", null); // Add the new domain to the list displayed in the UI. ListViewItem newLVI = new ListViewItem(new string[] { newAD.FriendlyName , copyLocation}, -1); newLVI.Tag = newAD; listView1.Items.Add(newLVI); m_numCopies++; // Update the AppName text box so we copy to a new location next time. txtAppName.Text ="Copy" + m_numCopies.ToString(); } private void btnUnload_Click(object sender, System.EventArgs e) { if (listView1.CheckedItems.Count == 0) { MessageBox.Show("Please select one or more Domains to unload by selecting the check boxes"); return; } foreach (ListViewItem i in listView1.CheckedItems) { AppDomain ad = (AppDomain)i.Tag; // If a custom shadow copy location was specified, we need to // delete the contents of the directory after the domain is // unloaded. Remember the name of the custom directory here // (if one was specified). String delDirectory = ad.SetupInformation.CachePath + "\\" + ad.SetupInformation.ApplicationName; // Unload the domain and remove the entry from the UI. AppDomain.Unload(ad); listView1.Items.Remove(i); // Delete the shadow copy directory if any. We check to see // if it's greater than one because above we added "\". if (delDirectory.Length > 1) { Directory.Delete(delDirectory, true); } } } } } |

|
EAN: N/A
Pages: 119