Hierarchical Storage Management
| WSS can be used to manage data in a hierarchical fashion by creating a top-level Web site with subsites to divide site content into distinct separately manageable sites. The top-level sites can contain several subsites; subsites in turn can also contain several subsites. The entire structure of top-level and subsites, called a Web site collection, can be managed centrally . This structure allows knowledge workers to have a main working site for the entire team, plus individual working sites or shared sites for side projects. Top-level Web sites and subsites allow different levels of control over the features and settings for sites. The hierarchy in WSS is similar to the hierarchy in Active Directory, which is structured with a top-level domain, with Organizational Units (OUs) comprising the sub divisions. Like AD, administration of subsites in WSS can be delegated to Team administrators. A subsite administrator would only have access to control settings and features of his particular subsite , without requiring control at the top-level site. Depending on the level of control that is desired for a particular Web site collection, you can individually create and control the entire hierarchy, or can allow users to create their own top level Web sites. Creating a Top-Level Web SiteWeb site creation can be performed from SharePoint Central Administration or from the command prompt. To create a top-level Web site from SharePoint Central Administration, perform the following steps:
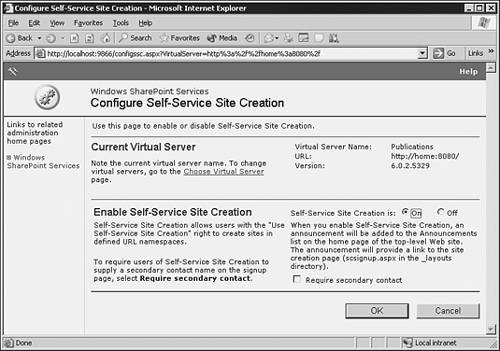
Creating the Full URL The name and URL path are combined with the server name to create the full URL to the site. For example, on http:// servername , if you create a top-level Web site at the /sites URL path, and use Site001 as the name, the full path to the new top-level Web site is http://servername/sites/site001 . As a best practice for enterprise environments, at step 5, identify a user as the secondary owner of the new top-level Web site. In the event that the primary owner of the site is unavailable for an extended period of time, the secondary owner receives all the notifications directly related to the site and can respond accordingly . Self-Service Site CreationDepending on the amount of customization and control you want to allow users, you can let them create either top-level Web sites or sub-sites. The Self-Service Site Creation feature gives users the ability to create top-level Web sites on their own. This feature enables the knowledge worker to manage data (they can do it themselves ) and reduces administrative overhead. The user does not need administrator permissions on the server or virtual server, only permissions on the Web site where Self-Service Site Creation is hosted. The user simply enters some basic information and the new top-level Web site is created with the user as the owner and administrator. Users can also create subsites of any site for which they have the Create Sites and Workspaces right. The Create Sites and Workspaces right is included in the Administrator site group by default, so any member of the Administrator site group for a site can create a subsite of that site. Self-Service Site Creation is enabled at the Configure Self-Service Site Creation page for the virtual server that will host the sites. When Self-Service Site Creation is enabled, an announcement is added to the home page of the top-level Web site on that virtual server, with a link to the sign-up page. Users can click the link to go to the sign-up page and create their sites. To enable Self-Service Site Creation for a virtual server, use the Configure Self-Service Site Creation page for that virtual server, and perform the following steps:
|
EAN: 2147483647
Pages: 325
