| Microsoft Cluster Service (MSCS) is included with the Enterprise and Datacenter versions of Windows Server 2003. MSCS provides system fault tolerance through a process called failover. When a system fails or is unable to respond to client requests, the clustered services are taken offline and moved from the failed server to another available server, where they are brought online and begin responding to existing and new client requests . Cluster Support Windows Server 2003, Enterprise Edition supports clusters up to four nodes. Datacenter Edition supports up to eight nodes. A cluster cannot be made up of nodes running both Windows Server 2003, Enterprise Edition, and Windows Server 2003, Datacenter Edition.
MSCS is best used to provide fault tolerance to such resources as file shares, print queues, e-mail or database services, and back-end applications. Applications and other services defined and monitored by the cluster, in addition to cluster hardware, are called cluster resources. Choosing the Best Cluster Configuration Model MSCS can be deployed in one of three different configuration models: single-quorum device cluster, single-node cluster, and majority node set cluster. Choosing the best model depends on the type of service that will be clustered and the type of fault tolerance intended. The Single-Quorum Device Cluster The most common model adopted for clustering is the Single-Quorum Device Cluster. The defining characteristic of this model is that each node in the cluster is connected to a shared storage device that houses a single instance of the quorum, or cluster configuration, data. This configuration is appropriately suited to providing fault tolerance to applications and services that access large amounts of mission-critical data. Examples would be file, messaging, and database servers. When the cluster encounters a problem on a cluster group containing a shared storage disk resource, the group is failed over to the next node with little or no noticeable disruption to the end user . The Single-Node Cluster A single-node cluster, as its name suggests, utilizes only a single node. In addition to running solely on local disks, a single-node cluster has the ability to use shared storage. A single-node cluster is primarily created as a first step to creating a single-quorum cluster. Because only a single server with local resources is needed, single-node clusters are also beneficial for application development for testing cluster applications. Because the single-node cluster only contains one node, there is no failover when the server goes down. The Majority Node Set Cluster The Majority Node Set (MNS) cluster can use shared storage devices but it does not depend on the shared resource for configuration data as does the single-quorum cluster. Each node in an MNS cluster maintains a local copy of the quorum device data. As such, MNS clusters can be deployed across a WAN in a geographically distributed environment to provide fault tolerance to two distinct sites in an IT organization. In situations where the cluster needs to failover across sites, the two sites need to be either bridged or a virtual private network (VPN) or Network Address Translation (NAT) must be installed and configured for proper recovery to occur. The latency between the cluster nodes for private communication must not exceed 500 milliseconds ; otherwise , the cluster will go into a failed state. For an MNS cluster to remain up and running, more than half of the nodes in the cluster must be operational. For example, in a four-node cluster, three nodes must be operational; a three-node cluster requires two operational nodes. Installing Microsoft Cluster Service The Cluster Service is installed by default in Enterprise and Datacenter editions of the operating system. Both the GUI-based Cluster Administrator and the command-line Cluster.exe utility can be used to create and manage clusters. In any event, Microsoft recommends that the Manage Your Server and the Server Configuration Wizard not be used to configure cluster nodes. BEST PRACTICE: Configuring Clusters -
Configure cluster disks as Basic. Partition and format all disks on the cluster storage device as NTFS before adding the first node to a cluster. Do not configure them as dynamic disks, and do not use spanned volumes (volume sets) or Remote Storage on the cluster disks. -
For clusters accessing a shared storage device, ensure that only the first node has access to the cluster disk. The cluster disks can become corrupted if more than one node has access to it. After the Cluster Service is running properly on one node, the other nodes can be installed and configured simultaneously . -
Use multiple network cards in cluster nodes. This allows one card to be dedicated to internal cluster (private network) communication, whereas the other can be used for client (public network) communication, or for mixed (both public and private) communication. -
Cluster certified applications. Be sure that both Microsoft and the software manufacturer certify that the applications are compatible with Cluster Services and will work on Windows Server 2003. -
Do not enable MSCS on a server with Network Load Balancing enabled. NLB can interfere with a server cluster's use of network adapters and Microsoft does not support this configuration. |
To install the first node in the cluster using the Cluster Administrator, perform the following steps: -
Shut down both the cluster nodes and shared storage devices. -
Connect cables as required between the cluster nodes and shared storage devices. -
Connect each node's NICs to a network switch or hub using appropriate network cables. -
If a shared storage device is being used, power on the shared storage device and wait for bootup to complete. -
Boot up the first node in the cluster. If a shared disk will be used, configure the adapter card's ID on each cluster node to a different number. For example, use ID 6 for node 1 and ID 7 for node 2. -
Log on with an account that has Local Administrator privileges. -
If server is not a member of a domain, add the server to the correct domain and reboot as necessary. -
Configure each network card in the node with the correct network IP address information. Network cards that will be used only for private communication should have only an IP address and subnet mask configured. Default Gateway, DNS, and WINS servers should not be configured. Also, uncheck the Register This Connection's Address in DNS box, as shown in Figure 22.8, on the DNS tab of the Advanced TCP/IP Settings page. For network cards that will support public or mixed networks, configure all TCP/IP settings as they would normally be configured. Figure 22.8. TCP/IP DNS configuration settings. 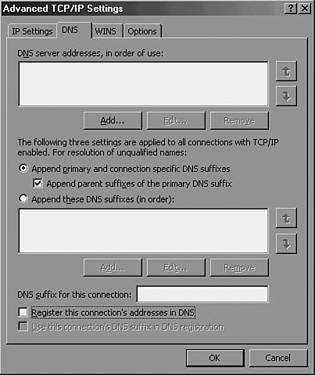 -
Log on to the server using an account that has Local Administrator privileges. -
Click Start, Administrative Tools, Cluster Administrator. -
When the Cluster Administrator opens, choose Create New Cluster Action, and click OK. -
Click Next on the New Server Cluster Wizard Welcome screen to continue. -
Choose the correct domain from the Domain pull-down menu. -
Type the cluster name in the Cluster Name text box and click Next to continue. Cluster Service Account The Cluster Service account needs to be only a regular domain user, but specifying this account as the Cluster Service gives this account Local Administrator privileges on the cluster node and also delegates a few user rights, including the ability to act as a part of the operating system and add computers to the domain. -
Type the name of the cluster node and click Next to continue. The wizard defaults to the local server, but clusters can be configured remotely. The cluster analyzer analyzes the node for functionality and cluster requirements. A detailed log containing any errors or warnings that can stop or limit the installation of the Cluster server is generated. -
Review the log and make changes as necessary; then click Re-analyze or click Next to continue. -
Enter the cluster IP address and click Next. -
Enter the Cluster Service account name and password and choose the correct domain. Click Next to continue. -
On the Proposed Cluster Configuration page, review the configuration and choose the correct quorum type by clicking the Quorum button, as shown in Figure 22.9. Figure 22.9. Choosing the cluster quorum configuration. 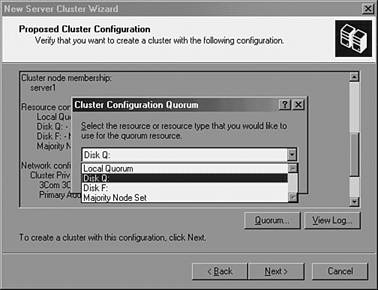 -
To create an MNS cluster, click the Quorum button on the Proposed Cluster Configuration page, choose Majority Node Set, and click OK. -
If a SAN is connected to the cluster node, the Cluster Administrator will automatically choose the smallest basic NTFS volume on the shared storage device. Make sure the correct disk has been chosen and click OK. -
To configure a single node cluster with no shared storage, choose the Local Quorum resource and click OK. -
Click Next to complete the cluster installation. -
After the cluster is created, click Next and then Finish to close the New Server Cluster Wizard and return to the Cluster Administrator. After the cluster is created on the first node, additional nodes can be added. To add a node to a cluster, perform the following steps: -
Log on to the desired cluster node using an account that has Local Administrator privileges. -
Click Start, Administrative Tools, Cluster Administrator. -
When the Cluster Administrator opens, choose Add Nodes to a Cluster and type the name of the cluster in the Cluster Name text box. Click OK to continue. -
When the Add Nodes Wizard appears, click Next to continue. -
Type in the server name of the next node and click Add. -
Repeat the preceding steps until all the additional nodes are in the Selected Computer text box. Click Next to continue. The cluster analyzer will then analyze the additional nodes for functionality and cluster requirements. -
Review the log and make changes as necessary; then click Re-analyze or click Next to continue. -
Enter the Cluster Service account password and click Next to continue. -
Review the configuration on the Proposed Cluster Configuration page and click Next to configure the cluster. After this is finished, click Next and then Finish to complete the additional node installation. -
Select File, Close to exit the Cluster Administrator. Configuring Failover and Failback Although failover is configured automatically on clusters of two or more nodes, failback needs to be configured manually. Failback is designed to allow a preferred server, assuming it is available, to always run a cluster group. Failover functionality can be configured manually as well to set a threshold number of failovers after which the cluster group is changed to a failed state. Creating a failover/failback process will automate server cluster functionality. To create a failover/failback process, perform the following steps: -
Click Start, Administrative Tools, Cluster Administrator. -
When the Cluster Administrator opens, choose Open Connection to Cluster and type the name of the cluster in the Cluster Name text box. Click OK to continue. If the local machine is part of the cluster, enter . (period) as the cluster name, and the program will connect to the cluster running on the local machine. -
Right-click the appropriate cluster group and select Properties. -
Select the Failover tab and set the maximum number of failovers allowed during a predefined period of time. When the number of failovers is exceeded within the Period interval, the Cluster Service will change the group to a failed state. -
Select the Failback tab, choose the Allow Failback radio button, and set time options for allowing failback. -
Click Next and then Finish to complete the failback configuration. -
Select File, Close to exit the Cluster Administrator.  |