Writing Macros
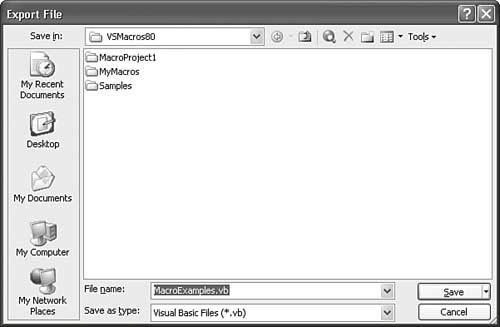
| As we have already established, macros are Visual Basic routines that interact with the automation object model to control various aspects of the IDE. Although macros can certainly be complex pieces of logic, their real value lies in the fact that it is relatively simple to write short, quick routines that take some of the manual pain away from the development process. Macros aren't used so much to add new functionality to the IDE as they are to batch together actions in the IDE and enable a single invocation point for those actions. If you think about the common tasks that you perform while developing a Visual Studio solution, the macro's value lies in its capability to help you automate those tasks where it makes sense. Chapter 10, "The Visual Studio Automation Object Model," included a macro sample that inserts a comment flowerbox at the start of a function or subroutine. The goal with that macro was to reduce the time required to fully comment routines. That particular macro wasn't complicated, nor did it solve a particularly egregious software engineering problem. Its intent, rather, was to take a small edge off a very manual component to the code-writing process: commenting your code. So the macro development process really starts with first identifying an opportunity for automation. The next step is to understand the IDE objects you will have to touch to effect a solution. The final step is tying those objects together with Visual Basic code in the form of a macro. We have already covered two of the three pieces of knowledge that enable you to become proficient with macros: We discussed the automation object model in-depth in the preceding chapter, and we summarized the scenarios where macros shine. The third and final piece is understanding the mechanics of writing a macro from start to finish and then executing the macro in the IDE. Recording a MacroThe simplest way to create a macro is to record one: Just turn on Visual Studio's macro recorder and perform a series of actions in the IDE. The macro recorder will turn your IDE interactions into macro code. To start recording a macro, select Tools, Macros, Record TemporaryMacro (or press Shift+Ctrl+R). This will immediately start the recorder; a small toolbar, as shown in Figure 11.1, will appear at this point to allow you to control the recording. Figure 11.1. The Macro Recorder toolbar.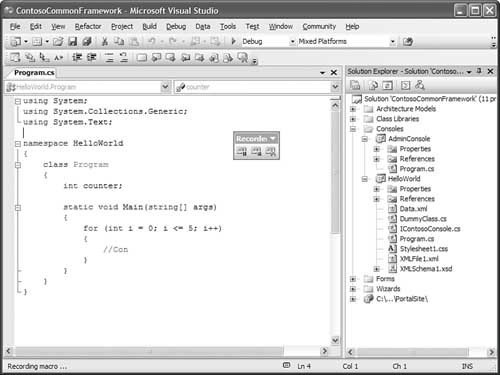 The three buttons on the toolbar allow you to pause and resume the recording, stop the recording, or cancel the recording. Pausing the recording will do just that: The recorder will stop recording your actions in the IDE, although it will still remain active. Clicking the button a second time will resume recording. If you stop the recording, this will cause the macro code to be generated and saved for later execution. Canceling the recording will stop the recorder but will not save the macro. With the recorder running, perform a series of actions in the IDE. Suppose that you wanted to have an easy way to expand all of the project nodes (and their subnodes) in the Solution Explorer window. To record this action, you would simply click on each of the project items in the Solution Explorer to expand them in their tree view. When you are finished going through every project and project item, click on the Stop Recording button. The macro will be stored at this point as a "temporary" macro. It will not be saved to disk at this stage, but you can immediately run it by selecting Run Temporary Macro from the Tools, Macros menu. Note Only one temporary macro is stored at a time in Visual Studio. This means that if you record another temporary macro, it simply replaces the current temporary macro. If you want to have the macro around for a while, you can store it on disk by selecting Tools, Macros, Save TemporaryMacro. If it is not already displayed, this selection will show the Macro Explorer. Using the Macro ExplorerWe briefly touched on the Macro Explorer in Chapter 5, "Browsers and Explorers"; it is a tool window that shows all of the macros available to you. Macros are organized in projects and modules. The temporary macro that you just created will show up under the MyMacros project, under a module called RecordingModule, and it will be called TemporaryMacro. If you have selected to save the temporary macro, Visual Studio will automatically place that TemporaryMacro node in edit mode with the name highlighted. This is your cue to type in a name for the macro. Pressing Enter will commit the name change and cause the macro to be saved to disk. If you don't change the name, it will not be saved. Using the Macro Explorer, you can rename or delete macros and run macros. To execute a macro, just double-click on its node in the Macro Explorer. This will immediately run the macro's code. While a macro is running, you will see an animated icon and a status message on Visual Studio's status bar (see Figure 11.2). Figure 11.2. A running macro. Tip Macros don't have any default or prebuilt notification mechanism that tells you when the macro has completed or if the macro has encountered an error. If you want to track a macro's progress, you will need to edit the macro accordingly so that it outputs messages to the output window, through message boxes, or other means. To see the Visual Basic code responsible for implementing the macro, you right-click on the macro in the Macro Explorer and select Edit. This will launch the Macro IDE. The IDE can also be launched by selecting Tools, Macros, Macros IDE (or pressing Ctrl+F11). Using the Macro IDEThe Macros IDE, shown in Figure 11.3, is essentially a specialized version of Visual Studio, trimmed down and streamlined to support the macro development process. Figure 11.3. The Macros IDE. Immediately, you can see that this is, in fact, the Visual Studio user interface that you are, by now, used to working with. Everything behaves the same: Tool windows can be docked, float, pinned, and so on. The code editor window that you use to edit your macro code works the same with IntelliSense, outlining, and all of the other productivity aids that you have come to expect. Although the Macros IDE behaves identically to the full-blown Visual Studio IDE, there are some differences. For instance, it has only a subset of the tool windows and document windows supported in the full IDE. Language support in the code editor is limited strictly to Visual Basic (because that is the only macro language supported), and you can't design forms or any similar artifact here. Working with Macro ProjectsThe Project Explorer tool window works on the same principles as the Solution Explorer; it presents a tree view of your work items. In the case of macros, the tree nodes are organized like this: project -> module. Individual macros are displayed in the code editor window (note that this is essentially the same as the Macro Explorer view, with the exception that the Macro Explorer's tree shows each individual macro by name). In our case, we recorded a temporary macro, and it shows up under the MyMacros project, in the module named RecordingModule. If you look back at Figure 11.3, you will see a portion of the code that was created when the macro was recorded; it is all contained in a Visual Basic sub called TemporaryMacro(). Tip When you use the macro recorder, the code that it emits is automatically stored in the MyMacros project. To change this, just right-click any other macro project in the Macro Explorer and select Set as Recording Project. Macro projects map one-to-one with a folder on disk; they are not the same as Visual Studio projects. By default, you have a MyMacros project (which maps to the folder MyMacros under My Documents\Visual Studio 2005\Projects\VSMacros80) and a Samples project (which maps to a Samples folder under the same directory tree). Within each macro project directory, there will be a .vsmacros file whose name is the same as the project directory's name. Thus, there is a Samples.vsmacros file in the Samples folder and a MyMacros.vsmacros file in the MyMacros folder. The .vsmacro file contains all of the code for the individual macros (and modules) within the project that it maps to. This is a huge difference from the way that Visual Studio works with project files: A macro does not map to its own file like a project item does in, say, a Visual Basic class library project. Sharing MacrosYou might be surprised to learn that the native storage format for macros is binary. Technically, the .vsmacros file is a COM-structured storage file; within this file resides all of the source code for every macro in the project. There is a way, however, to export a macro, module, or macro project to a Visual Basic (.vb) file. To do so, perform the following steps:
After a macro module has been exported, you can then physically share it with other developers by simply passing the file around. Importing a previously exported macro file is easy: From the Macros IDE, you select Project, Add Existing Item and select the macro .vb file to import; this will place it into the macro project currently selected in the Project Explorer. Adding a ProjectConfusingly, the capability to add a macro project is not present in the Macros IDE. It is, however, an option in the Visual Studio IDE: Select Tools, Macros, Load Macro Project. From there, you simply browse for the .vsmacros file that contains the project you want to load. If you want to create a new, empty macro project, you select Tools, Macros, New Macro Project. After a macro project has been added, it is immediately accessible in the Macros IDE. Writing a MacroIf you revisit the code that was generated for you when you recorded your Solution Explorer node expansions, you can see that the macro recorder has generated the code in Listing 11.1. Listing 11.1. Recorder-Generated Macro Code
In the case of the recorded macro, the generated code is straightforward, and it represents a verbatim replay of what you manually accomplished in the Solution Explorer window. The macro references each individual item in the explorer window by using the ActiveWindow.Object.GetItem method, passing in the object's name to get a UIHierarchyItem reference. From there, it is a simple property set to expand all of the items below (by setting UIHierarchyItems.Expand = True). The code is complete and works, but it's probably not exactly what you were looking for. For instance, it references the projects and project items that you expanded by their path and name. This means that the macro is certainly not generic (it would work only with the Contoso sample solution), and even then the code is fairly brittle: If you add or remove a project or project item, the macro won't know and will still try to set the prior item's Expanded property. To really make the macro useful, you will want to rework the code here. The advantage of using the recorder is that it produces, if nothing else, a valid starting point for macro development. In fact, it has highlighted the use of an object, UIHierarchyItem, which we did not discuss in the preceding chapter. An eye for general program structure would tell you that there should be a way to refactor these lines of code into a loop, recursively expanding nodes out in the tree until all have been expanded. Perhaps instead of just expanding or collapsing nodes, you could also try toggling this property. You edit macro code using the code editor just as you would to edit any other document with Visual Studio. To rework this macro, you can start by establishing a recursive helper routine that takes in a UIHierarchyItem object, toggles its Expanded property to true, and calls itself for each sub item found in the UIHierarchyItems collection: For Each subNode As UIHierarchyItem In node.UIHierarchyItems ExpandNodes(subNode) Next node.UIHierarchyItems.Expanded = True Note Unlike the editors in the main Visual Studio IDE, the text editor in the Macros IDE will automatically save the file that you are editing when you close it. This will be done without any prompting whatsoever. Unless you undo changes that you have made while editing, they will be committed after you close the editor, regardless of whether you have explicitly saved them. Then, to kick things off, you need a parent, controlling routine that instantiates a window object (representing the Solution Explorer) and grabs the root-level UIHierarchy object from the window. From there, you loop the first level of nodes in the tree and call down into the recursive routine: Dim tree As UIHierarchy Dim explorer As Window2 explorer = DTE.Windows.Item(Constants.vsWindowKindSolutionExplorer) tree = explorer.Object For Each node As UIHierarchyItem In tree.UIHierarchyItems ExpandNodes(node) Next To go one step further, if you modify the recursive routine to take in a Boolean value, you now have a general-purpose routine that can either expand or collapse a series of nodes. Putting it all together, you end up with two macros: One will expand all nodes in the Solution Explorer tree, and one will collapse all nodes in the Solution Explorer tree. In Listing 11.2, you see these two macros as public subroutines called ExpandAll and CollapseAll. The private routine ExpandCollapseNodes is called by both of the macros. Listing 11.2. Macro: Expand/Collapse All Solution Explorer Nodes
Compared with the code that the macro recorder emitted for you, there isn't a whole lot of similarity; but again, the recorded code was useful from an education perspective, alerting you to the approach and concept of using the UIHierarchy/UIHierarchyItem/UIHierarchyItems objects to handle the node expansion. DebuggingThe debug experience with macros is similar to that of debugging other Visual Studio projects. The runtime debugger in the Macros IDE supports all of the familiar concepts of breakpoints and the Step Into and Step Over commands. If you were unsure of your recursive code, you might choose to place a breakpoint in the recursive routine and monitor the progress of the macro. The Macros IDE also supports the error list window, which will flag any syntax errors for you. See Figure 11.5 for a glimpse of a breakpoint and the error list window in the Macros IDE. Figure 11.5. Debugging a macro.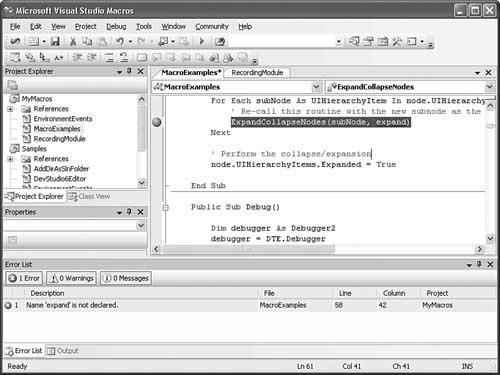 Note If debugging is taking place in the Macros IDE, the main IDE will be inaccessible. You won't be able to perform tasks in the main IDE. Handling EventsWe covered the individual event classes in Chapter 10; every event exposed in the IDE is available via these automation classes. To handle an event in a macro, you need to have two things: an event definition and an event handler. Every macro project has, by default, an EnvironmentEvents module. This module is automatically created for you every time you create a new macro project, and it implements event definitions for many of the automation events. If you need to handle any of the following event categories, the event definition is already taken care of for you:
Listing 11.3 shows the EnvironmentEvents source code (generated by Visual Studio) that is responsible for implementing these event definitions. Listing 11.3. EnvironmentEvents Module
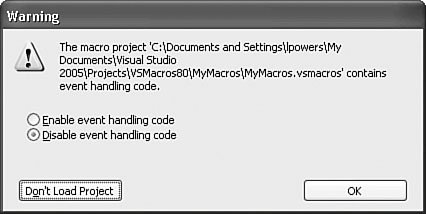
Writing the Event HandlerIn addition to defining the various event objects for you, the IDE can also be leveraged to insert the actual event handler skeleton code for you. First, open the EnvironmentEvents module in the code editor. Then use the type drop-down (the leftmost drop-down at the top of the code editor) to select the event class that you want. Figure 11.6 shows the process of selecting the SolutionEvents type. Figure 11.6. Selecting a macro event type.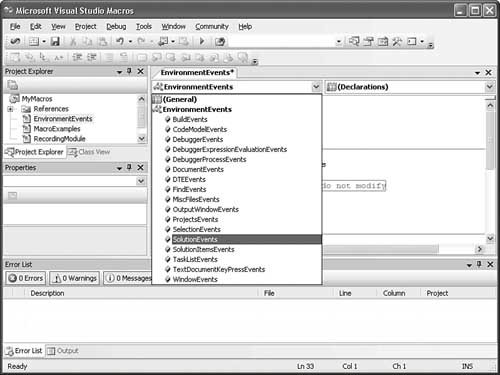 When you have the type selected, the declarations drop-down (the drop-down at the far-right, top of the code editor) will hold a list of the events defined for that event object. If you were interested in receiving notification, for example, every time a solution was opened, you would select the Opened event. Immediately after you select this event, the event handler code will be injected into the code editor. In this case, the following code results from the selection: Private Sub SolutionEvents_Opened() Handles SolutionEvents.Opened End Sub You can leave this code as is in the EnvironmentEvents module (a reasonable practice), or you can cut and paste it into any other module in the project. With the event handler in place, you just need to worry about writing the code that deals with the event. You should know that every time you load a macro project with events (in other words, every time you add a macro project with events to your list of macros), a security dialog box will be displayed (shown in Figure 11.7). Figure 11.7. Loading a macro project with events. This dialog box merely alerts you to the fact that the macro contains event interception code and enables you to disable the event objects in the macro; the latter is probably a good idea when you're opening a macro from an untrusted source. You also have the option to simply abort the project load process by clicking on the Don't Load Project button to the bottom left of the security dialog box. Adding a New Event DeclarationIf you need access to an event that isn't predeclared for you in the EnvironmentEvents module, it is possible to add the event declaration manually. As a demonstration, let's add a new event handler for the WindowHiding event exposed by the WindowVisibilityEvents class. This event, which is not included by default, will tell you whenever a tool window in the IDE is hidden. First, you need to add the event declaration somewhere within the macro project. The obvious location would be the EvironmentEvents module; this keeps all of the event code in one spot. Just remember to place any manual event declarations outside the region marked as "Automatically generated code, do not modify". Here is the event declaration for the WindowVisibilityEvents class: <System.ContextStaticAttribute()> _ Public WithEvents WindowVisibilityEvents As EnvDTE80.WindowVisibilityEvents Now for the event handler: Just as you did in the previous example, select the type WindowVisibilityEvents in the type drop-down and the event WindowHiding in the members drop-down. This will create a skeleton event handler routine (to which you have the display of a message box): Private Sub WindowVisibilityEvents_WindowHiding(ByVal Window As _ EnvDTE.Window) Handles WindowVisibilityEvents.WindowHiding MessageBox.Show("WindowHiding fired for " & Window.Caption) End SubInitializing the Event ObjectAlthough you have declared the event object and have written the event handler, you still aren't finished: You also need to initialize the event object. The macro runtime itself has two events that you need to hook to ensure that the event object is initialized correctly every time the macro runtime starts or resets itself. Without this step, the event object is syntactically complete but won't receive any events from the main IDE. There are two events that you need to concern yourself with, both exposed by the DTEEvents class. The first is DTEEvents.OnMacrosRuntimeReset; this event is fired whenever the runtime is reset for any reason. Because a runtime-reset causes all global state to be cleared, including event connections, this would essentially prevent any event interception from happening if you didn't initialize the event object as a step in the reset process. Handling this event is the same as handling any other: You use the type and member drop-downs to generate the skeleton code for you, and then you insert the code that you need to initialize the event object: Private Sub DTEEvents_OnMacrosRuntimeReset() Handles DTEEvents.OnMacrosRuntimeReset WindowVisibilityEvents = CType(DTE.Events, Events2).WindowVisibilityEvents End Sub The second event that you need to hook is the DTEEvents.OnStartupComplete event. This event is fired when the runtime and macro environment has completed its startup process: Private Sub DTEEvents_OnStartupComplete() Handles DTEEvents.OnStartupComplete WindowVisibilityEvents = CType(DTE.Events, Events2).WindowVisibilityEvents End Sub By initializing the event object every time the runtime starts or resets itself, you ensure that you maintain a viable, active link to the eventing engine in the IDE. To test the event handler, you simply switch to the main IDE and close or hide any of the tool windows by clicking on their Close button. If you have done everything correctly, you will see the message box shown in Figure 11.8. Figure 11.8. Catching the WindowHiding event. Note If you have added a new event declaration to your macro project and are unable to get its event handler to fire, a few things may have gone wrong. First, make sure that you have correctly added the event class initialization code to both the OnStartupComplete and OnMacrosRuntimeReset events. Second, you may need to unload and reload your macro project to establish the "wiring" for your event. To unload the macro project, shut down the Macros IDE (if it is open), and from the Main IDE's Macro Explorer window, right-click on the macro project that you have added the event(s) to and select Unload Macro Project. Then add the macro project back in by right-clicking the root Macros node in the Macro Explorer and selecting Load Project. Make sure you have selected Enable Event Handling Code in the security dialog box that will trigger when you try to load the project. Invoking MacrosFrom the discussion of the Macro Explorer, you know that one way to run a macro is to simply double-click on the specific macro in the explorer window. One of the more common things you will want to do with certain macros is provide an alternative (and potentially easier) way to trigger a macro from the main IDE through toolbar buttons, menu items, and keyboard shortcuts. Triggering Macros from Toolbars and MenusIf you wanted to provide quick access to the node expansion and node collapse macros, you could assign them as toolbar buttons or menu items in the main IDE. You do this through the Customize dialog box as follows:
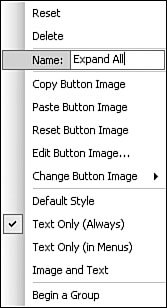
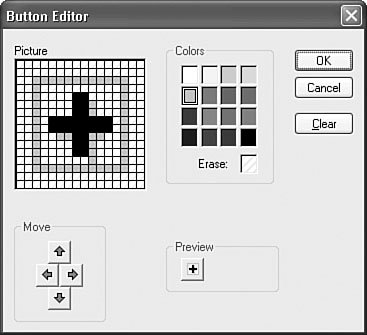
Figure 11.9. Drag the macro from the list to the toolbar or menu.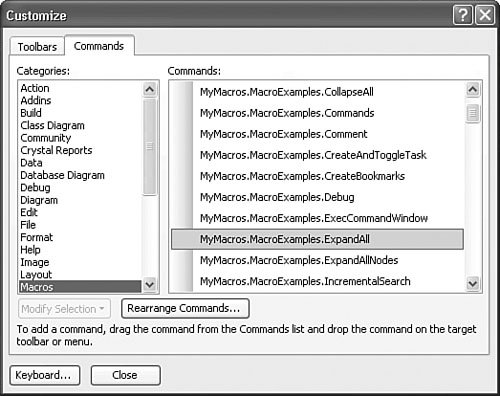 After you add the button or menu item, the item will remain highlighted/selected; if you now click on the Modify Selection button in the Customize dialog box, a drop-down menu (displayed in Figure 11.10) will appear that allows you to change the appearance of the button or menu item. Figure 11.10. The Modify Selection drop-down. Using this interactive drop-down, you can change the text that appears for the item, assign a picture to the item, or even "paint" your own picture using the Button Editor (see Figure 11.11). You launch this dialog box by selecting the Edit Button Image option from this drop-down. Figure 11.11. Assigning a button image. Assigning Keyboard Shortcuts to MacrosTo launch a macro via a keyboard shortcut, you need to assign the key sequence to the macro using the Options dialog box as follows:
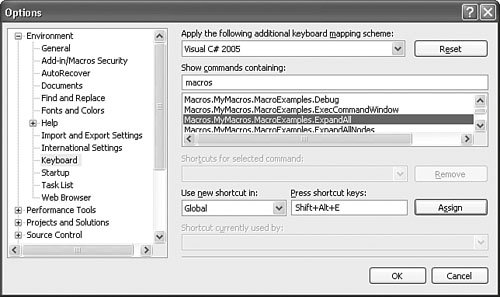
Note Visual Studio already has many different key combinations assigned to its various actions and commands. If you happen to press a key combination that is already in use, the command that currently uses that key combination will be displayed in the drop-down at the bottom of the Options dialog box (see Figure 11.12). At this point, you can either choose a different set of keys to use, or you can overwrite the key assignments. Overwriting is probably not a good idea if you are replacing one of the more common commands such as cut, open file, and so on. Running Macros from the Command WindowAs you have seen from the steps to trigger a macro via toolbar/menu and keyboard shortcut, each macro is exposed in the IDE via a command (see the section "Command Objects" in Chapter 10). The command window is purpose-built to execute commands, so macros can be run from the command window prompt as well. With your cursor at the prompt in the command window, just type the letter m to trigger the window's IntelliSense and thus display a list of all macros. Scroll down and select the macro you want to run; then press Enter. The macro will execute. Macros with ParametersAlthough, in general, it makes sense for macros to execute without any required user interaction, it may sometimes be beneficial to write macros that accept parameters as part of their function/sub definition. Consider the ResizeIDE macro in Listing 11.4. It takes in width and height values as parameters and then resizes the main IDE window according to those values. Listing 11.4. Resizing the IDE
If you were to call this macro from the command window, you would have to pass these parameters in like this: Macros.MyMacros.MacroExamples.ResizeIDE 800 600 Note If you write a macro that accepts parameters, those parameters must be declared as optional, and you must provide default values for the parameters. Although you won't receive any errors, if you write a macro with nonoptional parameters, the macro won't be registered. You won't see it in the Macro Explorer, and you won't be able to run the macro. |

EAN: 2147483647
Pages: 195