Solution Explorer


The Solution Explorer is the primary tool for viewing and manipulating solutions and projects. It provides a simple but powerful hierarchical view of all solution and project items, and it allows you to interact with each item directly via context menus and its toolbar.

Using Solution Explorer, you can launch an editor for any given file, add new items to a project or solution, and reorganize the structure of a project or solution. In addition, the Solution Explorer provides instant, at-a-glance information as to the currently selected project; the startup project for the solution; and the physical hierarchy of the solution, its projects, and their child items.

The Solution Explorer is simply another window hosted by Visual Studio. It can be docked, pinned, and placed anywhere within the Visual Studio environment. It is composed of a title bar, a toolbar, and a scrollable tree-view region (see Figure 5.1).

Figure 5.1. The Solution Explorer.


The tree view provides a graphics- and text-organizational view of the currently loaded solution. Figure 5.1 shows all of the various items and projects represented for an eight-project solution loaded in the IDE.

Visual Cues and Icons

Each item in the Solution Explorer is represented by a name and by an icon. Table 5.1 summarizes which icon is used to represent the supported item types.

Table 5.1. Solution Explorer Item Types and Icons

Icon

Item

Notes

About Box

Visual Basic only

Application Diagram

ASP .NET Web Site

This represents the root node for an ASP .NET website project

Bitmap File

Class Diagram

Component Class

Custom Control

DataSet

Dialog

Visual Basic only

Folder

Solution folders or project folders

Global Application Class

HTML Page

Icon File

Interface (Visual Basic)

Interface (Visual C#)

Logical Datacenter Diagram

Master Page

Web projects only

Module

Visual Basic only

My Project File

Visual Basic equivalent to the C# Properties Folder

Partial Class

Project Reference

Visual C# only

Properties Folder

Visual C# equivalent to the Visual Basic My Project File folder

References Folder

Visual C# only

Resources Folder

Settings Folder

Site Map

Web projects only

Skin File

Web projects only

Solution

The topmost root node visible within Solution Explorer

Style Sheet

System Diagram

Text File

User Control

Any class that inherits directly from the UserControl class

User Control (Web)

Class that inherits from System.Web.UI.UserControl

VBScript/JScript File

Visual Basic Class File

Visual Basic Project

The root node for a Visual Basic project

Visual C# Project

The root node for a Visual C# project

Visual C# Class File

Web Configuration File

Web Form (.aspx)

Web Service

Windows Form

A file containing a class that implements the Form class

Windows Form (Inherited)

Windows Form (MDI Parent)

Visual Basic only

Web Project

XML File

XML Schema File

XSLT File


Note

The icons shown in Table 5.1 are a representative list that correspond to specific project and solution items within the IDE. Other files added to a project or solution will be represented by the icon associated with their file type. For example, a Word document will be represented by the standard Word document icon in the Solution Explorer.


Icon Overlays

To provide a visual cue about the status of a particular item, the Solution Explorer will overlay an additional graphical element over the item icon. These overlays are called signal icons. For example, when source code control is enabled, the Solution Explorer will visually indicate whether an item is checked out or not via a graphical overlay. Table 5.2 describes the signal icons used in the Solution Explorer.

Table 5.2. Solution Explorer Signal Icons

Icon

Description

Item not found. The item was specified as part of the solution/project but can't be located.

Checked in. The item is under source code control and is currently checked in.

Checked out (exclusive). The item is under source code control and is currently checked out exclusively.

Checked out (shared). The item is under source code control and is currently checked out in a shared mode.


The Solution Explorer supports different management actions depending on whether you are currently interacting with a solution or a project. In fact, supported commands may vary by project type as well. As an example, the Copy Web Project command button is available for web projects but not class library projects, whereas the Properties command button is available for all item types.

Table 5.3 shows the various toolbar command buttons supported by the Solution Explorer, along with their specific context.

Table 5.3. Solution Explorer Toolbar Buttons

Icon

Context

Description

All

Properties button. Launches the Solution Properties dialog box.

Solution, solution item, solution folder

Add New Solution Folder button. Creates a new solution folder in the currently loaded solution.

Project, project item

Refresh. Refreshes the Solution Explorer's tree view of the project.

Web project, web project item

Nest Related Files. Visual Studio can group certain project item constructs together. This is most commonly done with items such as code-behind files. This is a toggle button: Clicking it on will cause related files to be nested underneath the "parent" file. Clicking it off will cause all files to show up at the same level under the project.

Project, project item

View Class Diagram. Creates a class diagram project item and launches the viewer for that item. All of the types contained within the project will be automatically added to the diagram.

Web project, web project item

Copy Web Site. Copies the website to a specified location (available only for web projects).

Web project, web project item

ASP .NET Configuration. Launches a browser to the ASP .NET Web Site Administration Tool. This feature is useful for setting up global security parameters and application-specific options.

Solution, solution item, project, project item (only if items in the solution are currently hidden)

Unhide All. Unhides any hidden items in the solution.

Project code files

View Code. Opens the current item in the code editor.

Project code files with a UI (Windows form or web form)

View Designer. Opens the designer for the currently selected item.


Managing Solutions

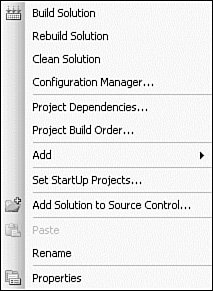
Clicking on the solution in Solution Explorer will immediately expose all of the valid management commands for that solution. You access these commands either through the Solution Explorer toolbar or the context menu for the solution (accessed by right-clicking on the solution). Through the toolbar and the solution's context menu, the Solution Explorer allows you to

  • View and set the properties for a solution

  • Build/rebuild a solution

  • Directly launch the configuration manager for a solution

  • Set project dependencies and build order

  • Add any of the various Visual Studiosupported solution and project items

  • Add the solution to the source control

You can initiate some of these actions by using the Solution Explorer toolbar; you can access the balance in the context menu for a solution, as shown in Figure 5.2.

Figure 5.2. The solution context menu.


Managing Projects

Just as with solutions, Solution Explorer provides a variety of ways to manage projects within a solution. They include

  • Opening a project item

  • Building or rebuilding a project

  • Adding items to a project

  • Adding a reference to a project

  • Cutting, pasting, renaming, or deleting a project within the solution tree

  • Unloading a project

Note

The current startup project for a solution is indicated with a bold font (as is the Contoso.Fx.Integration project in Figure 5.1). If multiple projects are selected as startup projects, the solution name will instead be bolded.


The default action when you double-click an item is to open it within its default editor or designer. Multiple select and drag-and-drop operations are also supported. For instance, multiselecting several code files will allow you to open them simultaneously in their editor windows.

You can move and copy items within a solution, project, or between projects through the standard drag and drop using the left mouse button. You can also drag certain items from within a project and drop them onto a suitable designer surface. This is an easy way, for instance, to add classes to a class diagram: Simply highlight the code files that contain the types you want to add and drag them onto the class diagram designer window.


Microsoft Visual Studio 2005 Unleashed
ISBN: 0672328194
EAN: 2147483647
Year: 2006
Pages: 195

flylib.com © 2008-2017.
If you may any questions please contact us: flylib@qtcs.net