Managing the Many Windows of the IDE
| To round out our whirlwind tour, we thought it important to provide you guidance on customizing and managing the plethora of windows available within the IDE (lest they leave you with a postage-stamp size window in which to write your code). To manage these windows, you really need to know only two skills: pinning and docking. PinningPinning refers to the process of making a window stick in the open position. It is called pinning in reference to the visual cue you use to perform the act: a push-pin (refer to the Toolbox title bar inside Figure 2.19). Pinning is imperative because you sometimes want full-screen real estate for writing code or designing a form. In this case you should un-pin (hide) the various extraneous windows in your IDE. Note that when a window is un-pinned, a vertical tab represents the window (see the Solution Explorer tab inside Figure 2.19). Moving the mouse near this tab will result in the window unfolding for your use. After you use it, however, it will go back to its hiding spot. Figure 2.19. Pinned and un-pinned windows in the IDE.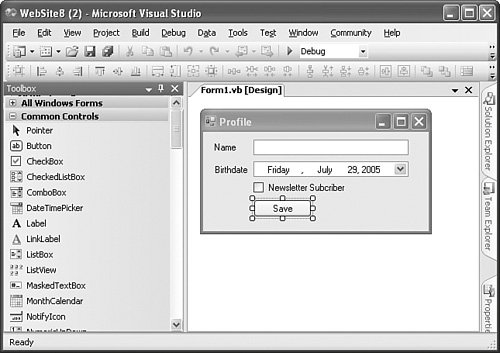 Alternatively, you might be working to drop controls on that form. In doing so, you might want to pin (stick open) the Toolbox window (see Figure 2.19). This keeps open just the window you are working with and closes everything else. DockingDocking is the process of connecting windows to various sticky spots within the IDE. Typically, this means docking to the left, top, right, or bottom of the IDE. For example, the Toolbox is, by default, docked to the left side of the IDE. You may prefer to put it at the bottom of the screen, docked below the active designer (see Figure 2.20). Figure 2.20. Some docking options in the IDE. You can also dock windows to one another. For example, you may want to dock the Properties window below the Solution Explorer. Or you may want the Properties window to be a tab within the same window to which the Solution Explorer is docked (see Figure 2.20). To help with docking, Visual Studio 2005 now provides a nice set of visual cues. First, you start with a pinned window (you cannot dock unpinned windows). You click and hold the title bar with the mouse. You then drag the window to where you want to dock it. Visual Studio will display some docking icons. Four icons are at the edge of the IDE, one each at the left, top, right, and bottom. These icons are used for docking the window at the given edge of the IDE. Using these icons will result in the window's being docked across the full length (or width) of the IDE. Figure 2.21 shows the window housing the Solution Explorer and related tabs being docked to the full right of the IDE. Figure 2.21. A window being docked.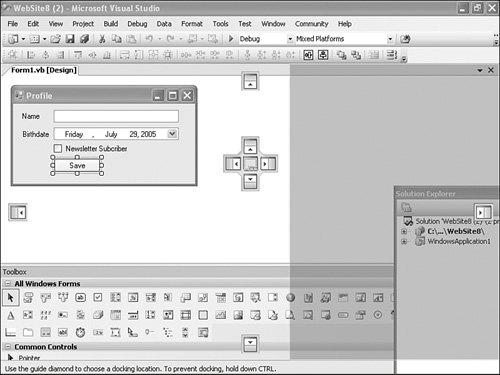 There is also an icon in the middle of the IDE. This icon is used for docking the selected window relative to the other windows in the IDE. For example, you might want to dock the Solution Explorer to the right side of the IDE but above the Toolbox. You would do so with the rightmost icon inside this center group. Finally, the centermost icon in the center group is used for docking a window to another window as a tabbed item (as in the Properties window in Figure 2.20). Of course, you can also undock items. This is simply the process of floating windows off by themselves (outside, or on top of, the IDE). We have not seen much of this, but to do so, you simply grab (click with the mouse) a pinned window by the title bar and move it off to the side of the IDE or just don't choose a docking icon. |
EAN: 2147483647
Pages: 195