Image Maps
| < Day Day Up > |
An image map is an image that contains numerous hot spots that might result in a different URL being loaded, depending on where the user clicks. The two basic types of image maps are server-side image maps and client-side image maps . In the server-side image map, the following process is followed:
-
The user clicks somewhere within the image.
-
The browser sends a request to the Web server, asking for the URL of the document associated with the area clicked. The coordinates clicked are sent to the Web server, which decodes the information.
-
After consulting a file that shows which coordinates map to which URL, the server sends back the requested information.
-
After receiving the response, the browser requests the new URL.
Server-side image maps have some major downsides and, fortunately, they are rarely used today. Regardless, they will be covered in this edition to further convince users to not consider this older format. The first downside of server-side image maps is that users really don't have a sense, URL-wise, of where a particular click will take them. All that users see as they run a mouse over the image is a set of coordinates showing the current x , y value. The second ”and more significant ”problem is that the server must be consulted to go to the next page. This can be a major bottleneck that slows down the process of moving between pages. The slow speed of decoding, combined with the possibility that a user will click an unmapped hot spot and have nothing happen, makes client-side image maps preferable to server-side maps.
With client-side image maps, all the map information indicating which regions map to which URLs can be specified in the same HTML file that contains the image. Including the map data with the image and letting the browser decode it has several advantages, including the following:
-
A server doesn't need to be visited to determine the destination, so links are resolved faster.
-
Destination URLs can be shown as the user's pointer moves over the image.
-
Image maps can be created and tested locally without requiring a server or system administration support.
Although it's clear that client-side image maps are far superior to their server-side cousins, very old browsers do not support this feature. This doesn't have to be a problem, however, because you can include simultaneous support for both types of image maps.
Server-Side Image Maps
To specify a server-side image map, you use an <a> tag to enclose a specially marked <img> tag. The a element's href attribute should be set to the URL of a program or map file to decode the image map. The <img> tag then must contain the attribute ismap so that the browser can decode the image appropriately.
| Note | Depending on the Web server being used, support for server-side image maps may or may not be built in. If image maps are supported directly, the particular <a> tag simply must directly point to the URL of the map file and it will be decoded. This is shown in the next example. On some extremely old servers, however, the anchor might have to point to an image map program in that server's cgi-bin directory. |
As with all linked images, turning off the image borders may be desirable; you can do this by setting the <img> tag's border attribute equal to 0. A simple example showing the syntax of a server-side image map is shown here; a rendering appears in Figure 4-5:
<!DOCTYPE HTML PUBLIC "-//W3C//DTD HTML 4.01 Transitional//EN" "http://www.w3.org/TR/html4/loose.dtd"> <html> <head> <title> Server-side Image Map Example </title> <meta http-equiv="content-type" content="text/html; charset=ISO-8859-1"> </head> <body> <h1 align="center"> Server-side Imagemap Test </h1> <div align="center"> <a href="http://www.htmlref.com/examples/chapter4/shapes.map"> <img src="http//www.htmlref.com/examples/chapter4/shapes.gif" ismap alt="shapes map" border="0" width="400" height="200"></a> </div> </body> </html>
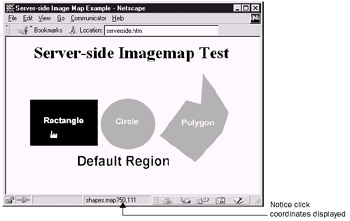
Figure 4-5: Server-side image feedback
As previously mentioned, server-side image maps do not provide adequate feedback to the user and could incur performance penalties. Figure 4-5 shows that the browser provides image coordinate information rather than a destination URL with a server-side image map.
HTML authors should favor client-side image maps and use server-side image maps only as needed to support very old browsers.
Client-Side Image Maps
The key to using a client-side image map is to add the usemap attribute to an <img> tag and have it reference a <map> tag that defines the image map's active areas. An example of the img element syntax under XHTML is <img src="controlbar.gif" usemap="#controlmap" /> . Note that unlike server-side image maps, the image will be indicated as a link regardless of the lack of an <a> tag surrounding the <img> . The border attribute should be set to zero or style sheets used to control border appearance if necessary.
The map element generally occurs within the same document, although support for it might exist outside of the current document. This is similar, in a sense, to the way server-side maps work. The map element can occur anywhere within the body of an HTML document, although it is often found at the end.
The map element has two important attributes ( name and id) , which are used to specify the identifier associated with the map. The map name is then referenced within an <img> tag, using the usemap attribute and the associated fragment identifier. The < map> tag must have a closing </map> tag. Within the <map> and </map> tags are defined shapes that are mapped onto an image, defining the hot spots for the image map. Shapes are defined by the area element, which is found only within the map element. The area element has a variety of attributes, some of which are summarized in Table 4-7.
| Attribute Name | Possible Values | Description |
|---|---|---|
| shape | rect , circle , and poly | Sets the type of shape. |
| coords | x , y coordinate pairs | Sets the points that define the shape. |
| href | A URL | Defines the destination of the link. |
| id | Text | Identifies the anchor for target by another anchor, style sheet access, and scripting exposure. |
| target | A frame name | Defines the frame or window destination of the link. |
| nohref | N/A under HTML 4.Under XHTML value of nohref | Indicates that the region has no destination. |
| alt | Text | Defines the alternative text for the shape. |
| title | Text | Sets the hint text for a shape. |
| tabindex | A number | Sets numeric order in tabbing sequence. |
| onclick | A script | Relates the click event of a link with a script. |
| onmouseover | A script | Relates mouseover event with a script. |
| onmouseout | A script | Relates mouseout event with a script. |
The most important attributes of an <area> tag are href , shape , and coords . The href attribute defines the destination URL for the browser if that particular region of the image is selected. The shape and coords attributes define the particular region in question. When the shape attribute is set to rect , it defines a rectangular region, and the coordinates should be set to provide the top-left and bottom-right coordinates of the image. If the shape attribute is set to circle , the coords attribute must provide the x , y coordinates of the center of the circle, followed by its radius. If the shape is set to poly , it indicates that the area defined is an irregular polygon; each coordinate makes up a point in the polygon, with lines between each successive point, and the last point connected to the first. Areas of the image that are not assigned values might be assigned a value of shape="default".
| Tip | If the shape attribute is not set or omitted, rect is assumed. |
Table 4-8 summarizes the possibilities for the area element, and provides examples. The various x and y coordinates are measured in pixels from the top-left corner (0,0) of the mapped image. Percentage values of the image's height and width also might be used. For example, < area shape="rect" coords="0,0,50%,50%" /> defines a rectangular region from the upper-left corner to a point halfway up and down and halfway across. Although percentage-style notation can allow the image to resize, it generally isn't useful for any but the most basic image maps. The biggest difficulty with image maps is determining the coordinates for the individual shapes within the image. Rather than measuring these values by hand, HTML authors are encouraged to use an image-mapping tool. Many HTML editing systems such as Macromedia's Homesite and Dreamweaver (www.macromedia.com) include image-mapping facilities, as shown in Figure 4-6.
| Shape | Coordinate Format | Example |
|---|---|---|
| rect | left- x , top- y , right- x , bottom- y | <area shape="rect" |
| circle | center- x , center- y , radius | <area shape="circle" |
| poly | x 1, y 1, x 2, y 2, x 3, y 3, | <area shape="poly" |
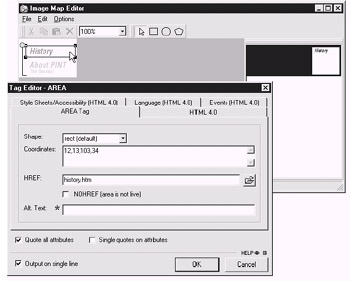
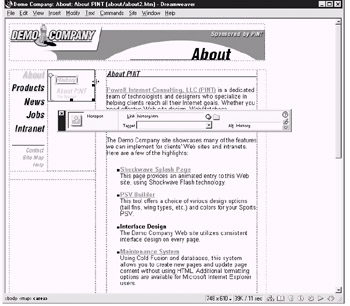
Figure 4-6: Image mapping made easy in an editor
| Tip | Using any height and width values other than the actual sizes for a mapped image isn't recommended. Once a map has been mapped, resizing will ruin it. |
The following is an example of a client-side image map, the results of which are rendered in Figure 4-7:
<!DOCTYPE html PUBLIC "-//W3C//DTD XHTML 1.0 Transitional//EN" "http://www.w3.org/TR/xhtml1/DTD/xhtml1-transitional.dtd"> <html xmlns="http://www.w3.org/1999/xhtml" lang="en"> <head> <title> Client-side Image Map Example </title> <meta http-equiv="content-type" content="text/html; charset=ISO-8859-1" /> </head> <body> <h1 align="center"> Client-side Imagemap Test </h1> <div align="center"> <img src="shapes.gif" usemap="#shapes" alt="shapes map" border="0" width="400" height="200" /> </div> <!-- start of client side image map --> <map name="shapes" id="shapes"> <area shape="rect" coords="6,50,140,143" href="rectangle.html" alt="rectangle" /> <area shape="circle" coords="195,100,50" href="circle.html" alt="circle" /> <area shape="poly" coords="255,122,306,53,334,62,338,0,388,77,374,116,323,171,255,122" href="polygon.html" alt="polygon" /> <area shape="default" href="defaultreg.html" alt="" /> </map> </body> </html>
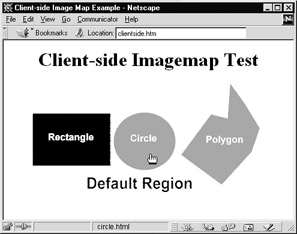
Figure 4-7: Rendering of client-side image-map
You can combine support for both server-side and client-side image maps into one file. The browser should override the server-side support with the improved client-side style. This approach guarantees backward compatibility with older browsers. To support both image maps, use the ismap and usemap attributes in conjunction with an embedded map and a remote map, as shown by the following code fragment:
<a href="shapes.map"> <img src="shapes.gif" usemap="#shapes" border="0" ismap="ismap" width="400" height="200" alt="" /></a>
Image Map Attributes
Client-side image maps have a variety of attributes that can be used with the area element. Server-side image maps have no attributes other than those normally associated with the img element, such as border . The important attributes are discussed here with a full listing in Appendix A.
target
The <area> tag for client-side image maps has been extended to support a target attribute like the addition to the <a> tag. The target value should be set to the name of a frame or window. Generally, a frame has a name, so setting target to the frame name results in the link loading in the frame named in the attribute. When selected, a link such as
<area shape="rect" coords="0,0,50%, 50%" href="http://www.yahoo.com" target="display_frame" />
loads the page referenced by the URL set by href into the frame named "display_frame" . If the target attribute is omitted, the current window or frame that the document is in is used. In addition to author-named frames , the following are several reserved names for frames that, when used with the target attribute, have special meaning: _blank , _self , _parent , and _top . For more information about frames, see Chapter 8.
nohref
Although the nohref attribute appears to have little use, it can be used to set a region in the map that does nothing when clicked. This might be useful when attempting to cut a hole in something. For example, an image of a donut might make a great image map, particularly if the hole in the middle of the donut isn't an active, clickable area. The nohref attribute makes this simple. Just define a large click region for the whole image and then declare the middle of the image nonclickable with the nohref attribute. An example of this is shown here:
<!DOCTYPE html PUBLIC "-//W3C//DTD XHTML 1.0 Transitional//EN" "http://www.w3.org/TR/xhtml1/DTD/xhtml1-transitional.dtd"> <html xmlns="http://www.w3.org/1999/xhtml" lang="en"> <head> <title> Nohref Example </title> <meta http-equiv="content-type" content="text/html; charset=ISO-8859-1" /> </head> <body> <img src="donut.gif" width="300" height="300" border="0" alt="A donut" usemap="#donut" /> <map name="donut" id="donut"> <area shape="circle" coords="150,150,81" nohref="nohref" alt="" /> <area shape="circle" coords="150,150,146" href="donut.html" alt="donut" /> <area shape="default" nohref="nohref" alt="" /> </map> </body> </html>
If a browser supports nohref , the browser will either change the look of the cursor and disallow clicking or simply not allow clicking although the cursor appears to indicate the area is hot. Obviously, the former is the preferred browser action, but cannot be guaranteed .
Given that nohref creates an inactive region that sits on top of another, what happens when one region overlaps another? According to the specification, if two or more regions overlap, the region defined first within the <map> tag takes precedence over subsequent regions. This rule implies that area elements with the nohref attribute should be placed before <area> tags that are active so that clicking the <area> tag with the nohref attribute doesn't take the user to a new URL as a result of a previously placed, overlapping active < area> tag.
alt and title
Image maps ”even client-side image maps ”have some major drawbacks when viewed in text-based browsers. The alt attribute can be used, as shown in the previous examples, and should provide text labels that are displayed in the status line when the pointer passes over the hot spots. Although the title attribute can be added to all elements, and can provide a function somewhat similar to alt in graphical browsers, in practice, browsers seem to pick up alt before title . To be on the safe side, you can use both attributes simultaneously . One unfortunate problem with the alt attribute and client-side image maps is that non-graphical browsers don't always pick up the alt attributes and build meaningful renderings . Instead of a set of links, the viewer might only see a cryptic message, as shown in Figure 4-8.
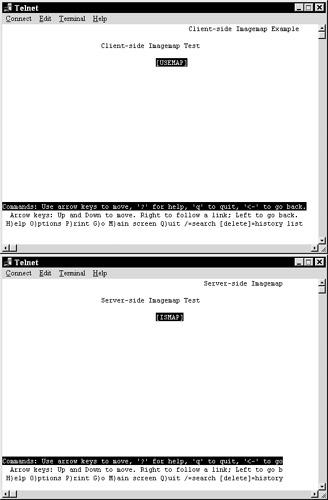
Figure 4-8: Non-meaningful image map renderings
Web designers are encouraged to provide secondary navigation that mirrors the choices available in the image map. This secondary navigation should consist of text links located below the image, which makes the site accessible for non-graphical user agents and might improve the site's usability. Users with slow connections can opt to select text links before the image is completely downloaded. An example of text links offered in conjunction with an image map is shown in Figure 4-9. Also, when using server-side image maps, you can make the inactive or default area link to a new page that contains a text menu of the choices provided through the image map. In this way, a user who selects the ismap provided by an older browser receives the menu, not the map.
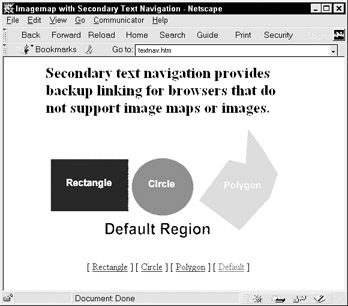
Figure 4-9: Image map with secondary text navigation
Discussion of the design and navigation issues surrounding image maps is left to books that focus on site design, such as the companion book Web Design: The Complete Reference Second Edition (Powell “ Osborne 2002). Where possible, however, HTML authors should avoid relying too heavily on single-image “style image maps for navigation purposes.
tabindex
Under HTML 4 and beyond, you can use the tabindex attribute of the area element to define the order in which hot spots in a client-side image map are tabbed through in a browser that supports keyboard navigation. The value of tabindex typically is a positive number. A browser tabs through links in order of increasing tabindex values, but generally skips over those with negative values. So, the following line sets this anchor to be the first thing tabbed to:
<area shape="rect" coords="0,0,50%,50%" href="http://www.yahoo.com/" tabindex="1" />
If the tabindex attribute is undefined, the browser tends to tab through links in the order in which they are found within an HTML document.
| < Day Day Up > |
EAN: 2147483647
Pages: 252