The Document Object
The Document object provides access to page elements such as anchors, form fields, and links, as well as page properties such as background and text color . We will see that the structure of this object varies considerably from browser to browser, and from version to version. Tables 9-2 and 9-3 list those Document properties and methods , respectively, that are the least common denominator and available since the very first JavaScript-aware browsers. For the sake of brevity, some details and Document properties will be omitted in the following discussion. Complete information about the Document properties can be found in Appendix B.
| Document Property | Description | HTML Relationship |
|---|---|---|
| alinkColor | The color of active links ”by default, red | <body alink="color value"> |
| anchors[] | Array of anchor objects in the document | <a name="anchor name "> </a> |
| bgColor | The page background color | <body bgcolor="color value"> |
| cookie | String giving access to the page's cookies | N/A |
| fgColor | The color of the document's text | <body text="color value"> |
| forms[] | Array containing the form elements in the document | <form> |
| LastModified | String containing the date the document was last modified | N/A |
| links[] | Array of links in the document | <a href="URL">linked content</a> |
| linkColor | The unvisited color of links ”by default, blue | <body link="color value"> |
| location | String containing URL of the document. (Deprecated.) Use document.URL or Location object instead. | N/A |
| referrer | String containing URL of the document from which the current document was accessed. (Broken in IE3 and IE4) | N/A |
| Title | String containing the document's title | <title>Document Title</title> |
| URL | String containing the URL of the document | N/A |
| vlinkColor | The color of visited links ”by default, purple | <body vlink="color value"> |
| Method | Description |
|---|---|
| close() | Closes input stream to the document. |
| open () | Opens the document for input. |
| write() | Writes the argument to the document. |
| writein() | Writes the arguments to the document followed by a newline. |
| Note | The document.referrer attribute is spelled correctly despite the actual misspelling of the HTTP referer header. |
Examination of Tables 9-2 and 9-3 reveals that the early Document Object Model was very primitive. In fact, the only parts of a document that can be directly accessed are document-wide properties, links, anchors, and forms. There is no support for the manipulation of text or images, no support for applets or embedded objects, and no way to access the presentation properties of most elements. We ll see all these capabilities are presented later, but first let s focus on the most basic ideas. The following example shows the various document properties printed for a sample document.
<<!DOCTYPE html PUBLIC "-//W3C//DTD XHTML 1.0 Transitional//EN" "http://www.w3.org/TR/xhtml1/DTD/xhtml1-transitional.dtd">> <<html xmlns="http://www.w3.org/1999/xhtml">> <<head>> <<title>>Traditional Document Object Test<</title>> <<meta http-equiv="content-type" content="text/html; charset=ISO-8859-1" />> <<script type="text/javascript">> <<!-- function showProps() { var i; document.write("<<h1 align='center'>>Document Object Properties<</h1>><<hr />><<br />>"); document.write("<<h2>>Basic Page Properties<</h2>>"); document.write("Location = "+document.location + "<<br />>"); document.write("URL = " + document.URL + "<<br />>"); document.write("Document Title = "+ document.title + "<<br />>"); document.write("Document Last Modification Date = " + document.lastModified + "<<br />>"); document.write("<<h2>>Page Colors<</h2>>"); document.write("Background Color = " + document.bgColor + "<<br />>"); document.write("Text Color = " + document.fgColor + "<<br />>"); document.write("Link Color = " + document.linkColor +"<<br />>"); document.write("Active Link Color = " + document.alinkColor +"<<br />>"); document.write("Visited Link Color = " + document.vlinkColor + "<<br />>"); if (document.links.length >> 0) { document.write("<<h2>>Links<</h2>>"); document.write("# Links = "+ document.links.length + "<<br />>"); for (i=0; i << document.links.length; i++) document.write("Links["+i+"]=" + document.links[i] + "<<br />>"); } if (document.anchors.length >> 0) { document.write("<<h2>>Anchors<</h2>>"); document.write("# Anchors = " + document.anchors.length + "<<br />>"); for (i=0; i << document.anchors.length; i++) document.write("Anchors["+i+"]=" + document.anchors[i] + "<<br />>"); } if (document.forms.length >> 0) { document.write("<<h2>>Forms<</h2>>"); document.write("# Forms = " + document.forms.length + "<<br />>"); for (i=0; i << document.forms.length; i++) document.write("Forms["+i+"]=" + document.forms[i].name + "<<br />>"); } } //-->> <</script>> <</head>> <<body bgcolor="white" text="green" link="red" alink="#ffff00">> <<h1 align="center">>Test Document<</h1>> <<hr />> <<a href="http://www.pint.com/">>Sample link<</a>> <<a name="anchor1">><</a>> <<a name="anchor2" href="http://www.javascriptref.com">>Sample link 2<</a>> <<form name="form1" action="#" method="get">><</form>> <<form name="form2" action="#" method="get">><</form>> <<hr />> <<br />><<br />> <<script type="text/javascript">> <<!-- // Needs to be at the bottom of the page showProps(); //-->> <</script>> <</body>> <</html>> An example of the output of the preceding example is shown in Figure 9-3.
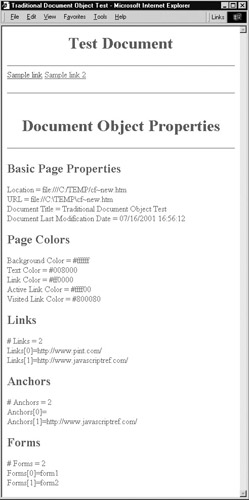
Figure 9-3: Simple Document properties
One thing to note with this example, however, is the fact that many of the properties will not be set if you do not run this with a document containing forms, links, and so on. Notice the result of the same script on a document with the following simple << body >> contents shown in Figure 9-4.
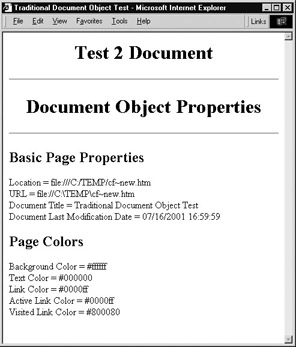
Figure 9-4: Some Document properties require no HTML elements.
<<body>> <<h1 align="center">>Test 2 Document<</h1>> <<hr />> <<script type="text/javascript">> <<!-- // Needs to be at the bottom of the page showProps(); //-->> <</script>> <</body>> <</html>>
JavaScript will not create, or more correctly in programming parlance instantiate, a JavaScript object for a markup element that is not present. While you will notice that browsers tend to define default values for certain types of properties such as text and link colors regardless of the presence of certain (X)HTML elements or attributes, we do not have Form objects, Anchor objects, or Link objects in the second example because we lacked << form >> and << a >> tags in the tested document. It should be very clear that the (X)HTML elements have corresponding objects in the JavaScript Document object, and that is how the two technologies interact. This last idea is the heart of the object model ”the bridge between the world of markup in the page and the programming ideas of JavaScript. We now explore how to access and manipulate markup elements from JavaScript.
| Tip | Given the tight interrelationship between markup and JavaScript objects, it should be no surprise that with bad (X)HTML markup you will often run into problems with your scripts. You really need to know your (X)HTML despite what people might tell you if you want to be an expert JavaScript programmer. |
Accessing Document Elements by Position
As the browser reads an (X)HTML document, JavaScript objects are instantiated for all elements that are scriptable. Initially, the number of markup elements that were scriptable in browsers was limited, but with a modern browser it is possible to access any arbitrary HTML element. However, for now let s concentrate on the (X)HTML elements accessible via the traditional JavaScript object model, particularly << form >> and its related elements, to keep things simple. For example, if we have a document like so,
<<!DOCTYPE html PUBLIC "-//W3C//DTD XHTML 1.0 Transitional//EN" "http://www.w3.org/TR/xhtml1/DTD/xhtml1-transitional.dtd">> <<html xmlns="http://www.w3.org/1999/xhtml">> <<head>> <<title>>Simple Form<</title>> <</head>> <<body>> <<form action="#" method="get">> <<input type="text" />> <</form>> <<br />><<br />> <<form action="#" method="get">> <<input type="text" />> <<br />> <<input type="text" />> <</form>> <</body>> <</html>>
using the traditional JavaScript object model, we can access the first << form >> tag using
window.document.forms[0]
To access the second << form >> tag we would use
window.document.forms[1]
However, accessing window.document.forms[5] or other values would cause a problem since there are only two form objects instantiated by each of the << form >> tags.
If we look again at Figure 9-2, notice that the forms[] collection also contains an elements[] collection. This contains the various form fields like text fields, buttons , pull- downs , and so on. Following the basic containment concept to reach the first form element in the first form of the document, we would use
window.document.forms[0].elements[0]
While this array-based access is straightforward, the major downside is that it relies on the position of the (X)HTML tag in the document. If the tags are moved around, the JavaScript might actually break. A better approach is to rely on the name of the object.
Accessing Document Elements by Name
Markup elements in a Web page really should be named to allow scripting languages to easily read and manipulate them. The basic way to attach a unique identifier to an (X)HTML element is by using the id attribute. The id attribute is associated with nearly every (X)HTML element. For example, to name a particular enclosed embolded piece of text SuperImportant, you could use the markup shown here:
<<b id="SuperImportant">>This is very important.<</b>>
Just like choosing unique variable names within JavaScript, naming tags in markup is very important since these tags create objects within JavaScript. If you have name collisions in your markup, you are probably going to break your script. Web developers are encouraged to adopt a consistent naming style and to avoid using potentially confusing names that include the names of HTML elements themselves . For example, button does not make a very good name for a form button and will certainly lead to confusing code and may even interfere with scripting language access.
Before the standardization of HTML 4 and XHTML 1, the name attribute was used to expose items to scripting instead of id . For backward compatibility, the name attribute is commonly defined for << a >>, << applet >>, << button >>, << embed >>, << form >>, << frame >>, << iframe >>, << img >>, << input >>, << object >>, << map >>, << select >>, and << textarea >>. Notice that the occurrence of the name attribute corresponds closely to the traditional Browser Object Model.
| Note | Both << meta >> and << param >> support an attribute called name , but these have totally different meanings unrelated to script access. |
Page developers must be careful to use name where necessary to ensure backward compatibility with older browsers. Even if this is not a concern to you, readers should not be surprised to find that many modern browsers prefer the name attribute on tags that support it. To be on the safe side, use name and id attributes on the tags that support both and keep them the same value. So we would write
<<form name="myForm" id="myForm" method="get" action="#">> <<input type="text" name="userName" id="userName" />> <</form>>
And then to access the form from JavaScript, we would use either
window.document.myForm
or simply
document.myForm
because the Window object can be assumed. The text field would be accessed in a similar fashion by using document.myForm.userName .
| Note | Having matching name and id attribute values when both are defined is a good idea to ensure backward browser compatibility. However, be careful ”some tags, particularly radio buttons, must have consistent names but varying id values. See Chapter 14 for examples of this problem. |
Accessing Objects Using Associate Arrays
Most of the arrays in the Document object are associative. That is, they can be indexed with an integer as we have seen before or with a string denoting the name of the element you wish to access. The name, as we have also seen, is assigned with either (X)HTML s name or id attribute for the tag. Of course, many older browsers will only recognize the setting of an element s name using the name attribute. Consider the following HTML:
<<form name="myForm2" id="myForm2" method="get" action="#">> <<input name="user" type="text" value="" />> <</form>>
You can access the form as document.forms["myForm2"] or even use the elements[] array of the Form object to access the field as document.forms["myForm2"].elements["user"] . Internet Explorer generalizes these associative arrays a bit and calls them collections . Collections in IE can be indexed with an integer, with a string, or using the special item() method mentioned later in this chapter.
Event Handlers
Now that we have some idea of how to access page objects, we need to see how to monitor these objects for user activity. The primary way in which scripts respond to user actions is through event handlers . An event handler is JavaScript code associated with a particular part of the document and a particular event. The code is executed if and when the given event occurs at the part of the document to which it is associated. Common events include Click , MouseOver , and MouseOut , which occur when the user clicks, places the mouse over, or moves the mouse away from a portion of the document, respectively. These events are commonly associated with form buttons, form fields, images, and links, and are used for tasks like form field validation and rollover buttons. It is important to remember that not every object is capable of handling every type of event. The events an object can handle are largely a reflection of the way the object is most commonly used.
Setting Event Handlers
You have probably seen event handlers before in (X)HTML. The following simple example shows users an alert box when they click the button:
<<form method="get" action="#">> <<input type="button" value="Click me" onclick="alert('That tickles!');" />> <</form>> The onclick attribute of the << input >> tag is used to bind the given code to the button s Click event. Whenever the user clicks the button, the browser sends a Click event to the Button object, causing it to invoke its onclick event handler.
How does the browser know where to find the object s event handler? This is dictated by the part of the Document Object Model known as the event model . An event model is simply a set of interfaces and objects that enable this kind of event handling. In most major browsers, an object s event handlers are accessible as properties of the object itself. So instead of using markup to bind an event handler to an object, we can do it with pure JavaScript. The following code is equivalent to the previous example:
<<form name="myForm" id="myForm" method="get" action="#">> <<input name="myButton" id="myButton" type="button" value="Click me" />> <</form>> <<script type="text/javascript">> <<!-- document.myform.mybutton.onclick = new Function("alert('That tickles!')"); // -->> <</script>> We define an anonymous function containing the code for the event handler, and then set the button s onclick property equal to it.
Invoking Event Handlers
You can cause an event to occur at an object just as easily as you can set its handler. Objects have a method named after each event they can handle. For example, the Button object has a click() method that causes its onclick handler to execute (or to fire, as many say). We can easily cause the click event defined in the previous two examples to fire:
document.myForm.myButton.click();
There is obviously much more to event handlers than we have described here. Both major browsers implement sophisticated event models that provide developers an extensive flexibility when it comes to events. For example, if you have to define the same event handler for a large number of objects, you can bind the handler once to an object higher up the hierarchy rather than binding it to each child individually. A more complete discussion of event handlers is found in Chapter 11.
EAN: 2147483647
Pages: 209