Recovering from Database Corruption
| < Day Day Up > |
| If an Exchange database is corrupt, it is not extremely effective to restore the corrupt database to a production server. The server might continue to operate , but database corruption never goes away on its own, and you eventually will have to repair the database. In fact, when minor database corruption is not repaired, the corruption can get to the point that entire sections of the Exchange database become inaccessible. A couple methods can be used to repair a corrupt Exchange database, or at least restore the database and extract good information from the database. Key to the successful recovery of as much information as possible is using the right tool. In many cases, administrators jump right into using the ESEUTIL /p repair command; instead of repairing the Exchange database to 100% condition, the utility finds a corrupt section of the database and deletes all information from that portion of the database on. So, although the Exchange system becomes 100% clean, the utility deleted 2030% of the data that was in the database to get the database to a clean state. The ESEUTIL /P command is the task of last resort: Other tools work around corrupt database areas and allow the administrator to recover as much of the data as possible. Going all the way back to the start of the chapter in the "What to Do Before Performing Any Server-Recovery Process" section, this is where having a complete backup of the databases in Exchange is really important. If a process to repair or recover information causes more harm to the database than good, there is still a backup copy to restore and start again. Flat File Copying the Exchange DatabasesOne of the best techniques Exchange experts use when working to recover corruption in a database is to make a flat file copy of the Exchange databases. A flat file copy is merely an exact copy of the Exchange databases copied to another portion of the server hard drive or to another server. To do a manual copy of the databases, do the following:
NOTE If the databases need to be manually restored, a simple XCOPY (or Windows Explorer copy) of the databases back to the original subdirectories will bring the data back to the condition the databases were in at the time the databases were copied off the system. Inside the directories ( \Program Files\Exchsrvr\mdbdata or the like) are other files, such as tmp.edb , *.log, files. These files are support files to the Exchange databases. These files could be copied off the system and then copied back if a restore is desired. The support files beyond the basic priv1.edb , priv1.stm , pub1.edb , and pub1.stm files typically need to be copied as a group. After maintenance is run on the main *.edb and *.stm files, the support files are typically unuseable because they are no longer associated with the master database files. Moving Mailboxes to Another Server in the SiteOne way of extracting mail from a corrupt database is to move the mailbox or mailboxes to a different server in the site. Instead of trying to run utilities to fix the corruption in the database, which can take several hours (or even days, depending on the size of the database and the amount of corruption that needs to be fixed), an administrator can set up another server in the Exchange site and move the mailboxes to a new server. Moving mailboxes grabs all of the mail, Calendar, contacts, and other mailbox information from one server and moves the information to a new server. As the information is written to the new server, the information is automatically defragmented and corruption is not migrated . Additionally, mailboxes can be moved from one server to another without ever having to bring down the production server. A mailbox user must be logged out of Outlook and must not be accessing Exchange before the mailbox can be moved. However, if mailboxes are moved when individuals are out of the office or at lunch , or on weekends, the mailboxes can be moved without users ever knowing that their information was moved from one system to another. The two caveats to moving mailboxes are these : Corrupt mailboxes will not move, and user Outlook profiles will be changed. For Outlook profiles, because a user's Outlook profiles point to a specific server, when a mailbox is moved from one server to another, the user's profile also needs to point to the new server. Fortunately, with Exchange and Outlook, when a user's mailbox is moved, Outlook tries to access the mailbox on the original server, and the server notifies Outlook that the mailbox has been moved to a new Exchange server. The user's Outlook profile automatically changes to associate the profile to the new server where the user's mailbox resides. So, as long as the old server remains operational and the user attempts to access email from the old server, the profiles will be automatically changed the next time the user tries to access email. Typically within 12 weeks after moving mailboxes from one server to another, the user profiles are all automatically changed. As for corrupt mailboxes, unfortunately , Exchange typically does not move a corrupt mailbox. So, if a user's mailbox has been corrupted, the mailbox will remain on the old server. Moving the data from the corrupt mailbox will need to be handled in a manner specified in the following section, "Extracting Mail from a Corrupt Mailbox." However, if 8090% of the user mailboxes can be moved to a new server, the administrators are trying to recover only a handful of mailboxes instead of all mailboxes on a server. This could mean far less downtime for all users who had mail on the server and could limit the exposure of data loss to a limited number of users. To move mailboxes between servers in a site, do the following:
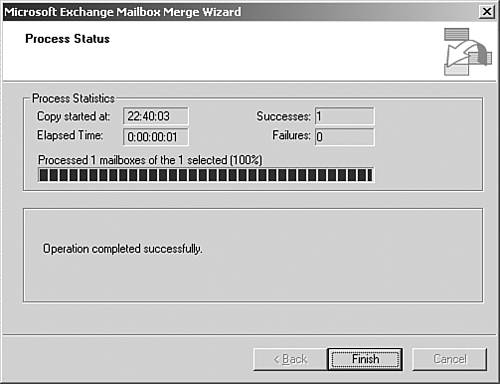
Extracting Mail from a Corrupt MailboxWhen mailboxes cannot be moved between servers, either due to mailbox corruption or because the organization does not have a spare server to move mailboxes between, the exmerge.exe utility can be used to export mailboxes to a file. The ExMerge utility is freely downloadable from the Microsoft downloads page at www.microsoft.com/downloads (search for "ExMerge" or "Mailbox Merge Wizard"). ExMerge allows an administrator to select specific mailboxes and export the data from the mailbox into a PST file. The PST file can then be imported (using the ExMerge utility) into another server. Unlike the Move Mailbox tool, which is an all-or-nothing migration tool, ExMerge extracts information on an item-by-item basis. When corruption is found in a user's mailbox, the corrupted item is skipped and the balance of the user's information is extracted. The ExMerge utility can be used to extract all mailboxes from a server and import the information back into a new server. However, because ExMerge extracts and imports information item by item, it could take more than an hour to extract 1GB of mail and another hour to import that 1GB of mail back into a new server. So, if the Move Mailbox tool can migrate the information directly from one server to another over the wire, the migration process of good mailboxes goes much faster. However, for corrupt mailboxes, the ExMerge method does skip corrupt portions of mailboxes and minimizes the loss of information. To use the ExMerge utility, do the following:
To import the ExMerge information to another server, the process is very similar. Do the following:
Running the ISINTEG and ESEUTIL UtilitiesWhen a database is determined to be corrupt, usually an administrator is directed to run the built-in utilities on Exchange to run maintenance on the databases. The utilities are the ISINTEG ("eye-ess-in-tehg") and ESEUTIL ("ee-ess-ee-u-tihl"). However, depending on the condition of the database, a very corrupt database can take several hours to run, only to result in the loss of data. Some administrators are incorrectly told to never run the utilities because they will always result in loss of data. It's typically just a lack of knowledge of how the utilities work that leads to misunderstanding the potential results of the databases. As noted in the previous two sections, there might be better options for recovering information from a corrupt database. Instead of trying to fix a known corrupt database, simply migrating the information off a server or extracting information from corrupt databases is frequently a better fix. However, if the determination is to run the utilities, a few things should be noted:
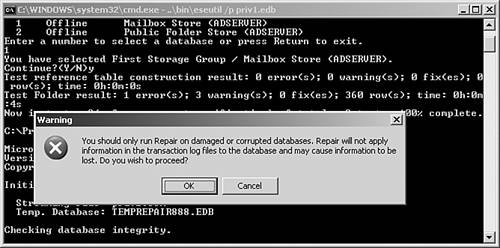
The common parameters used for the ISINTEG and ESEUTIL utilities are as follows . For regular maintenance such as checking the database structure's integrity and performing defragmentation of the database, the following commands should be run: isinteg -s SERVERNAME -test allfoldertests eseutil /d priv1.edb When run against an Exchange Server 2003 system, the ISINTEG utility produces a summary similar to the one in Figure 32.5. Figure 32.5. Results from an ISINTEG utility run. NOTE The ISINTEG and ESEUTIL utilities typically reside in the \Program Files\Exchsrvr\Bin directory of the Exchange server. The databases that are typically specified in ESEUTIL are the priv1.edb and pub1.edb . However, if an organization has multiple database and storage groups, several database might need to be checked separately for integrity. When a database needs to be repaired, eseutil /p priv1.edb can be run. Beware: The /p repair command is a brute-force repair and deletes sections of the database to make the integrity of the database clean. A message provides an additional warning about ESEUTIL , as shown in Figure 32.6. When running the /p command in ESEUTIL , entire sections of the database might be deleted to repair and recover the state of the database. Figure 32.6. ESEUTIL warning when a database repair ( /p ) is run. |
| < Day Day Up > |
EAN: 2147483647
Pages: 393