| Before you can write VBA macros, you need an editor. Outlook, like the other Office applications, includes the Visual Basic Editor. Open the editor interface by choosing T ools, M acro, V isual Basic Editor or by pressing Alt+F11 on your keyboard.  | The Visual Basic Editor should be installed by default with a typical or complete installation. If it's not available, you'll have to use the Add/Remove Programs applet in Windows Control Panel and change your installed features. |
The Visual Basic Editor has all the tools you'll need. Use the Project Explorer to see all the modules you've associated with Outlook and the Properties window to add or change properties, including the project name and other properties. Type your code in the large window. Selecting Application in the Object drop-down list, shown as (General) in Figure 21.1, lists the available procedures in the right field and automatically enters the selection in the code window. Figure 21.1. Use the Visual Basic Editor to develop your macros. 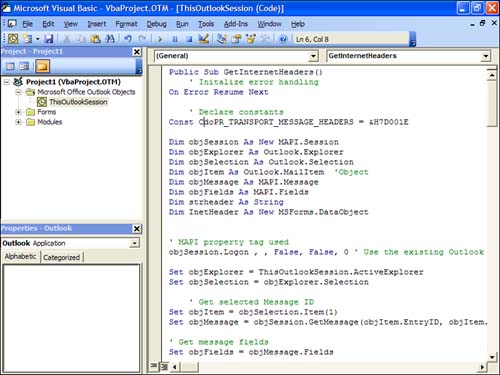 The Visual Basic Editor interface includes the Project and Properties browsers, the main code window, and the Standard toolbar. Right-click on the toolbars and show the Edit and Debug toolbars. Figures 21.2 through 21.4 detail the buttons found on these toolbars . Figure 21.2. The Standard toolbar has the standard Windows commands along with commands you can use to switch back to Outlook, select a module, form, or class, run your code, and show the object browser and control toolbox. 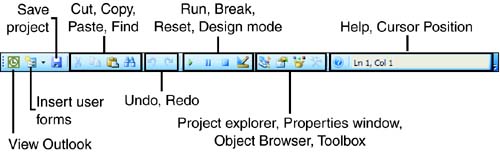 Figure 21.4. The Debug toolbar is used for your debugging code. Use Run, Break, and Reset to start and stop the macro, and use Step In, Out, and Over to run the code line by line or skip lines. Use the windows and watches and see the results your code returns. 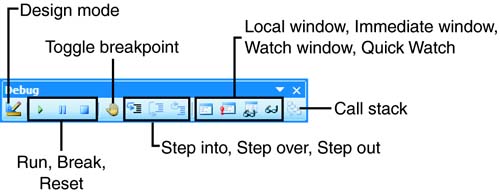 Figure 21.3. Use the Edit toolbar to provide information about properties and methods in your code, toggle breakpoints, change indentation, comment code blocks, and use bookmarks while writing and debugging your code. 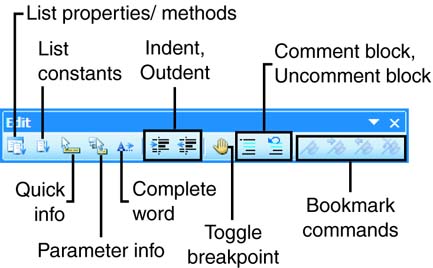 One of the most important features of the VB Editor is the Object Browser. Using the Object Browser, you can see all the properties, methods, and objects referenced in your project and available for you to use (see Figure 21.5). Figure 21.5. Use the Object Browser to view the object model and libraries referenced in your project. Select the library from the Project/Library list or enter search words in the Search field. 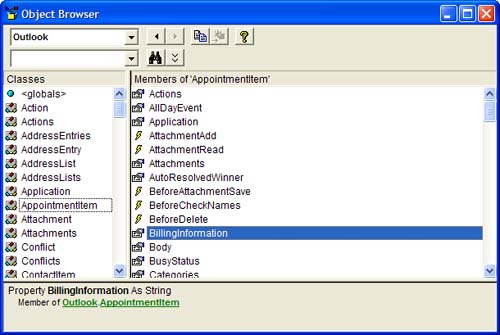 | | Add or remove libraries from your project using T ools, R eferences. Only references that have checkmarks are available for use in your project. |
Now that you know where to find the main parts of the editor, it's time to write your code. The general steps are -
Make a copy of or back up your mailbox before testing your code. Although it's safer to test against a test account, the results might be different when you test against real data and it's very risky if your code doesn't work correctly. Backups are especially important when you're writing code that changes items. -
Name the Sub procedure. This is the project name you'll look for when you run the macro from T ools, M acros, M acros. Don't use spaces and keep the name short. -
Declare your objects, strings, and so on. You need to define the name and data type of a variable used in your code. -
Type your code in the module. -
Test your code to see if it works without error.  | Use the Save button often and either exit Outlook and confirm the prompt to save the VBAProject.OTM , or copy the code to Notepad or an Outlook post form and then save. If Outlook hangs on your code, you could lose your work. |
Task: Create Your First Macro When there is a feature Microsoft forgot that you'd like to have in Outlook, many times you can create a macro yourself. Some macros are complex, but others just look complex. The macro we're going to create falls into the second group ; it looks complex, but it's really simple. This macro provides a time-saving feature that Outlook should have, but doesn't: the ability to easily save attachments to a specific folder on your hard drive and then delete the attachment from the message. In addition, we add a clickable link pointing to the attachment on the bottom of the message. | | Attachments that are blocked by Outlook's Attachment Security features will not be saved or removed from the message. |
Before you can enter VBA code, you have to open the VB Editor, using the T ools, M acros, V isual Basic Editor menu selection. If you prefer keyboard shortcuts, use Alt+F11. -
Click on ThisOutlookSession to open it in the code window, if it's not already open. -
Choose Insert, Procedure to open the Add Procedure dialog (see Figure 21.6). Enter a name for the procedure. I'm calling mine SaveAttachments . Leave the options on their defaults and choose OK. Use an underscore to replace spaces in names . Figure 21.6. Use the Add, Procedure dialog to enter the name of the procedure automatically or type it in the code window yourself. 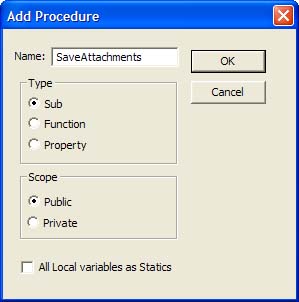 | | You can download a text file containing the code sample from http://www.poremsky.com/samples/. Copy and paste the text into ThisOutlookSession , and then follow along with the text. |
-
Declare your variables . This macro removes attachments from selected messages, so we know we'll need to define what Application , MailItem , Attachments , and Selection are. Any variables we discover we need later will be added here. Type the following code into your subprocedure in ThisOutlookSession , as shown in Figure 21.7. Public Sub SaveAttachments() Dim objOL As Outlook.Application Dim objMsg As Outlook.MailItem 'Object Dim objAttachments As Outlook.Attachments Dim objSelection As Outlook.Selection Dim i As Long Dim lngCount As Long Dim strFile As String Dim strFolderpath As String Dim strDeletedFiles As String Figure 21.7. Define the objects you'll use in your macro. 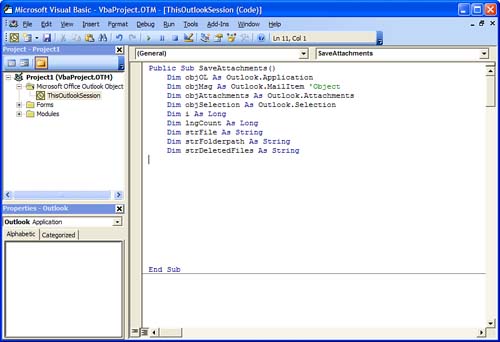 -
We need a location to save the attachments. In my case, I wanted them saved to a subfolder in My Documents. I could easily hardcode the path, but if I give it to someone else, her path would be different. Add a line for error handling and comment out or remove the MsgBox line when you are satisfied that it's getting the correct path. A hardcoded path would look something like this, where My Outlook Attachments is the full path to the folder location: strFolderpath = "D:\My Data\My Outlook Attachments\" Because I want to share this code with others, I'm using the user 's My Documents folder, which is a special Windows folder whose full path is stored in the registry. strFolderpath = CreateObject("WScript.Shell").SpecialFolders(16) MsgBox strFolderpath On Error Resume Next | | Add an apostrophe to the front of a line you want to comment out. VB ignores all comment lines, which are used as notes to the person reading the program code. You can also select a block of code and use the Edit toolbar's Comment Block and Uncomment Block buttons to quickly add and remove comments from your code. Use comments liberally throughout the code so that you can remember why you did it like that months later. |
-
Instantiate an Outlook Application object and get the collection of selected objects. This tells the code what folders and items we want to use. In this sample, we want whatever Outlook item is selected. Later, we'll verify it's a mail item. Set objOL = CreateObject("Outlook.Application") Set objSelection = objOL.ActiveExplorer.Selection -
Set the path to the attachment location. I created a subfolder to save the attachments in. Again, remove or comment out the MsgBox line when you're satisfied that it returns the correct path. strFolderpath = strFolderpath & "\OLAttachments\" MsgBox strFolderpath Message boxes, or MsgBox in VBA, are useful to show you if a piece of code is returning the results you expect. When a MsgBox is used, the code stops until you press OK (see Figure 21.8). Other methods, such as using the Immediate window to display the results and continue running, are often better for debugging, but for small projects, MsgBox is quick. Figure 21.8. Use MsgBox to display the results of strings while you test your code to learn whether a string contains the data you expect it to.  -
This code checks the selected message for attachments. If attachments are found, it counts how many there are. Comment out the MsgBox line after you verify that it works. For Each objMsg In objSelection If objMsg.Class = olMail Then Set objAttachments = objMsg.Attachments lngCount = objAttachments.Count MsgBox objAttachments.Count -
Use this next section of code to loop through the selected messages, saving and removing the attachments. We count down ( Step -1 ), not up, because the index changes each time an attachment is deleted and only every other item would be removed otherwise . If lngCount > 0 Then For i = lngCount To 1 Step -1 -
We need the filename next. First, we get the filename of the attachment and store it in the strFile string. Then we append it to the string that contains the folder path. When we're done, we save the attachment and delete it from the message. strFile = objAttachments.Item(i).FileName strFile = strFolderpath & strFile objAttachments.Item(i).SaveAsFile strFile objAttachments.Item(i).Delete -
This next piece of code is used to save the file path on the message. First check to see whether the message is HTML formatted. If it's plain text, we'll use a simple file:// hyperlink, but we need to use HTML tags if the message is HTML formatted. The path is added to a string and a message box shows us the full string while we're debugging the code (see Figure 21.9). If objMsg.BodyFormat <> olFormatHTML Then strDeletedFiles = strDeletedFiles & vbCrLf & "<file://" & strFile & ">" Else strDeletedFiles = strDeletedFiles & "<br>" & "<a href='file://" & _ strFile & "'>" & strFile & "</a>" End If MsgBox strDeletedFiles Figure 21.9. The message containing the attachments used HTML formatting, so the StrDeletedFiles string contains the filenames and HTML formatting and is used to create links to the files. 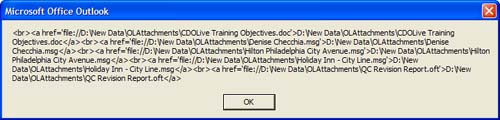 -
Loop back to remove the next attachment. After all the attachments are removed, the loop ends and the macro continues to the next step. Next i End If -
Check the body for HTML formatting. If the message is HTML, write the file path string to the message body using HTML formatting tags. Then save the message. If objMsg.BodyFormat <> olFormatHTML Then objMsg.Body = objMsg.Body & vbCrLf & _ "The file(s) were saved to " & strDeletedFiles Else objMsg.HTMLBody = objMsg.HTMLBody & "<p>" & _ "The file(s) were saved to " & strDeletedFiles End If objMsg.Save -
If more than one message was selected, the macro loops back and processes the next message. The filename string, strDeletedFiles , must first be reset to nothing; otherwise, each additional message will have links to all previous attachments or you'll be limited to selecting one message at a time. End If strDeletedFiles = "" Next -
This code exits the macro early if there is an error and clears the objects from memory when it exits due to an error or after it's finished removing the attachments. ExitSub: Set objAttachments = Nothing Set objMsg = Nothing Set objSelection = Nothing Set objOL = Nothing End Sub Press F8 or use D ebug, Step I nto to walk through the macro and watch it work on copies of your messages or using a test message store. | | You should always set the objects you use to nothing before exiting a procedure so that the memory they hold is released. If you don't release the objects each time you run the macro, more memory is held and you'll have to reboot your computer. |
You could refine this macro to ask for the file location, either prompting you with a simple input screen or with a folder browser dialog. Although adding a folder browser dialog appears to defeat the purpose of using a macro because it mimics Outlook's File, Save Attachments command, Outlook doesn't allow you to select multiple messages, add the file path, and delete the attachment in one step. You could also check for existing files using the same name, create new subfolders based on the date, or save the attachments in different folders based on file type. After you save the procedure, customize your Outlook toolbar and add a button to run the macro. Choose Macros from the Customize dialog and drag your macro to the toolbar. Edit the display name and it's ready to use.  | Always make backups before testing code on your items. If there is an error, you might lose the data. Use the Search Folder to locate items in your mailbox that contain attachments. Then create a test folder and use Edit, Select All, Edit, Copy to Folder and make copies of the messages. If you don't have many messages containing attachments, make several copies. Use the copies when you test your code. |
Task: Get the Internet Message Header Anyone who trying to report spam or is curious about suspicious messages wants to look at a message's Internet header. It contains information about the sender, who he says he is, the route the message took to get to you, and the location it was sent from. You can learn a lot from viewing a message header, but Outlook makes using the Internet header difficult. As you know, viewing the Internet message header on a message is not as easy as it could be. You need to right-click on the message in the message list, choose Options, and then try to read the header in a tiny text box. You might need to paste it in the message to forward to your email administrator, or need to Select All, Copy and then paste the header into a new message. The process is an annoyance and requires too many steps for many people. You can use a few lines of VBA to make the process much simpler. If you often need to paste a header in a message, two additional lines of code will copy the header to the Windows Clipboard. You can view the header in a message box or create a form and display it in a text box. -
Open the VBE (Alt+F11) and choose ThisOutlookSession , if it's not in focus already. -
Click in the code window and choose I nsert, P rocedure. Enter the name of your procedure. I'm going to use GetInternetHeaders . Click OK and the sub is created for you. -
You first need to set the references to the libraries you're going to access. Using T ools, R eferences, scroll down and select Microsoft CDO 1.21 Library (see Figure 21.10). When you receive an error that says Compile error: User-defined type not defined , you're missing references. Figure 21.10. Your list might have more or fewer libraries checked. Occasionally, you'll have to browse the file system to locate the file you need.  | | Collaboration Data Objects (CDO) is used for some Outlook programming tasks , such as displaying some message and address book properties. |
| | If you don't see Microsoft CDO 1.21, it's probably not installed. Use Add/Remove Programs applet in the Windows Control Panel to run Office setup and install it. |
-
Enter your code, beginning with error handling. Because this is a simple procedure, I'm going to use only basic error handling, On Error Resume Next . Public Sub GetInternetHeaders() On Error Resume Next | | You can download a text file containing the code sample from http://www.poremsky.com/samples/. Use F ile, I mport File to import the frmHeader form. |
-
Because we use CDO to get the message header, we need to declare it as a constant. Const CdoPR_TRANSPORT_MESSAGE_HEADERS = &H7D001E -
Next, we must declare the objects that we need to use. When you write a procedure from scratch, you might not know what you need to declare and will add more objects or variables to the list as you code. You should always have these grouped at the top and in the order you use them. It makes the code easier to read and understand later. Dim objSession As New MAPI.Session Dim objExplorer As Outlook.Explorer Dim objSelection As Outlook.Selection Dim objItem As Outlook.MailItem 'Object Dim objMessage As MAPI.Message Dim objFields As MAPI.Fields Dim strheader As String Dim InetHeader As New MSForms.DataObject -
Now it's time for the nitty-gritty. The code needs to log on to Outlook. objSession.Logon , , False, False, 0 ' Use the existing Outlook session -
Once we're logged on, we need to instantiate an Outlook Application object and get the selected objects. Set objExplorer = ThisOutlookSession.ActiveExplorer Set objSelection = objExplorer.Selection -
Each item in Outlook's message store has a unique EntryID. We need to pass the selected message's EntryID to CDO so that the code knows exactly which message to get. Set objItem = objSelection.Item(1) Set objMessage = objSession.GetMessage(objItem.EntryID, objItem.Parent.StoreID) -
When we know which message we need, we ask for the field in a text string called strheader . We use error handling here, just in case we try to get a message header from another item, such as a contact. When an error is found, the code skips to step 15, otherwise, it continues on. ' Get message fields Set objFields = objMessage.Fields ' Get SMTP header Err.Clear strheader = objFields.Item(CdoPR_TRANSPORT_MESSAGE_HEADERS).Value If Err.Number = 0 Then -
If there is a message header, we can display it immediately in a message box (see Figure 21.11). Message boxes display just 256 characters , so you'll see only part of the header. This line can be commented out later. 'Verify code gets header MsgBox strheader Figure 21.11. The message box displays the contents of strheader . Because the message box displays only the first 256 characters, the complete header isn't visible. 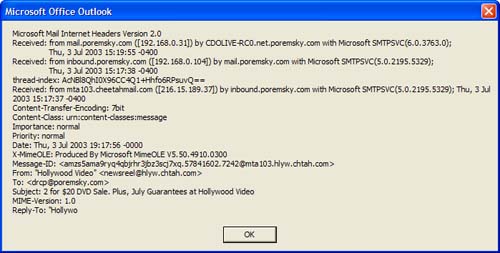 -
If you want both the message header and the body, this code snippet gets the body and adds it to the header string. If you only need the message header, comment this section out. If objItem.HTMLBody = "" Then strheader = strheader & objItem.Body Else strheader = strheader & objItem.HTMLBody End If -
This copies the header string to the Windows Clipboard. If you don't need the string on the Clipboard, comment out this section. InetHeader.SetText (strheader) InetHeader.PutInClipboard -
This sends the header string to a text box in a form that we'll create later. If you use the message box and/or copy the header string to the Clipboard, you could comment out this section and paste the header into a new message or Notepad. You must have a form in the project for this line to work. frmHeader.txtHeader.Text = strheader frmHeader.Show -
If an error is found in step 9, the code skips ahead to this line and displays a message box on the screen. Else MsgBox "No SMTP message header information on this message", vbInformation End If -
Now that the code is done, the code needs to log off the Outlook session and release the objects it stored in memory. If you don't set the objects to Nothing , your computer will eventually require a reboot to free up resources. 'Logoff and clean up objSession.Logoff Set objExplorer = Nothing Set objSelection = Nothing Set objItem = Nothing Set objSession = Nothing Set objMessage = Nothing Set objFields = Nothing Set objField = Nothing End Sub Your procedure is now complete. You can test it now, if you comment out the lines in step 13. Otherwise, before the code will work correctly, we have to create a UserForm, which we'll do next. Task: Create a UserForm You're already familiar with UserForms, even if you don't think soevery application in Windows uses at least one as a Help, About dialog. In this task, we're going to create a UserForm of our own to display an Internet header in a larger box than Outlook uses. -
Select I nsert, U serForm or use the Insert button on the Standard toolbar and choose UserForm. Drag the lower-right corner to make the form a little bigger. -
Enter a name for the form in the (Name) field of the Properties window. Because the code refers to frmHeader , we need to name the form frmHeader or change the code. The Caption field holds the text that is displayed in Windows title bars. I'm using Internet Headers for my caption (see Figure 21.12). Figure 21.12. Create your own dialog boxes using UserForms. Use the Properties window to change the form name, title, and other attributes. 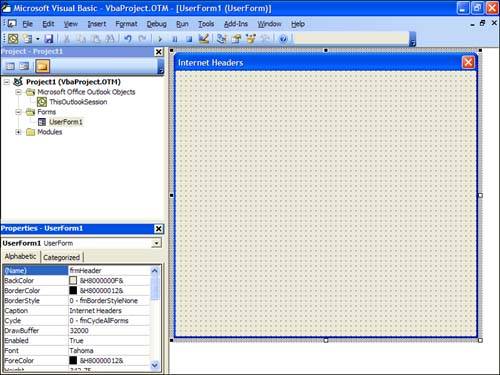 -
Show the Toolbox by clicking the Toolbox toolbar button or selecting V iew, Toolbo x . Add a command button to the bottom of the form. Change the (Name) to cmdClose and the caption to Close. -
Drag the TextBox control (lowercase ab icon) to the form. Drag the corners so that the control fills most of the form (see Figure 21.13). Change the (Name) to txtHeader . Figure 21.13. Add a text box and command button, and your form is almost complete. 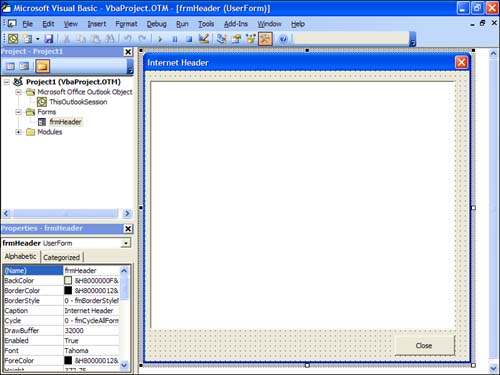 -
Right-click on any part of the form and choose View Code. Enter the following code to exit the form when you're done looking at the message header: Private Sub cmdClose_Click() Unload Me End Sub You're done. Now it's time to see whether it works. Run or step through the code. You might want to show the Immediate and Local windows so that you can see what the code is doing. If you receive errors, first check for typographical errorsit's a problem even seasoned developers have. Next, check your Dim statements. Did you include statements for each object you used? Did you set the references you need? | | Because the code uses the CDO library, you'll get the security prompt when you run the procedure and you'll need to allow access. The 1 Minute setting is more than enough time for the macro to run. |
After you save the procedure, customize your Outlook toolbar and add a button to run the macro. Choose Macros from the Customize dialog and drag your GetInternetHeader macro to the toolbar. Edit the display name and it's ready to use (see Figure 21.14). Figure 21.14. The macro's final result. Use it to view headers on spam or view the message body of suspect messages. 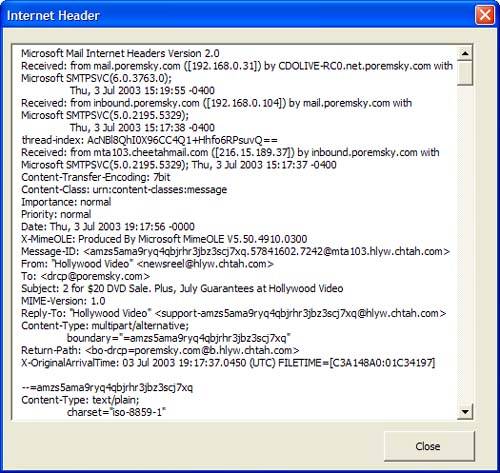 If you regularly report spam, you could refine the procedure to paste the message header and body in a new mail message. | | For links to many ready-to-use code samples, see http://www.slipstick.com/dev/code/index.htm and http://www.outlookcode.com/. |
|