Chapter 9. Introduction to the Bash Shell
| CONTENTS |
- Different Shells
- Introduction to Bash
Different Shells
Most UNIX variants allow you to select among several shells. The shell is important to you as a user because it is your window into the system. The many shells available on UNIX variants are similar in that you use them to issue commands, control many aspects of your user environment, write command files and shell programs, and so on. Because you'll probably be spending a lot of time in your shell, you should develop an understanding of several different shells and see whether you develop a preference of one over the other. A particular shell, such as Bash, does not vary much going from one UNIX variant to another. The shells themselves, however, have some unique features. In general, I don't find that users strongly prefer one shell over another. All the shells are similar in functionality and enjoyable to use once you get to know them. Most UNIX variants allow your system administrator to select from among several different shells when configuring users, so he or she usually has some flexibility concerning the shell that users run. In general, system administrators prefer users to use the same shell, making system administration easier in general. Most system administrators, however, will be happy to grant your request for a particular shell if indeed it is available on your system and you have a good reason to use it. I cover the Bash shell in this chapter and the C and KornShell in the following two chapters.
Introduction to Bash
Most UNIX variants allow you to select among several shells. The Linux-based UNIX operating systems, I have used configure Bash as the default shell. Bash possesses many of the fine features of other shells, and, in fact, derives its name from Bourne Again SHell, which is a dead giveaway that it possesses at least some of the features of the Bourne shell. Bash is similar to other shells in that it provides a user interface to UNIX. You can use the Bash shell in the following three ways:
-
Interactively type commands on the command line.
-
Group commonly executed sets of commands into command files that you can execute by typing the name of the file.
-
Create Bash shell programs using the structured programming techniques of the shell.
These three techniques are listed in the order in which you'll probably use them. First, you log in and use interactive commands. Then you group together commonly used commands and execute them with a single command. Finally, you may want to create sophisticated shell scripts.
For this reason, describe these aspects of the Bash shell in the order in which they are listed. The command file and programming aspects of the Bash shell are covered as part of the "Shell Programming" chapter. Bash is very similar to the KornShell, which is the shell used in the shell programming chapter. You can, therefore, use the shell programming chapter as an introduction to programming with Bash as well. Keep in mind, however, that differences always occur when programming with one shell vs. another.
Issuing Commands
The first activity you perform after you log into the system is to issue commands at the prompt. A command you may want to issue immediately is ls -al. Here is what I see on my system after executing this command to check my present working directory and producing a long listing of all files when logged in as root:


# pwd # ls -al total 46 drwxr-xr-x 5 root root 1024 Nov 26 19:40 . drwxr-xr-x 20 root root 1024 Nov 8 20:10 .. -rw-r--r-- 1 root root 964 Nov 26 19:40 .bash_history -rw-r--r-- 1 root root 674 Feb 5 1997 .bashrc -rw-r--r-- 1 root root 602 Feb 5 1997 .cshrc -rw-r--r-- 1 root root 14815 Nov 8 20:09 .fvwmrc.menus.prep -rw-r--r-- 1 root root 116 Feb 5 1997 .login -rw-r--r-- 1 root root 234 Feb 5 1997 .profile drwxr-xr-x 2 root root 1024 Nov 8 14:10 .seyon -rw-r--r-- 1 root root 4276 Nov 8 20:09 XF86Config -r--r--r-- 1 root root 13875 Nov 8 20:05 XF86Config.bak drwxrwxrwx 2 root root 1024 Nov 26 19:40 book drwxr-xr-x 5 root root 1024 Nov 14 18:12 lg -rw-r--r-- 1 root root 0 Nov 26 19:40 typescript #
Among the files produced in the long listing of all files is a Bash startup file called.bashrc. The following shows the contents of the.bashrc file:

# cat .bashrc # ~/.bashrc -- # The individual per-interactive-shell startup file for bash . /etc/profile # try solve this tedious 'Backspace vs. Delete' problem... if [ -z "$TERM" ]; then echo ".bashrc: TERM empty: this shouldn't happen!" 1>&2 echo " Please contact 'support@lst.de'" 1>&2 else case $TERM in linux*) stty erase '^?' ;; *) stty erase '^H' ;; esac fi # general environment settings #export GROFF_TYPESETTER=latin1 #export LC_CTYPE=iso-8859-1 export LESSCHARSET=latin1 #export METAMAIL_PAGER=less HISTSIZE=100 alias which='type -path' alias h=history alias j="jobs -l" alias l="ls -Fax" alias ll="ls -Alg" alias pd=pushd alias z=suspend #
Some interesting contents are in the.bashrc file. Among them is a value for HISTSIZE, which we'll get into shortly, and a set of aliases. These aliases are "shortcuts" for long commands. When I issue the ll command, for instance, I am really issuing the ls -Alg command.
I may execute both the local.profile shown in the earlier long listing as well as /etc/profile. /etc/profile usually performs setup for all users who log into the system. The following is a listing of /etc/ profile:
# cat /etc/profile # /etc/profile # System wide environment and startup programs # Functions and aliases go in $HOME/.bashrc PATH="/bin:/usr/bin:/opt/bin:/usr/X11R6/bin:/usr/openwin/bin:/usr/TeX/bin:/usr/ local/bin" umask 022 if [ `id -gn` = `id -un` ] && [ `id -u` != 0 ]; then umask 002 fi if [ -z "$UID" ]; then UID=`id -u` fi if [ "$UID"=0 ]; then PATH=/sbin:/usr/sbin:$PATH else PATH=$PATH: fi USER=`id -un` LOGNAME=$USER export PATH USER LOGNAME HOSTNAME=`/bin/hostname` MAIL="/var/spool/mail/$USER" export HOSTNAME MAIL if [ -n "$BASH_VERSION" ]; then # (aliases now in $HOME/.bashrc, resp. /etc/skel/.bashrc) export PS1="[\u@\h \W]\\$ " export HISTSIZE=100 fi # We'll also cover some of the contents of /etc/profile.
Initializing the History List in .bashrc
The Bash shell can keep a history list of the commands you have issued. If you wish to reissue a command or view a command that you earlier issued, you can use the history list.
You can specify any number of commands to be included in the history list. The following line in.bashrc sets the history list to 100:
set history = 100
One hundred commands will be saved in the history list. When you log out the last 100 commands you have issued are stored in the history list. The next time you log in, you can view these 100 commands; however, as you issue commands, the oldest commands fall off the history list. This fact is shown in the following example:
# history 2 more history 3 ll 4 cd.. 5 pwd 6 cd.. 7 ll 8 cd.. 9 ll 10 ll log 11 cd log 12 more * 13 l 14 ll 15 cd / 16 ll 17 cd 18 XF86Setup 19 XF86Setup 20 startx 21 ll 22 pwd 23 ll 24 ll / 25 XF86Setup 26 ll 27 startx 28 find / -name XF86Config* 29 cp /usr/X11R6/lib/X11/XF86Config.eg . 30 ll 31 XF86Setup 32 XF86Setup 33 startx 34 ll 35 mv XF86Config.eg XF86Config 36 XF86Setup 37 startx 38 shutdown -h now 39 man ls 40 man ll 41 man ls 42 man file 43 lsr 44 man chmod 45 man chmod 46 shutdown -h now 47 pwd 48 ls -l 49 pwd 50 ls -a 51 ls -al 52 pwd 53 ls -al 54 more .profile 55 more .bashrc 56 57 alias 58 ll 59 pwd 60 script 61 script 62 scrit 63 script 64 more .bashrc 65 more .bashrc 66 ll 67 more .profile 68 ll 69 more .bashrc | grep P 70 more .profile | grep P 71 env 72 more /.profile 73 more /etc/profile 74 more /etc/profile | grep PS 75 find / -name *profile* -print 76 more .bashrc 77 more .bashrc 78 ll /etc/profi* 79 cp /etc/profile /etc/profile.orig 80 vi /etc/profile 81 exit 82 cp /etc/profile.orig /etc/profile 83 history 84 85 exit 86 history 87 history 88 ll 89 ll 90 history 91 ll /etc/profi* 92 ll /etc/profi* 93 more .bashrc 94 history 95 ll 96 cd /root 97 ll 98 history | more 99 history | more 100 exit 101 history Notice in this example that command number 100 is the exit, or command to log out, from the last session. Command number 101 is the history command I issued immediately upon establishing the next session.
Recalling from the History List
All these commands (cp, more, find, ll) are in the history list with their corresponding numbers. You can repeat the last command with !!, the 89th command with !89, and the last command that started with "m" with !m, all of which are shown in the following example:
# !! history 3 ll 4 cd.. 5 pwd 6 cd.. 7 ll 8 cd.. 9 ll 10 ll log 11 cd log 12 more * 13 l 14 ll 15 cd / 16 ll 17 cd 18 XF86Setup 19 XF86Setup 20 startx 21 ll 22 pwd 23 ll 24 ll / 25 XF86Setup 26 ll 27 startx 28 find / -name XF86Config* 29 cp /usr/X11R6/lib/X11/XF86Config.eg . 30 ll 31 XF86Setup 32 XF86Setup 33 startx 34 ll 35 mv XF86Config.eg XF86Config 36 XF86Setup 37 startx 38 shutdown -h now 39 man ls 40 man ll 41 man ls 42 man file 43 lsr 44 man chmod 45 man chmod 46 shutdown -h now 47 pwd 48 ls -l 49 pwd 50 ls -a 51 ls -al 52 pwd 53 ls -al 54 more .profile 55 more .bashrc 56 57 alias 58 ll 59 pwd 60 script 61 script 62 scrit 63 script 64 more .bashrc 65 more .bashrc 66 ll 67 more .profile 68 ll 69 more .bashrc | grep P 70 more .profile | grep P 71 env 72 more /.profile 73 more /etc/profile 74 more /etc/profile | grep PS 75 find / -name *profile* -print 76 more .bashrc 77 more .bashrc 78 ll /etc/profi* 79 cp /etc/profile /etc/profile.orig 80 vi /etc/profile 81 exit 82 cp /etc/profile.orig /etc/profile 83 history 84 85 exit 86 history 87 history 88 ll 89 ll 90 history 91 ll /etc/profi* 92 ll /etc/profi* 93 more .bashrc 94 history 95 ll 96 cd /root 97 ll 98 history | more 99 history | more 100 exit 101 history 102 history # !89 ll total 44 -rw-r--r-- 1 root root 956 Nov 26 19:33 .bash_history -rw-r--r-- 1 root root 674 Feb 5 1997 .bashrc -rw-r--r-- 1 root root 602 Feb 5 1997 .cshrc -rw-r--r-- 1 root root 14815 Nov 8 20:09 .fvwmrc.menus.prep -rw-r--r-- 1 root root 116 Feb 5 1997 .login -rw-r--r-- 1 root root 234 Feb 5 1997 .profile drwxr-xr-x 2 root root 1024 Nov 8 14:10 .seyon -rw-r--r-- 1 root root 4276 Nov 8 20:09 XF86Config -r--r--r-- 1 root root 13875 Nov 8 20:05 XF86Config.bak drwxrwxrwx 2 root root 1024 Nov 13 21:25 book drwxr-xr-x 5 root root 1024 Nov 14 18:12 lg -rw-r--r-- 1 root root 0 Nov 26 19:36 typescript # !m more .bashrc # ~/.bashrc -- # The individual per-interactive-shell startup file for bash . /etc/profile # try solve this tedious 'Backspace vs. Delete' problem... if [ -z "$TERM" ]; then echo ".bashrc: TERM empty: this shouldn't happen!" 1>&2 echo " Please contact 'support@lst.de'" 1>&2 else case $TERM in linux*) stty erase '^?' ;; *) stty erase '^H' ;; esac fi # general environment settings #export GROFF_TYPESETTER=latin1 #export LC_CTYPE=iso-8859-1 [7m--More--(70%)[m export LESSCHARSET=latin1 #export METAMAIL_PAGER=less HISTSIZE=100 alias which='type -path' alias h=history alias j="jobs -l" alias l="ls -Fax" alias ll="ls -Alg" alias pd=pushd alias z=suspend [root@nycald1 /root]# Script done on Thu Nov 26 19:39:51 1998
Table 9-1 includes some of the more commonly used history list recall commands.
| Command | Description | Example |
|---|---|---|
| !N | Issue command N | !2 |
| !! | Issue last command | !! |
| !-N | Issue Nth command from last command issued | !-N |
| !str | Issue last command starting with str | !c |
| !?str? | Issue last command that had str anyplace in command line | !?cat? |
| !{str1}str2 | Append str2 to last command with str1 | !{cd} /tmp |
| ^str1^str2^ | Substitute str2 for str1 in last command | ^cat^more^ |
Editing on the Command Line
Using the history list is a great way of viewing and reissuing commands. Bash also supports command-line editing. You can use the up arrow key to move back one command in the history list. When you press the up arrow key, the last command from the history list appears on the command line. Every time you press the up arrow key, you move back one more command in the history list. When a command appears on the command line, you can press the "Enter" key to issue the command. You can modify the command by using the left and right arrow keys to move to a point in the command line and type additional information, or use the "backspace" and "delete" keys to remove information from the command line.
Aliases in .bashrc
An alias is a name that you select for a frequently used command or series of commands. You can use the.bashrc file as a place where your aliases are stored and read every time you log in. In the earlier.bashrc file, seven aliases were already set up. You can add additional aliases in the.bashrc file or define aliases at the command-line prompt, but these will be cleared when you log out.
Here is a list of the aliases that are already set up for us in the.bashrc file and an example of running the aliases l and ll:
# alias alias h='history' alias j='jobs -l' alias l='ls -Fax' alias ll='ls -Alg' alias pd='pushd' alias which='type -path' alias z='suspend' # # l ./ ../ .bash_history .bashrc .cshrc .fvwmrc.menus.prep .login .profile .seyon/ XF86Config XF86Config.bak book/ lg/ typescript # # ll total 44 -rw-r--r-- 1 root root 970 Nov 26 21:35 .bash_history -rw-r--r-- 1 root root 674 Feb 5 1997 .bashrc -rw-r--r-- 1 root root 602 Feb 5 1997 .cshrc -rw-r--r-- 1 root root 14815 Nov 8 20:09 .fvwmrc.menus.prep -rw-r--r-- 1 root root 116 Feb 5 1997 .login -rw-r--r-- 1 root root 234 Feb 5 1997 .profile drwxr-xr-x 2 root root 1024 Nov 8 14:10 .seyon -rw-r--r-- 1 root root 4276 Nov 8 20:09 XF86Config -r--r--r-- 1 root root 13875 Nov 8 20:05 XF86Config.bak drwxrwxrwx 2 root root 1024 Nov 26 19:41 book drwxr-xr-x 5 root root 1024 Nov 14 18:12 lg -rw-r--r-- 1 root root 0 Nov 26 21:35 typescript #


These are all very useful indeed, but let's now set up our own alias. Suppose that we want to know how many processes are running on the system. We'll create an alias called "procs" that does this for us. The ps command produces a list of processes. We'll issue ps and pipe (|) this output to wc with the "l" option to tell us how many lines are present. The pipe (|) directs the output of ps to be used as the input to wc. The ps command produces a list of processes and wc -l gives us a count of the number of lines. Therefore, we'll know the total number of processes running. The following example first shows the output of ps, then our alias command, and finally the output produced by the alias command:
# ps PID TTY STAT TIME COMMAND 188 2 S 0:00 /sbin/getty tty2 VC linux 189 3 S 0:00 /sbin/getty tty3 VC linux 190 4 S 0:00 /sbin/getty tty4 VC linux 191 5 S 0:00 /sbin/getty tty5 VC linux 192 6 S 0:00 /sbin/getty tty6 VC linux 619 1 S 0:00 login root 620 1 S 0:00 -bash 642 1 S 0:00 script 643 1 S 0:00 script 644 p0 S 0:00 bash -i 656 p0 R 0:00 ps # # alias procs='echo "Number of processes are: ";ps | wc -l' # # procs Number of processes are: 11 #
This alias works great. All we have to type is "procs" to see the number of processes running on our system.
A lot of quoting takes place in this command line. To understand what is taking place on this line, seek the help of Table 9-2.
| Character(s) | Description |
|---|---|
| 'cmd' | Single quote means to take the string character literally |
| "str" | Double quote means allow command and variable substitution |
| \c | Escape character prevents everything following it from printing, including new line |
| 'str' | Grave means to execute command and substitute output |
Applying Table 9-2 to the earlier procs alias, we can see what comprises this alias. The alias begins with a single quote, which means execute the command(s) within the single quotes. The first command is the echo command, which uses double quotes to specify the characters to echo. We could have added the escape character \c, which would have prevented a new line from being printed. The semicolons separate commands. ps is then run to produce a list of processes, and the output is piped (|) to word count (wc), which produces a count of the number of lines, as shown in Figure 9-1.
Figure 9-1. Quoting Example
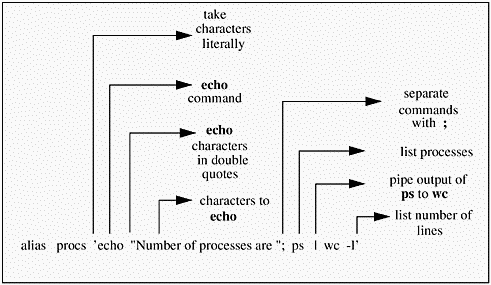
As you can see in Figure 9-1, some of the quoting becomes tricky. An understanding of quoting is important if you wish to modify and reuse existing shell scripts or craft your own.
Command and Path Completion
Bash sometimes knows what you're thinking. You can type part of a command or path name, and Bash can complete the remainder for you. You can type part of a command or path name and use the "tab" key to complete the command. If, for instance, you wish to issue the runlevel command to view the current system run level but can't remember the full command, you can type "run" and the tab key and the command is completed for you as shown in the following example:
# run<tab key>level N 3
Bash determined that the only command that starts with "run" is runlevel and completed the command.
As long as you issue the command or path name to the extent that it is unique, then Bash completes it for you. If the command or pathname is not unique, then Bash shows you the options for completing the command. The following example shows typing "ru" and two tabs to get a list of commands that start with "ru":
# ru<tab key><tab key> runlevel rusers You can see from this example that typing "ru" produced two possible commands: runlevel and rusers.
This great completion also works for path names. If you change directory to "/b," you get the following result:

# cd /b<tab key><tab key> bin boot Because two directories at the root level begin with "b," Bash could not determine which of the two you wanted and listed both.
File Name Expansion
Before we can cover the upcoming topics as well as the material in the shell programming chapter, you will want to take a look at file name expansion. As a user manipulating files, you will surely be preparing shell scripts that deal with file names. An overview of file name expansion is useful to ensure that you're comfortable with this topic before you start writing shell scripts.
Table 9-3 lists some common file name expansion and pattern matching.
| Character(s) | Example | Description |
|---|---|---|
| * | 1) ls *.c | Match zero or more characters |
| ? | 2) ls conf.? | Match any single character |
| [list] | 3) ls conf.[co] | Match any character in list |
| [lower-upper] | 4) ls libdd.9873[5-6].sl | Match any character in range |
| str{str1,str2,str3,...} | 5) ls ux*.{700,300} | Expand str with contents of {} |
| ~ | 6) ls -a ~ | Home directory |
| ~username | 7) ls -a ~gene | Home directory of username |
The following descriptions of the examples shown in Table 9-3 are more detailed:
-
To list all files in a directory that end in ".c," you could do the following:
$ ls *.c conf. SAM.c conf.c -
To find all the files in a directory named "conf" with an extension of one character, you could do the following:
$ ls conf.? conf.c conf.o conf.1 -
To list all the files in a directory named "conf" with only the extension "c" or "o," you could do the following:
$ ls conf.{co} conf.c conf.o -
To list files with similar names but a field that covers a range, you could do the following:

$ ls libdd9873[5-6].sl libdd98735.sl libdd98736.sl -
To list files that start with "ux," and have the extension "300" or "700," you could do the following:
$ ls ux*.{700,300} uxbootlf.700 uxinstfs.300 -
To list the files in your home directory, you could use ~ as shown below:
$ ls -a ~ . .cshrc.org .login .shrc.org .. .exrc .login.org .cshrc .history -
To list the files in the home directory of a user, you can do the following:
$ ls -a ~gene . .history splinedat under.des .. .login trail.txt xtra.part .chsrc .login.org ESP-File .cshrc.org .profile Mail .exrc .shrc.org opt
Many of these techniques are useful when writing shell scripts, so become familiar with file name expansion.
Redirection (I/O Redirection)
UNIX is set up such that commands usually take their input from the keyboard, often called standard input, and usually send output to the screen, often called standard output. Commands also send error information to the screen. You do not always want input to come from standard input and output and errors to go to standard output. You are given a lot of control to override these defaults. This is called redirection. Table 9-4 shows many common forms of redirection.
As shown in the table, to redirect the output of a command from standard output to a file, you would use ">". This works almost all the time. If you have an environment variable called noclobber set, then redirecting to an existing file does not work (we'll cover environment variables shortly). The noclobber does not permit redirection to write over an existing file. If you try to write over an existing file, such as / tmp/processes below, you receive a message that the file exists:
# ps -ef > /tmp/processes /tmp/processes: File exists You can, however, use a "!" with redirection to force a file to be overwritten. Using ">!" forces a file to be overwritten, and ">>!" forces the output to be appended to the end of an existing file. Examples of these are shown in the Table 9-4.
| Command or Assignment | Example | Description |
|---|---|---|
| < | wc-l<.login | Standard input redirection: execute wc (word count) and list number of lines (-l) in.login |
| > | ps -ef > /tmp/processes | Standard output redirection: execute ps and send outputto file/tmp/processes |
| >> | ps -ef >> /tmp/processes | Append standard output: execute ps and append outputto theend ofthefile /tmp/processes |
| >! | ps -ef >! /tmp/processes | Append output redirection and override noclobber: write over /tmp/processes even if it exists |
| >>! | ps -ef >>! /tmp/processes | Append standard output and override noclobber: append to the end of /tmp/processes |
| | (pipe) | ps wc -l | Run ps and use the result as input to wc |
| 0 -standard input | ||
| 1 -standard output | ||
| 2 -standard error | cat program 2> errors | cat the file program to standard output and redirect errors to the file errors |
| cat program 2>> errors | cat the file program to standard output and append errors to the file errors | |
| find / -name '*.c' -print > cprograms 2>errors | find all files on the system ending in.c, place the list of files in cprograms in the current working directory, and send all errors (file descriptor 2) to the file errors in current working directory | |
| find / -name '*.c' -print > cprograms 2>&1 | find all files on the system ending in.c, place the list of files in cprograms in the current working directory, and send all errors (file descriptor 2) to the same place as file descriptor 1 (cprograms) |
Environment Variables
An environment variable is a name associated with a string. The name is the variable and the string is its value. When you issue a command on the system, you usually enter a relative path name, not an absolute path name. The command you issue is found because the PATH variable points to the location of directories where commands are located. Without this PATH variable, you would have to type the absolute path name of every command you issue. When you issue a command the shell searches the directories listed in the PATH variable in the order in which they are listed. A good way to see many of the environment variables you have set is with the env command, as shown below on my Linux system:
# env HISTSIZE=100 HOSTNAME=nycald1.hp.com LOGNAME=root MAIL=/var/spool/mail/root TERM=linux HOSTTYPE=i386 PATH=/sbin:/usr/sbin:/bin:/usr/bin:/opt/bin:/usr/X11R6/bin: /usr/openwin/bin:/usr/TeX/bin:/usr/local/bin HOME=/root SHELL=/bin/bash PS1=[\u@\h \W]\$ USER=root LESSCHARSET=latin1 OSTYPE=Linux SHLVL=2 _=/usr/bin/env # As you can see, there are other environment variables in addition to PATH that make working on your UNIX system easier. If you want to know the value of a specific environment variable, you could use the echo command to see its value, as shown below for the environment variable HOME:
$ echo $HOME /root The "$" preceding the environment variable name specifies that the value of the variable be sent to standard output. In this case, the value of the environment variable HOME is /root, which means that the current user has a home directory of /root.
You can define your own environment variables in Bash with the following syntax:
export NAME=value You could set your prompt, defined by the PS1 environment variable, with the following command:
PS1=[\u@\h \W]\$ PS1 has now been set to open bracket, user name, "at" sign, host name, space, home directory, close bracket, dollar sign. As you can see from the previous listing of environment variables, PS1 has by far the most difficult format.
You can also append to the end of an existing variable with the following format:
export NAME="$NAME:appended_information" To add /root/programs to the existing PATH environment variable, for instance, you would issue the following command:
export PATH="$PATH:/root/programs" This appends the path /root/programs to the environment variable PATH.
I recommend issuing env to see the environment variables set for your environment and their values.
Background Jobs and Job Control
When you run a command, as we have done so far in many examples, you don't get back the prompt until the command has completed. Some commands can take a long time to complete, in which case you'll be waiting a long time for the prompt to return. As an alternative to waiting for the prompt to return, you can run the command in the background, meaning that it is running behind the scenes while you perform other work. Because UNIX is multi-tasking, it is happy to run many commands in the background and still provide you with a prompt to issue yet more commands.
In order to run a command in the background, you simply add an ampersand (&) to the end of the command line. When you follow your command with an ampersand, the command is run in the background and the prompt is immediately returned. If you were to issue a recursive listing of all files on your system and redirect this listing to a file, it would take a long time. Probably tens of thousands of files and directories on your system would need to be written. You might be waiting some time for your list of files to be written. Let's now run a command just to see how many files and directories are on the system. What I would like to ultimately produce is a list of these files, but we'll start with a command that tells us how many files and directories are present on the system. The following example shows running the ls command with the "a," "-l," and "-R" options to produce a long and recursive listing of all files on the system and piping this output to wc with the "-l" option to get a count of the number of lines.
# ls -alR | wc -l ls: proc/18/exe: No such file or directory ls: proc/19/exe: No such file or directory ls: proc/2/exe: No such file or directory 29982
This output shows three errors and a total of 29982 lines. If I want to write all 29982 entries to a file when I issue the ls -alR command, I have to sit and wait for the prompt to return. What I would rather do is issue the command to write all these entries to a file followed by an ampersand, in which case the job runs in the background and the prompt returns immediately, as shown in the following example:
# ls -alR > /tmp/files & [1] 817 ls: proc/18/exe: No such file or directory ls: proc/19/exe: No such file or directory ls: proc/2/exe: No such file or directory 
The result of running this command in the background produces a job number in brackets and the process id, or PID, as the second number. The errors associated with this command, however, are printed to the screen. You can go back to our earlier redirection discussion and redirect both the list of files as well as errors to /tmp/files and run the job in the background with the following command:
# ls -alR >& /tmp/files & [1] 817 Now you don't see the errors, because they have been redirected to the file /tmp/files along with the listing of files, and you still get the command prompt back immediately. When I search /tmp/files for the three errors earlier produced, I can see that they are embedded in the file when they were encountered.
You have control over both foreground jobs, those which have not run in the background, and background jobs. To stop a foreground job, you type the "control" and "z" keys simultaneously, as shown in the following example:
# ls -alR . .. .lgb amd auto bin ctrl-z [4]+ Stopped ls -alR After ctrl-z is pressed, the ls command is interrupted at the point at which you type ctrl-z. The command is suspended at this point and you are shown the job number, in this case "4," and its status is listed as "Stopped." This command has been only suspended; it is not gone forever. You can start this process in the foreground with fg or run it in the background with bg. Using bg runs the command as if you had followed it with an "&." It is started from the point at which you interrupted it. You do not have to supply a job number when you issue the fg or bg command, because the default is to perform the specified operation on the last job, which in this case is job number 4.

Notice that in this example we have stopped job number 4. This means that other jobs are running with a lower job number. You can use the jobs command to get a list of all jobs and their status. You can then control the jobs by issuing commands such as fg followed by a "%" and the job number to run the command in the foreground, or a bg followed by a "%" and the job number to run the command in the background. If you wish to terminate a job altogether, you can issue the kill command followed by a "%" and the job number. In the process of creating the examples in this section, I have started and suspended many jobs. The following example shows listing all jobs with the jobs command, killing jobs 1 and 2 with kill, and running job 3 in the background:
# jobs [1] Stopped ls -alR [2]- Stopped run_audit [3]+ Stopped run_check # kill %1 [1] Stopped # kill %2 [2]- Stopped # bg %3 #
Killing jobs 1 and 2 and running job 3 in the background return the prompt so that you can perform additional work.
umask and Permissions

An additional topic to cover before shell programming techniques is file permissions and the way they relate to umask. This is important because you will write some shell programs which anyone can use and others that you will want only a limited number of users, possibly just the system administrator, to use. umask is used to specify permission settings for new files and directories.
Let's start with an example of a long listing of a file. We'll use the alias ll, whichisls -l, in the following examples:
sys1 1: ll script1 -rwxr-xr-x 1 marty users 120 Jul 26 10:20 script1 The access rights for this file are defined by the position of read (r), write (w), and execute (x) when the ll command is issued. Figure 9-2 shows the three groups of three access rights for this file.
Figure 9-2. Example of File Permissions
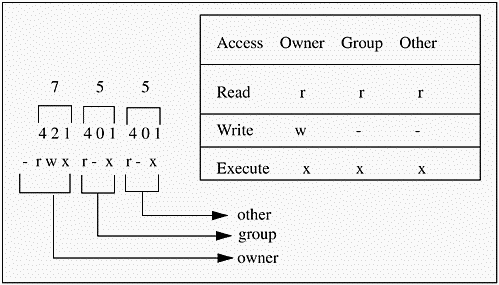
The owner of this file has read, write, and execute permissions on the file. The group to which the user belongs has read and execute permissions, and others also have read and execute permissions. The permissions on this file can be specified by the octal sum of each field, which is 755.
What happens if you craft a new shell script or any new file? What permission settings will exist? You will want to execute the shell script, so you will need execute permission for the file. You can use umask to define the defaults for all your new files and directories.
You can view your umask with the following command:
sys1 2: umask You can set the umask in.cshrc to define permission settings for new files and directories. The umask is used to disable access. You start with a umask and use the fields to disable some level of access. The umask command uses three octal fields. The fields are the sum of the access codes for user, group, and other, as shown in Figure 9-3.
Figure 9-3. umask Fields

The complement of the umask field is "anded" with the default setting to change the umask. If you wanted to remove write permissions of files in Figure 9-4 for "group" and "other," you assign a umask of 022, as shown.
Figure 9-4. umask Example
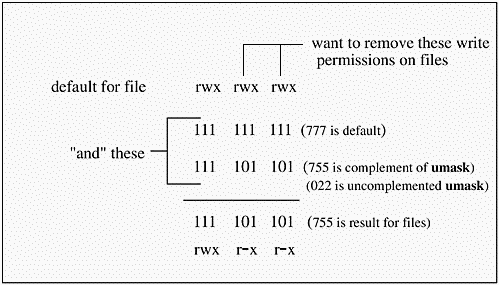
umask 022 changes the file permissions to 755 in this example.

If you create a new file (script2) for your shell script, you may need to make it executable with the chmod command. If a file has permissions of 666 (rw-rw-rw-) and you wish to give the owner execute permission, you would issue the following command:
sys1 3: chmod 766 script2 | CONTENTS |
EAN: 2147483647
Pages: 34