| In Chapter 1 we loaded HP-UX 11i and Virtual Partitions software. Now we're ready to create Virtual Partitions. After we create Virtual Partitions in this chapter we have to boot the partitions we've created. Although we will boot the partitions in this chapter, the details of booting Virtual Partitions, and HP 9000 booting in general, are covered in detail in Chapter 3. With both HP-UX 11i and the Virtual Partitions software on our disk, we can begin the process of creating partitions. Our goal is to have a system that looks like that in Figure 2-1: Figure 2-1. Virtual Partitions Software Stack 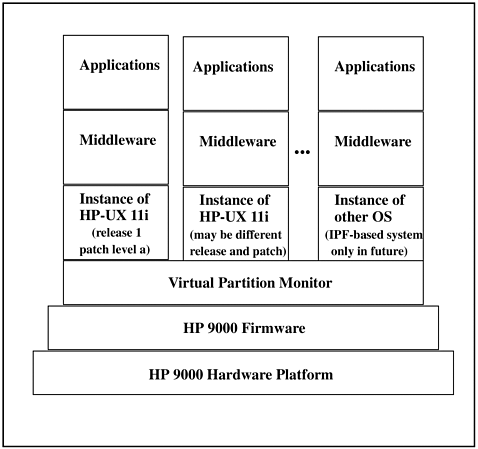 There are many components in Figure 2-1. We already have many of the components in this diagram on our system. Starting from the bottom we have the hardware, firmware, Virtual Partition Monitor (covered as part of the boot process in Chapter 3), and HP-UX 11i installed on two different disks. There are two HP-UX 11i instances shown in the leftmost two stacks of Figure 2-1. These are the operating systems we already have loaded. The two HP-UX 11i instances can't run simultaneously on our L-Class system because we have not yet created our Virtual Partitions. Without Virtual Partitions created, we can boot HP-UX off of one or the other of these disks but we can't run both. Let's now create our Virtual Partitions so we can indeed have two instances of HP-UX 11i running simultaneously. After Virtual Partitions have been created, you can proceed to load the middleware and applications shown on top of HP-UX 11i in Figure 2-1. Although we're covering running multiple instances of HP-UX 11i in the Virtual Partitions we create, we won't be restricted to only HP-UX 11i in the future. On systems based on the Itanium Processor Family (IPF) CPUs, we'll be able to run additional operating systems. The rightmost Virtual Partition In Figure 2-1 depicts this future capability. This capability does not exist at the time of this writing, so it is not covered. Look for an updated revision of this book in the future to cover this capability once it exists and keep an eye on www.hp.com for both IPF and Virtual Partition enhancements. Although the examples in this chapter take place on four-way (four-processor) L-Class systems, vPars run on most HP servers. The more components of which your HP server is comprised, the more vPars you can have on the server and the more options you have for crafting vPars. Figure 2-2 shows an example of an eight-way HP server and the way vPars can be configured: Figure 2-2. Example of HP Server Resource Allocation with vPars 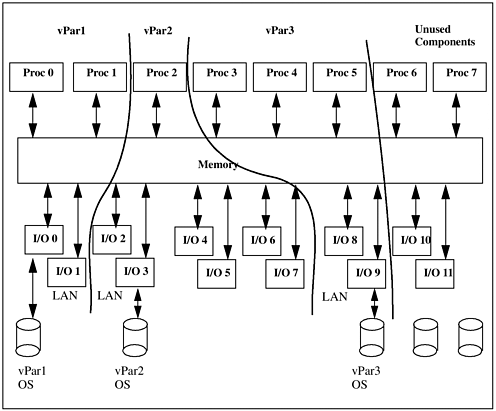 You can see that the eight-way system shown has a different number of processors, different amount of memory, and different number of I/O cards allocated to each Virtual Partition. The unused components can be added to any of the vPars or be the basis for yet another vPar. In addition, components can be moved from one vPar to another (with some restrictions described later in this chapter.) In the examples in this chapter we'll end up with a four-way L-Class with two fully configured Virtual Partitions. Before we proceed with the examples, let's first take a look at the commands we'll be using throughout the chapter in the next section. | 