Installing Red Hat Advanced Server Using the Serial Console
| < Day Day Up > |
| This section covers installing Red Hat Advanced Server using the consoleonly. The console-only installation is focused on because many of the machines needing Advanced Server will not have a graphics display connected to them. Console-only installation has some nuances, so you should perform the steps outlined here. Please keep in mind that there may be modifications to the commands at any time, so your console installation might look slightly different. Graphical installation is straightforward and is documented in most Linux books. Even if you have a graphics display on your Integrity system you would still begin installing Advanced Server at the console. The graphical part of the Advanced Server install begins after the Enablement Kit For Linux is installed and the Advanced Server CD-ROM is booted. Control will be automatically switched to the graphical display if you have a VGA port on your server. The installation selections are the same whether you're using the graphical installation or console, so this chapter applies if you have graphics as well. Still, for the reasons mentioned, this chapter focuses only on the text-based console installation. The first product that you'll install is the HP Enablement Kit for Linux (sometimes called LEK), which is a set of tools that provide a framework for installing, configuring, and recovering a Linux distribution on the Integrity server. The kit is completely distribution agnostic meaning that it is independent of a Linux distribution. You'll be installing Red Hat Advanced Server only in this book, but other Linux variants can be installed on some Integrity servers so the LEK needs to be independent of a specific Linux variant. The kit also provides a framework for delivering platform-specific drivers and updates. There is a workstation enablement kit and server enablement kit. You'll use the server LEK in the upcoming example. The elilo program used later to bootstrap our Integrity system was provided as part of the HP Enablement Kit for Linux. To begin the installation process, boot the system and see the Extensible Firmware Interface (EFI) menu that was covered in Chapter 1 (see "Working with EFI" on page 5). This menu offers a variety of boot options as shown in Figure 2-1. We first want to install the HP Enablement Kit for Linux, which puts boot and service partitions on our destination disk. You'll install the Advanced Server software later. Figure 2-1. Select Boot Option Maintenance Menu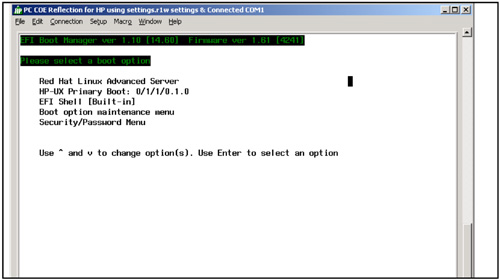 Note that you may want to remove (or disable by disconnecting them from the power supply) any disks that already have other operating systems installed. That way, you don't run the risk of overwriting any of the other operating systems with the new installation. In the upcoming screen shots, examples of both scenarios are given. That is, you will see examples of what the installation would look like with and without all the disks installed. To begin the installation, select Boot option maintenance menu from the EFI Boot Manager, as shown in Figure 2-1. When the EFI Boot Maintenance Manager's Main Menu appears (Figure 2-2), select Boot from a File. Figure 2-2. Select Boot From a File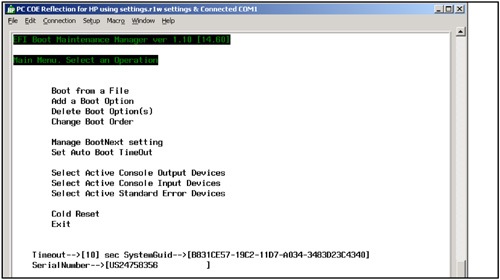 After you select Boot From a File, you see one of the menus shown in Figure 2-3. Figure 2-3. Select Removable Media Boot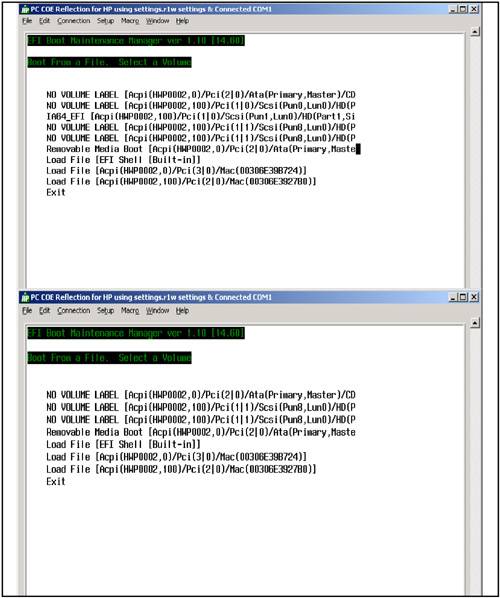 Note that the top screen shot in Figure 2-3 shows more selections than the bottom screen shot. The top screen shot was produced with two additional disks in the system in addition to the target disk on which we want to install Advanced Server. The bottom screen shot was produced with only the target disk physically installed in the system. In either case, when the Boot From a File menu appears, select Removable Media Boot. The menu displayed in Figure 2-4 is displayed. Figure 2-4. Loading the Enablement Kit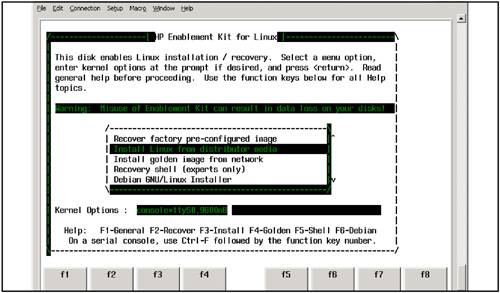 To install the HP Enablement Kit for Linux, select the second entry in the list (Install Linux from distributor media). You must also specify the console. To do so, at the Boot: prompt, enter the line console=ttyS0,9600n8. This specifies the console device, its speed and parity-related information. After you make this selection and enter the console line, press Enter. The Prepare Boot and Service Partitions screen displayed in Figure 2-5 appears. Figure 2-5. Loading Boot and Service Partitions from Enablement Kit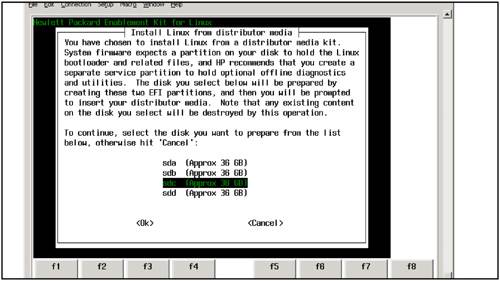 The Prepare Boot and Service Partitions screen prepares one of your hard disks to receive the Linux Advanced Server. Figure 2-5 shows a total of four disks on the system and I'll install RHEL 3 to sdc, which is selected in the figure. After you select the installation drive, press <Ok>. The Preparation Complete screen displayed in Figure 2-6 appears. Figure 2-6. Load of Boot and Service Partitions Complete Message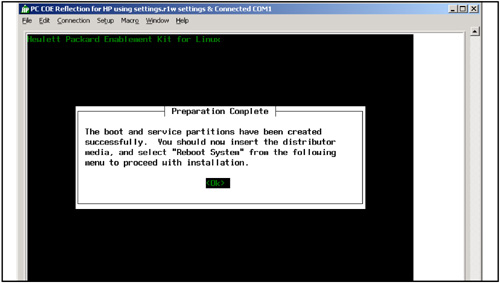 This screen indicates that you have successfully installed the boot and service partitions, and that you are ready to move on. Press <Ok> and the Options screen appears (see Figure 2-7). Figure 2-7. Reboot Message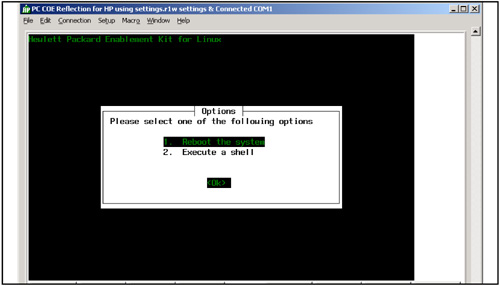 The Options screen allows you to reboot or execute a command shell. Reboot the system and the boot option screen displayed in Figure 2-8 appears. Figure 2-8. Boot Manager Screen After Reboot with Linux Media CD Loaded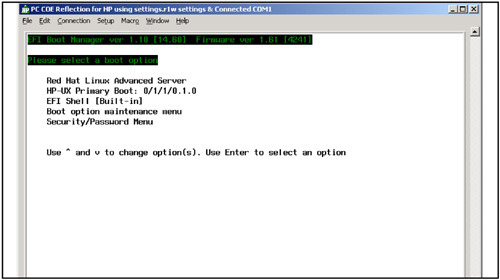 This is the main EFI Boot Manager screen on which you may also see Internal Bootable DVD. This time, select EFI Shell [Built-in] and press Enter. The following listing of available devices is produced: Loading.: EFI Shell [Built-in] EFI Shell version 1.10 [14.61] Device mapping table fs0 : Acpi(HWP0002,0)/Pci(2|0)/Scsi(Pun0,Lun0)/HD(Part1,Sig00000000) fs1 : Acpi(HWP0002,0)/Pci(2|0)/Scsi(Pun2,Lun0)/HD(Part1,SigA81750C2-1624-11D8-8002-D621 7B60E588) fs2 : Acpi(HWP0002,0)/Pci(2|0)/Scsi(Pun2,Lun0)/HD(Part3,SigA8175126-1624-11D8-8004-D621 7B60E588) fs3 : Acpi(HWP0002,0)/Pci(2|1)/Scsi(Pun3,Lun0)/CDROM(Entry0) fs4 : Acpi(HWP0002,100)/Pci(1|0)/Pci(1|1)/Scsi(Pun0,Lun0)/HD(Part1,Sig934FD5F8-1738-418 C-B579-CAC4A28A8F0E) fs5 : Acpi(HWP0002,100)/Pci(1|0)/Pci(1|1)/Scsi(Pun0,Lun0)/HD(Part2,Sig3A66A196-08B5-480 8-8D49-824292280DEC) blk0 : Acpi(HWP0002,0)/Pci(2|0)/Scsi(Pun0,Lun0) blk1 : Acpi(HWP0002,0)/Pci(2|0)/Scsi(Pun0,Lun0)/HD(Part1,Sig00000000) blk2 : Acpi(HWP0002,0)/Pci(2|0)/Scsi(Pun0,Lun0)/HD(Part2,Sig00000000) blk3 : Acpi(HWP0002,0)/Pci(2|0)/Scsi(Pun2,Lun0) blk4 : Acpi(HWP0002,0)/Pci(2|0)/Scsi(Pun2,Lun0)/HD(Part1,SigA81750C2-1624-11D8-8002-D621 7B60E588) blk5 : Acpi(HWP0002,0)/Pci(2|0)/Scsi(Pun2,Lun0)/HD(Part2,SigA81750F4-1624-11D8-8003-D621 7B60E588) blk6 : Acpi(HWP0002,0)/Pci(2|0)/Scsi(Pun2,Lun0)/HD(Part3,SigA8175126-1624-11D8-8004-D621 7B60E588) blk7 : Acpi(HWP0002,0)/Pci(2|1)/Scsi(Pun3,Lun0) blk8 : Acpi(HWP0002,0)/Pci(2|1)/Scsi(Pun3,Lun0)/CDROM(Entry0) blk9 : Acpi(HWP0002,100)/Pci(1|0)/Pci(1|1)/Scsi(Pun0,Lun0) blkA : Acpi(HWP0002,100)/Pci(1|0)/Pci(1|1)/Scsi(Pun0,Lun0)/HD(Part1,Sig934FD5F8-1738-418 C-B579-CAC4A28A8F0E) blkB : Acpi(HWP0002,100)/Pci(1|0)/Pci(1|1)/Scsi(Pun0,Lun0)/HD(Part2,Sig3A66A196-08B5-480 8-8D49-824292280DEC) blkC : Acpi(HWP0002,100)/Pci(1|0)/Pci(1|1)/Scsi(Pun2,Lun0) blkD : Acpi(HWP0002,100)/Pci(1|0)/Pci(1|1)/Scsi(Pun2,Lun0)/HD(Part1,Sig1690AF09-E88C-47D 7-B101-213ED9D1D1E3) startup.nsh> echo -off Shell> This is the list of available boot devices with all four disks installed. At the Shell> prompt, enter fs3: as our boot device. Assuming you have already inserted the Advanced Server CD-ROM into the device, what you see the fs3: prompt, enter dir to see its contents: fs3:\> dir Directory of: fs3:\ 10/07/03 09:55p <DIR> 2,048 EFI 10/07/03 09:55p 351,822 bootia64.efi 10/07/03 09:55p 130 elilo.conf 10/07/03 09:55p 351,822 elilo.efi 10/07/03 09:55p 3,890,655 initrd.img 10/07/03 09:55p 3,091 syslinux-splash.png 10/07/03 09:55p 2,636,729 vmlinuz 6 File(s) 7,234,249 bytes 1 Dir(s) fs3:\> A directory and a number of files are shown in this listing, including two elilo files and vmlinuz. Use elilo at the fs3:\> prompt to boot the sys-tem. At the same time, specify the console. To do so, enter the elilo command: fs3:\> elilo linux console="ttyS0" ELILO Uncompressing Linux... done Loading initrd initrd.img...done Linux version 2.4.21-4.EL (bhcompile@rocky.devel.redhat.com) (gcc version 3.2.3 20030502 ( Red Hat Linux 3.2.3-20)) #1 SMP Fri Oct 3 17:29:39 EDT 2003 A series of messages fly by, not shown in the output above, and then you begin the console-only installation of Advanced Server. If you booted off of the Advanced Server CD-ROM directly instead of the console-only procedure, installation screens would have been automatically displayed using the graphics card. Note that even using the console-only installation, you can enter graphics-related information on the type of graphics card. Integrity servers, such as the rx2600, commonly use ATI or NVIDIA graphics systems and a p930 display. You can also specify mouse information, such as the USB mouse. In addition, from the console you can also set up the default graphical environment such as GNOME or KDE. Getting back to the console-only installation, you are asked if you'd like to test the CD media before the installation. Skip that step, as well as the one that asks whether you have an official version of RHEL Advanced Server. You are next asked what language you'd like; choose English, as shown in Figure 2-9. Figure 2-9. Select Language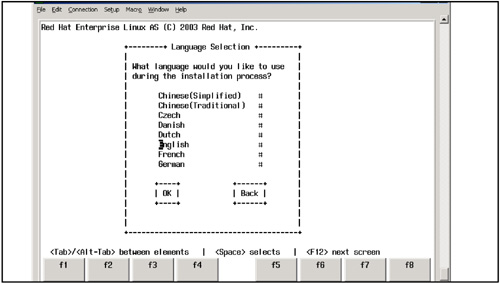 Next, you are asked about Disk Partitioning Setup, as shown in Figure 2-10. Figure 2-10. Partition Options At this point, you can select from a variety of partition options. For simplicity, select Autopartition. If you have a preferred tool, such as Disk Druid, you can select it at this point. Although you'll use the defaults, the following is a list of custom partitions that I've used on Integrity Oracle 9i RAC systems: # df Filesystem 1k-blocks Used Available Use% Mounted on /dev/sda8 1007896 162484 794212 17% / /dev/sda1 102166 6122 96044 6% /boot/efi /dev/sda6 20158332 32828 19101504 1% /home none 2066160 0 2066160 0% /dev/shm /dev/sda5 2015824 32868 1880556 2% /tmp /dev/sda3 6047492 3302772 2437520 58% /usr /dev/sda7 1007896 105840 850856 12% /var # These values are much different than the Autopartition will prepare on the system. The /boot/efi partition is a vfat partition used for boot. vfat is FAT16 and elilo doesn't support FAT32. After selecting Autopartition, the installation asks if you want to Remove or Keep existing partitions on the destination disk. Select Remove, and you see the Automatic Partitioning screen (see Figure 2-11). Figure 2-11. Removing Partitions for Advanced Server Installation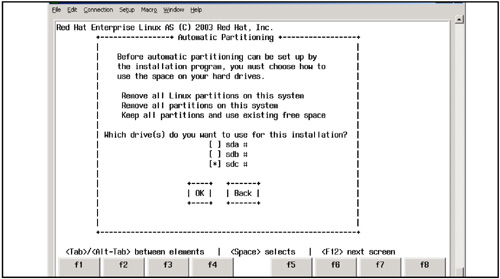 Select Remove all Linux Partitions on the system and then select the drive you want to use for the installation. If you have to choose, make sure you choose the correct hard drive for the Linux installation. In the example, choose [*] sdc # and select OK. sdd scrolled off the screen so you have to unselect it as well. The installation creates the partitions and displays the results (see Figure 2-12). Figure 2-12. Partitions Automatically Created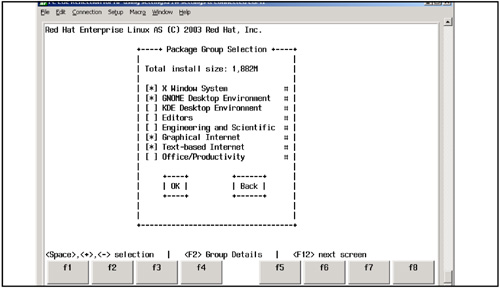 After scrolling down so that sdc was visible, you could edit the partitions to change their size or make other modifications. After you're done, select OK. The installation then asks you for information on system-level configuration, including network-related information, hostname, firewall configuration, additional languages, time zone, root password, and so on. As a side note: If you should need to boot in single-user mode for any reason, you would interrupt the boot process of Linux with ^Ecf and then at the ELILO boot: prompt, issue linux single as shown below: ELILO boot: linux single Linux package information is then read from the CD-ROM and the installation displays the Package Group Selection screen (see Figure 2-13). Figure 2-13. Selecting Package Groups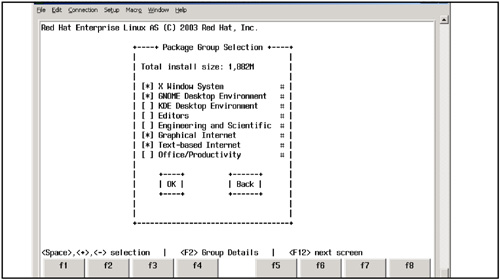 Review and select individual software package groups (each consists of multiple packages) on this screen. After you select the software you want to install, press OK. The Package Installation screen appears and regular updates on the install procedure are produced, as shown in Figure 2-14. Figure 2-14. Software Load Update Screen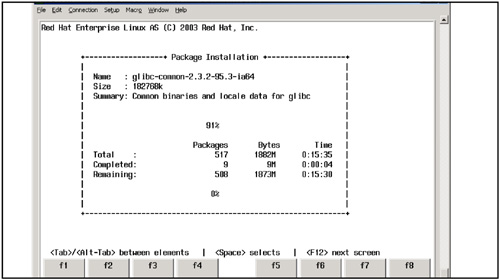 Depending on the packages that you select, you may be asked to put in the second, third, and fourth Advanced Server CD-ROMs. During package installation, you are asked a couple of more installation-related questions and the installation completes. Since this is a console-only installation, your only access to the system is through the console. However, if you have a graphical display, the graphics would have been activated early in the process of installing Advanced Server. If the graphical display is installed and activated, when the system reboots after the install is complete, you would be able to use the graphical display to login. After the installation is complete, if you have disconnected or removed the other two hard drives make sure you reinstall or reconnnect them. After they are reinstalled, when you boot your system, the Boot Option menu displays all the operating systems, including the Advanced Server installation that you just completed. Figure 2-15 shows the Boot Option menu with Microsoft Windows .NET Server, Red Hat Linux Advanced Server, and HP-UX as installed bootable operating systems on a system. Figure 2-15. Three Operating Systems Installed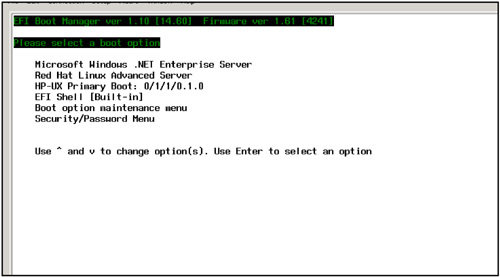 The system on which you've performed this example does not support multiple bootable partitions, so you can only boot one of these operating systems at a time. On Integrity servers, all these operating systems are bootable, not just the Advanced Server that you installed earlier. |
| < Day Day Up > |
EAN: 2147483647
Pages: 100