11.2. Transferring Footage to the Camcorder or VCR The actual steps of transferring the project from iMovie back to the camcorder are fairly simple. The results are almost always satisfying , especially if you've had to look at your footage in its relatively coarse Mac rendition for hours or days. Finally, you get to see your masterpiece at full digital quality. iMovie's transitions and titles look especially good when viewed on an actual TV (or camcorder LCD panel). You can either transfer the movie to a camcorder tape as a first step, or you can play it directly from the Mac to a VCR, using the camcorder only as a passthrough adapter that doesn't actually record anything. The following discussions cover both methods . 11.2.1. First to DV Tape, Then to VCR If you'd like your finished movie on DV tape, preserving 100 percent of its original quality, proceed like this: -
Insert a blank cassette into your camcorder . Confirm that the tape is unlocked (see Section 11.3.4), and this is important that it's cued up to a part of the tape you're willing to record over. This may sound like an obvious step, but complacency on this point has led camcorder owners to the accidental erasure of many a precious piece of footage. Sooner or later, everyone finds out: A camcorder has no Undo command. -
Put the camcorder into VTR or VCR mode (refer back to Figure 2-1) . Confirm that its FireWire cable is plugged into your Mac. Unless you're willing to risk running out of battery power in midtransfer, plug your camcorder into a power outlet, too. Open your iMovie project on the Mac, if it isn't already open . -
Choose Share  Video Camera . Video Camera . The Share dialog box appears, as shown in Figure 11-2, with the Videocamera icon already selected.
Note: Apple didn't want to risk any chance that you might miss this important dialog box; you have about 60 ways to make it appear. For example, you can choose Share Share (or press Shift- -S), or choose File Export (Shift- -E). Both commands produce the same dialog box. The advantage of choosing Share Video Camera, though, is that you save the additional step of clicking Videocamera at the top of the dialog box.
Figure 11-2. The Share dialog box lets you specify whether you're sending your finished movie to a tape, QuickTime movie, iPod, DVD, Bluetooth phone, Web page, or whatever.
(Technically, this type of box, which slides down from the iMovie title bar, is known as a sheet.)
If you're working with high-definition video, you see the three additional radio buttons shown here ("Share to a file," etc.). For details, see the box on the next page. 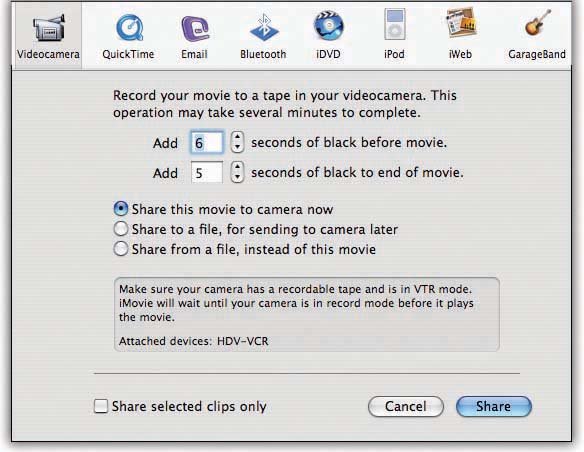 -
Change the " seconds of black" numbers in the dialog box, if necessary . These numbers specify how many seconds of blackness you want to appear on the tape before the movie begins or after it ends; three or four seconds is about right. Without a black "preroll," the movie would begin instantly. Your audience would be deprived of the customary " settle down and start paying attention" moment that precedes every TV show, movie, and commercial throughout the world. And without a moment of blackness at the end, the mood created by your movie might be shattered too soon. In theory, you could also take this opportunity to turn on "Share selected clips only," if you like. This feature would let you split up a long movie into smaller chunks by preselecting only the clips you want before you invoke the Share command. Alas, it doesn't work in iMovie 6.0.1. There is, however, a workaround; see Section B.9. -
Click Share . If your project contains certain special effects, iMovie takes this opportunity to say "Your movie contains still, slow motion, and/or reverse clips which need to be rendered for export to iDVD or tape." In that case, click "Render and Proceed." You're instructing iMovie to generate smoother, more professional-looking versions of these scenesnot the quick-and-dirty, temporary ones it's been showing you during editing. Either way, after a moment, iMovie commands the camcorder to begin recording, and then begins pumping your finished video over the FireWire cable to the tape, from the very beginning of the movie (Figure 11-3). (There's no way to begin playing from the middle of your movie.) GEM IN THE ROUGH
High-Def Movies: Process Now, Record Later | | As you know from Section 4.3.3.1, high-definition video is several times more massive and data- intensive than standard video. Exporting it back to a camcorder takes much longer, too. It's not the actual recording part that takes longer; it's the encoding process. That's when iMovie converts your hi-def footage from the Apple Intermediate format (Section 4.7) back into the HDTV signal that the camcorder expects. It takes a very long time. Imagine your frustration, then, if you wanted to make several copies of a high-definition movie. You'd have to sit through that endless conversion process over and over again. That's why, when you export a hi-def movie back to tape, you see additional options in the dialog box (see Figure 11-2). "Share this movie to camera now" does just what it says, meaning you'll just have to be patient. But "Share to a file, for sending to camera later" and "Share from a file, instead of this movie" are sneaky new options that let you split apart the file-processing stage (long and time-consuming) from the dumping-to-tape stage (real time). Using these options, you can do the time-consuming encoding process onceand then export to tape quickly and efficiently whenever you like. (These options are also useful whenever you don't have the hi-def camcorder availableand let's face it, these cameras are still a relatively rare commodity these daysbecause you can do the time-consuming part of the export ahead of time.) It works like this. Click "Share to a file, for sending to camera later" and then click Share. iMovie asks you to choose a name and file location for the video-export file. iMovie crunches away, converting your movie into camcorder-ready format, even though you don't have the camcorder connected. Later, when you manage to borrow or rent the hi-def camcorder, open up any old iMovie project (doesn't have to be the one you're exporting). Make sure the camera is turned on, connected, and cued up to a blank spot on the tape. Choose Share Video Camera. This time, choose "Share from a file, instead of this movie and click Share. Now you're asked to locate and open the file you exported before. (You'll notice that iMovie has given it the file name suffix ".m2t," as in "movie to tape.") iMovie immediately starts sending it to the camcorder. When the transfer is finished, you see the message illustrated here, offering you a Make Another Copy button. It's yet another iMovie effort to spare you having to sit through the encoding process again. It means, "OK, I've already got the converted file in my head. Shall I just spin out another copy?" 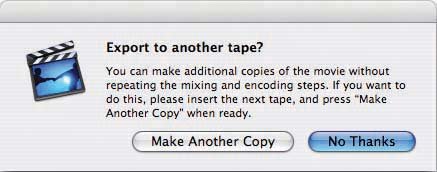 | While this process is taking place, you might want to open the LCD panel on the camcorder so that you can watch the transfer and listen to the audio at better quality than the Monitor window provides. When the transfer is complete, the camcorder automatically stops recording. Your finished production is now safely on DV tape.
Tip: After the transfer is complete, drag the Camera/Edit switch on your iMovie screen (at the left edge of the screen, just below the Monitor) to its Camera position. Doing so puts iMovie into "I'm controlling your camcorder now" mode. Click Rewind, then Play to watch your newly transferred production.
Now you can connect your camcorder to a VCR for transfer to VHS (or any other non-DV format). Connect the camcorder to the Audio and Video input jacks on the VCR. These jacks were once found exclusively on the backs of VCRs, but appear on the front panels of many recent VCR models for convenience at times like this. Figure 11-3. While iMovie sends your finished production back to the camcorder whence it came, a progress bar shows how much longer you have to wait. Also, you see the Playhead ride along your Movie Track to show where you are in the transfer.
You can interrupt the transfer process at any time by clicking Stop. The camcorder stops automatically, having recorded your movie up to the part where you stopped . 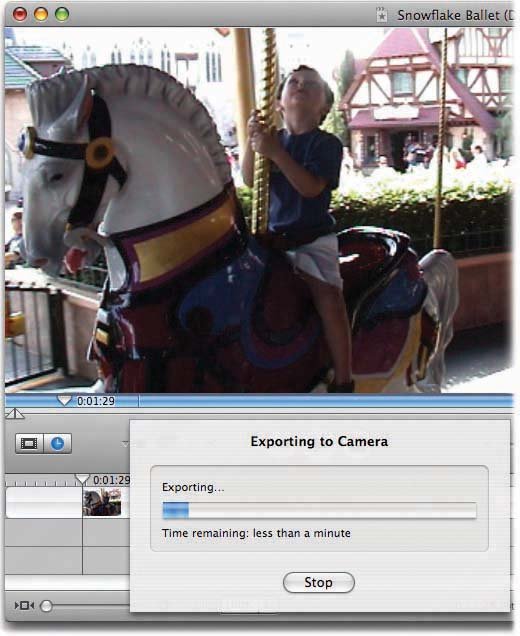
Make sure that the VHS tape is blank and not protected by its erase tab. If you're smart, you'll label it, too now , before you even record it, so that you won't forget. Put it into the VCR and cue it up to the right spot. Cue up the camcorder, too. Finally, put your camcorder into VCR or VTR mode, start the VCR recording, and then press Play on the camcorder. If your TV is on, you can watch the footage as it plays into your VCR. Press Stop on both the camcorder and VCR when the transfer is complete.
Tip: iMovie 6 can also recognize some FireWire-equipped HDTV sets (Sony's XBR960 and Sharp Aquos flat panels, for example). If you attach one, you'll see it listed in the Share dialog box next to the "Attached Devices:" item. When you click Share, iMovie plays the video in a continuous loop to the TV (choose the TV's "Digital VCR" input). Click Cancel in iMovie to end the show.If you can't connect your Mac directly to your TV, here's a consolation prize: you can connect your HDV camcorder to the TV, and play directly from the camera via FireWire for that cleanest possible pictureeven better than using the component inputs.Sub-tip: If you do have a FireWire-equipped TV, how'd you like to be able to record and play TV shows directly to your Mac? You can do that with the free DVHSCap software from http://developer.apple.com/sdk. After installing, the program waits in your Developer FireWireSDK21 Applications DVHSCap.app folder.
11.2.2. From Mac Directly to VCR If your aim is to get your movie onto VHS tape, you don't have to transfer it to your camcorder first. Hook the camcorder to the Mac via the FireWire cable, if it isn't already, and then hook the VCR to the camcorder as described above. The trick here is to turn on the "Play DV project video through to DV camera" option in the iMovie Preferences Playback dialog box, as described in Section 4.4.1. Press Record on your VCR, then play your movie from the beginning (or from whatever spot you like). iMovie sends the full-quality video through the camcorder and into the connected VCR. When you reach the end of playback, hit Stop on the VCR.
Tip: If you have an analog-to-DV converter box like those described in Section 4.14, use precisely the same steps. The converter replaces the camcorder in the setup described here.
Of course, this technique bypasses the Export dialog box shown in Figure 11-2, and with it the ability to "lay down" some nice blackness before and after the footage. If you really want those bookends , just add black clips to the movie itself (Section 5.8.1). |